Crop Video-UniConverter
- Automatically resize videos for different social media channels.
- Adjust motion keyframes to make the result perfect.
- Preview the output video before finishing cropping.
- Rotate the video in different ways.
- Adjust motion speed to the level you want.
- Additional features include video convert, download, recording, compression, and others.
Generally, if any online user will export their video to social media platforms for their audience to keep them updated, there is a certainty that you will need to crop videos at some point. Cropping video size for easy upload on social media is very easy on its own, but the way you go about editing the video file can make a huge difference in how your video comes out.
Have you had the experience that you upload a video on YouTube, but the images are distorted? That is because your video is not in the right aspect ratio, and the only thing that can help you out is cropping. The process of cropping video files will help cut away unnecessary portions of the video or change the dimension of some certain area. This article shows 5 different methods and related tips to help you crop video.
Part 1: How to Use The Built-in Video Size Changers on Windows And Mac
Photos App on Windows
Photos App on Windows has some exciting editing tools that make it a perfect image editor and viewer even though the editing tools are limited to some extent. You might have been using different software or online video editor to resize video or trim video files. The bright side is that with the Photos App, you can crop your video files, images, and add some effect.
Photos App allows you to import your video files from mobile devices, smartphones, cameras, and others. It also has a share button to share the edited video directly from the app and upload it to a social network.
Detailed steps on how to crop video with Photos App
Step 1
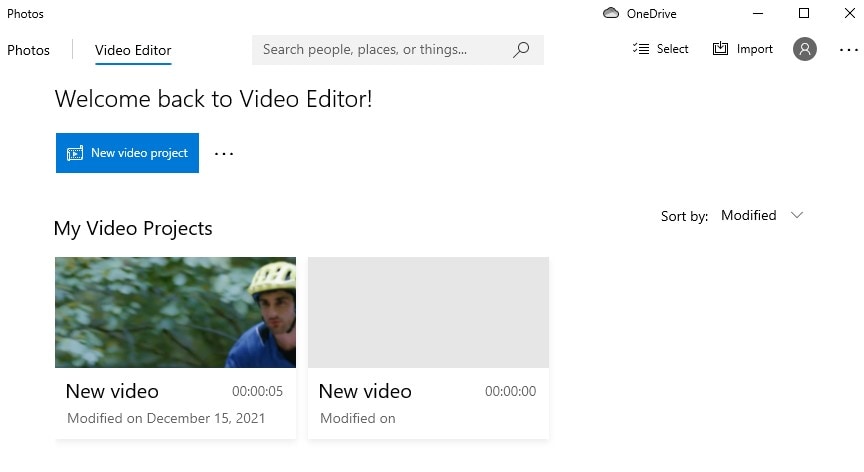
Open the Photos app on your Windows. The interface will only show pictures that are available on the PC. Therefore, click on video editor to start a new video project
Step 2
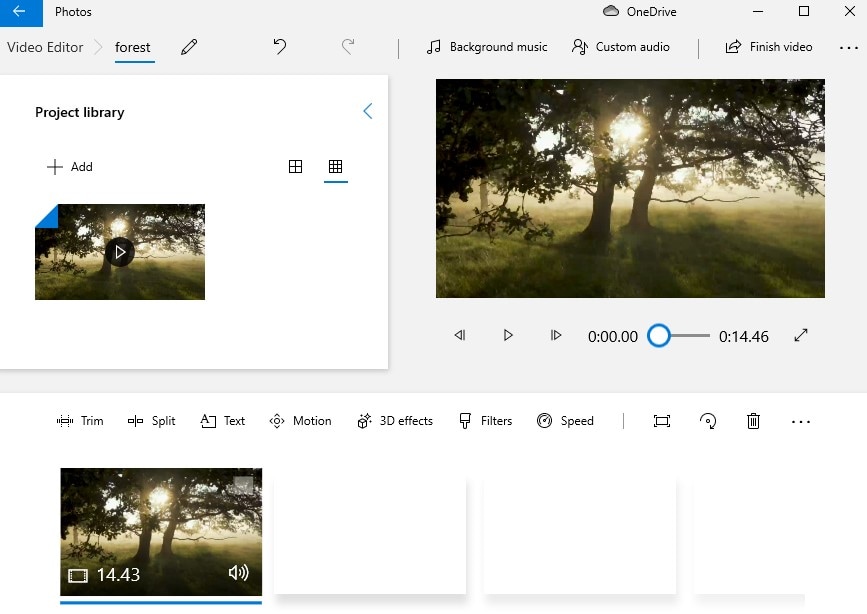
Upload the video file you're cropping and add it to the project library before adding it to the storyboard for editing. You can trim the video file, split and add some other effect while editing the video.
Step 3
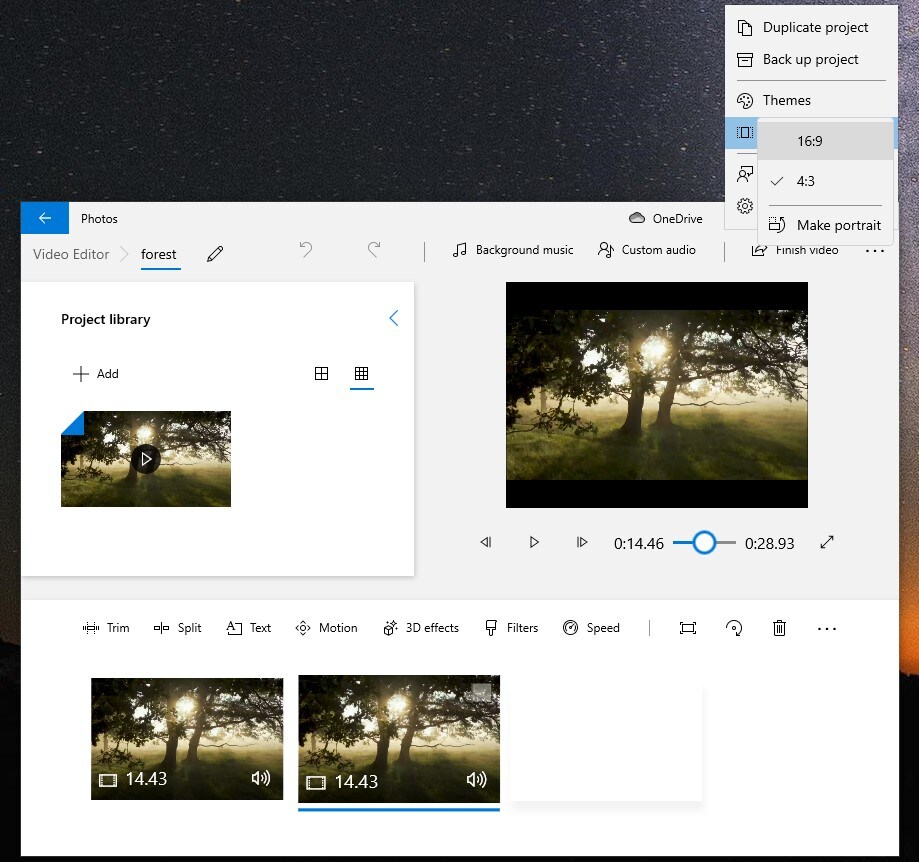
When you're done editing, scroll to the right-hand side of the interface to click on the Lanscape option. Choose the most preferred ratio and click on finish video > choose the resolution of the video and click on 'import' to select the output location and save.
Pros
It is easy to navigate when cropping
It does not require an internet connection to crop video
It's a built in app for video editing that doesn't require any download before cropping
Cons
Limited size to choose
It will leave the black bars
The features of cropping are not good enough
iMovie on Mac
iMovie can be used to crop video to square as it will allow you to have a better taste of your video than before. The process will enable you to browse your video clips easily, share your favorite clips with your audience, create movie trailers and bring out a better resolution for your video file.
You can crop video frames and pictures to get better interest in the content of the video clips or rather delete unwanted areas away from video files. iMovie allows its users to crop movie till it fits the social media required ratio, and it is advisable to note that you should not add videos over other video clips. The video clip must be compatible with the Imovie software. The two aspects stated will ensure a better result while cropping your video file.
Detailed steps on how to use Imovie as video editor crop
Step 1
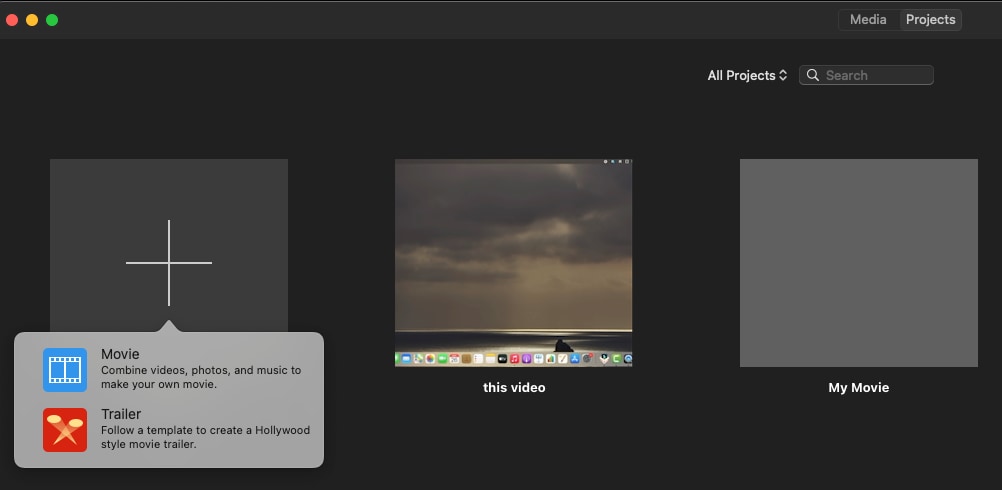
Launch the iMovie to create a new project and select a movie from the drop-down menu before you proceed to import the video file.
Step 2
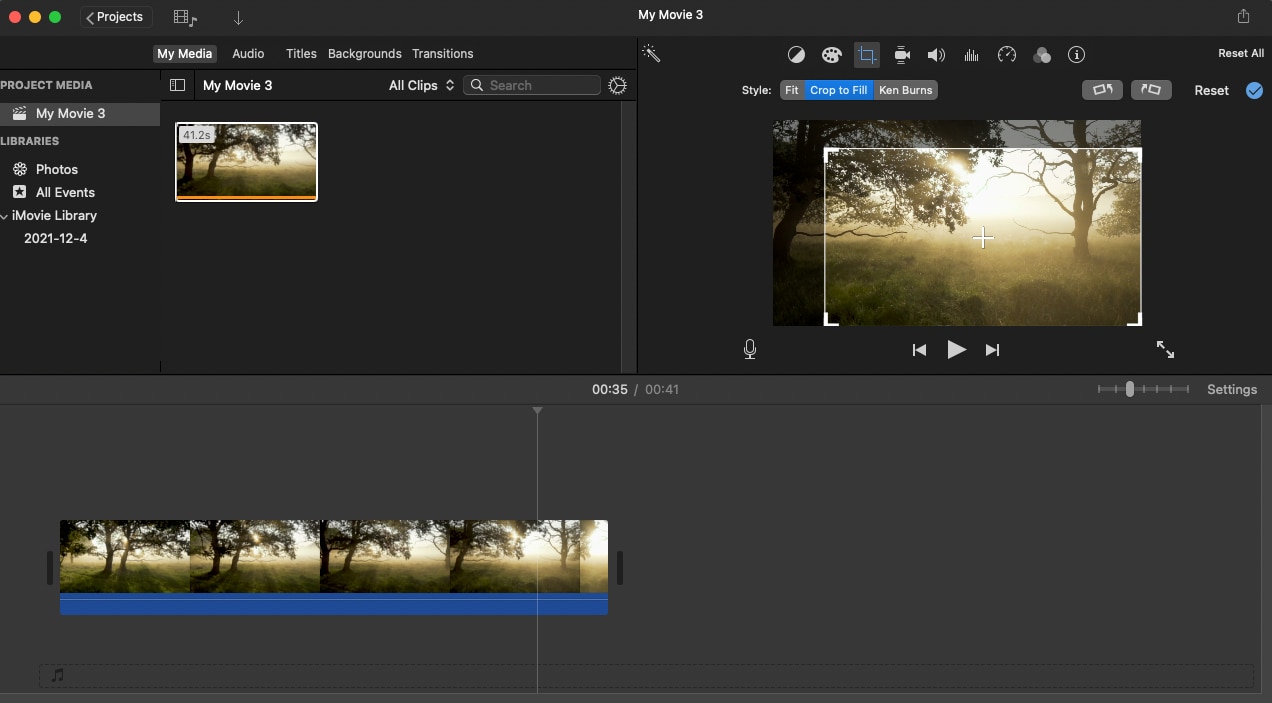
Once you've imported the video file, select the crop button placed on the toolbar > click the icon to start cropping. Drag and select the area you desire to crop away.
Step 3
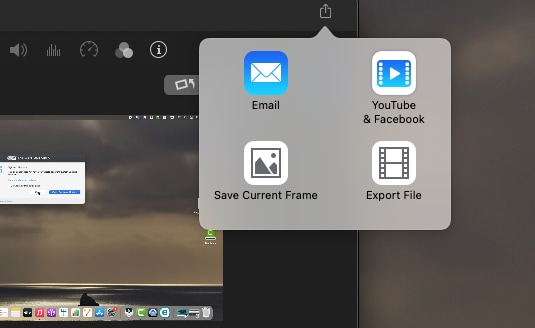
When you're done cropping the video, click the export icon at the top right corner of the interface to save the changes you've made.
Pros
Based on the fact that it's built-in software, it does not require additional download before you can crop
You can import files of different format
It is easy for first-time users to crop video files easily
Cons
It is slow when cropping a big file
There are limited options for output format after you've cropped the video
The clip trim feature is not accurate
Part 2: How to Resize Video Automatically with Uniconverter 13
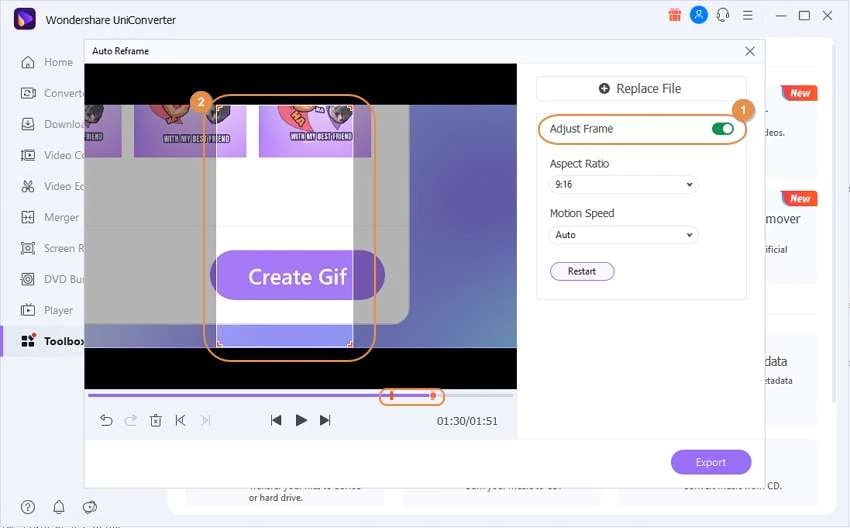
Built-in croppers have some limitations, so we need advanced tools that would be easy and convenient to use, such as Uniconverter. The video size changer (Uniconverter) works efficiently irrespective of the size and quality of the video clips. The Auto reframes feature of the software makes it easy to crop and trim videos to share the same video clip on social networks such as YouTube, Facebook, Instagram, Tiktok, or any other social media platform.
Some of the actions displayed in your video clip might not be in the frame generated by the auto keyframes. Therefore, you need to edit through a manually adjusted motion keyframe. Uniconverter does not resize video file of MP4 alone, but it also supports other formats such as FLV, AVI, MTS, 3GP, MKV, MOV, and others without losing the video quality.
Detailed steps on how to crop video with Uniconverter 13
Step 1
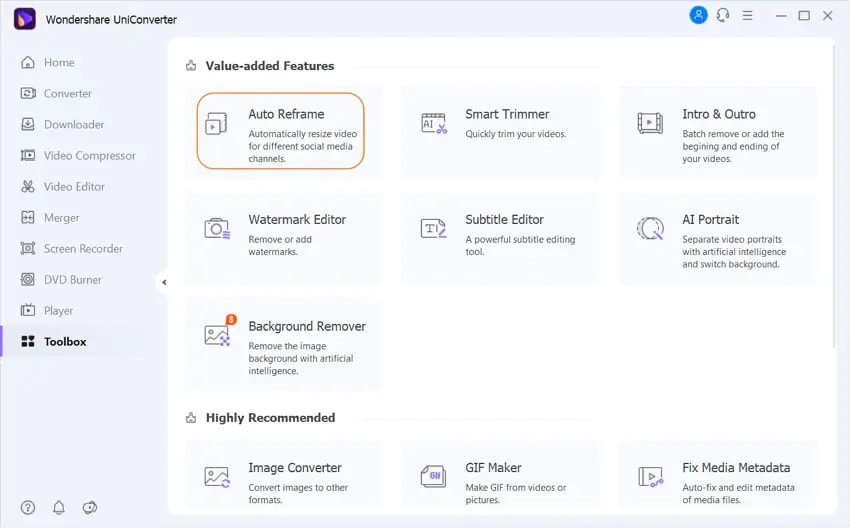
Go to Toolbox section on the UniConverter's interface, then choose 'Auto-Reframe' and import the video clip you want to crop directly from your PC by clicking on central box.
Step 2
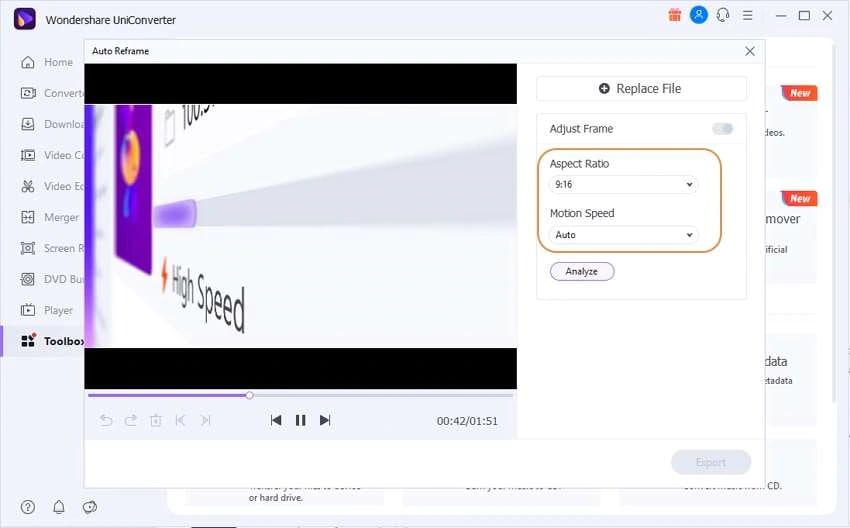
Select the aspect ratio to auto-resize. Under the options available for the aspect ratio, click on the ratio that best suits the social media channel you'll be sharing your video. For example; you choose 16:9 for the youtube channel. The 'Adjust Frame' mode can help you conclude the main object in the frame after cropping. Click the Analize button to begin cropping.
Step 3
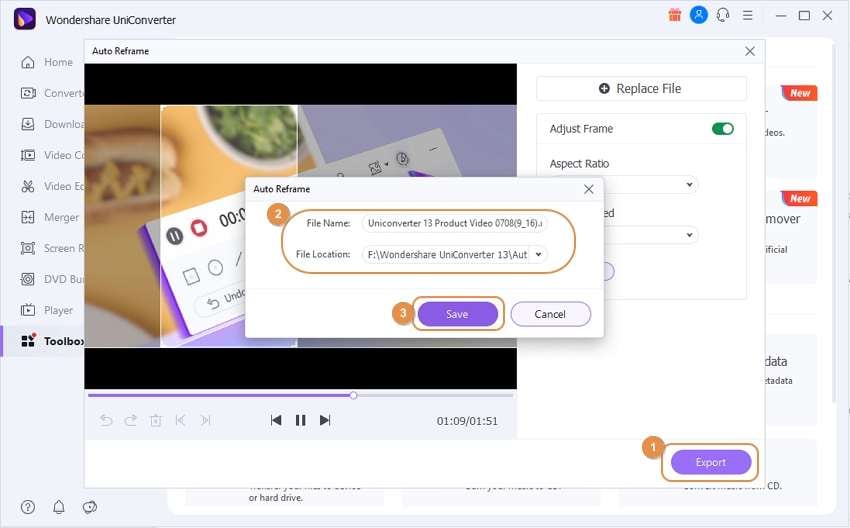
To save your video, click on export and save the resize video.
Pros
It is 90X faster when exporting the cropped video
You can crop more video files as many times as you want
It can be used by both professionals and Amateur when editing
Cons
You don't get enough features because it's not free
It isn't easy to trim at some point
File size limitations

Wondershare UniConverter 13 - Best Video Converter for Mac/Windows
5,481,435 people have downloaded it.
UniConverter supports 1000+ formats and handles 90X faster conversion, ensuring that high quality is delivered at all times.
You can add multiple files since the program does batch conversion of files.
The GUP acceleration can help you download online videos with high speed.
You can use the editing suite to remove video background, edit watermark and subtitles, and auto-trim videos.
This software facilitates file transfer to devices like Android and iPhone among others once the conversion is complete.
UniConverter is also capable of handling video compression hence ensures you acquire the video sizes you desire.
Part 3: Online Free Solutions to Crop Video Size
Uniconverter is good, but it is not free. We can use online free croppers to change the video aspect ratio to make it easy to upload your video clips to any social network. You can choose from landscape, portrait, or square size, and then adjust the size to fit the new aspect ratio of the social network. The online cropping tool to be recommended can be used on your iPhone, Smartphone, Android, Desktop computer, and Mac.
Clideo
The online tool is programmed to resize their video clips to the default ratio of social media platforms. So you don't have to worry about making a square. The only thing you need to do is select the aspect ratio you need. The online video editor supports MPG, AVI, MP4, WMV, MOV, and any other video formats you want as the output outcome.
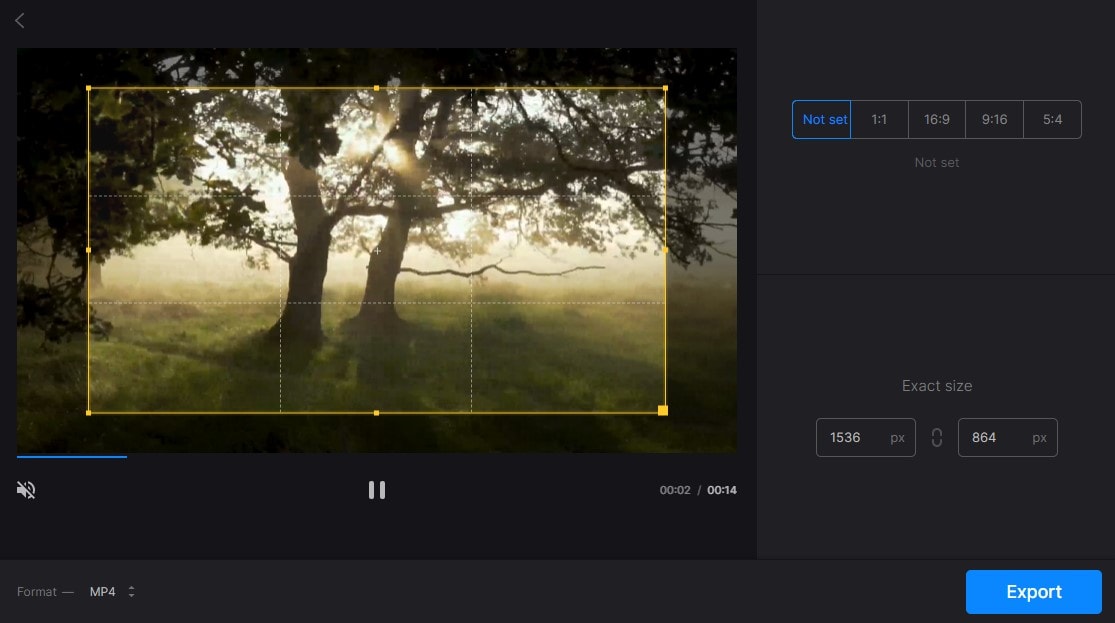
Clideo is strictly used online, which means you need not worry about downloading any software or anything on your computer or mobile devices. Be assured that your files being uploaded are protected with a high level of security. Therefore, no one or any other third party can access your files except you. You can use the online tools as a beginner without having any experience in video editing because its interface is easy to use.
Detailed steps in using Clideo as video size editor
Step 1: Select your video clip or drag and drop your video clip from your windows computer, Android, iPhone, or Mac. You can also import the file from your Dropbox or Google drive, and it must be noted that the file size must not be more than 500MB
Step 2: Select the area you want to crop out of the video before proceeding. Choose your output format before proceeding to save
Step 3: Export the cropped movie clip back to your storage, and you can also preview the result online.
Pros
Users can upload file sizes up to 500MB
It allows you to choose the output format
You can save your video file into your Google Drive or Dropbox after you've cropped the video
Cons
It has file size limitations
It usually hangs when you're editing a file with large size
It is internet driven
Kapwing
Some users want to crop a video to remove a watermark, hide information or remove a border that might have shown up while editing the video. Whatever your reasons for cropping the video clips might be, Kapwing has the perfect editing tools to support your workflow. It is completely done online, and it does not require any fee before use. With Kapwing, you can cut, crop, resize, cut clips out, and much more all at a go.
Choose your aspect ratio manually or automatically when cropping. When you're done, you can use Kapwing studio to add other features such as background music, text, animations, and any other thing the video needs. When resizing the aspect of the video to a particular dimension, you can use the studio to set the exact pixels for video to fit wherever you want to use it, for example, Facebook, YouTube, Instagram, Tiktok, Snapchat, and more.

Detailed steps on using Kapwing as Video editor crop
Step 1. Import the video file: Import the video, image, animations directly to Kapwing, and you can also paste a video link for Kapwing to fetch the video.
Step 2. Crop the video file: Choose the aspect ratio that will fit the social network you are sharing your video file from the preset crop dimensions.
Step 3. Download the edited file: Click the export button to download the final output.
Pros
Kapwing does not serve ads while cropping
Its watermark-free
Kapwing is online-based, and they won't share your information with anyone
Cons
The output format is limited while cropping
You can't crop a file that's larger than 500MB
Part 4: Q&As about Resizing Video File
1. Is cropping the same as trimming?
No, they are different. To crop means to remove the unwanted aspect ratio (area) from your video clip or change the dimension of the file. The cropping process allows you to choose the part of the video displayed to your audience, thereby adjusting the edges for the audience to pay more attention to what is important.
On the other hand, trimming means cutting away the beginning of a video or the end of a video to reduce the length and size of the video file. Trimming helps make sure that your video starts from where your viewers will gain interest and not get bored while watching the video.
2. The best video aspect ratio for popular platforms
Platforms |
Recommended aspect ratio |
| YouTube | 16:9 |
| 16:9 (Landscape), 1:1 (square ), 4:5 (vertical ) | |
| 16:9 (Landscape), 9:16 (Portrait) | |
| TikTok | 9:16 |
| 16:9 | |
| 16:9 (widescreen), 1:1 (square) | |
| 16:9 |
3. Can I crop the video with VLC?
Yes, you can. VLC media players allow their users to perform certain functions such as cropping and merging. However, the majority of the people who had used it complain that VLC media video cropping does not work, expatiating that frames are not removed after cropping. There are two types of video cropping in the VLC media player: Video effect for view/preview, and the other is cropping video permanently.
Steps in cropping video for view/preview:
- Navigate to the tools> click effect and filters
- Scroll to the video effect tab and select the crop tab
- Input the pixel you want to crop out from the edge of the video
For Win 7 or later (64-bit)
For macOS 10.12 or later

