Crop Video-UniConverter
- Crop video without watermark in the paid version.
- Rotate the video in different ways.
- Crop area size fluently.
- Crop video in batch with just one click.
- Preview the output video before finishing cropping.
- Additional features include video convert, download, recording, compression, and others.
Cropping video or resizing is not what most people will bother with, but it sure is indispensable in video editing. When you edit a video, you edit for a purpose. There is a limit to the size of videos that each website or application can take. They all have their specs in terms of aspect ratio, which is the width and height of the video, the resolution, and sometimes some websites have a selection on video length. In summary, you can use cropping tools to adjust the videos to the standard format for the website that you will be posting to. It is sometimes called resizing videos. Resizing videos is not hard, especially when you have a good cropping tool. Also, note that cropping differs from trimming or cutting, which deals with reducing and splitting the videos into shorter clips, while cropping deals with sizes in terms of video height and breadth.
Part 1. How to Crop Videos on Windows 10 with the Basic Video Croppers
Windows Movie Maker
A lot can be said about the advantages of built-in apps and software, they do not need to be downloaded, and most of them are free to use. They possess basic features, but that might be just what you need. Some people can get confused when the apps contain too many features, but Window Movie Maker, for example, is not like that. It is a smooth app. The interface is not aesthetically appealing, but it is easy to navigate, and it serves its purpose pretty well, so who cares. Surprisingly, Windows Movie Player has some features only found in some of the most advanced video editors. It can merge and even split videos
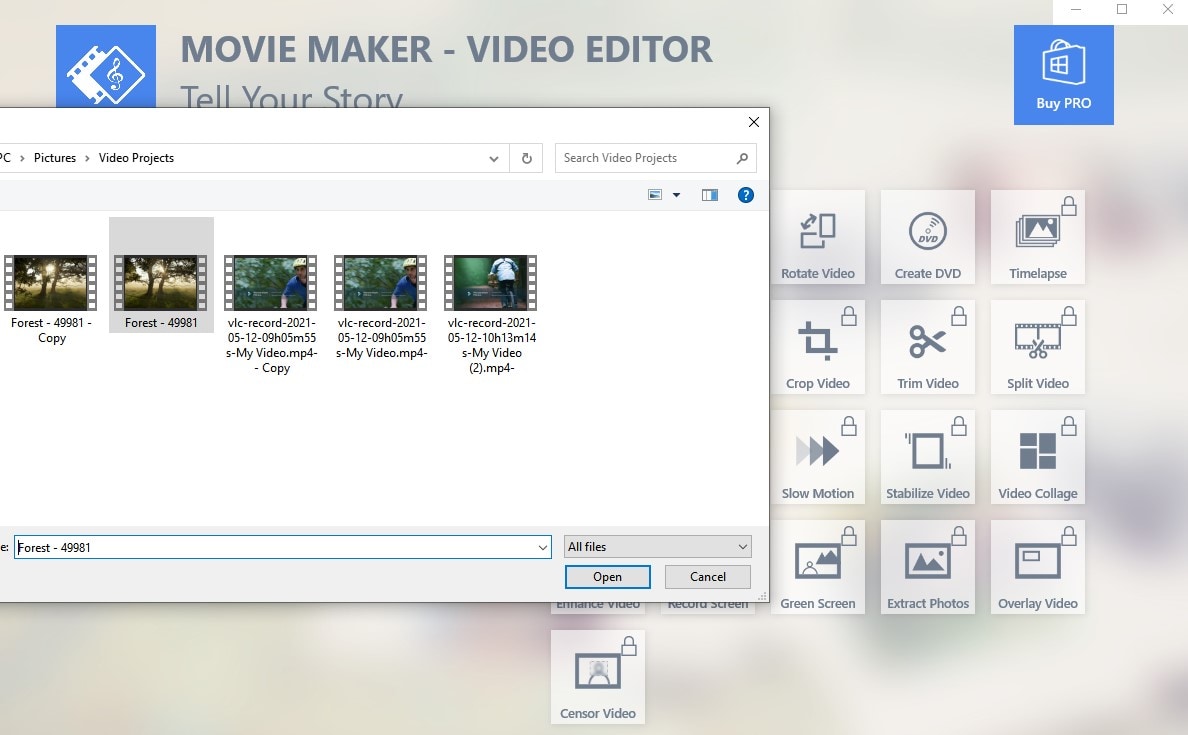
Step 1 Launch Windows Movie Maker and Add videos
As you launch the app, click on the Crop Video option, and then import the video you want to crop.
Step 2 Activate the Cropping tool
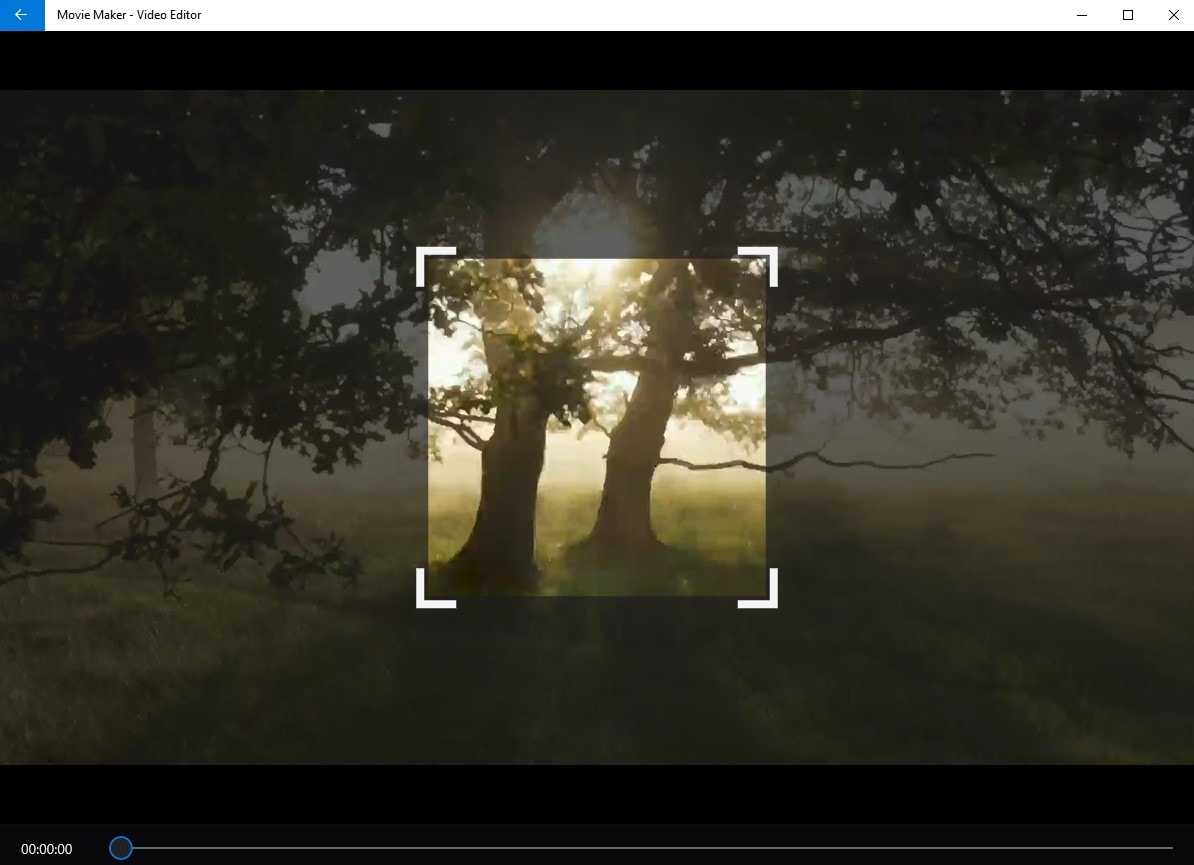
Right-click on the video on the timeline to get a list of things you could do with it. Click on 'crop' to activate cropping mode.
Step 3 Adjust the size
Adjusting the size is probably the easiest aspect of this process. If you know the size you want, you can input it directly at the bottom of the slider. You can use the usual cropping box to resize the video manually if you do not know. Alternatively, you can use the preset aspect ratios if you know what you want.

Step 4 Return
Next is to click on Save Vidoe, and all changes will be applied to your videos.
Pros:
It is free, doesn't contain any hidden charges
The interface is easy to navigate. There is a lot of breathing space between each function.
It allows you to choose a preset of crop settings or do it yourself.
Cons
It cannot convert videos
It can only export videos in WMV format
VLC Media Player
A lot of people have favorited VLC Media Player because of its immense popularity and compatibility. Still, you do not know that apart from the regular video player, VLC is packed with a lot of other functionalities that involve video editing. Although these tools and functions are not as specialized as the apps, they can still do it at the basic level. If you just want to edit your video casually with nothing too serious attached, then you can try cropping your videos with VLC.
Steps to Crop videos with VLC Media Player
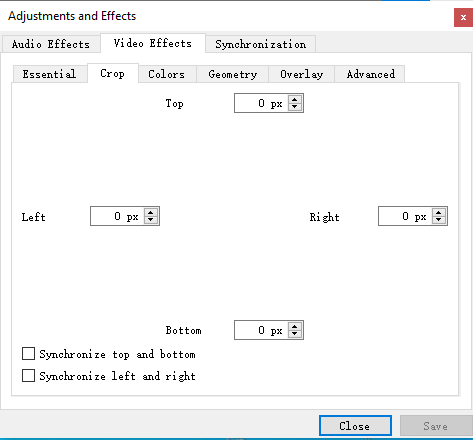
Step 1 Set the Video effects for cropping
From the main interface, click on Tool and select Effect and Filers. A new window pops up, locate the Video effect tab and click on it. The box changes again to the video effect box, locate crop again and click on the tab. There are four corners, input size in pixels, and see how the preview.
Step 2 Set preferences
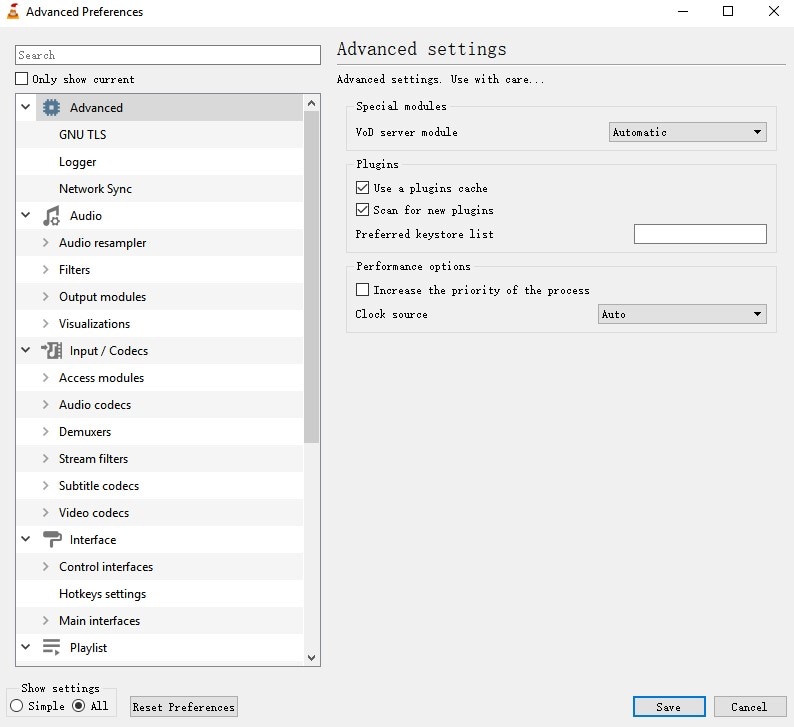
The next steps contain a series of advanced information, follow the attention to detail lest you tamper with something else.
On the toolbar, click on Tool and then Preferences. A new box pops up that shows a series of eye-turning settings, don't let it bother you. Check the 'All' circle at the bottom of the screen, and the settings change again. Locate Croppadd or search it for from the search box. Click on it, and you get the video cropping filter option. Input the sizes you used in the preview.
Step 3 Save
Save the cropped file size, go to Media in the toolbar, click on Convert/ Save. Import the video of your choice. Next, click on Convert/Save. You can change the destination folder as well.
Pros:
It is free
It supports almost all video formats
You can perform some basic editing
Cons
The interface is too simple
It doesn't do well as a music player
Part 2. How to Crop Videos on Windows 10 Using the Advanced Video Croppers
Uniconverter
Uniconverter is a top-notch video editor with no lack of advanced features. If you need all the tools to edit your video all in one place, then Uniocnverter is your app. It has converting features, compression features, cropping, trimming, and video effect features. You can even download videos online from millions of websites. The processing speed is way above average. You simply cannot compare it to other apps. The free version has a toned-down version, and yet it still completes conversions in a matter of seconds. If you use the paid version, then you get the full speed, faster than you could imagine
Steps to Crop Videos on Windows 10 Using Uniconverter
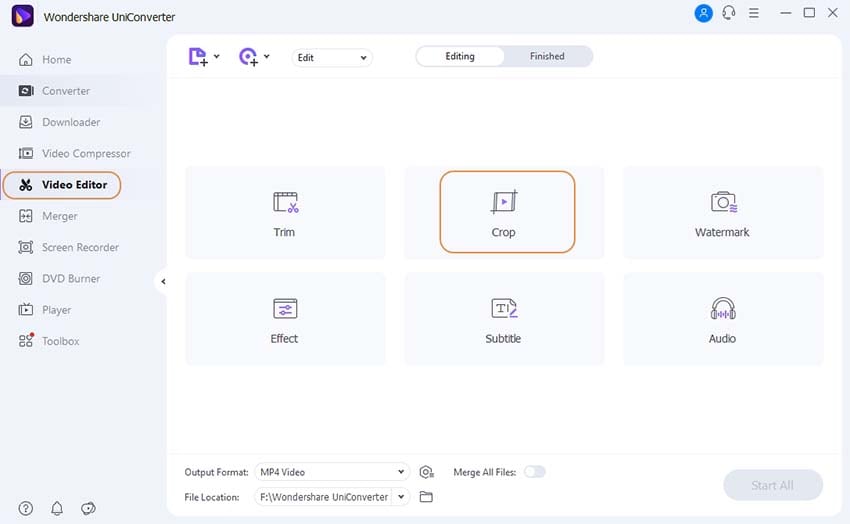
Step 1 Launch Uniconverter and Select the Video Editor tool
Download and install the Uniconverter software if you haven't done so. On the left side of the main interface, click on Video Editor. Select Crop from the six options available.
Step 2 Upload Video and Set Parameters
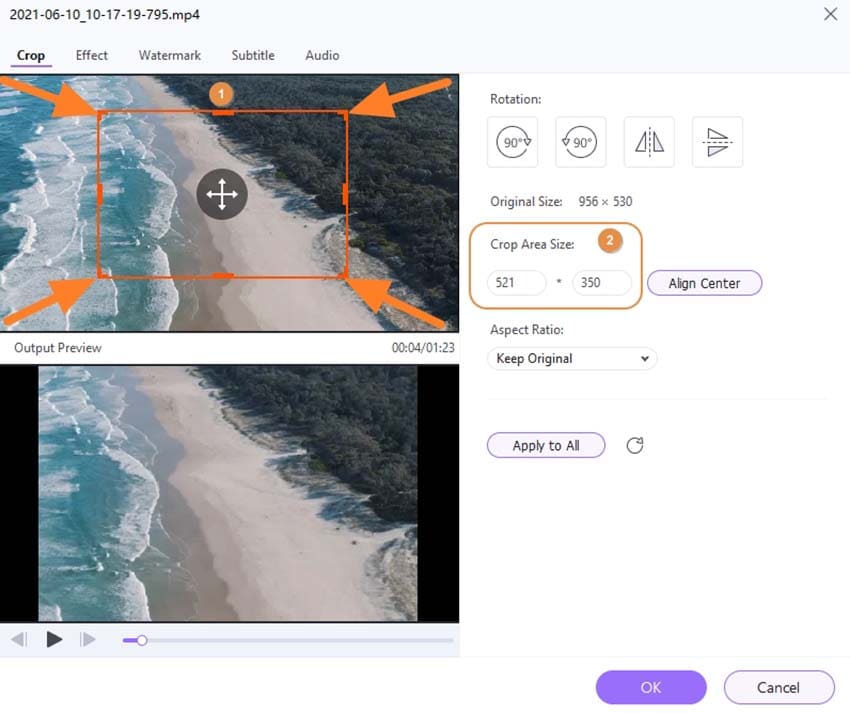
Clicking on Crop will open your file explorer, choose the video of your choice. Once loaded into Uniconverter, the video will be displayed on two screens, one for the original video, with an orange rectangle around it. You can use this to resize the rectangle, the other screen previews any changes made to the original video regarding cropping. Alternatively, you can click on the Aspect ratio tab at the side of the screen to simply choose any one of the preset sizes. You can also input the size manually.
Step 3 Save to your computer
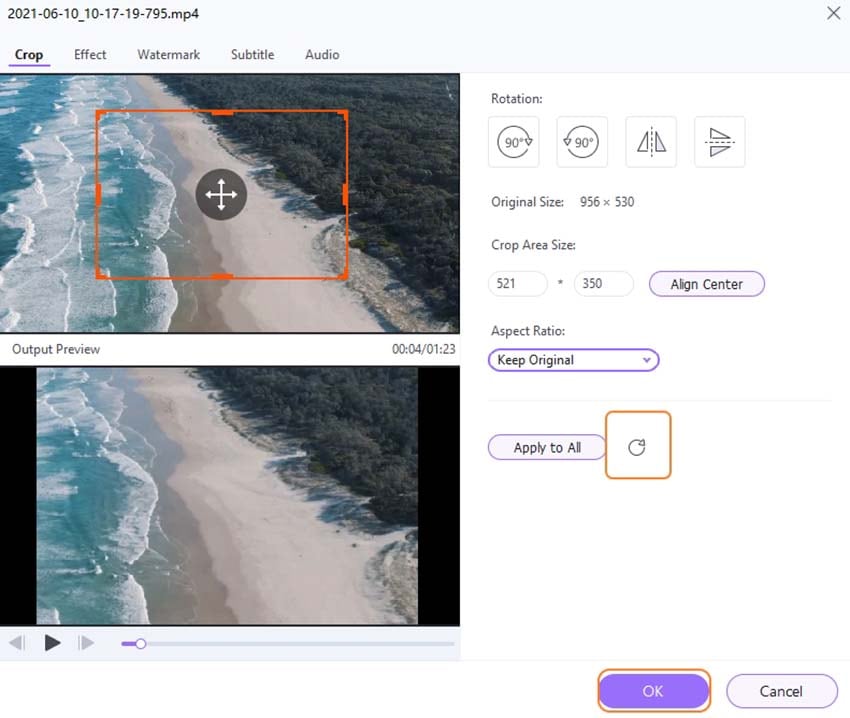
When you are done with the setting, click on OK, the next screen will already have a cropped video. Easy peasy
Pros:
Has a lot of editing features
Supports conversion to and from over 50 formats
Uniconverter tools are all standard and can compete with other specially made tools.
Cons
Uniconverter is not free
Its free trial has some limitations
It is not yet available on Linux

Wondershare UniConverter 13 - Best Video Converter/Editor for Mac/Windows
5,481,435 people have downloaded it.
UniConverter supports many formats and handles conversion equally, ensuring that high quality is delisered at all times.
During the conversion process, you may add multiple files since the program does batch conversion of files.
You can use the editing suite that covers subtitle editing, watermark editing, etc to make your results creative masterpieces.
This software facilitates file transfer to devices like Android and iPhone among others once the conversion is complete.
UniConverter is also capable of handling video compression hence ensures you acquire the video sizes you desire.
Joyoshare Vidikid
Joyoshare Vidikid is another great video editor, a software with a beautifully crafted interface. It has a lot of functions which include; screen recorder, audio recorder, add and remove watermarks, video merger, video converter, etc. For converting, Joyoshare Vidikid supports conversion to and from over 100 media formats. There is currently no known limit to the number of videos you can upload at once for its batch processing. However, this batch processing only works for functions like converting or merging. You can only crop one video at a time.
Step 1 Launch Joyoshare Vidikid and Upload Video
Choose the Video Cutter option. There are two ways to upload your videos: click on the Open file tab and select from your file explorer or simply drag and drop the video into the preview screen.
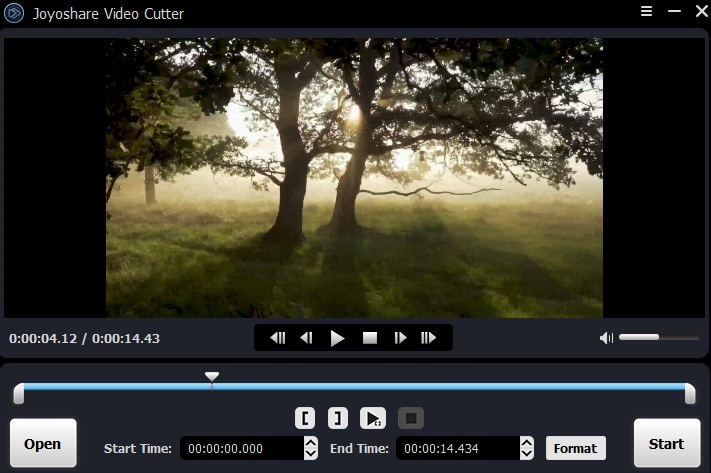
Step 2 Select Encoding and Crop
Next, click on the format tab and select one; high-speed mode is fast and ensures no quality loss. This mostly for when you are will not be changing the file format of the video you are working on. Use the Encoding option when you want the output format to be different from the origin format. Click on OK to save. Then click on the edit icon. It is at the bottom of the interface, right beside the delete icon. Then click the Edit icon, and a new window will appear. Click on 'adjust,' and the next screen will be the cropping window. A rectangle would be on the screen. You can zoom in and out from all six angles to adjust the selected area. The area outside of the box will be cut out, while the one inside will remain. If you know the exact size you want, you can input it at the bottom of the screen. Click on OK when you are done.

Step 3 Save your newly cropped video
When you click on OK, you will be returned to the main interface. Click on Start to begin the conversion process.
Pros:
Process video in high-quality
Can perform some editing functions like watermarking, cropping, trimming, etc
Supports multiple formats and different resolutions under each
Cons
It is not free
There is a limit on the number of times you can use advanced features like cropping in the free version.
Clideo
Clideo is amazing as an online app. Even though online apps are usually lower in function when compared to desktop software. However, Clideo is a tad bit higher in functionality. It can merge, compress, convert, add subtitles, cut, resize, create and edit videos, crop videos, and so on. Clideo makes video creation and editing easy. It can also create and edit GIFs, and it exports in high-quality HD format.
Steps to Crop Videos on Windows Using Clideo
Step 1 Visit the website and upload your video
You can add videos from your computer by clicking on 'choose file' on the website. You can also upload files from cloud apps Dropbox and Google Drive. You can upload a maximum of 500MB of video size at once.
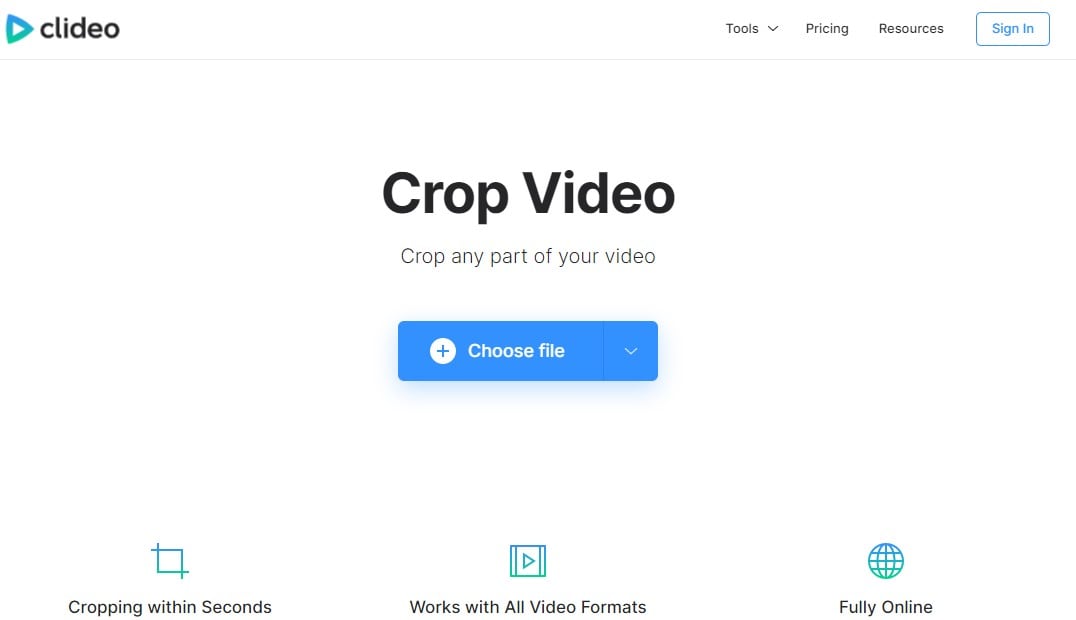
Step 2 Set Parameters
Once a video has been uploaded, the screen updates and a preview of the video will start with a rectangle that can be used to set the cropping screen. Alternatively, you can use any one of the preset aspect ratios on the right side of the screen. When you are done with the cropping, move to the bottom left corner and select the format you want your video to be exported. Click on Export when you are done.
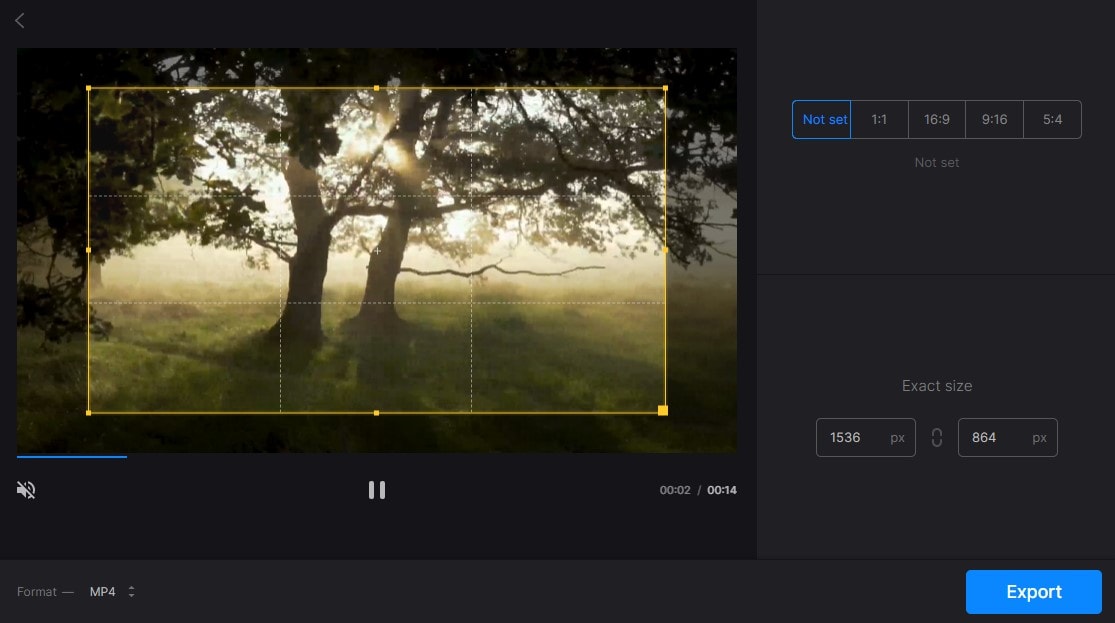
Step 3 Save the edited video
Wait for the processing to finish. Free users will have a Clideo watermark on their video, and you can get rid of it by buying their subscription. Download your cropped video on this page to save it to your computer.
Pros:
Social media sharing
Increase or decrease video speed option
Real-time annotation and editing
HD resolution for upload and download
Cons
There is a limit on the upload size
They offer no free trials
Animotica
Another video editor that should not be underestimated. Animotica possesses some pretty decent functions and features that gave it its spot as one of the best and most easy ways to crop videos. Apart from cropping, it can also trim, and split videos, add video effects, add and remove audio from video, create gifs, audio enhancement features, and so on. It is one of that software you would wish you had tried earlier.
Step 1 Open the Software and Upload a video
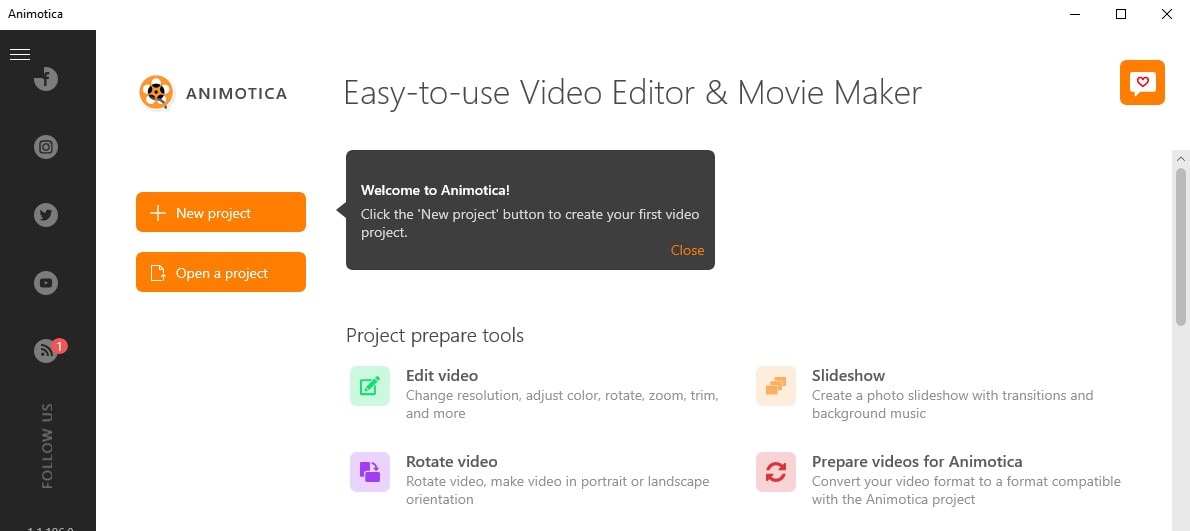
Click on Project Prepare Tools and then 'edit video' from the home page. You will be able to select a video from your computer.
Step 2 Adjust the settings
Click the thumbnail made for the video to see the editing options. Select crop video. The next screen is where you will be able to set the range of the cropping. By default, the deleted sections will be blurred out. You can choose to replace them with solid colors or background instead.
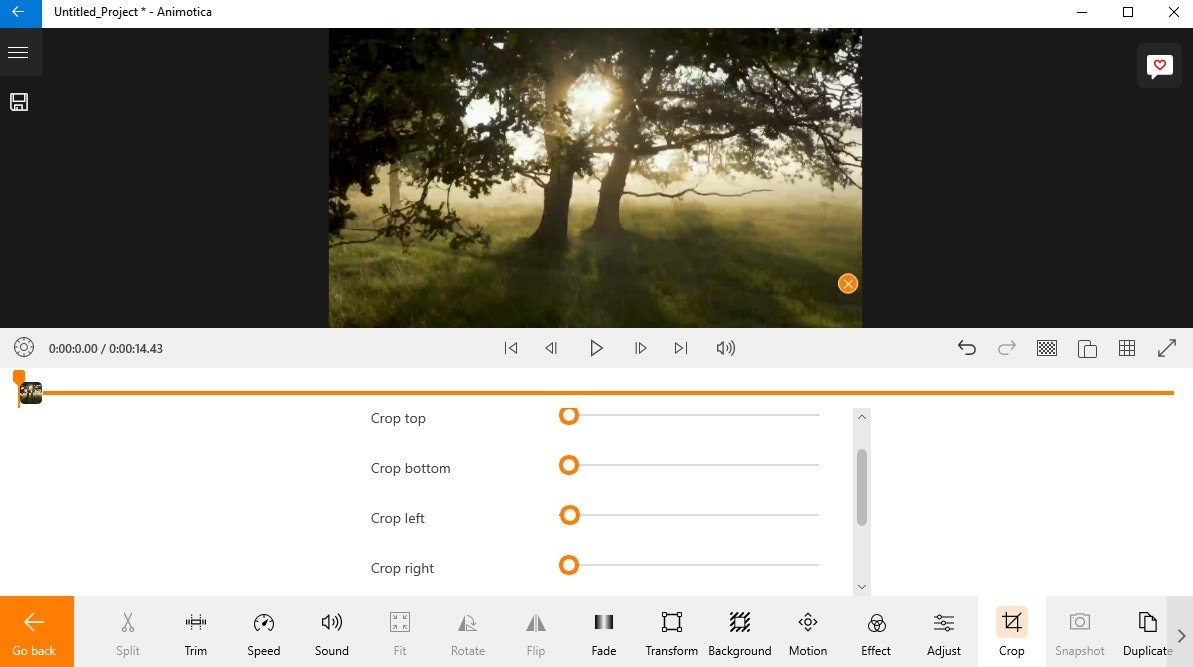
Step 3 Save your video
Hit the Save Video tab to download it to your computer.
Pros:
Has a lot of editing options
The interface is easy to navigate and very user-friendly
It has audio enhancement features
Cons
You can not adjust area size by draging the corner of video frame, cause it doesn't have this feature.
You can not preview the results before exporting the video.
Part 3. FAQs about Cropping Video on Windows
1. Are there any built-in video croppers on Windows?
No, there isn't. While Windows does indeed have a built-in video editor and media player, it cannot perform advanced features like cropping and trimming. They don't have the cropping feature
2. Can I crop video on Windows without a watermark?
Yes, you can. Using some of the video editors mentioned above, you can edit videos, trim them, and crop them with ease. Whether free tools or paid tools and even online tools, it must be a very good editor if a video editor can trim or cut videos.
For Win 7 or later (64-bit)
For macOS 10.12 or later

