Crop Video-UniConverter
- Crop video without watermark in the paid version.
- Rotate the video in different ways.
- Crop area size fluently.
- Crop video in batch with just one click.
- Preview the output video before finishing cropping.
- Additional features include video convert, download, recording, compression, and others.
As we all know, iMovie is one of the best editing apps used by both Mac and iOS users, and you might have asked yourself why iMovie crop my video? This article will expose you to how to crop videos in iMovie, which is easy. It is all about choosing the area or ratio you intend to use while trimming the part that is not important.
The app comes with different features that make you a professional without stressing yourself on editing since the process is easy to do. The latest feature added to the app is the cinematic mode. This mode (cinematic mode) allows you to edit the videos captured in cinema for more professional scenes with small effort. It doesn't matter if you're using Mac, iPad, or iPhone. All you have to do is select the video clip, add your titles, background music, effects, and even transition. It is easy to create professional-looking videos by adding new photos and clips to your project, input fade in and fade out like a professional. You can also edit your ProRes video and Apple ProRaw images. Follow these basic steps to crop videos in iMovie
Part 1: Detailed steps to crop a video in iMovie on Mac
This article will guide you on how to crop a video on Mac by using iMovie software. It must be noted that cropping a video is different from trimming the duration of a video. When trimming the video, you only shorten the length of the video, but it does not affect the movie's frame. But cropping has to do with removing unwanted frames away from the movie for the sake of avoiding distraction by things that are not necessary.
Make sure iMovie software is installed on your Mac, and it must be an updated version of the software.
Steps on how to crop on iMovie:
Step 1 Launch the iMovie software to create a new project.
Open iMovie on the Mac system > select the {+} plus, which is the 'create new' button under the project section.

Step 2 Import your file
After creating a new project, you'll be asked to choose the project type. Select 'movie'> Select the 'import media' icon and select the video clip you want to crop. You can also import your file manually by dragging it and then dropping it on the crop window.
Step 3 Crop your video
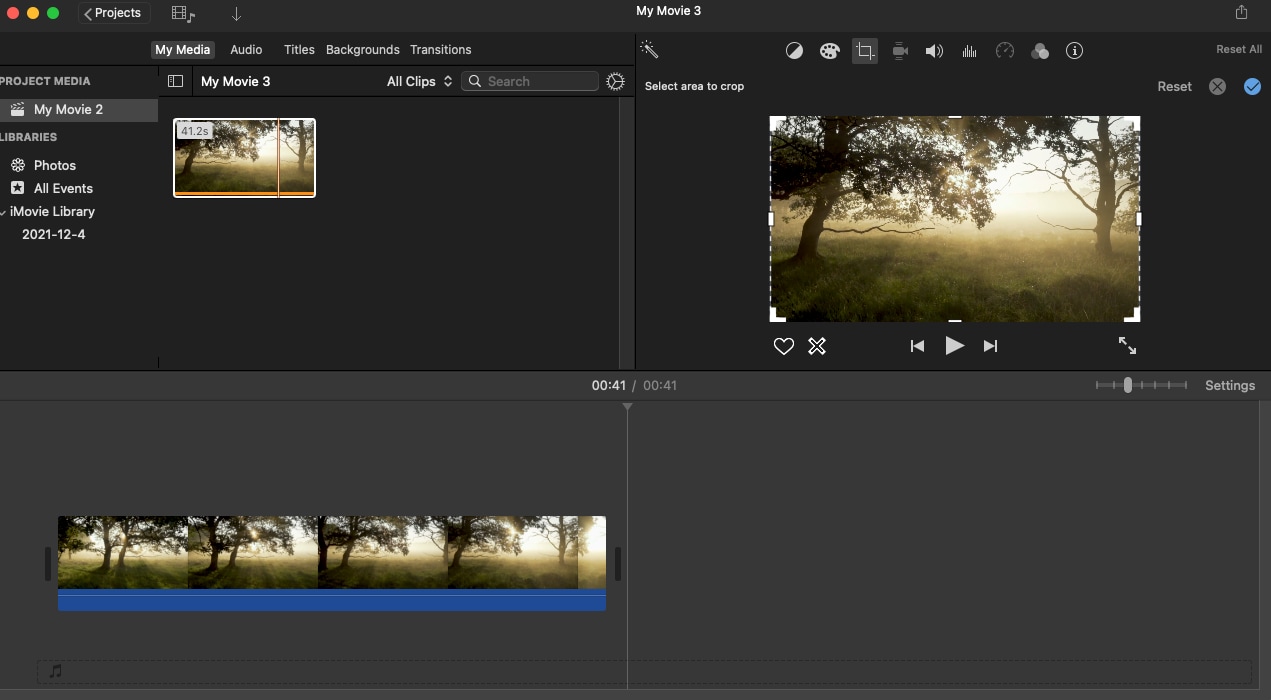
Search for the crop button under the toolbar. The overlapping right-angle corners represent the crop icon. When cropping a video, you have two options: crop to fill and ken burns.

Step 4 Apply the adjustment and save
When you're done cropping the frame, click on 'apply crop adjustment'. Save your file after applying the changes.
Pros
User-friendly interface
It is easy to learn
Professional editing tools
Cons
Output options are limited
It does not support tagging
Importing files are sometimes complex
Part 2: How to Crop a Video in iMovie on iPhone
There are several features of iMovie available on iOS, but the function of cropping video on iMovie is not obvious. You can't easily detect the crop button unless you know about it, as the crop function is referred to as zoom. The iMovie crop function is placed behind a few layers of the app interface that can be easily neglected or remain hidden to people using iMovie. Many iPhone and iPad users have concluded that there is no crop functionality in iMovie for iOS, but the question is: 'Can you crop a video in Imovie?' The answer is yes. These are the steps to be followed.

image source: https://www.digitaltrends.com/
Step 1
Launch the iMovie app on your iOS device > select the video you choose to crop.
Step 2
Select 'create movie'> tap on the video timeline to activate the video editor. You can use your finger and thumb to adjust the frame of the video manually to change the aspect ratio of the video.
Step 3
After adjusting the video file, press 'done', proceed to press 'upload icon,' then click on 'save video' to add your new project to your library.
Cropping your video might look troublesome and tiring because of the time consumption, but in the end, the result is always lovely.
Pros
It is fun to use
The auto-save feature
It is easy to add new titles
Cons
It is not easy to add background music
The output format is not enough
The features are limited
Part 3: What are the things iMovie can do & can't do on how to crop iMovie
Can do
1. Imovie can crop video by dragging the corner of the video frame
2. The app can rotate video with two options
3. The app allows you to adjust the brightness, effects, and filter of video
4. The app can share the edited movie to other devices
5. You can edit the level of the audio clip on the app
6. You can merge and trim videos on the app
Can't do
1. You cannot batch crop
2. You can't adjust the iMovie crop video aspect ratio automatically
3. It can't bring out a clear resolution of a large file
4. It can't edit music that has copyright
5. You can't convert videos to different formats
6. It can't be used for other devices apart from Mac, iPad, and iPhone
Part 4: How to crop a video without iMovie
iMovie has some limitations. Therefore we can use Uniconverter to crop video to our satisfaction. Uniconverter is an explicit software from wondershare used for several reasons: to record a piece or the full screen of your desktop screen more easily with mouthwatering features such as fonts, adding colors, and adding shapes, adding text, and subtitles. You can also edit your video by trimming unwanted parts, adding the background.
The most important of it all is the app's capability to edit your video more professionally and acceptably. It is easy to remove segments that are not relevant away from your videos. The steps to crop your video using UniConverter is highlighted below:
Step 1 Launch the app and import your file.
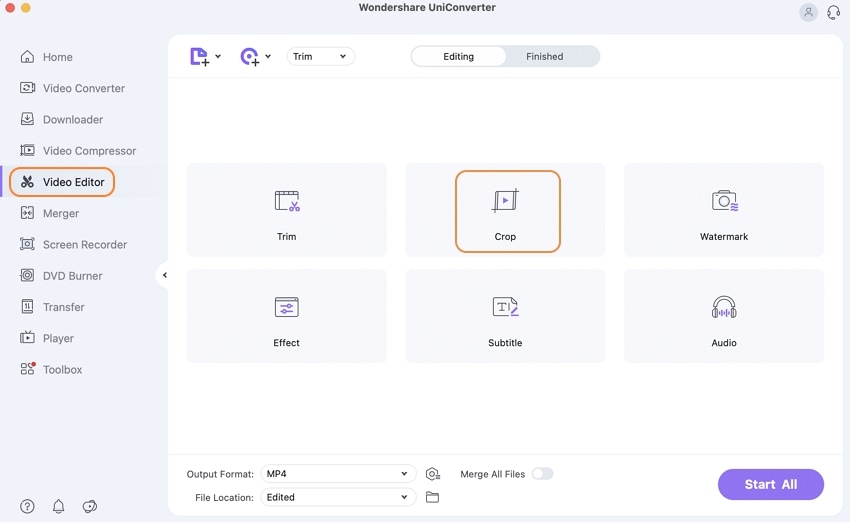
You must have the app installed on your device before you launch it. Once you launch the app, choose the 'Video Editor', then the 'Crop' option.

Step 2 Begin to crop your video file
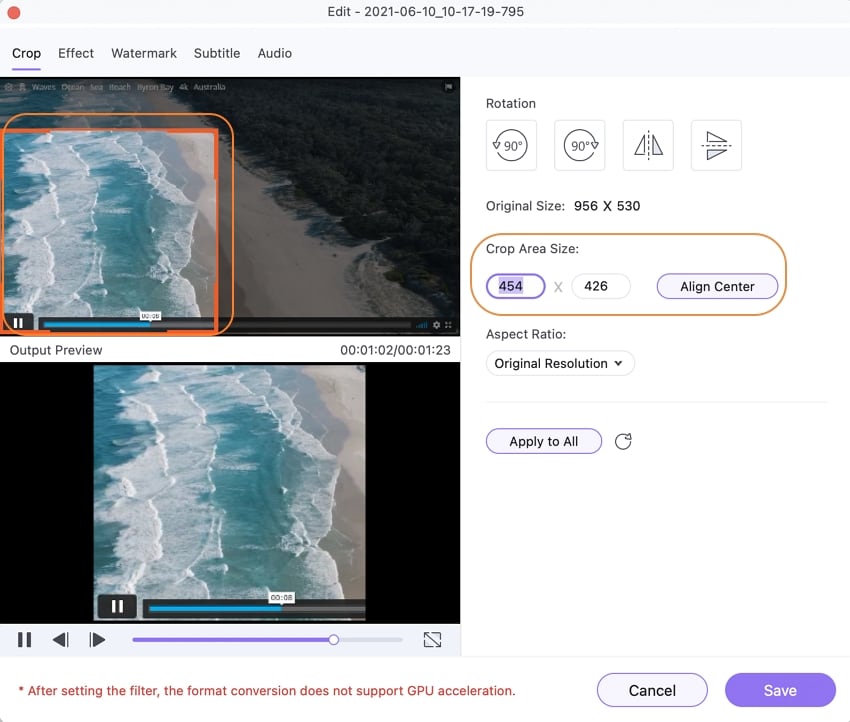
Import the file to be submitted by clicking on the 'add file' icon. And you can upload your file manually by dragging the file to the app. Now you can crop area size by adjusting the hight and width, or you can drag the corner of the video's frame to crop video.

Step 3 Select the output format of your choice
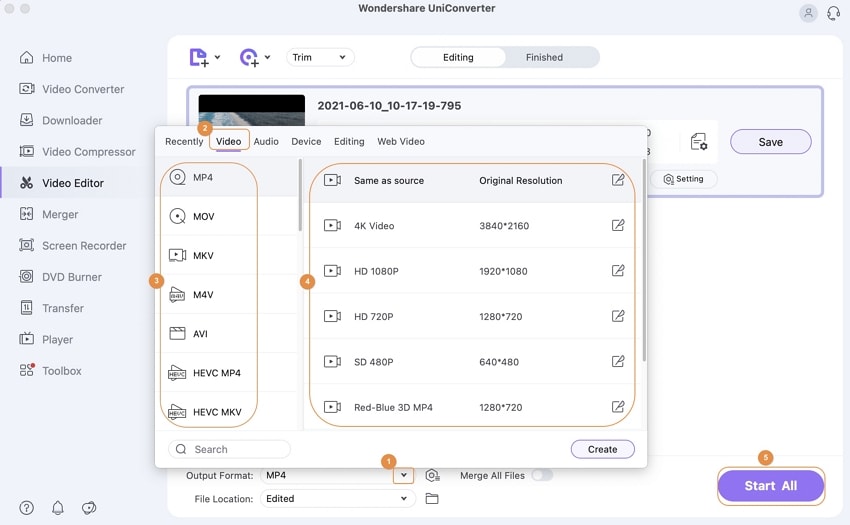
After cropping your file, you can choose a suitable format for your edited videos. Once you're done selecting the output format, you can save the file into the default folder of your device. Finally, click on 'Start All' to complete your project.

Pros
User-friendly interface
Different output format
Enough features
Cons
It is not free
It is not available on mobile devices

Wondershare UniConverter 13 - Best Video Converter/Editor for Mac/Windows
5,481,435 people have downloaded it.
UniConverter supports many formats and handles conversion equally, ensuring that high quality is delisered at all times.
During the conversion process, you may add multiple files since the program does batch conversion of files.
You can use the editing suite that covers subtitle editing, watermark editing, etc to make your results creative masterpieces.
This software facilitates file transfer to devices like Android and iPhone among others once the conversion is complete.
UniConverter is also capable of handling video compression hence ensures you acquire the video sizes you desire.
For Win 7 or later (64-bit)
For macOS 10.12 or later

