- Convert WMV to DVD with 90x faster conversion speed and lossless quality output.
- Burn WMV videos to DVD, DVD Folder, Blu-ray discs, and ISO files.
- Burn HD and FHD files to DVD and Blu-ray discs quickly.
- Trim, crop, add effects, subtitles and watermark to enhance your DVD.
- Download hd movies from YouTube, Vimeo directly.
How to Burn WMV to DVD on Mac/Windows
by Brian Fisher •
WMV (Windows Media Video) is a proprietary video container format launched by Microsoft. In fact, it’s the default format of Windows Media Player. However, some situations might force you to convert WMV to DVD. For example, you may need to watch your WMV movies using your home DVD or create backup files on an optical disc. But finding the right program to help you with the conversion process can turn out to be a difficult task. Today, I’ll show you how to burn WMV to DVD Windows 10 using two top-class programs.
Part 1:Best WMV to DVD Converter Recommended
If you’re looking for the best free WMV to DVD converter program, then check out UniConverter. With this powerful tool, you can burn WMV files to DVD minus any quality loss. You can also burn file formats like MP4, AVI, MOV, FLV, etc. to DVD, Blu-ray disc, or create ISO Image. And yes, this program is compatible with the latest Mac and Windows operating system versions.
iSkysoft WMV to DVD Converter key features:
- Convert WMV to DVD with 90x faster conversion speed and lossless quality output.
- Built-in video editor for trimming, rotating, cropping, cutting, adding watermarks, applying effects, etc.
- Burn WMV videos to DVD, DVD Folder, Blu-ray discs, and ISO files.
- Burn HD and FHD files to DVD and Blu-ray discs quickly.
- Offer 30+ free DVD menu templates for customizing your DVD.
- Download videos from more than 10,000 online video sharing sites like Facebook, YouTube, Vimeo, etc.
- Versatile toolbox featuring a GIF maker, CD ripper, VR converter, cast video to TV, etc.
Steps on how to burn a WMV file to DVD Windows 10/8/7 and Mac computers with iSkysoft video converter:
Step 1: Launch iSkysoft WMV to DVD converter
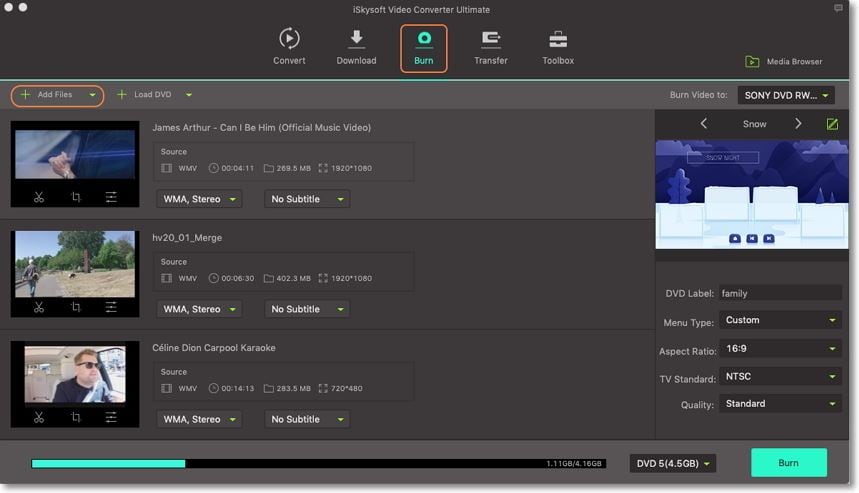
Download, install, and launch iSkysoft WMV to DVD converter and then click the Burn tab. Next, click the + Add Files button to locate and start importing your WMV files for conversion to DVD. An alternative method is to drag and drop the files to iSkysoft home interface.
Step 2: Edit videos (Optional)
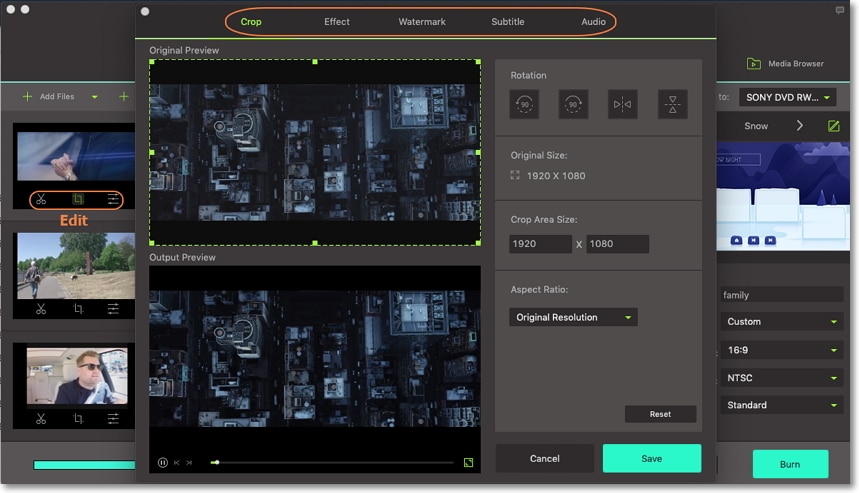
You’ll see three small edit icons below each thumbnail which you’ll click on to edit your videos. You can now edit your videos by trimming, cropping, cutting, compressing, adding subtitles, and many more. Click Ok when you’re done.
Step 3: Select a DVD menu template
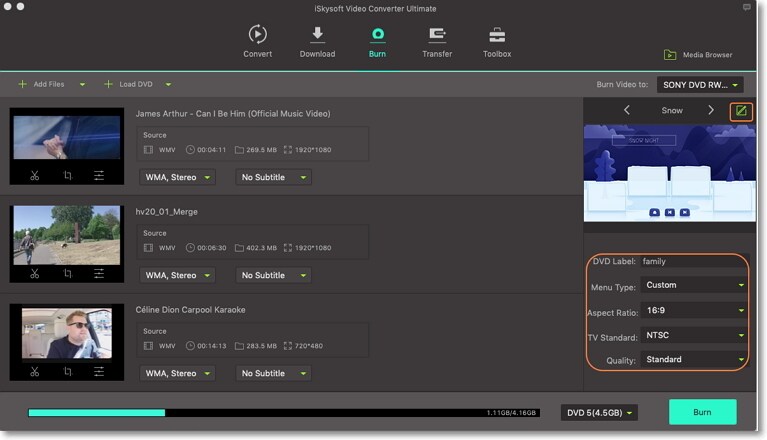
Next to the DVD menu template panel at the right side of the screen, you’ll see a small pencil-like icon. Click on it and then proceed to scroll through the 30+ menu templates and make a pick. You can also add your favorite background image and picture. Again, click OK to continue. Lastly, set other DVD parameters like TV standard, Quality, Aspect Ratio, Menu Type, etc.
Step 4: Burn WMV to DVD
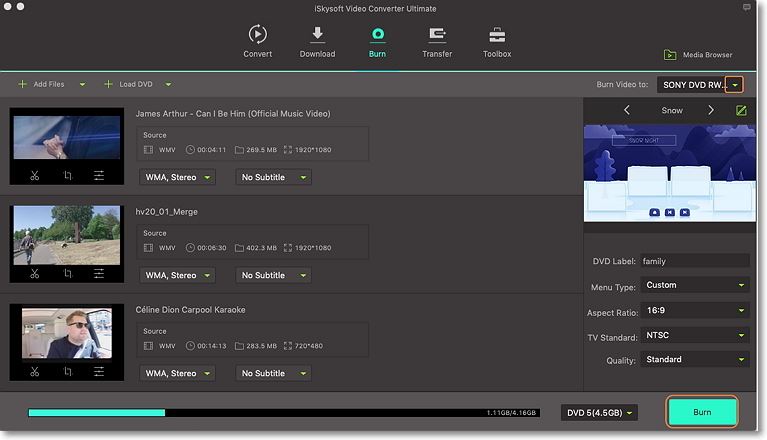
Insert your blank DVD into the system and then click the Burn video to section to choose it. After that, check if you are satisfied with your DVD and click the Burn button. iSkysoft DVD Burner will convert your WMV movies to DVD within a few minutes.
Part 2: Burn WMV to DVD with iSkysoft DVD Creator
If you’re a Mac user, then you must know how difficult it is to make a video DVD using the default Mac DVD Burner. But with iSkysoft DVD Creator for Mac and Windows OS, you can creatively burn all your audios and videos to DVD, Blu-ray, and ISO file. Apart from that, this native DVD maker also allows users to preview their DVDs before burning. So, if you want the best WMV to DVD burner free program, iSkysoft DVD Creator should be your number one choice.
Step by step guide on how to burn WMV to DVD with iSkysoft DVD Creator:
Step 1: Add WMV videos to iSkysoft DVD Creator
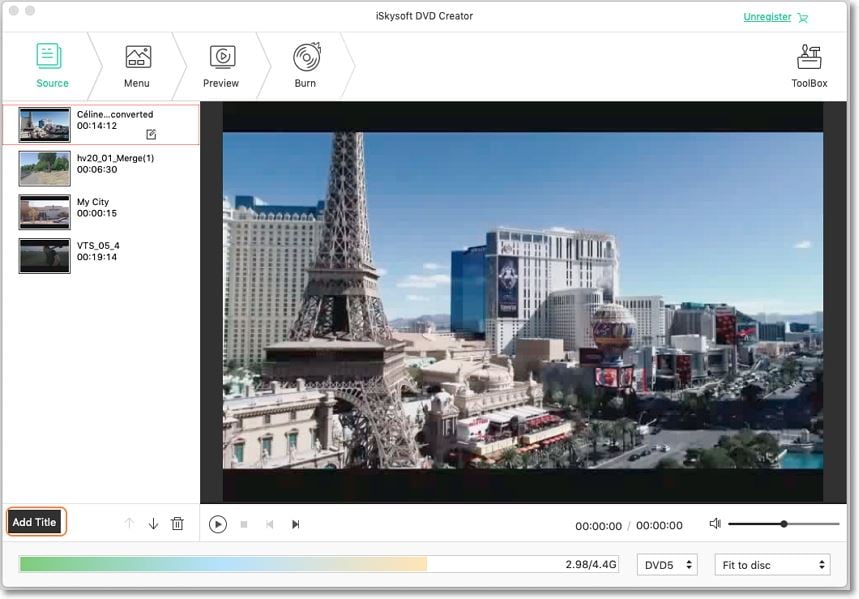
Download, install, and launch the program and then click the Create a New Project option. Now drag and drop your files to the program. Alternatively, click the + sign from the Source tab to import your WMV videos. Note that the program supports batch conversion. Therefore, you can click the Add Title button to add more movies.
Step 2. Edit your videos (Optional)
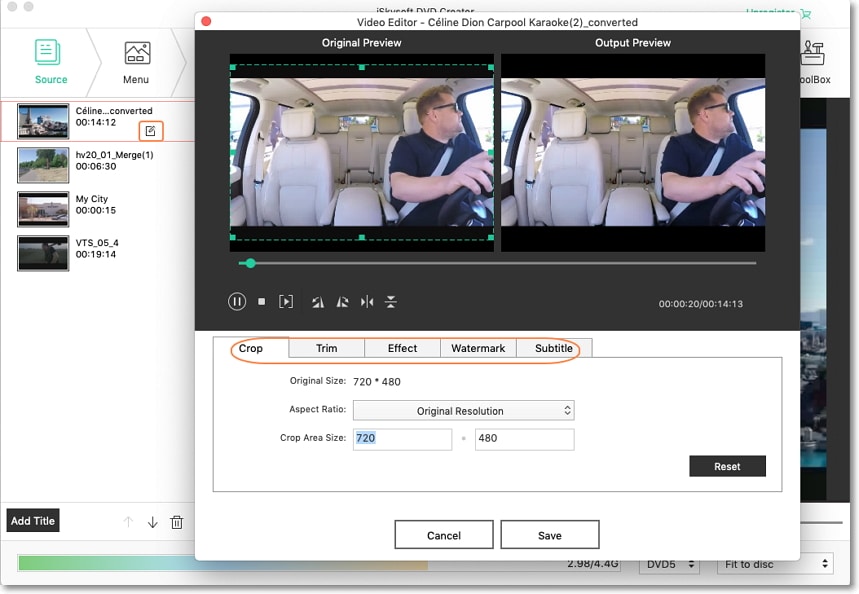
You can now edit the WMV videos for personalization. To do that, you’ll click the pencil-like icon below each thumbnail, and a Video Editor window will open. Now you can click the Crop, Watermark, Subtitle, Trim, and Effect tabs to make changes to your videos. Click the Ok button to continue.
Step 3. Choose a DVD menu template
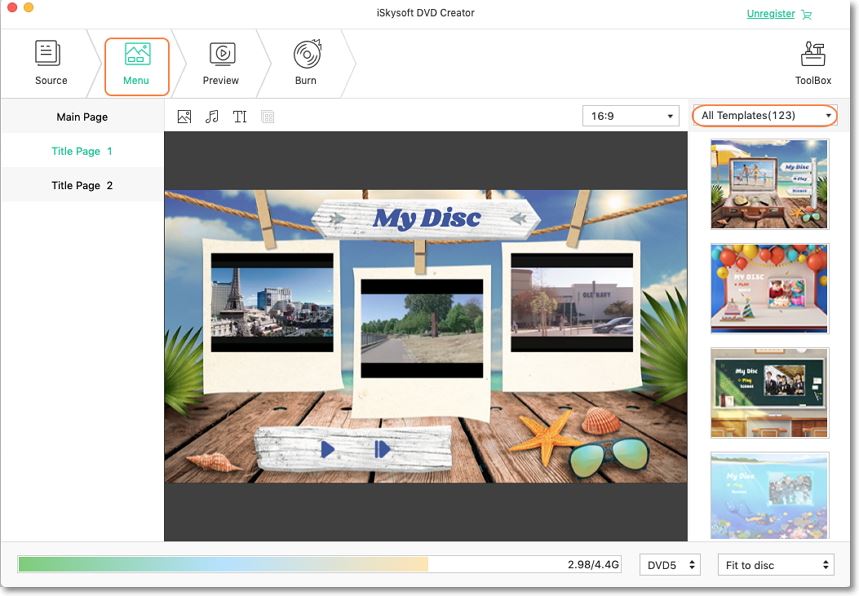
Click the Menu tab and choose your favorite DVD menu template from the 100+ available options. You can also add background image/music, create new chapters, and many more.
Step 4: Preview and burn WMV videos to DVD
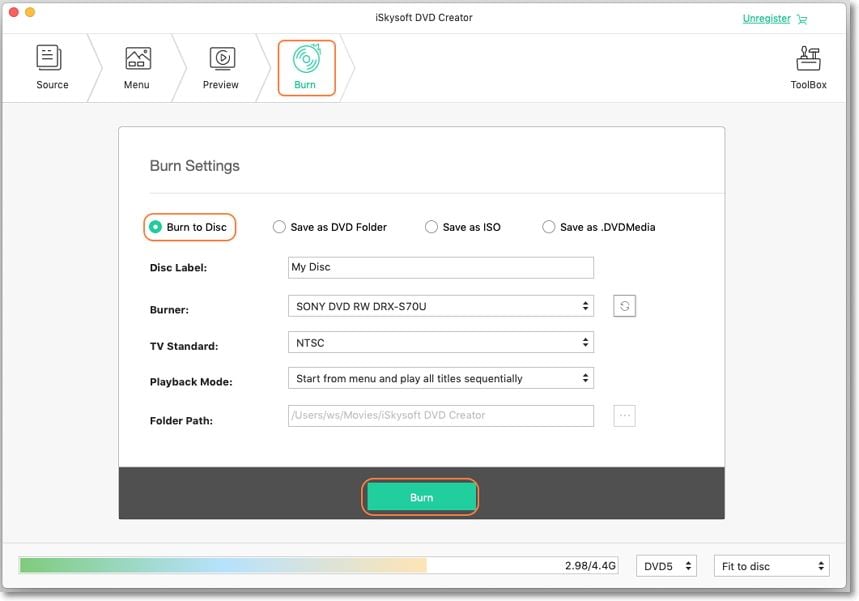
Hit the Preview tab to see if the changes you’ve made meet your expectation. Next, tap the Burn tab and set DVD parameters like Disc label, TV Standard, Folder path, Burn speed, etc. Finally, click the Burn button to start burning DVD using WMV to DVD burner free.
Up to here, I’m quite confident that you can easily convert your WMV videos to DVD. With these two effective iSkysoft programs, you can create high-quality DVDs quickly.

Brian Fisher
staff Editor