- Burn iMovie to DVD with color DVD template.
- Transfer MP4 videos to devices quickly to enjoy everywhere anytime.
- Download online videos and convert to iMovie format.
- Compress iMovie videos into smaller size for easier transfer.
- Bulit-in video editor that you can trim, crop your MKV videos.
2 Ways to Burn iMovie to DVD on Mac
by Brian Fisher •
iMovie is a free video editing tool that’s present in Mac devices. And after finishing customizing your videos, you will be required to burn imovie to dvd so that you may view it. But how do you create dvd using imovie? Plenty of programs have been availed handle the task. This guide is going to show you how to make a dvd from imovie 11 using different tools.
Part 1:Burn iMovie to DVD with a Professional Burner
iMovie is an important tool because of a number of reasons. The software makes it easy to search, share and come up with pictures, videos and clips. This tool also enables users to edit videos to achieve refined visuals and great outlook. The final product of iMovie can be easily accessed through Apple TV for small videos or Home Sharing and iTunes. And with the right tools, this videos can be easily burned to DVD for later use. Getting a right tool to create dvd using imovie with quality and ease means that you’ll be able to access an ideal storage option, and achieve a greater playback availability and more online distribution.
In order to burn iMovie to DVD, an iMovie to DVD creator is a necessity. The most popular choice for many people is iSkysoft and it’s recommended here. To use this tool, you’ll definitely be required to have its application. The application is fortunately available in multiple sites online. However, you can easily visit its main website and download it. After downloading and installing it, we’ll take you through a step by step guide on how to make a dvd from imovie 11 using this tool. But before we proceed on, this is a glimpse of what is contained in iSkysoft.
Main Features of UniConverter:
- Wide Formats Support: iSkysoft accommodates all the video formats that is presently in existence. Such formats include MP4, XviD, WMV, MKV, MPEG, AVI, aong many more others.
- Mobile Devices Support: iSkysoft converts videos that cannot play in mobile devices to a playable format. The videos will then play well in most of the common video players and mobile devices such as Pocket PC, iPad, Archos, and Apple TV.
- AVCHD Videos: This kind of videos are widely popular today. iSkysoft supports its various formats such as HD, MOV, FLV, TRP, MTS, etc.
- Batch Conversions: The feature lets users convert more than one videos at once. This will save plenty of time especially when handling files that need to be converted through a similar setting.
- Audio Extraction: iSkysoft lets users remove audio contents in a video. Moreover, the extracted videos can be converted to AC3, WAV, MP3, M4A, among many more others.
Steps to burn iMovie to DVD with iSkysoft iMovie to DVD creator
Step 1: Add iMovie video to iSkysoft iMovie to DVD creator
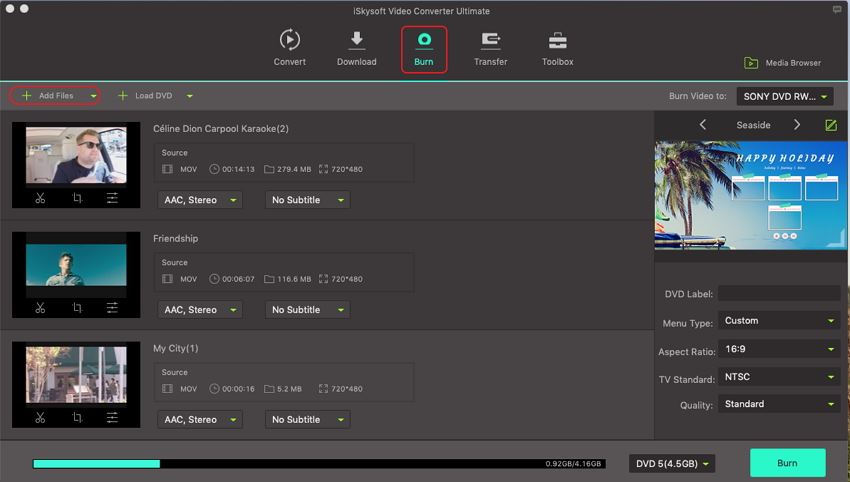
Launch the iSkysoft application. If you do not have the application, you can easily download and then proceed on to install it. Drag the iMovie video project and drop it to the program. iSkysoft also lets its users to upload multiple files and hence you can easily select many videos, and then drag and drop it into the software.
Step 2: Edit iMovie video (Optional)
This step lets you perform editing the uploaded video(s). To do this, click on the video and an edit button will appear. You will then proceed on to crop, rotate, trim, or add watermark to your video.
Step 3: Burn iMovie to DVD
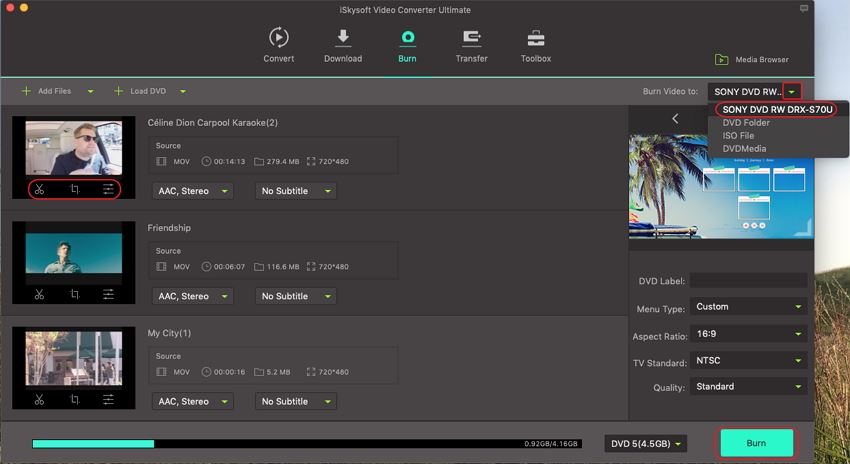
Finally, click on the Burn button and choose to either burn to DVD Folder, DVD Disc, ISO File or .dvdmedia. In this case, choose DVD Disc. Also, specify the name of the burned file.
Part 2: Convert iMovie to DVD Free
Picture this situation. You have finished accessing and editing videos using iMovie. You can easily access the file through Apple TV. However, you really want to play the file on other devices such as TV or DVD Players. How do you go about it if you cannot afford quality tools?
For those under a tight budget, it is still possible to convert iMovie to DVD free. You will learn about two tools in this section that can help you perform the conversions.
1. Finder
Finder is a free popular tool that converts iMovie files to DVD. The fact that this tool has been available for a long period and is highly recommended makes it come at the top of our list. Here is how to use this video converter to create iMovie using DVD.
Step 1: The first step is to click on the file that you want to convert to DVD upon inserting DVD disc. After selecting it, copy the file. This can be done in two ways. Either press the Command + C keys or click on the Edit button and then select Copy.
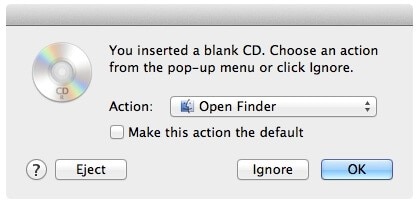
Step 2: There is a DVD icon on the lower left side of Finder interface. Click on the icon from where you will be directed to a folder.
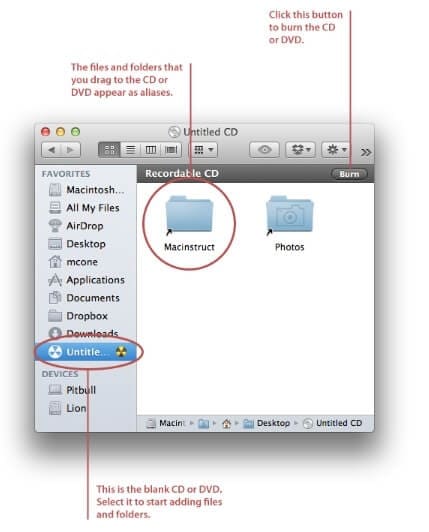
Step 3: Paste your movies in this folder by either pressing on Command + V buttons, or clicking on Edit and then Paste. This will make the uploaded movie files to appear on the window containing the DVD.
Step 4: On the top left part of the interface, there’s a File button. Click on it to display a drop-down menu.
Step 5: There’s a Burn [name] to Disc ... option on the drop down menu. Just click on it.
Step 6: Name the DVD by clicking on the Disc Name Also, click on the burn speed and select a suitable choice from the options present at the drop down menu.
Step 7: There is a blue button that’s present on the bottom right corner named Burn. Click on it and it will kick start the process of converting files from iMovie to DVD.
A chiming sound followed by the disappearance of the DVD icon will signal the end of conversion process.
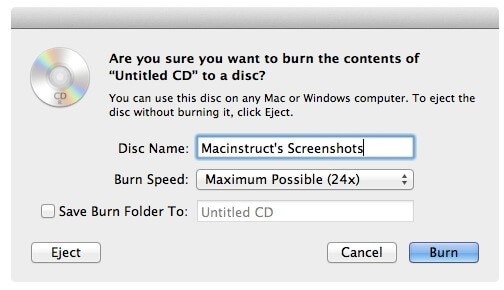
Limits
- It can be confusing to many because of too many steps to be followed.
- Converted files cannot play in a standard DVD player.
- It crushes unexpectedly a time.
2. Wondershare Free Video Converter
Wondershare Free Video Converter is a helpful tool that will let you handle all issues related to DVDs. It supports majority of popular file formats and possesses an array of professional tools. Its interface is also captivating and well detailed such that a beginner can use it smoothly
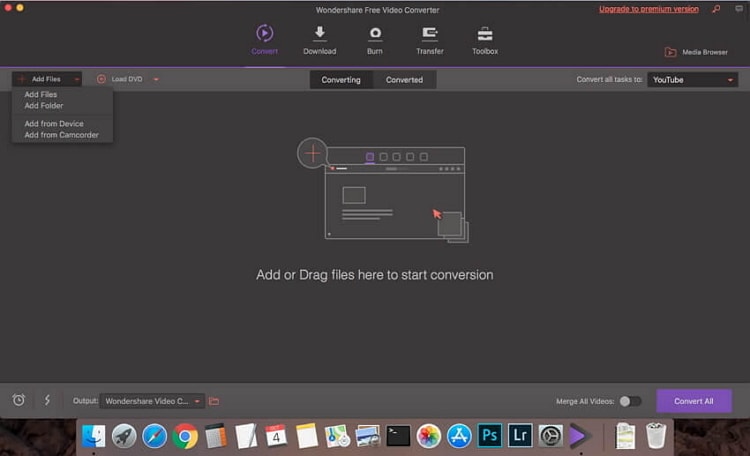
Step 1: Open the Wondershare Free Video Converter software. Click on the Burn button that’s present that’s available at the top toolbar. Under the button, there’s a + Add Files icon. Click on it to upload files to the program.
Step 2: The next step is selecting a suitable template by clicking on the left and ring arrows (< >) that’s present at the far right side of the program.
Step 3 : On the Burn Video to that’s present at the top of the arrows, select DVD File. Proceed on to enter the details and parameters of the yet to be converted DVD File. Finally, click on ‘Burn’ button to begin the conversion process.
Limits
- The version has limited features
- Some converted files through won’t play
Burning iMovie videos to DVD is an awesome way to preserve memorable moments. The guide above will help you select a suitable tool from the availed quality options. More so, you’ll get to perform some editing tasks on the files before conversion.

Brian Fisher
staff Editor