- Convert mini DV to DVD easily.
- Convert videos to MP4 and other popular video formats.
- Merge multiple mp4 videos into one.
- Built in video editor like trimming, cropping and rotating.
- Transfer DVD to your phone to eny everywhere anytime.
2 Ways to Convert Mini DV to DVD Easily
by Brian Fisher •
The Mini DV (Mini Digital Video) is a recorded video format of old camcorder models. However, this analog format is known to degrade with time, and that’s why you need a mini DV to DVD converter. If you convert mini DV to DVD, you’ll back up your files for future playback while maintaining the original video quality. Furthermore, you’ll be freeing the much-needed space on your camcorder, computer or mobile device. Today, I want to show you how to burn mini DV videos to DVD for future playback.
- Method 1: Convert Mini DV to DVD on Computer without Quality Loss [Recommended]
- Method 2: Copy DV tapes to DVD with DVD Recorder
Method 1: Convert Mini DV to DVD on Computer without Quality Loss (Recommended)
If you’re searching for the best mini DV to DVD converter, then search no more. That’s because UniConverter will convert your mini DV tapes to DVD and other 150+ formats like MP4, MTS, MOV, AVI, and plenty more. You’ll also get a built-in video editor to enable you to trim, cut, and compress your videos. You can also add watermarks, subtitles, effects, and many more to your mini DVD files before conversion.
iSkysoft DVD Recorder Features:
- Convert Mini DV to DVD and other 150+ formats, including MP4, AVI, MKV, WMV, and more for smooth playback.
- Burn mini DV to DVD/ISO image/Blu-ray disc with fast conversion speed and lossless quality.
- Built-in editor for trimming, cutting, compressing, adding watermarks/subtitles/effects, etc.
- Editing Tools:
- Compatible with Lots of Devices:
- Download videos from over 1000 video sharing sites like YouTube, Vimeo, Facebook, etc.
- Provide 30+ free stylish DVD menu templates to make your DVD look professional.
- All-in-one toolbox with a screen recorder, CD ripper, GIF maker, VR converter, and many more.
Step by step guide on how to burn mini DVD videos to DVD with iSkysoft DVD burner
First and foremost, you’ll have to connect your mini DV camcorder to your PC using a Firewire or USB cable to transfer DV files. Mac users can copy DV files to their computer via iMovie. You can now follow the same steps listed below to transfer mini DV to DVD.
Step 1: Launch and add DV files to iSkysoft DVD burner
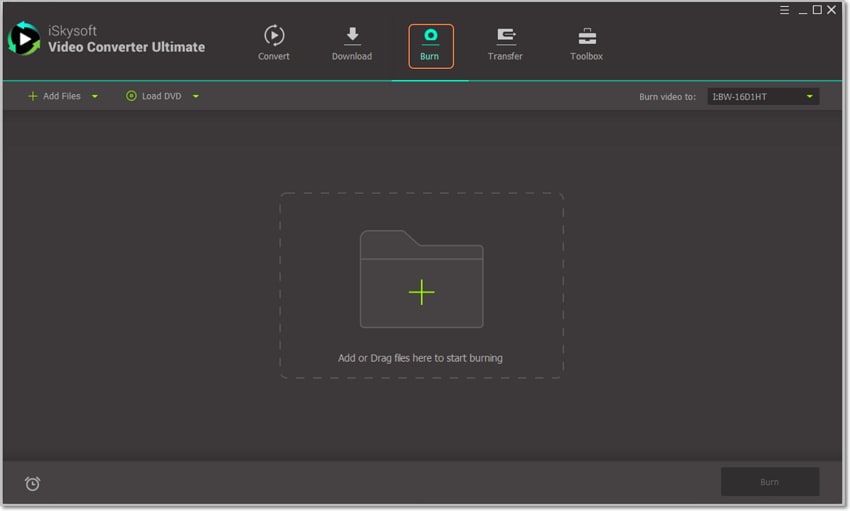
Download, install, and start iSkysoft DVD maker and then click the Burn tab. Under the Burn tab, click on the + button at the center of your home screen to launch your file browser. Alternatively, you can click the + Add files button and then select the Add from camcorder option. Your imported videos will then appear as thumbnails.

Step 2: Edit the imported mini DV videos (Optional)
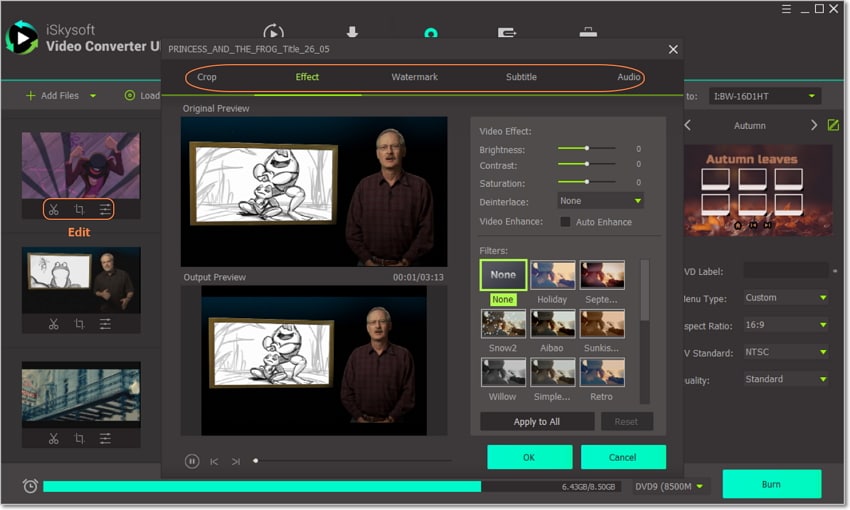
Although this process isn’t compulsory, it’s still vital that you make some changes to your DV videos before conversion. You can do this by clicking on the small edit icons below each thumbnail. You can now start trimming, cropping, adding effects, applying watermarks, and many more. Once you’re done, click the OK button to proceed.

Step 3: Customize DVD with menu templates
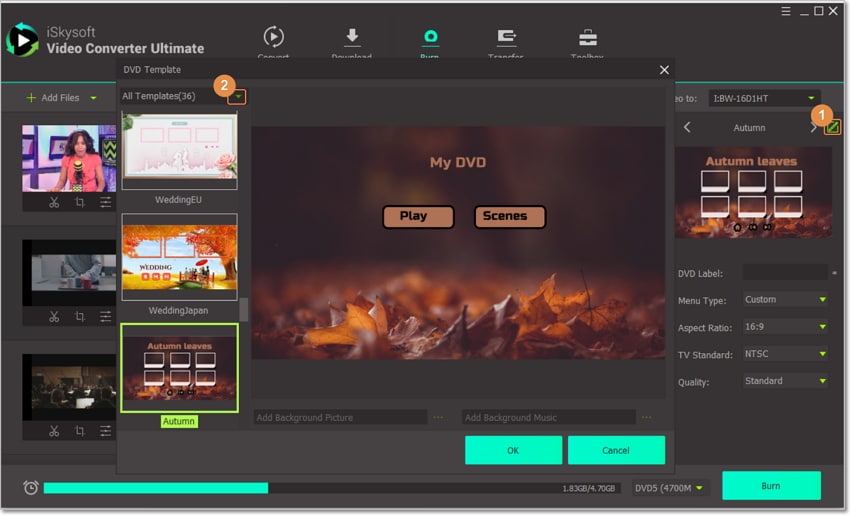
Look at the right side of your home screen, and you’ll see a small pencil-like DVD menu button. Click on it and then proceed to select your favorite DVD menu template from the 30+ available options. You also have the option to choose your preferred background picture and music. Click Ok once you're satisfied.
It doesn’t stop there, though, because you’ll also need to input other DVD parameters. You can enter the DVD name, aspect ratio, TV standard, and quality.

Step 4: Burn mini DV files to DVD
Now you’re almost ready to start converting mini DV to DVD. But before that, click on the Burn video to drop-down menu and choose where you’d like to burn your files to. If you don’t have a blank DVD, you can burn it to a DVD folder or create an ISO image. Now click the Burn button at the bottom of the screen to start the conversion process. iSkysoft DVD Burner will only take a few minutes to burn mini DV to DVD with lossless quality.
Method 2: Copy DV tapes to DVD with DVD Recorder
Another popular way of converting mini DV files to DVD is by using a DVD recorder. In fact, some users find this tool to be the most effective way of transferring mini DV files to DVD. That’s because you only need a USB cable to transfer your mini DV files to DVD. On the flipside, mini DV recorders are always expensive. In that case, I still recommend the iSkysoft DVD Burner as the cheapest and most effective tool.

Here is how to transfer mini DV tapes to DVD using a DVD recorder.
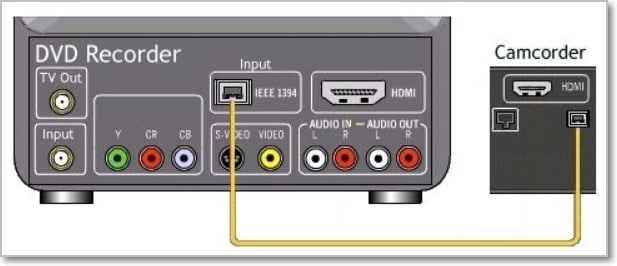
Step 1: Connect your camcorder to your DVD recorder by using a USB or HDMI cable. Make sure that your camcorder is connected as output while your DVD recorder is connected as input.
Step 2: Insert a blank disc into your DVD recorder’s disc drive and then switch it to the AV-in mode. Now put the mini DV tape you wish to convert into your camcorder.
Step 3: You’re now set to start recording your mini DV videos to DVD. To do that, press the Record button on your DVD recorder and then start playing the mini DV videos. If you want to stop recording, simply press the Stop button.
Note: You should take note that different DVD recorders may come with different operational steps. But the good news is that most of them have similar operational steps. Just make sure that you find the best DVD recorder to handle your needs if you choose this method.
As I have said earlier, most DVD Recorders are pretty expensive to purchase. They also don’t come with additional editing features like UniConverter. And of course, some users might find it challenging to operate a DVD Recorder. With these downsides in mind, you should download and install the iSkysoft DVD maker on your computer. And yes, the download and installation process with only cost you a few minutes.

Brian Fisher
staff Editor