- Burn DVD on Windows 10 easily.
- Convert videos to MP4 and other popular video formats.
- Merge multiple mp4 videos into one.
- Edit DVD like trim, crop, add effects.
- Transfer DVD to your phone to eny everywhere anytime.
2 Ways to Burn DVD on Windows 10
by Brian Fisher •
Do you want to burn DVD Windows 10? Well, Windows 10 comes with a built-in DVD burner that you should exploit. With this tool, you can create video or audio CD/DVD without necessarily needing third party software. Even better, there is a myriad of software on the internet that can also help you do that. In this article, I’ll show you how to use some of the best DVD burning software for Windows 10.
- Part 1: Best DVD Burning Software for Windows 10
- Part 2: Free DVD Burner Software for Windows 10
- Part 3: Comparison between Windows 10 DVD Burners
Part 1:Best DVD Burning Software for Windows 10
UniConverter is undeniably the best DVD burning software for Windows 10, 8, 7, and other previous versions. If you’re a Mac user, you can also download iSkysoft for Mac. Moving forward, this professional program will burn all popular file formats to DVD, ISO image file, and Blu-ray disc. What’s more? The program comes with a whole host of free DVD templates to give your DVD that professional look.
Main Features of UniConverter:
- Burn photos, audio, and videos of any format to DVD/Blu-ray/ISO image with super-fast speed and lossless quality.
- Built-in editor for personalizing photos and videos by trimming, cropping, rotating, adding watermarks/effects/subtitles, etc.
- Burn DVD Windows 10 with more than 30 free dynamic menu templates.
- Create photo slideshow with transition effects and music to DVD easily.
- Additional all-in-one toolbox with a GIF maker, screen recorder, CD ripper, etc.
Steps on how to burn DVD Windows 10 with iSkysoft DVD burner
Step 1: Open iSkysoft DVD burner
You’ll have to successfully download and install iSkysoft DVD maker to your PC first. Launch it and then click on the Burn tab.
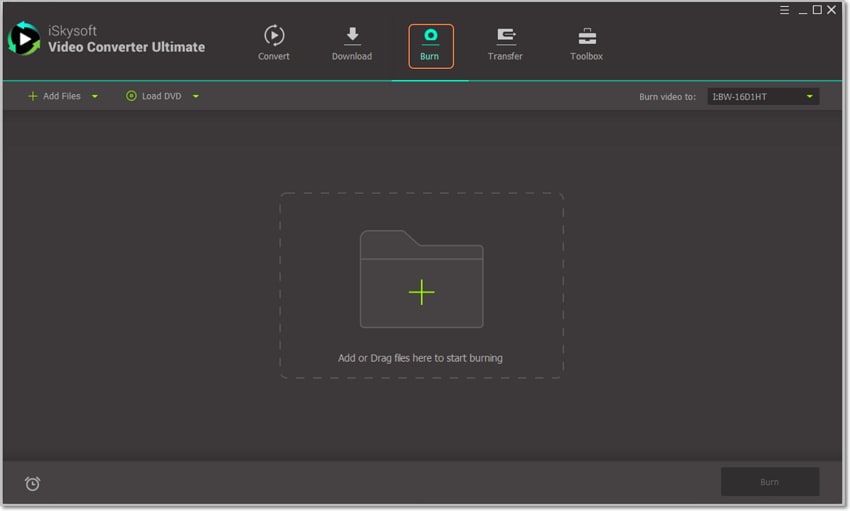
Step 2: Import and edit videos
You can now drag and drop your video files to the DVD burner. Alternatively, select the + Add Files drop-down menu to import your DVD files/folder.
Your imported files will appear as thumbnails with small edit icon below them. Click on one of them to trim, rotate, crop, add effects, etc. Click OK once you’re done. Remember that this part is optional.
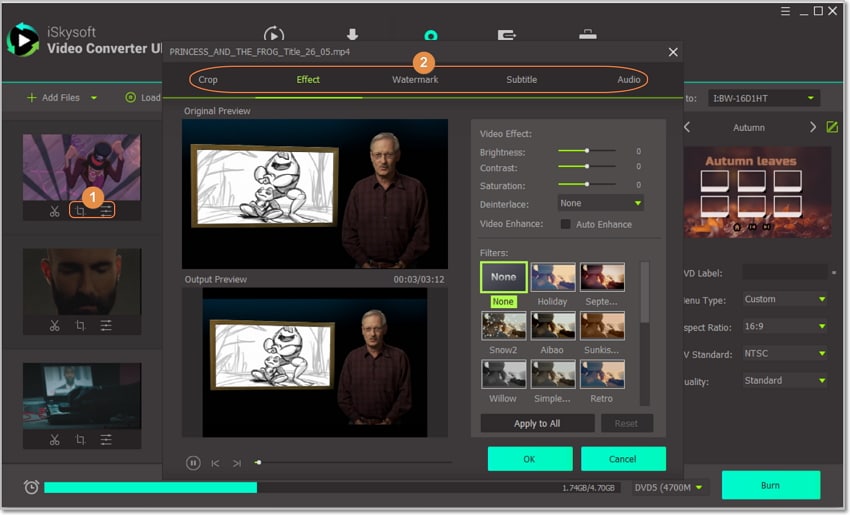
Step 3: Select your DVD template
Now move to the right side of the home window and click on the small, green pencil-like icon. A small window will appear where you can select your favorite DVD template from the 30+ options. You can also add your background music and image. After that, you can set other aspects like TV standard, DVD name, etc.
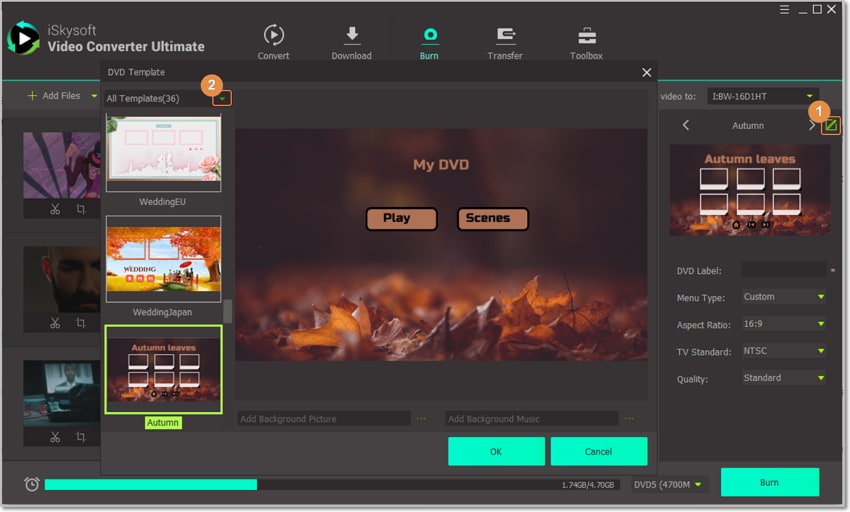
Step 4: Preview and Burn DVD Windows 10
You can now Preview your DVD videos and see if you’re satisfied with the changes. Now go to the Burn Video to drop-down menu and select your DVD Disc. Finally, click the button and leave the rest to iSkysoft DVD burner.
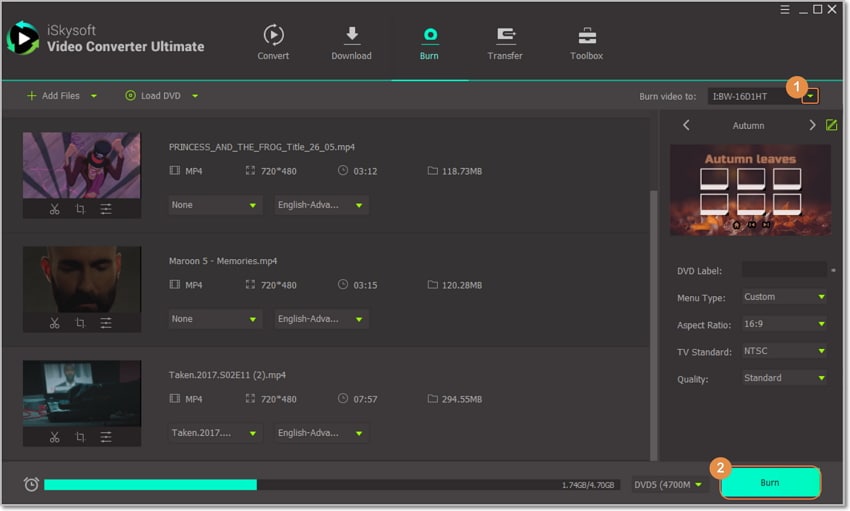
Part 2: Free DVD Burner Software for Windows 10
They say that great things in life aren’t free. Well, that’s not entirely true because you can quickly get some powerful DVD burner alternatives. In this part, we’ll be discussing two of the most popular free DVD burner software for Windows 10, 8, 7, and more. Let’s take a look at them.
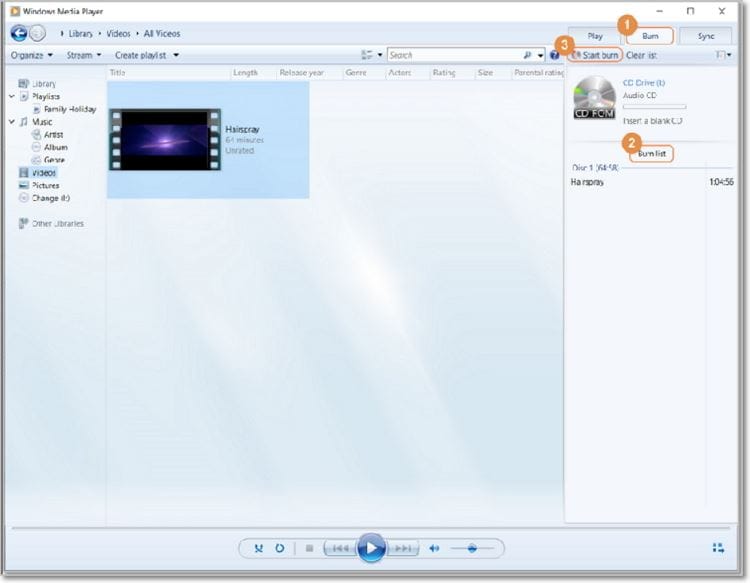
1. Windows Media Player
Microsoft developed the Windows Media Player. However, most Windows 10 users don’t know that you can use this tool to burn videos, audios, and photos to DVD or CD. You don’t even need any third-party software to do that. Supported video formats include AVI, MP4, MOV, VOB, etc. And yes, this tool is available on Windows 10, 8, 7, XP, and other previous versions.
Step 1: Insert a blank DVD/CD into your PCs disc drive and then launch Windows Media Player.
Step 2: Click the Burn tab and then choose Data CD or DVD option.
Step 3: Launch Windows File Explorer and then drag and drop your files to Windows Media Player burn list.
Step 4: Select your preferred file sequence order and then click the Start burn button to create DVD Windows 10.
2. BurnAware Free
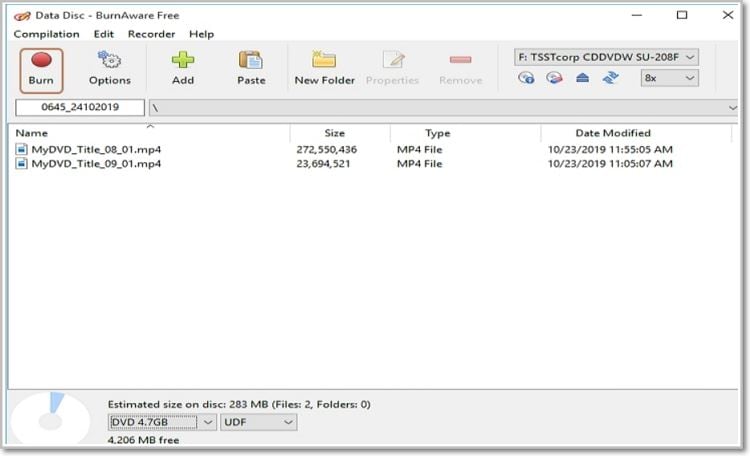
BurnAware is another free DVD burner that works seamlessly on Windows 10, 7, 8, etc. This lightweight program is supported by both 32-bit and 64-bit computers, making it easily accessible to many users. You can use BurnAware to create DVD, ISO image, erase CD data, and many more. Without any further ado, here is how to burn a disc on Windows 10 using BurnAware DVD creator.
Step 1: Download and install BurnAware to your PC and then launch it. You can now insert a blank DVD into your computer.
Step 2: From the Data row, click the Data Disc option and a new window will pop-up. You can now drag and drop your folder/files to BurnAware DVD creator. Alternatively, you can click the big + button to locate your files.
Step 3: Now click the red Burn icon at the top-left corner of the home screen and let BurnAware do the rest. It’s really that simple!
Part 3: Comparison between Windows 10 DVD Burners
Up to this point, you now know a thing or two about the best DVD burning software for Windows 10. However, all three programs have different features and functions. Here is a comparison table to help you figure out which program suits your needs.
|
Software Features or Specifications
|
iSkysoft VCU DVD Burner
|
Windows Media Player
|
BunrAware DVD Creator
|
|---|---|---|---|
| Supported Operating System | Windows 10/8/7/XP | Windows 10/8/7 | Windows 7/Vista |
| Supported File Formats | 150+ popular file formats | Supports popular file formats | Supports popular file formats |
| DVD Menu Templates | Offers 30+ dynamic and static DVD templates to choose | No DVD templates | No DVD templates |
| Burn Files to ISO Images | √ | × | √ |
| Built-in Video Editor | Supports trimming, cropping, cutting, etc. | × | × |
| Preview Functions | √ | × | × |
| Download online videos for burning | Download videos from video sharing sites like YouTube | × | × |
| Built-in DVD Media Player | √ | √ | × |
From the comparison table above, it’s easy to conclude that UniConverter is the superior program of the trio. With this program, you’ll not only create professional-looking DVD but do so in a hassle-free manner.

Brian Fisher
staff Editor