How to Import MTS Files to Adobe Premiere Pro for Editing on Mac
by Brian Fisher Proven solutions
Video editing can be enjoyable, until you come across an issue you did not expect. As you import MTS files to Adobe Premiere, the process will come to a halt at some point due to format compatibility issues.
So, how do you import important MTS files to Adobe Premiere without compromising the quality? When you can’t import MTS to Adobe Premiere, UniConverter is the solution. This tool solves the problem by converting MTS files to a format that is acceptable by Adobe Premiere. There are multiple formats to choose from when it comes to selecting an Adobe Premiere supported format. However, the best is MPEG-2 according to professionals.
Part 1. How to Import MTS Files to Adobe Premiere
MTS files refer to videos using the Advanced Video Coding High Definition (AVCHD) format. So, MTS file format, also known as MPEG Transport Stream, supports 720p and 1080i in a small size. As a result, Panasonic and Sony HD camcorders use it as their standard video format. Additionally, MTS file are useful in the storage of high definition videos on the Blu-ray discs.
Adobe Premiere is a great video editor invented in 1991. Since then it has evolved into other versions that come with added features. It is quite popular in the entertainment industry because big companies like Television serial creators and Movie makers use it to ensure their videos are persuasive. So, it is quite reliable for 3D editing and audio sampling.
Unfortunately, Adobe Premiere faces challenges during the editing process of MTS files, which explains why you can’t import MTS to Adobe Premiere. As you upload the MTS files from the camcorder, you are likely to get a message stating that they are unsupported files. This is one of the disadvantages of Adobe Premiere. Luckily, it is rectifiable.
If you really want to know how to import MTS to Adobe Premiere, you should not give up upon receiving that message. Instead seek another route that involves converting the files’ format to one that Adobe Premiere supports. So, the process to convert MTS to Adobe Premiere is the means to how to import MTS to Adobe Premiere. This is the highly recommended method.
Part 2. How to Convert MTS to Adobe Premiere Easily
UniConverter is an incredible tool that can convert MTS to Adobe Premiere quickly. It is extremely easy to install and has consistent excellent performance. It comes with remarkable features, which explains why the majority of experienced and professional editors recommend it. They include the following.

UniConverter(formerly UniConverter)
- Burn MP4 to DVD/ISO/DVD Folder/Blu-ray DVD easily.
- Edit videos before MP4 to DVD conversion.
- Customize DVD template for MP4 to DVD.
- Make photo slideshows to DVD with music.
How to convert MTS to Adobe Premiere with iSkysoft MTS Converter
Upload the MTS files into UniConverter
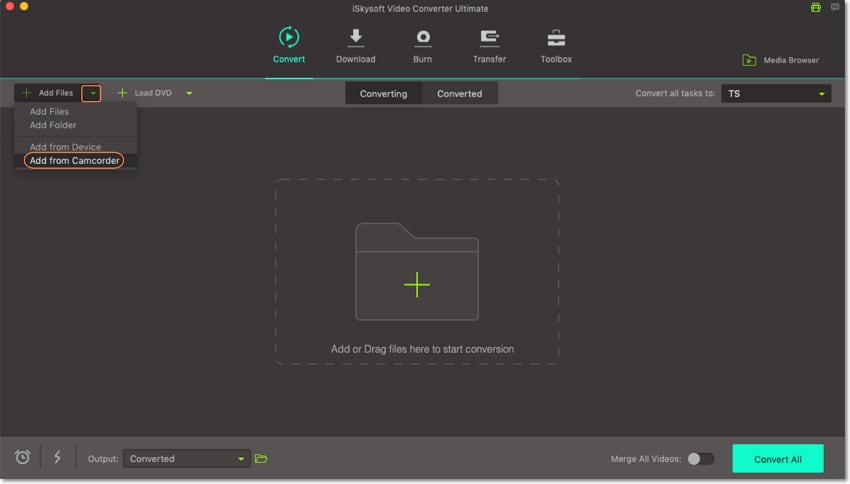
Begin by launching UniConverter and ensuring that your camcorder is well linked to your PC, so that you can add the MTS files to the software. At the screen’s top left side, choose the + Add Files option. Click on Add from Camcorder and upload the MTS files.
Set the supported format
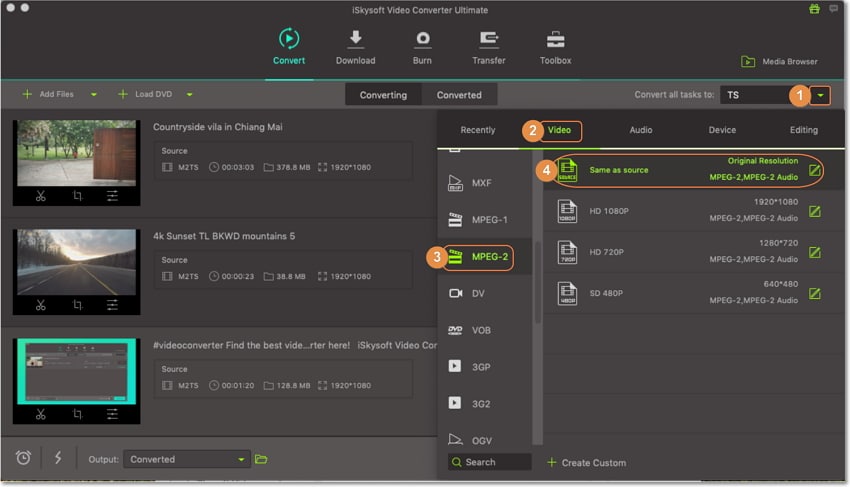
You must specify that MPEG-2 is the supported format for your files. To do so, access the label Convert all Files to. Go ahead and select Video and choose MPEG-2 file type. For resolution, you may click on Same as Source to maintain the settings.
Convert MTS to Adobe Premiere
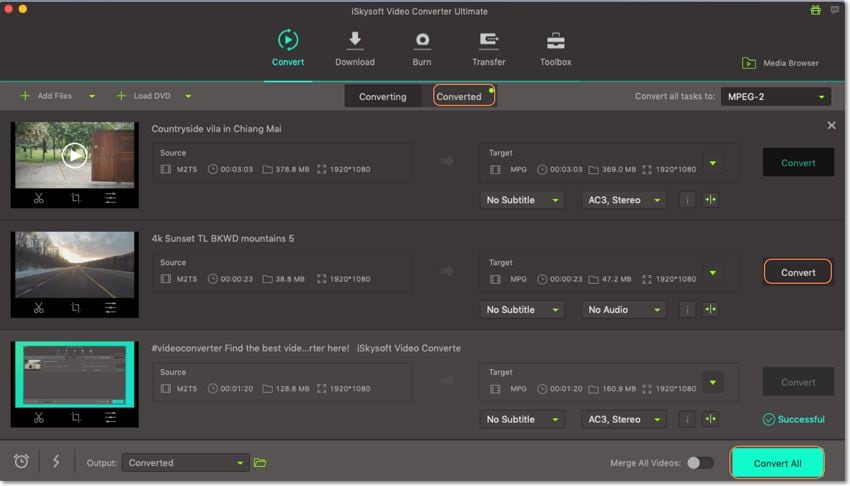
This final step is the conversion procedure. Activate it by choosing the Convert All button, situated on the screen’s right side. To access the output file, go to the Converted section.
Part 3. Tips of Using Adobe Premiere
Despite that Adobe Premiere presents some issues as you try to import MTS, it is still an incredible tool that can come in handy in many occasions. You just have to understand it better so that you can effectively use it and benefit.
The following are some useful tips that can help you in working with Adobe Premiere.
- Understand the formats it supports. They include AVI, MPEG, MOV, MKV, VOB, MXF, , XAVC(S), DNxHDS and Prores 444, among others.
- Choose your format according to its end use or requirements. For instance, if you want to backup, go for the Prores 444 format since it retains video quality. If you wish to upload the video files to social media such as Vimeo or YouTube, the format is the best because it makes streaming easy and completes the process in the least time possible.
- Study each format properly before proceeding with the editing process. If you do not understand formats like DNxHD and Prores 444, it is advisable to take your time to learn them, so that you can always have the best choice.
When the process of how to import MTS to Adobe Premiere hits a wall, UniConverter can make things easier for you. It can convert MTS to a suitable format that is supported by Adobe Premiere. This tool should be your first choice because the process is very smooth and short. What’s more, there is nothing complicated, making it easy for you to understand and enjoy the steps. On the other hand, use the useful tips to understand Adobe Premiere.
Camera Video
- 1. Import Camera Videos to Apps
- 2. Play Camera Videos on Devices
- 3. Convert Camera Videos to Other formats
-
- 3.1 Convert MTS to MPEG
- 3.2 Convert MTS to MKV
- 3.3 Convert MTS to MOV on Mac
- 3.4 Convert MTS to 3GP
- 3.5 Convert M2TS to AVI
- 3.6 Convert M2TS to MP3
- 3.7 Convert MTS to WMV
- 3.8 Convert M2TS to MP4
- 3.9 Convert MTS to FLV
- 3.10 Convert MTS to Prores
- 3.11 Convert MTS to QuickTime
- 3.12 Convert MTS to iMovie
- 3.13 Convert MTS with Handbrake
- 3.14 TS to MP4 Online
- 3.15 Convert MXF to MOV
- 3.16 Convert VRO to MP4
- 3.17 Convert DVR-MS to MP4
- 3.18 Convert MOD to MOV
- 3.19 Convert MOD to MP4
- 3.20 Convert HDV Video
- 4. Camera Video Converters
- 5. Camera Video Tips

Brian Fisher
chief Editor