by Brian Fisher • • Proven solutions
How can I make a Gif from a video?
GIF continues to be one of the most common file formats. It is one of the file formats that you can quickly send to your WhatsApp, Facebook and other video sharing sites. With the continuous growth in technology, the low-quality GIF is quickly dying. Several tools have been established from creating GIF from video thus making the process pretty simple. Quality GIFs can be obtained through efficient GIF creators, and you can use a desktop or an online creator. The tutorials to make a GIF from a video are discussed in this article.
- Part 1. Best Video to GIF Converter - UniConverter
- Part 2. How to Make a GIF from Video in Photoshop
- Part 3. How to Create a GIF from Video Online
Part 1. Best Video to GIF Converter - UniConverter
With UniConverter, you can never go wrong with video to GIF conversion. The tool supports conversion of videos to GIF at an incredible speed, and you can convert almost any video format with this tool. UniConverter ensures a perfect transformation of videos by not interfering with the quality of your videos. It also supports batch conversion where you can upload multiple files and turn them at once.
Best Video Converter - UniConverter
Get the Best Video to GIF Converter:
- UniConverter converts any video and audio file. It supports more than 150 video and audio formats with others being added daily. It converts HD, standard, and DVD formats.
- The program supports convert of videos and audios directly to presets backed by mobile devices and Apple devices such as Apple TV.
- It harbors all the DVD tools that one may want. For instance, you can burn, copy, backup and convert DVD content.
- You can get the best editing tools in this converter for your video customization. For instance, you can crop, trim, merge, rotate, cut, delete, add special effects, change volume, saturation, frame rates, etc.
- The tool has an internal video downloader that helps the download of videos from more than 1,000 video sharing sites including YouTube, Dailymotion, Break, etc.
Step-by-step Guide to Convert Video/Movie to GIF using UniConverter
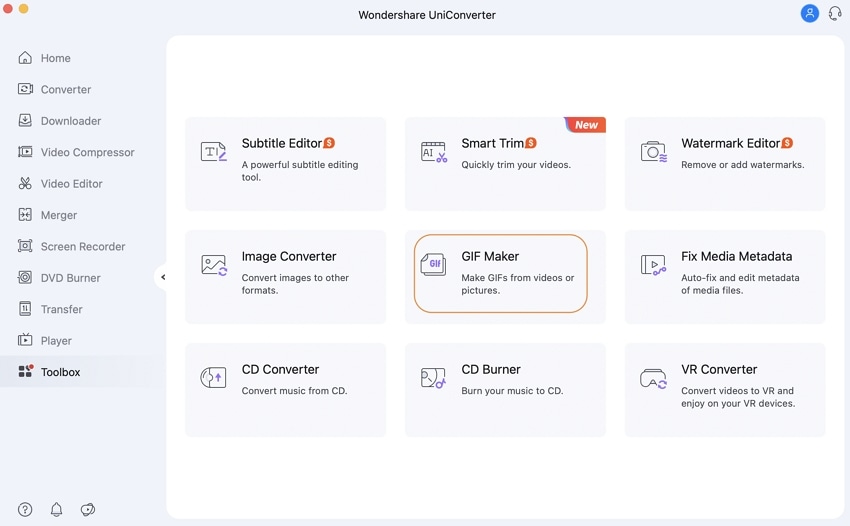
Step 1: Launch UniConverter and run the GIF Maker window
Start the iSkysoft iMedia Converter on your Mac or windows computer. On the top menu, click the “Toolbox” tab and from the list of options, click the “GIF Maker” option.

Step 2. Click “Video to GIF” to import the video file
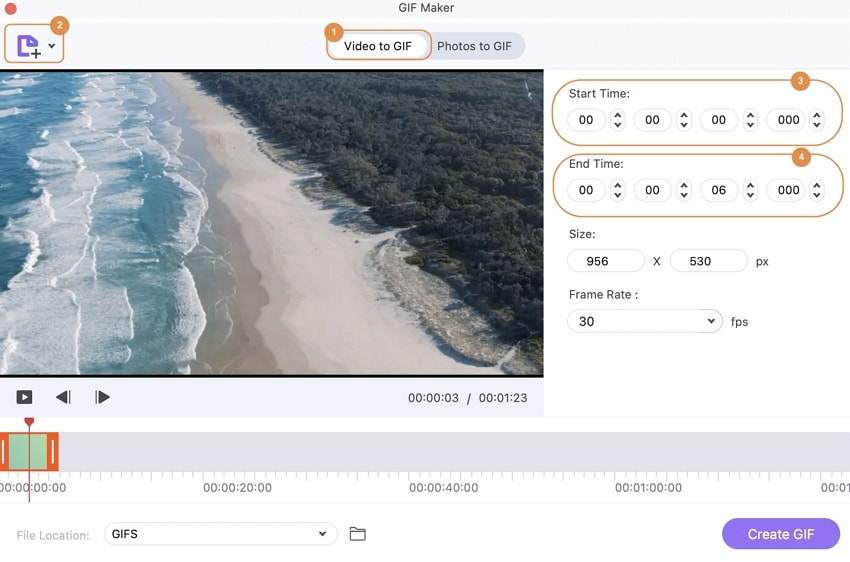
Once you select the GIF Maker option, two conversion options will pop up; Video to GIF and Photos to GIF. Select the “Video to GIF” option and click the “Add” button to import the video that you want to change to GIF to the video converter.

Step 3. Choose the desired Video Clip
Select the part that you want to include in the GIF. You can specify the video clip you want by dragging the arrow icon in the display window. You can also do it by specifying the starting time and the ending time of the video. You can set the frame rate, output size, and the output folder for your final GIF File. Once you are done changing the settings, click the “Create GIF” button to convert the video to a GIF file. Complete the process by saving the file to a defined folder. By default the GIF will be stored on UniConverter folder.
Tips: If you have a need to convert your pictures into GIF, UniConverter can also help you!
Part 2. How to Make a GIF from Video in Photoshop
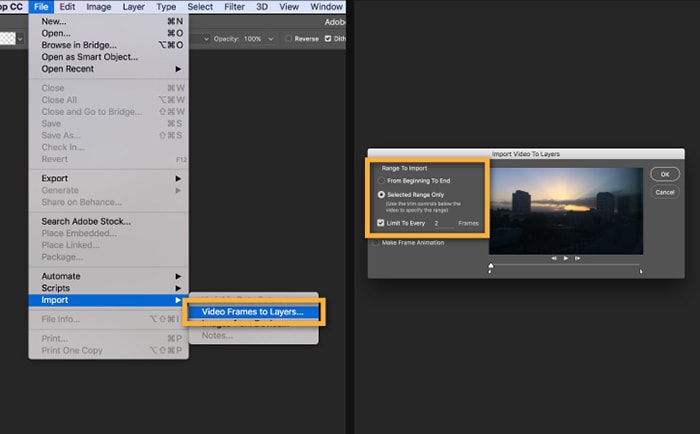
Step 1: Launch Photoshop on your computer. On the top menu in the Photoshop, go to “File” then click the “Import” button and then click “Video Frames to Layers”.
Step 2: In the pop-up explorer window, browse the video file from your computer. The supported formats are AVI, MOV, MPG, MP4, MPEG.
Step 3: You can cut or edit the part of the video that you want so that you do not have to make a separate video for that part. When the video is loaded into the application, select the range that you want to import. The options that are available are: “From beginning to end” and “Selected Range Only”. If you choose the second option, you should specify the part that you want by holding the “Shift Key” on the keyboard and slide the arrows back to cover the needed part.
Step 4: If you are done, click the “OK” button if the range is large, a popup saying “the frames will be limited to 500” will appear. Click “Continue”.
Step 5: The frames will be imported to the program as layers. You can delete, edit, or add effect to the layers like normal.
Step 6: When you are done with editing, go to “File” and click “Save for Web and Devices”.
Step 7: In the “Save” window, configure the settings before exporting the final GIF. You can change the image size, quality and looping options in this window.
Step 8: You can preview the GIF by hitting the play button on the bottom of that window.
Step 9: When you are okay with the results, click the “Save” to begin the exporting process.

Part 3. How to Create a GIF from Video Online
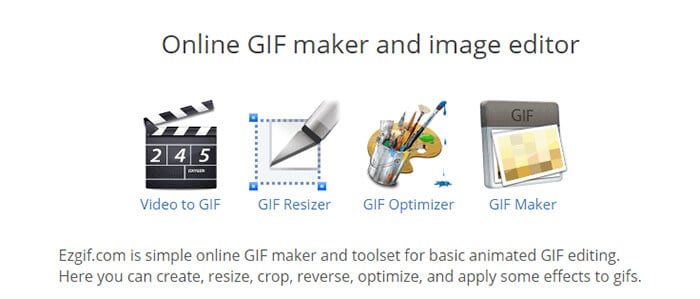
EZGIF is one of the best websites that offer the free creation of GIF from videos. With this converter, you can upload any video format such as MP4, AVI, WebM, WMV, FLV and other popular video formats. It helps turn videos to animated GIFs. Source videos can be uploaded from your smartphone, computer or they can be fetched from another server by URL.
How to Create a GIF from a Video using EZGIF:
Step 1: Choose a file to upload from your computer, or you can paste the videos URL. Then click the upload button to import the video to be converted.
Step 2. After the upload, you can choose the part of the video that you want to us by entering the start time and the ending time. If nothing is selected, the converter will select the first five seconds of the video.
Step 3: If you want to alter the dimensions of the GIF, you can use the resize and crop tools after finishing the conversion.


Brian Fisher
chief Editor