
Record Screen on Mac-UniConverter
- Show a gaming session, make tutorial video with customized settings.
- Record screen, audio and webcam simultaneously.
- Help you record a screen while working on another screen.
- Useful record timer to help you set the start and stop time.
- Convert, compress, and edit the recorded videos.
Screen recording has shown nothing but its effectiveness and efficiency when it comes to keeping records of online meetings, lectures, and activities going on in this digital age we reside in. Screen capturing becomes more fun when you have access to play a replay of a game for friends to watch, boasting about your achievements in the game. Whether you're a mac or windows PC user and you need a screen recorder to screen record a guide video, or the aforementioned events easily, there are thousands of screen recorders, but only in this article, you’ll get the good ones. So if you're looking for the best screen recorders or how to record your screen, you can explore this article.
In this article
Part 1. How to Record Screen with Built-in Recorders [for Basic Screen Recording]
Sometimes, not everyone wants a complete media workshop where they can screen record, edit the recorded screen, change the format, and all of that, all they just want is to have a quick record of an event that took place on their PC screen and nothing more. If you fall under this nomenclature, then here are a few screen recorders software for PC you can utilize.
Windows Xbox Game Bar
Windows Xbox Game Bar is a feature of the Microsoft Windows operating system that allows users to view the performance of their PC while a game is playing, tools to manage the game’s performance. The most important benefit readers of this article can get from this app is to utilize its screen recording option to record games and take screenshots from your screen. If you'd like to know how to record your screen using this app you can follow the steps below.
STEP 1
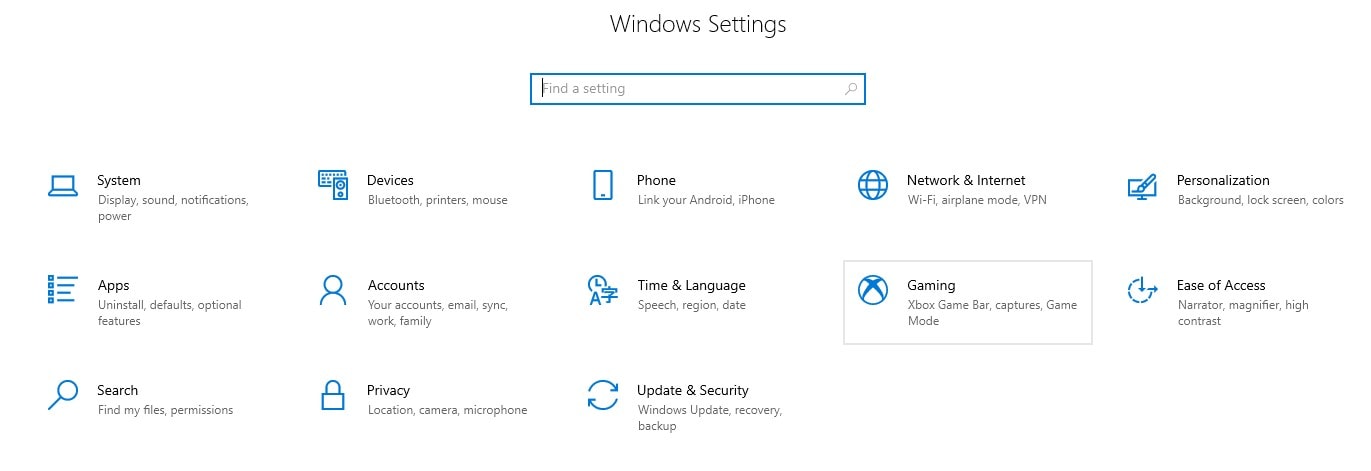
From the home screen of your PC click the start button > click the setting icon from the appeared menu > select Gaming from the setting menu you'll see.
STEP2
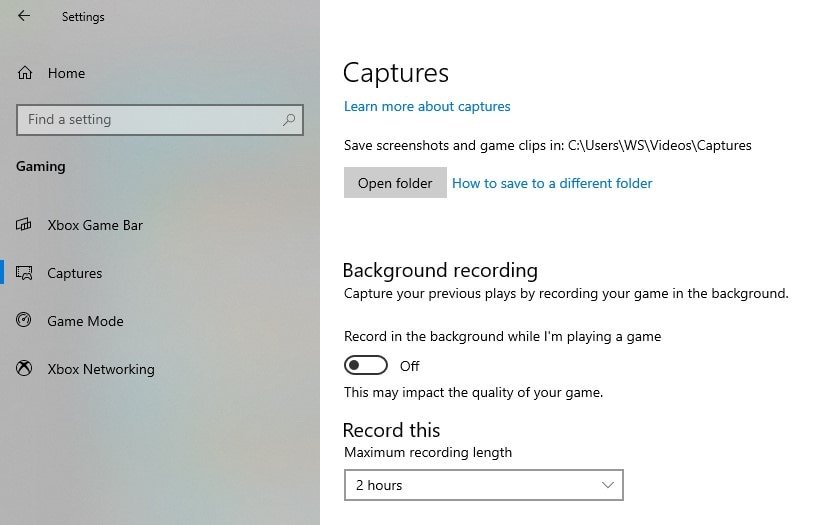
Once you open Gaming from the setting menu, click the Xbox Game Bar tab you'll see at the left side of the newly displayed interface > enable the togglebutton at the right side of the interface > go back to the left side of the interface > click on Captures and adjust every necessary parameter like file location, recording length, and more > once this is done, from your keyboard press the Windows button + G to open the capturing window
STEP3
Once it opens, from the newly click the third button ( Record button) to start recording > click the stop button on the newly appeared window at the right side of the screen to stop and automatically save.

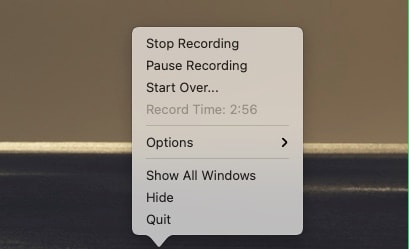
QuickTime Player
QuickTime Player is a product and property of Apple Inc. that basically functions as a media player giving the room for playing and watching movies, video clips, listening to audio files on a MacBook PC. Not Skipping the fact that it's a media player, the software has an embedded screen recording feature that allows you as a user to screen record from your computer. If you'd like to be a user of this feature, here are a few steps to guide you on how to record your screen.
STEP1
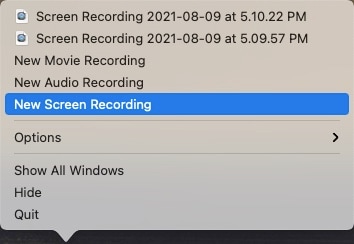
Launch the QuickTime Player on your Mac PC > once the apple media player opens, from the top left corner of the screen clickfile > select New Screen Recording from the drop-down menu. Also you can right-click the icon of QuickTime to select New Screen Recording option
STEP2
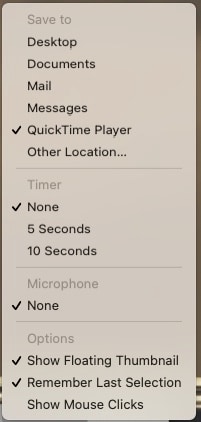
A new rectangular bar appears on the screen of your PC > click the options drop-down menu > include the pointer and choose a location to save your file.
STEP3
After adjusting and setting every necessary parameter, click on the Record button on the right side of the rectangular bar to start recording > stop when you're done recording

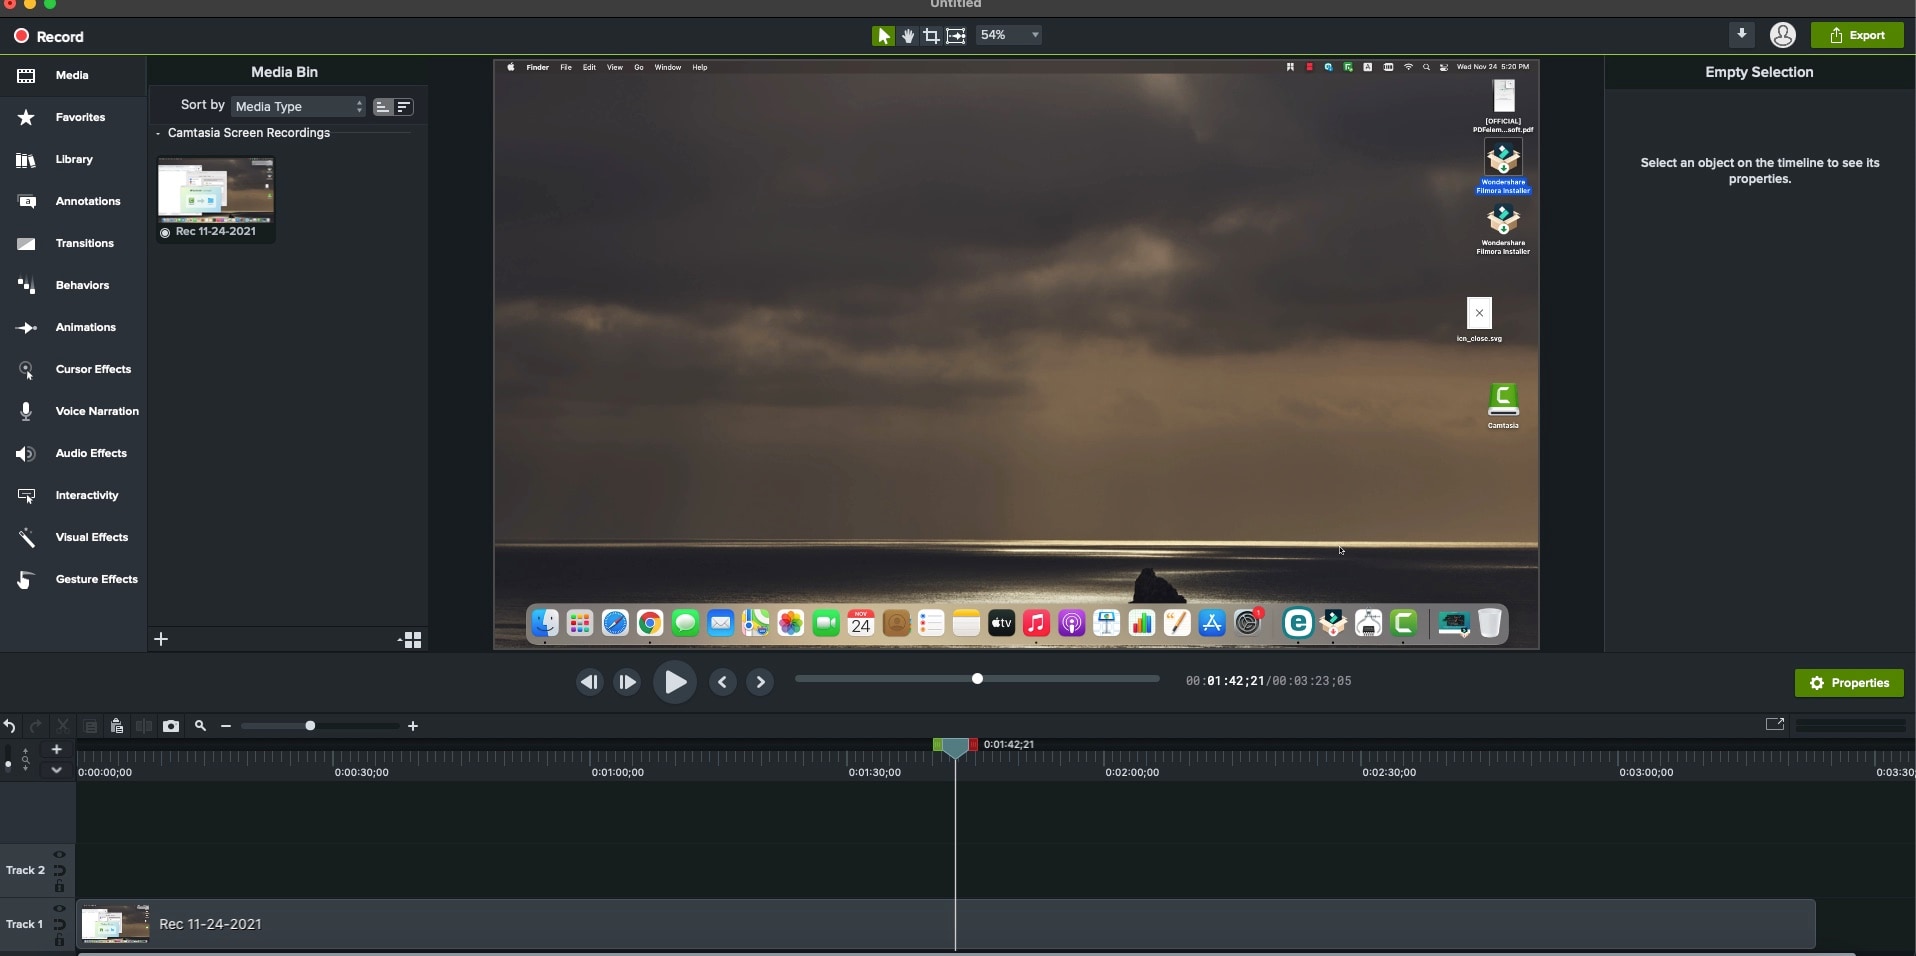
Part 2. How to Record Screen Using UniConverter 13 [for Advanced Screen Recording]
Without any doubt, we all know the power of screen capturing, or recording and it's important in the digital world we live in. Using a built-in screen recorder on your PC to record isn't bad at all, but sometimes we fall under the trap of app malfunctioning, unavailability of editing tools to customize the screen recorded file, and other uncertain risks, and seek to use a better screen recording app to achieve that goal. If you’re undergoing these issues, then the UniConverter 13 is best at your recommendation. UniConverter 13 is not just a screen recording software but functions as an intuitive interface that integrates a converter, downloader, compressor, merger, video editor, DVD burner, media player, and more in a single software. Aside from all of these, the screen recording feature of the UniConverter 13 offers an audio recorder, webcam recorder, and screen recorder that records in the highest possible qualities. As quality is what everyone desires, if you'd love to explore the features and still use the screen recorder of UniConverter 13 to do screen recording, then follow the steps below
STEP1
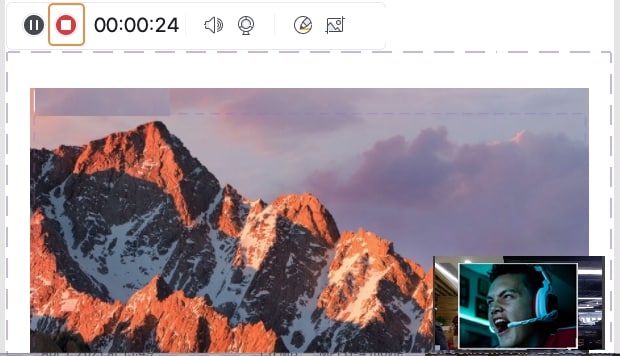
Download and install the UniConverter 13 on your PC whether are a mac or windows user > Launch it > once it opens, at the left side of the software interface click the Screen recorder tab > from the three displayed options, click the Screen Recorder option.
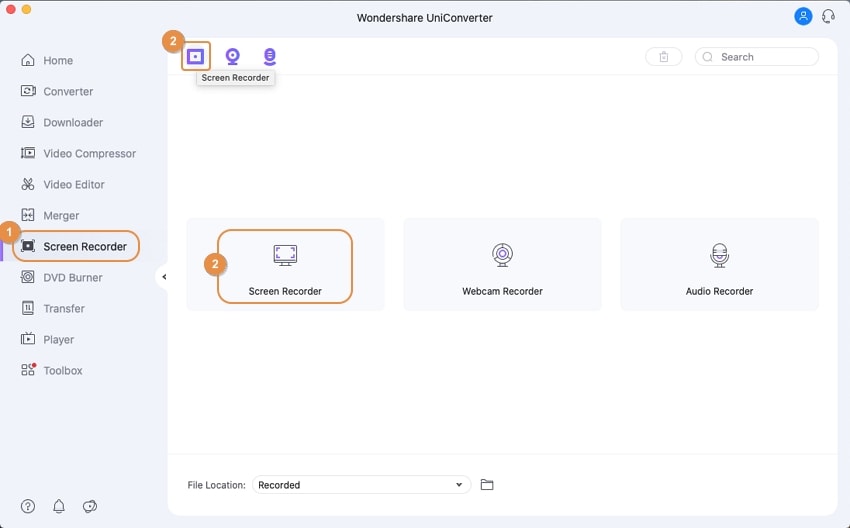
STEP2
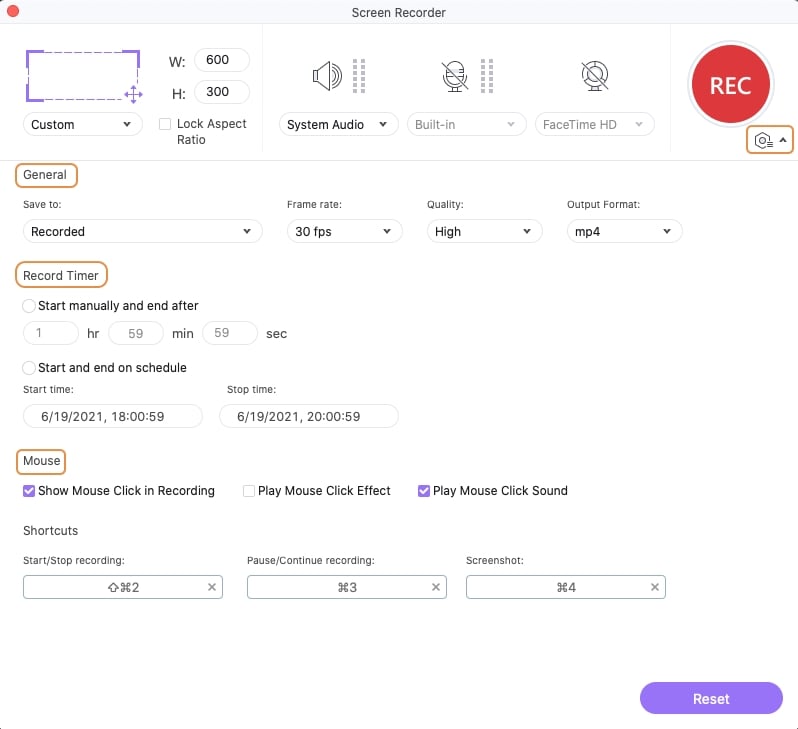
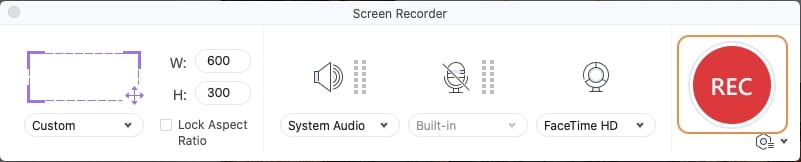
A new window labeled Wondershare screen recorder pops up. From the newly displayed window, choose if you'd like to record full or use a customized ratio using the dropdown option below the crop icon > enable the system audio if you'd like to record audio from the computer using its dropdown option > select a microphone if you want to input audio or voice notes in the recording >
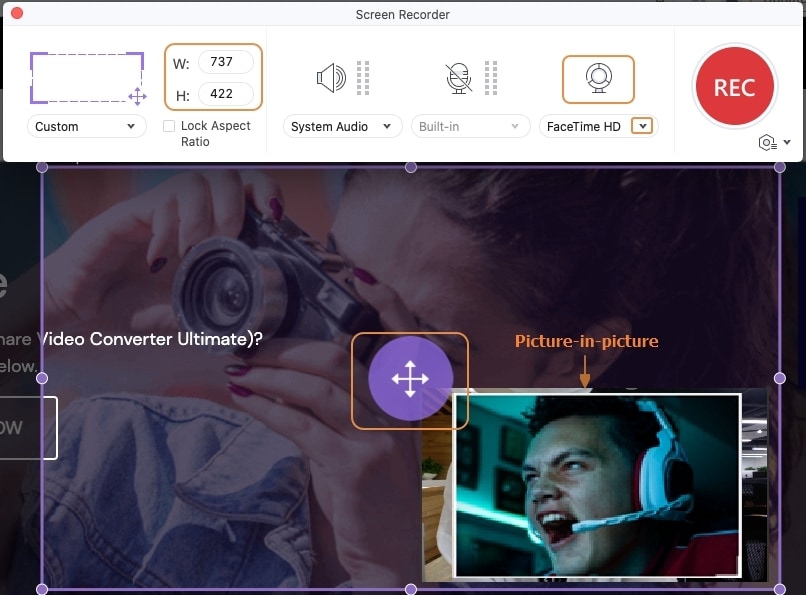
click on the Gear icon (settings) to set frame rate, quality, output format, and other available parameters you'll find on the interface. If you want to choose a specific screen to record, UniConverter 13 also offers the screen switching feature.
STEP3
Once you're done with all of these, click on the Record button to begin your screen recording > click on the stop button to end the screen recording.
Pros
As a user, you are allowed to record yourself with its webcam recorder, audio files with its audio recorder.
The software supports multiple audio and video formats.
It allows screen switching.
Cons
It requires you to be a subscriber before you have a 100% conversion
Subscription is a little expensive if you're a user in search of an ordinary screen recorder
Its offline version only supports mac and windows PC although it has an online version that supports all devices
Wondershare UniConverter 13 - A Complete Meida Toolbox
5,481,435 people have downloaded it.
UniConverter supports many formats and handles conversion equally, ensuring that high quality is delisered at all times.
During the conversion process, you may add multiple files since the program does batch conversion of files.
You can use the editing suite that covers subtitle editing, watermark editing, etc to make your results creative masterpieces.
This software facilitates file transfer to devices like Android and iPhone among others once the conversion is complete.
UniConverter is also capable of handling video compression hence ensures you acquire the video sizes you desire.
Part 3. How to Record Screen with TechSmith Camtasia [for Professional Screen Recording]
Just in case you'd like to go with software that will offer you nothing but a satisfying taste in screen recording and advanced editing, then you can cop the TechSmith Camtasia. TechSmith Camtasia is another wonderfully developed software you can utilize as a screen recorder to record webinars, online lectures, software tutorials, and more with a guarantee to edit the video in the best format using its intuitive tools. With TechSmith Camtasia, you're open to a lot of editing features that permit you to add music, animations, audio and visual effects to your videos. If you'd like to use TechSmith Camtasia to record your screen, then make the steps below useful.
STEP1
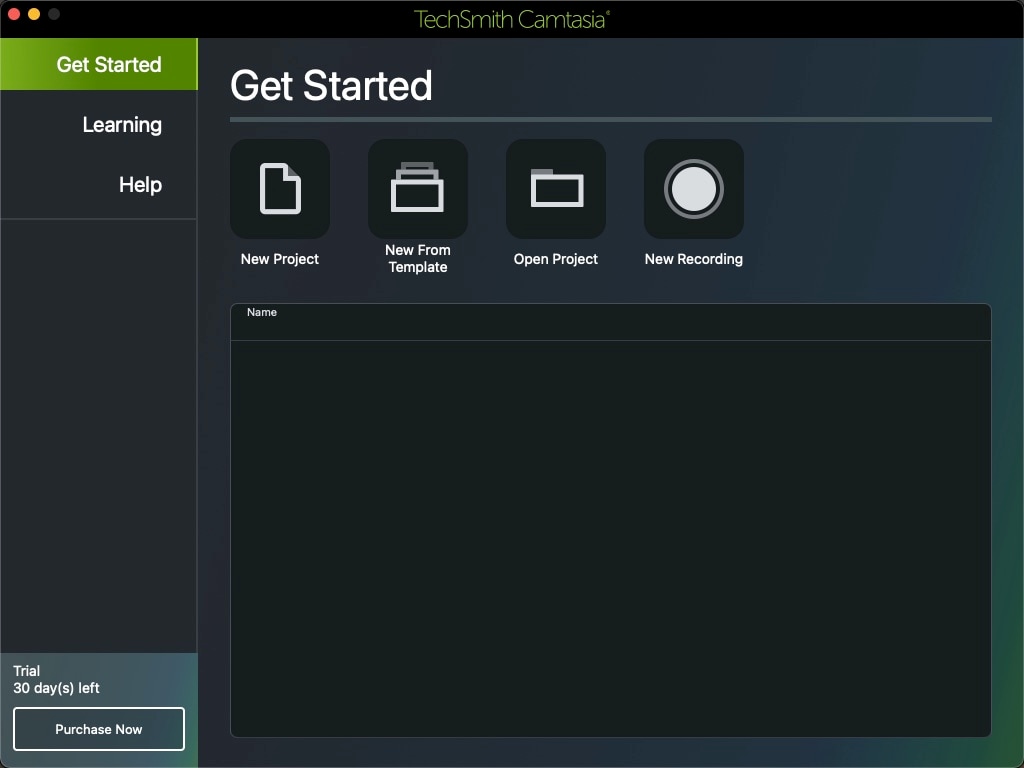
If you have TechSmith Camtasia installed on your PC launch it > if you don't have it installed on your PC whether is a mac or windows pc, you're permitted to download it > once it opens after launching you don’t need to start a new project before using the screen recorder because automatically appears on the screen of your PC.
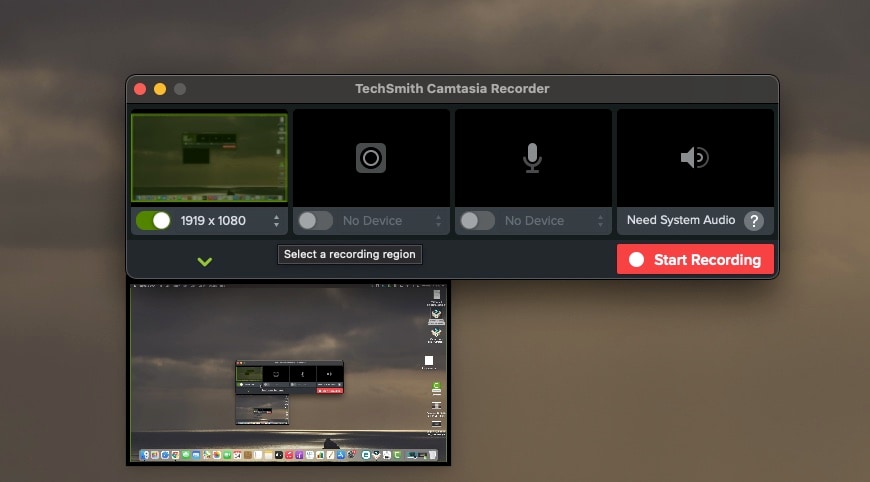
STEP2
A new rectangular screen recording bar displays > enable the toggle button for screen recording > enabletoggle button for webcam if you'd like to capture yourself while recording your screen > enable the toggle button for the microphone if you'd like to record your voice while screen recording > enable the toggleswitch for the system audio to record sound from the computer.
STEP3
Once you're done setting every requirement to enhance a smooth screening capturing, click on the Start Recording button to start > click on stop recording to end the process.
Note: Immediately you click on stop, the screen recorded file automatically loads to TechSmith Camtasia editor where you can edit and add effects.
Pros
TechSmith Camtasia offers a trial version
Advanced tools to enhance video editing.
It can be recommended for professional use
Cons
Limited features when using its free version.
TechSmith Camtasia is a expensive screen recorder.
It requires steep learning for users.
Part 4. Tips for Screen recording
- Ensure that the part of the screen you're recording doesn't capture any distraction (distracting item).
- Since music tends to catch a lot of people's attention and also ease their minds, ensure that you add background music to your recording.
- Quality matters a lot. Nobody would love to watch an unclear video or low-quality video, so ensure that you record in the highest possible quality to make every detail on the video clear.
- Nobody wants to view or listen to useless information, so make sure you trim unwanted parts with irrelevant detail from the video.
More tips to record screen: If you want to edit your recorded videos, UniConverter-a complete toolbox can help you be a better creator or presentor. Or if you are searching for some ways to record audio, UniConverter can also provide solutions.
For Win 7 or later (64-bit)
For macOS 10.12 or later
