Enhance Your Recording Experience-UniConverter
- Help you show a gaming session, make tutorial video with customized settings.
- Record screen, audio and webcam simultaneously.
- Help you record a screen while working on another screen.
- Useful record timer to help you set the start and stop time.
- Convert, compress, and edit the recorded videos.
Window screen recorders have become crowd-pleasing for this 21st-century generation. We can do quite different things just by capturing our activities on PC and displaying it to the people who might need the video. Windows 10 screen recorder has been productive, especially when you want to record a convention, advertisement, instructional video, online business transaction for your social media page, software program, and mobile device application.
You can record screen in win 10 to instruct your co-worker, employees both old and new, to show them how to make use of your software tools, you can also use the method of screen recording to share your skills with other people for them to solve some certain issues in their home, or any other computer program on their system, how they record webinars, how to dye cloth, do makeup on their date, how to draw using 3D and others.
In this article, we'll list some screen recorders on Windows 10 that will be helpful to record your computer screen with steps that will be used as a guideline to complete the process.
Part 1. Try 4 free Windows Screen Recorders without Expense
Bandicam
Bandicam is a screen recorder with a friendly interface that comes without any expense. The software allows you to record everything you want on your Windows 10 computer. The software program records and saves your file in distinctive formats such as MP4, MKV, WEBM, AVI, and other files. It is one of the best computer screen recorders for people who love to stream video online on their system, people who love to share their skills, people who love to be creative with video content, students that wish to know more with their other course-mates or friends, managers who instruct their employee.
Bandicam is a light and powerful software to do screen records for Windows, most especially for interviewing clients. It won't slow down the work of your computer nor require large space for you to deal with. It takes about 5 – 6 minutes to learn if it's your first time making use of the software.
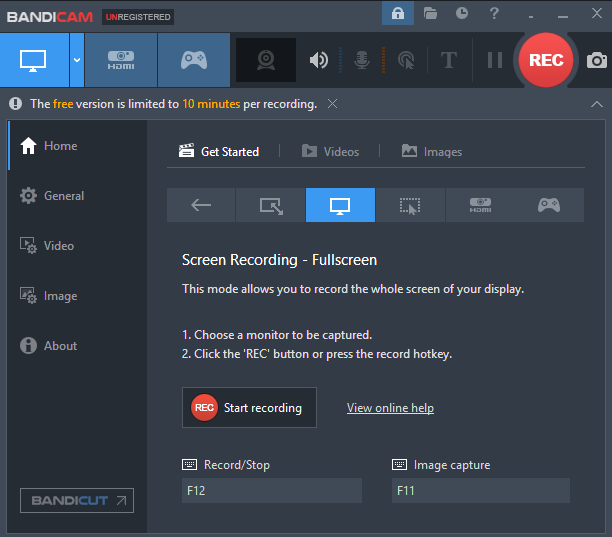
Steps in using Bandicam to screen record
Step 1. Open the application software
Step 2. Start to record by choosing the full mode, or you can also select the recording area just like other applications.
Step 3. Click on the red record button to start and stop the capturing. You can also make use of the F12 hotkey as a shortcut.
Step 4. After recording and saving the file, press the home icon to edit, play, delete and upload your videos.
Pros
It does not slow down my system
Easy to use
It cost much less
Cons
It requires additional software to edit
It's not free
It has a technical issue
ScreenRec
Screen res is free video capture Windows 10 software that allows an individual to capture both screen and computer audio. It functions as software to create online tutorials, learn to do, stream video recorder, record conferences for business purposes. And it can also screenshot the entire screen of your windows instantly for editing. You can record your voice with a microphone along with the screen record, It is a lightweight screen recorder that comes with no expense and is easy to operate, and it requires no background knowledge. Once you're done downloading the software, install it and become a member creating an account. You'll then begin to capture images or videos on your screen. You can make use of the steps highlighted below:

Step 1. Download and install ScreenRec screen capture for Windows 10, launch the software after installing it. Press the Alt + s key to select the designated area to be captured.
Step 2. Click the 'video camera button' to start capturing your screen. You can record the audio with the system microphone, and you can also make use of an external microphone for the audio.
Step 3. When you're done recording, you'll be given a link for you to share the video with your friends or publish it on your blog or website.
Pros:
It is suitable for windows screen recorder.
It's easy to use.
It does not have a watermark.
Cons:
You can record for a long period.
It does not have any feature to edit the videos you've recorded.
Video can't be saved in a different formats.
Screencapture.com
Screencapture is notably one of the easiest web-based Windows 10 screen recorders that capture your PC online without downloading the software. It works for windows with no restrictions to the duration of the record. You can capture as much as pleases you. It's excellent for capturing gaming videos, demos, lectures, PowerPoint presentations, messages to friends and other people. You may use the free online screen recorder with your computer audio and webcam connected to your system to create high-quality screen recordings with the inclusion of audio and video.

Steps in using screen capture to screen record on PC
Step 1. Make sure your PC is connected to a Wi-Fi connection to ensure smooth running. Also, your browser must support screen capture. Open your default browsers such as Firefox, Chrome, and others and log on to screencapture.com and click start recording.
Step 2. There will be a pop-up message with options to record the full screen, single window, or choose the area you intend to capture and click on ‘Share’.
Step 3. Immediately you click on share, your capturing will begin. When you're done, click the 'stop recording' icon, and it will take you to a window to download your recording.
Pros:
It can record from Skype
It has an excellent level of tutoring beginners
There are lots of capturing tools
Cons:
It doesn't save the record after some hours of usage
It's a buggy website
It does not come in a different format
Flexclip
Flexclip is an ultimate program designed for Windows 10 record screen, which is used to create a video for social media networks across the globe. It is an online video editor that is suitable for users who are a novice to screen recording on Windows 10. It allows you to create remarkable videos in seconds. You don't have to be a professional to make video essays, advertisements, lecture videos, invitations, and conference videos, all you need is just Flexclips features, and you're good to video capture on windows 10.
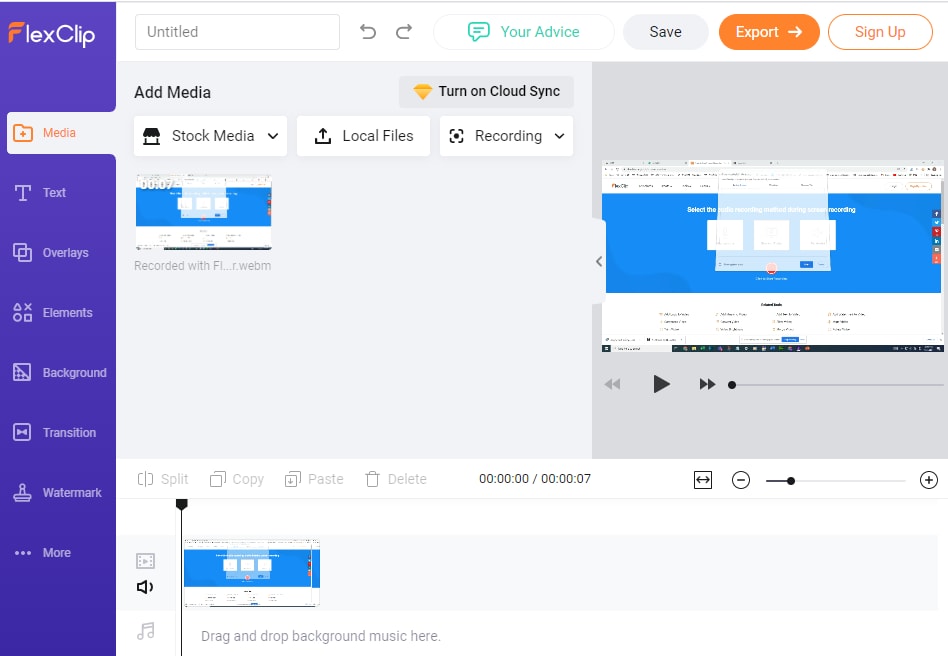
Steps in making use of Flexclip
Step 1. Visit Flexclip online screen recorder and click on the start recording button.
Step 2. Choose the audio recording method and click on the red circle button to start capturing.
Step 3. Highlight the full screen or the particular window you want to record, click 'share' to record the screen. When you're done capturing the screen, you can use flex clips powerful video editor to cut, add annotation, add subtitles and increase the speed.
Pros:
It's easy for a starter to make use of the tools
It is affordable
A free plan is available
Cons:
It can't be used to create a script
You can't add text to speech
You have to pay to have access to some features
Part 2. Do Advanced Recording with Paid Windows Screen Recorders
Uniconverter
Uniconverter is magnificent software from wondershare that is used for screen capture for windows 10. Compared to other software products that cannot capture an entire screen, your webcam or limited editing tools and other features, Wondershare Uniconverter is the best desktop-based program that can operate on all the latest versions of Windows, which is useful for a user that runs a YouTube channel, software review, Online lectures, and online marketing. It makes you record a piece or the full screen of your desktop screen in an easier way. You can also make the picture-in-picture screen recording, and edit the recording by trimming unwanted parts, adding background music,selection of the file parameters, setting the start time and stoppage time of screen capturing, merging clips to your satisfaction, converting the screen capture to different formats, increasing the audio's volume, adding watermarks to your file in order to brand them.
Lastly, the software makes it easy to import video files from your camera or mobile devices. You can import videos from your video editing applications, converting your phone, laptop, YouTube videos to HD or 1080p resolution.
Steps in using Uniconverter
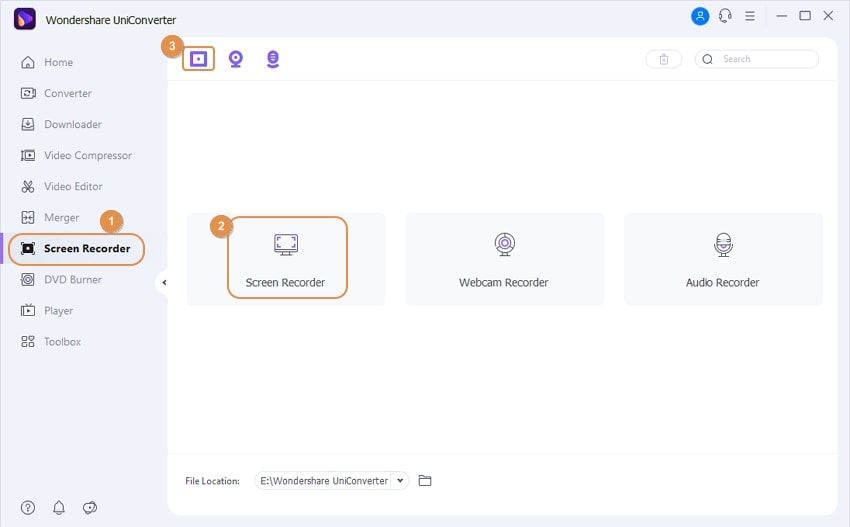
Step 1 Open Uniconverter and begin to record
Open the Software and click on Screen Recorder on the drop-down menu on the left. Choose the Screen Recorder option from: webcam recorder, audio recorder, and screen recorder.
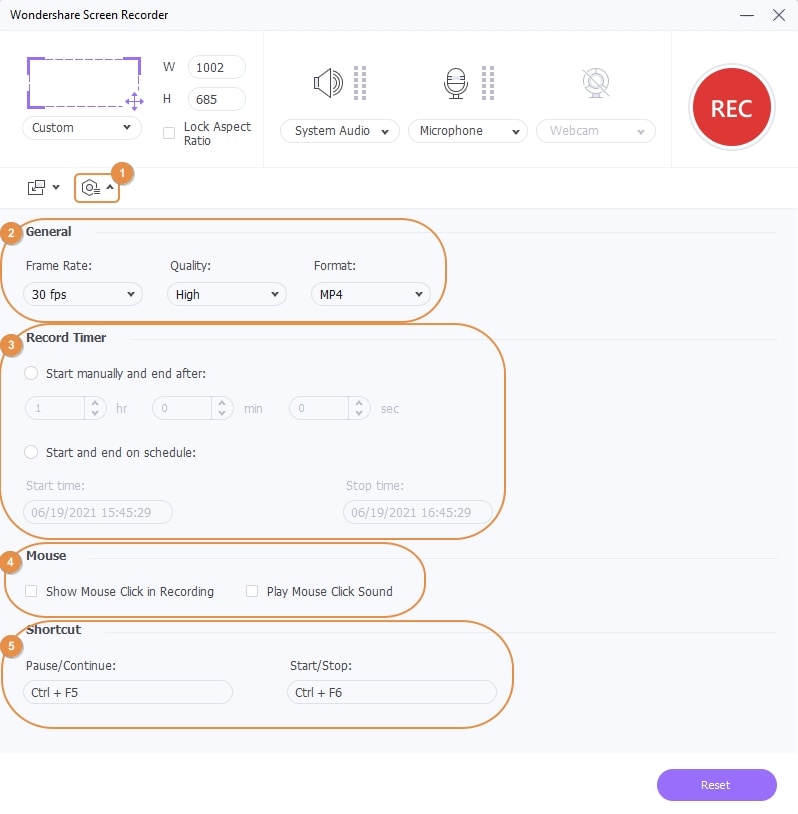
Step 2 Set your preference
You have to configure the part of the window you want to record. You can also input the size manually by increasing it vertically, horizontally, or at the edges. Choose your audio device and click on the REC icon to start recording.
Step 3 Save your file
When you're done recording, click on the Uniconverter icon showing on your taskbar. You can pause and stop recording.

Pros:
It converts the file into different formats.
Easy to use
It can be used to compress the file of the video
Cons:
It is not free
It can not capture two screens at the same time.
Camtasia
Camtasia is a Windows 10 record screen that helps you create content for your viewers to watch and catch their interest. It is a desktop app that does not require any enthusiast skills before you can create your video, which is quick to learn and adapt to.
The desktop software allows you to record every information on your Windows 10 websites, video calls, presentations, online games, software package, and even add text, transitions, effects, and other tools for video editing. Other features include; template, simplified editing, screen recording options, web camera capture, audio recording, background music, media import, and annotations.
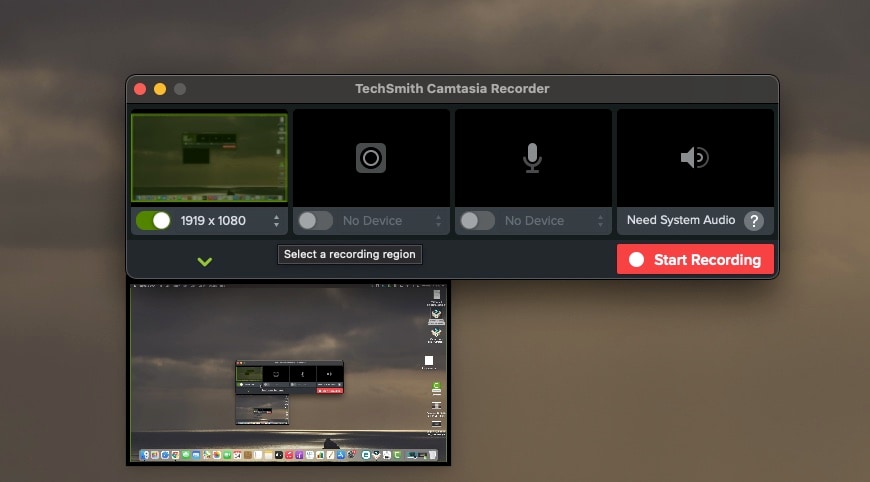
Steps in screen recording with Camtasia
Step 1: To start recording, you have to open the app then click on the red button at the top of the taskbar to start recording. Generally, Camtasia will record everything that appears on your PC.
You can change the settings by changing the options to 'select area to record'.
Step 2: Click on start after setting your preference
Step 3: You can stop, trim, add annotations, effects, subtitles while recording. Save your file when you're done recording.
Pros:
It's easy to use
The software comes with different features
Instruction is available for first time user
Cons:
It doesn't function well when dealing with large files
There are glitches
The software is not free from bugs
Snagit
Snagit is a screen record Win 10 tool. Snagit allows its user to display their creativity and other skills to help other people who need to learn. It is designed to let you record yourself while lecturing, modifying, or establishing your work. You can take a screenshot by pressing Alt + Prt Scr keys on your keyboard, and also you can also blur some sensitive information, add exciting callouts in your videos.

How to screen record with Snagit
Step 1: Open the Snagit app on your window 10, select the area to be captured (full screen, part of the screen, or half of the screen). Start your capture by clicking on the red button.
Step 2: The video tool allows its user to select audio and webcam at a time. Change the stings of your audio if needed.
Step 3: Edit your video. The moment you're done capturing your screen, click the stop button; the screen recorded will appear in Snagit editor for you to preview your recordings and cut out unnecessary parts of your video.
Pros
It's user friendly
It exports your file to the cloud
GIF maker
Cons
It is expensive
You can't edit the outcome of the video
The interface looks outdated
iSpring Suite
Ispring suite is a screen capture video windows toolkit programmed and designed for e-learning. It can be used for a course authoring tool, conversation stimulator, professional video studio, interaction editor, and other tools for online training. The tools allow its users to make screen capture for windows 10 with voiceovers, video tutorials using annotations, subtitles, add a comment, and share them with others in minutes.
Steps in recording with iSpring Suite:
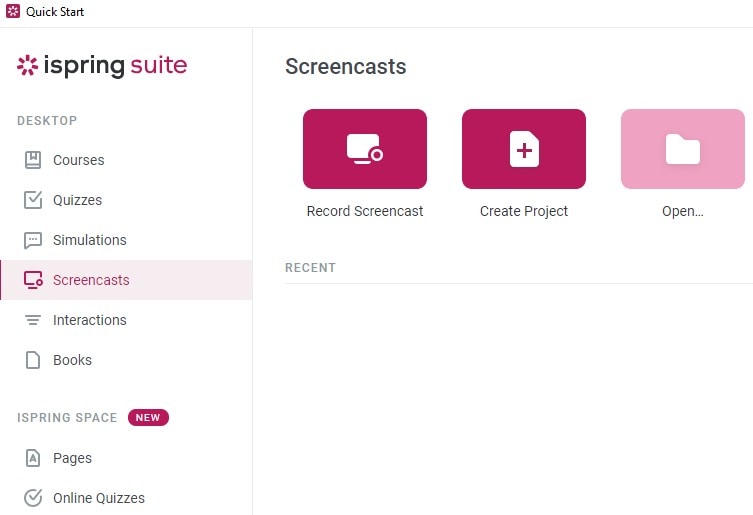
Step 1: Click on screen recording to start capturing and carefully select the area to be captured from the resolution pop-up menu button.
Step 2: Click Done when you're done recording, or make use of the F10 key on your keyboard.
Step 3: You have options to edit your video with iSpring video editor when the 'view recording pops up. Save your video file in .mp4 format and upload it to your social media pages or into your presentation.
Pros:
You can record a narration
No time restriction for capturing
You can record to video at the same time (i.e, screencast and webcam)
Cons:
The only format available is mp4
Some of the features are inconsistent
Group work is limited
Wondershare UniConverter 13 - A Complete Meida Toolbox
5,481,435 people have downloaded it.
UniConverter supports many formats and handles conversion equally, ensuring that high quality is delisered at all times.
During the conversion process, you may add multiple files since the program does batch conversion of files.
You can use the editing suite that covers subtitle editing, watermark editing, etc to make your results creative masterpieces.
This software facilitates file transfer to devices like Android and iPhone among others once the conversion is complete.
UniConverter is also capable of handling video compression hence ensures you acquire the video sizes you desire.
For Win 7 or later (64-bit)
For macOS 10.12 or later

