
Enhance Your Recording Experience-UniConverter
- Help you show a gaming session, make tutorial video with customized settings.
- Record screen, audio and webcam simultaneously.
- Help you record a screen while working on another screen.
- Useful record timer to help you set the start and stop time.
- Convert, compress, and edit the recorded videos.
Screen recording has proven to be nothing but one of the best options to lecture and teach people how to do a particular task by making tutorial videos and presentations. Countless times, we love to record screens with audio when playing games to replay an action scene, record video and audio from the screen when watching or streaming them from an online platform using the best screen and sound recorder. Suppose you are finding it difficult to screen record desktop with sound on your PC. In that case, you do not need any consultation because this article you're reading right now contains the one little big secret you've been looking for on how to easily screen record on your mac or windows PC whether it's online or offline. With no time taken, you can scroll down and see a few good screen recorder that records audio to make the right decision.
Part 1. How to Record Screen with Audio Using Built-In Recorders
Xbox Game Bar
If you've got a windows 10 PC and you're still looking for a screen and audio recorder to use, then you've been stressing the whole time. Game bar is a built-in feature of Windows 10 that functions as software to record screen and audio directly from your PC. So if you wish to screen record games and you've been finding it difficult, you can kindly follow the guidelines below to make the screen recording process easy for you.
STEP1
First of all, you don't need to download or install any software on your Windows 10 PC. Just ensure that your PC is booted. Now press the windows button from your keyboard or click the start windows icon at the bottom left corner of your screen > go to Settings or Click the Gear icon and select gaming.
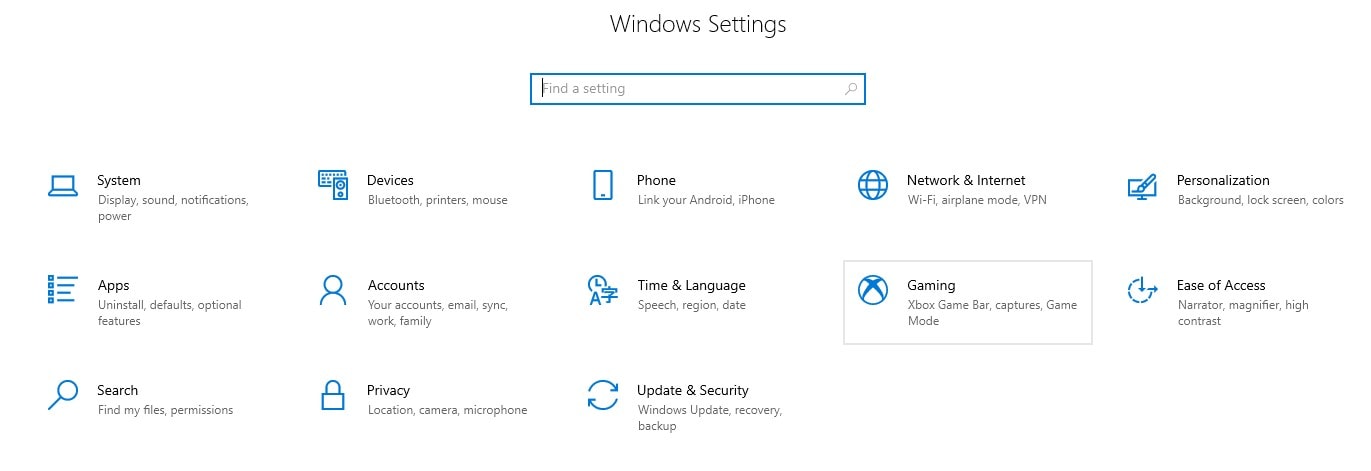
Alternatively, you can use the search box and type the game bar or press the Windows key + G.
STEP2
After pressing the Windows key + G or using any alternatives to open the Xbox game bar, the screen recorder with an audio interface opens. Once the screen recording window is opened, click the gear icon located at the right hand of the Xbox bar at the top of your screen > go to capturing from the displayed menu options > from recording, enable the available options if you wish to record in the background or show microphone recording notification > from the Audio To Record tab select if you'd like to record the system audio, enable mic and more.

STEP3
Now open the game you wish to record > open the recording window and click the record button to start recording > click on the stop button on the right side of your screen to end the recording.
Pros
Xbox Game Bar is completely free
As a Windows 10 user, you don't need to download or make any installation because it is built-in
The free built-in screen recorder gives users the chance to monitor the performance of their PC.
Cons
Although it is a computer screen recorder with audio, it only supports game recording.
No editing tool
It doesn't support multitasking.
QuickTime
Just in case you're a Mac OS user, you are not left out. QuickTime player is a macOS-compatible media player that permits mac users to play or stream videos and audio files from their PC without any problem. The software gives users the chance to screen capture with audio despite being a media player. If you are interested in utilizing the media player as a screen recorder with internal audio, you can vividly follow the guidelines below.
STEP1
Firstly, download a little plug called Soundflower > after downloading, ensure that you install the software on your Mac PC. Once you're done, go to your system preferences > select Sound, then select the Soundflower output option.
STEP2
After installing Soundflower, open the Audio MIDI Setup. Once the window opens, at the bottom left of the Audio MIDI Stepup window, click the + icon and select Create Aggregate Device from the drop-down menu > set every important parameter like the built-in microphone, Soundflower, sample rate, and more. After doing this, click on the + icon again > select create multiple output device from the drop-down menu > you can rename the set up if you like > from the newly appeared window choose your master device as Built-in output and Soundflower. Then, you can close once you're done with the step up.
STEP3
After this is done, before you start recording, ensure that you go back to your system preferences
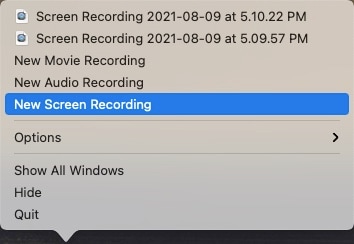
> select Sound > click the Output tab located at the top of the interface > choose screen record with audio. Now open your QuickTime Player > click on File > select new screen recording to screen record > Click on File again > select New Audio Recording > from the Audio Recording window, select the drop-down icon beside the recording button to select your saved input and output presets > Now you can click the record button to screen record with audio.
Pros
QuickTime player is easy to use
It plays videos and audio files of different formats
QuickTime supports iTunes sharing
Cons
QuickTime has a pro version which is a paid version
Users are not allowed to screen record large-sized files
Screen recording with audio using QuickTime player is quite complicated and requires deep learning for any user
Part 2. How to Record Screen with Audio Using Advanced Recorders
No one is disputing the fact that a built-in screen and voice recorder could be used to record video and audio from the screen of your PC. Still, the truth can't be hidden because when it comes to screen recording with a microphone, webcam, and more, delivering the best output quality, screen recording large files, and more, a built-in screen recorder with voice will limit your perspective on the kind of output you intend to have. This is more of a reason why we've introduced a few good programs to record screen and audio on your PC.
Uniconverter 13
Uniconverter 13 is an exceptional and easy-to-use integrated product of wondershare that allows you as a user to record desktop with sound using its built-in features that includes using an external or built-in microphone, webcam, record system audio, and many more. Apart from being a screen recorder that records internal audio, the integrated software offers a variety of media working and editing tools like a converter, downloader, compressor, merger, video editor, media player, and more, which can be utilized to enhance your screen recorded file. If you would like to use the professionally made Uniconverter 13, then kindly follow the listed steps below.
STEP1
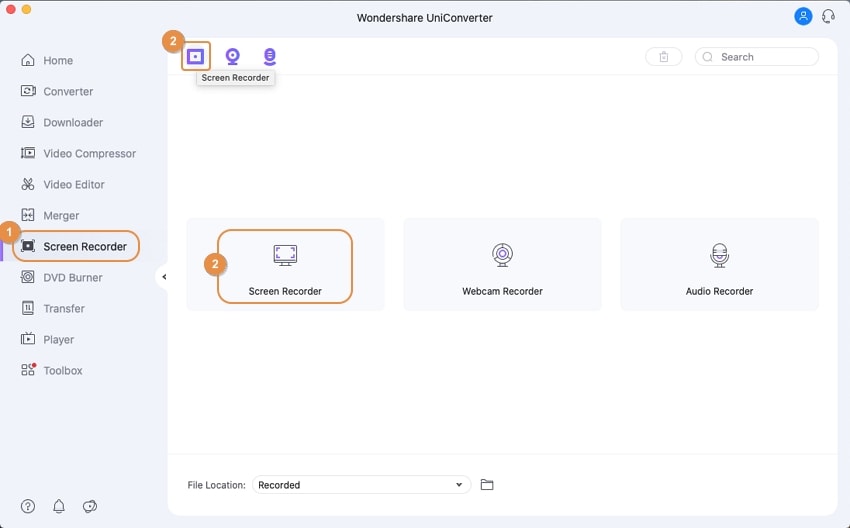
Download and install the uniconverter 13 on your Mac or Windows PC. After the installation of the software, launch it and select the Screen Recorder option from the left side of the displayed interface > then choose Screen Recorder from the three appeared options.
STEP2
Once you choose the screen recorder option, a new window or interface opens, displaying numerous options you can utilize to have a perfect screen recorded output. From the top left of the interface, you can set the crop ratio of your computer's screen If it's full screen or a custom ratio you prefer by clicking the drop-down icon below the crop icon, Set the System Audio by using the drop-down icon below the loudspeaker icon since you'd love to use a laptop screen recorder with audio. Also, if you'd like to screen record with voice over your recording, then utilize the drop-down icon under the microphone icon you'll see to select your microphone type, whether it's built-in or external. Just in case you want to make a tutorial video and you wish to appear in the background of your screen recording, you can click on the webcam drop-down icon > select the camera you want and choose your preferred pic-in-pic resolution.
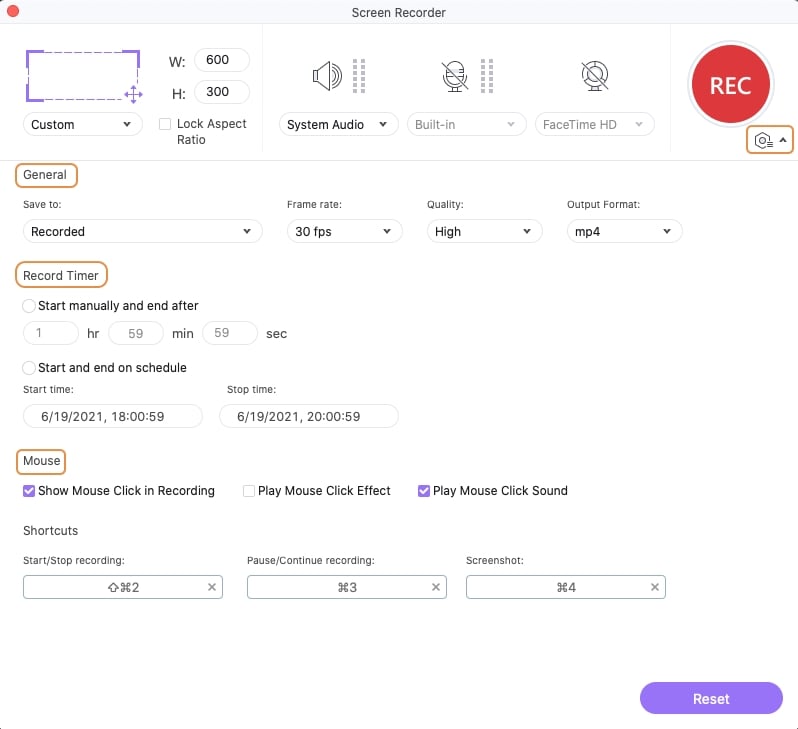
Note: if you'd like to set frame rate, quality format record timer, show Mouse click in recording, play mouse click sound, or create shortcuts, the uniconverter 13 screen recorder permits you to do that. All you need to do is click the gear icon beneath the crop ratio drop-down option and make every necessary adjustment.
STEP 3
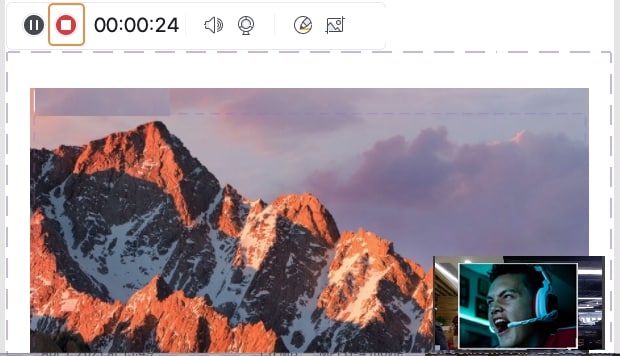
Once you're done with everything, click the REC button to begin the screen recording process > click on the Stop button to end it once you're done.
Pros
Uniconverter 13 has a beautifully designed interface that is simple and understandable.
The software is loaded with several tools you can utilize as a user to perfect your screen recorded files.
It offers a free version and still supports numerous audio and video formats.
Cons
It offers a paid version which some users might find unpleasant.
You can't have a 100% output delivery as a free version user but only 30%. So you need to be a subscriber with a subscription plan before you can have a 100% output.
The offline Uniconverter only supports mac and windows PC.
Wondershare UniConverter 13 - A Complete Meida Toolbox
5,481,435 people have downloaded it.
UniConverter supports many formats and handles conversion equally, ensuring that high quality is delisered at all times.
During the conversion process, you may add multiple files since the program does batch conversion of files.
You can use the editing suite that covers subtitle editing, watermark editing, etc to make your results creative masterpieces.
This software facilitates file transfer to devices like Android and iPhone among others once the conversion is complete.
UniConverter is also capable of handling video compression hence ensures you acquire the video sizes you desire.
OBS
OBS is another offline screen recorder that records internal audio. The software offers users the opportunity to screen capture movies, presentations, online tutorials, and more all from their computer systems without any time limit restricting them not to screen-record large-sized files in high quality. Just like any other professional screen video recorder with audio you know that supports windows capture cards, microphones, texts, images, and more, OBS also plays that role. So just in case you're looking for a screen and voice recorder, then you can also use OBS, which means Open Broad Software, and here are steps you can take to guide your recording process.
STEP1
Download and Install the OBS Studio on your PC. Launch the software once you're done installing it. Immediately the OBS studio opens, at the left down corner of the interface, you can add your sources i.e. the display and audio you wish to record from the PC.
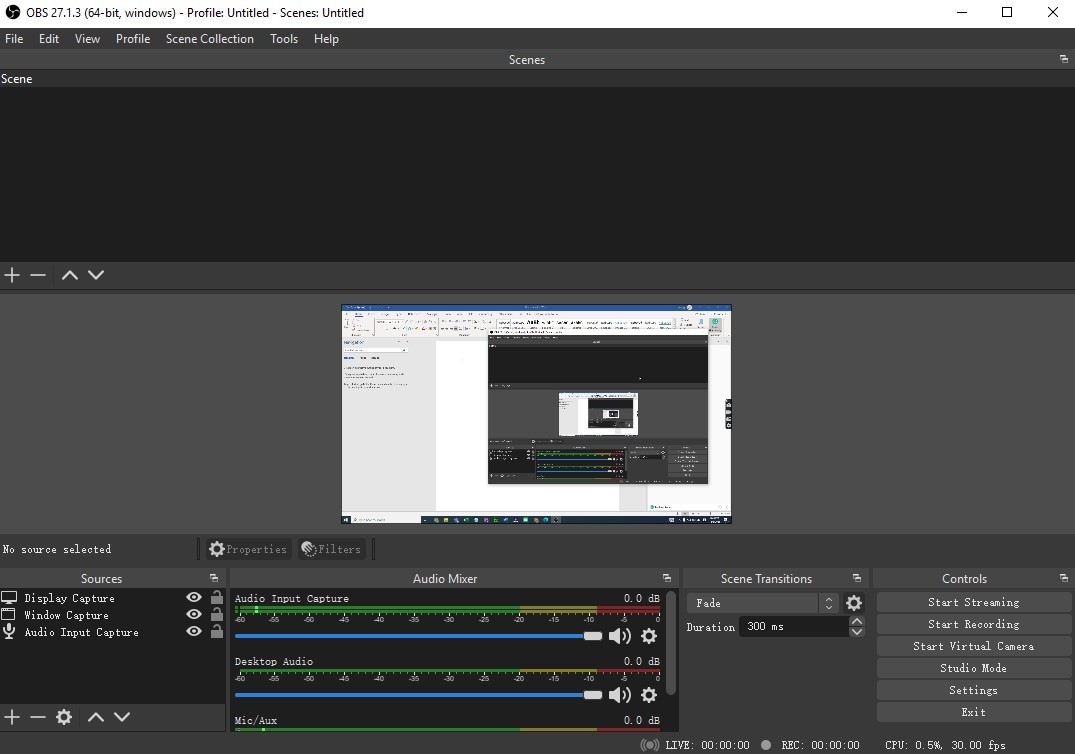
Note: just in case the sources are not there as default, then you can kindly right-click on the source interface, select Add from the displayed menu > select Audio input capture and Display Capture from the same menu to select the audio input and the monitor you wish to record respectively.
STEP2
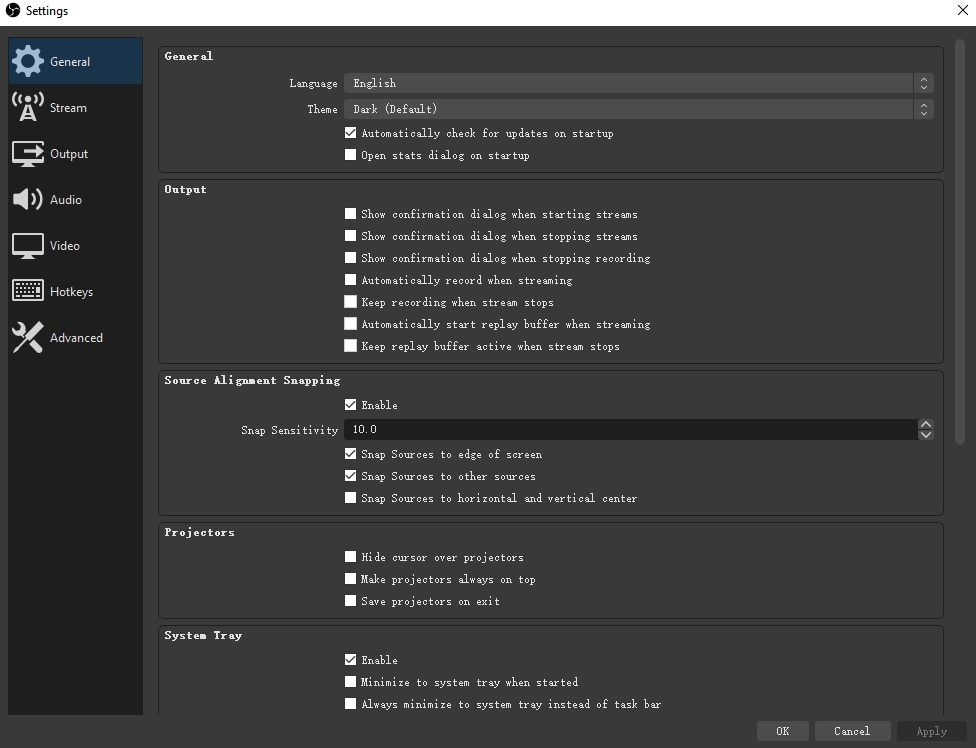
Once you've set your audio input and display, all you need to do is click the setting button on the bottom right corner of the OBS Studio interface to set many presets. From the General tab on the left side of the settings window, you can select your preferred language, theme, and more > from the output tab, you can set the video bitrate and audio bitrate, recording path, and more > repeat the same procedure for the audio, video, hotkeys, and advanced tab to set every necessary parameter. Once all of this is done, click on Apply, then Ok to save the presets.
STEP 3
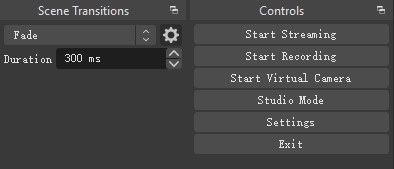
Immediately after this, the next step to take is, click start recording on the down right side of the interface to begin the recording. When you're done recording, just click on the Stop Recording button below the Starting recording button.
Pros
OBS is completely free
The software support almost all kind of computer operating systems
Users are open to quality editing features that permit them to enhance their recordings
Cons
The software malfunctions sometimes
It requires steep learning for inexperienced users
It can't be operated on smartphones or mobile devices like tablets, iPad, and more.
Part 3. How to Use Online Tools to Record Screen with Audio
In a populated world like the earth where we have more than 3 billion people with different cultures, norms, beliefs, and opinions, not everyone would love to download or install a screen recorder with internal audio on their PC. Rather, they'd love to use an online screen recorder that will be easily accessible anywhere, anytime. That's why we've provided a few good online screen recording software you can utilize.
FlexClip
FlexClip is an online web-based screen recorder that gives users free access to download or Screen record their PC without going through the stress of downloading and installing any offline screen recording software. Without taking much of your time, if you want to screen record with audio, here are steps that will carefully guide you through the recording process.
STEP1
Before anything, ensure that you have a good internet connection. Once that is ensured, you can now Launch online or browser-based FlexClip on your PC. Immediately the screen recorder opens, click the Start Recording button you'll see on the interface.
STEP2
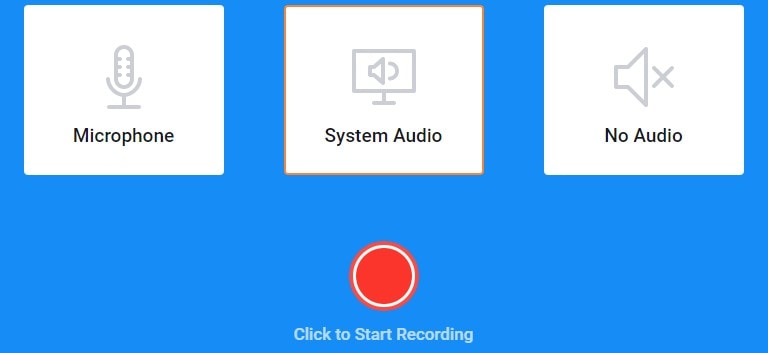
Immediately you click on the start recording button, three options display on your screen, which are the microphone, audio system, and no audio options. So if you wish to screen record with a voice, you can enable the microphone option > if it's the audio system, you can enable the audio system option > if you want no audio in your screen recording, you can as well enable the no audio option. After selecting the audio recording method you wish to record, you can now click on the start recording button below the three options to proceed.
STEP3
Now you are left with the option to select the entire screen option if you wish to record the whole screen of your PC, or the Window option if you wish to record only the displayed window on your screen, or the Chrome tab option. Once you've chosen one out of these options, you can kindly click on the Share button to start recording and the Stop button to end recording.
Pros
FlexClip offers tools other than just a screen recorder
It supports all operating systems since it's an online screen recorder
It is completely free
Cons
Flexclip screen recorder has no webcam feature
The software as a screen recorder has no editing feature
It requires an internet connection to function.
Loom
Just like any other desktop-based free screen recorder you know, loom is also a beautifully made online software you can use as a screen recorder to record your PC screen. There's no need to stress too much since it's just online software. So if you would love to screen record using Loom, here are steps you can follow.
STEP 1
Download and install the loom desktop based screen recorder to your Chrome extension > Launch it > Sign in or create a Loom
STEP2
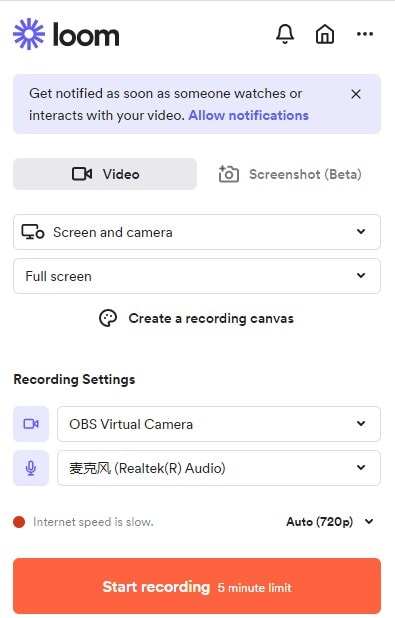
From the three-screen recording options that appear on the screen of your PC, select your preferred option ( Screen + Cam, Screen only, or Cam only). After this, you can select the ratio you wish to record, whether it's Full Screen, Window, or Custom size, set camera, and microphone.
STEP 3
Finally, hit the Start Recording button to begin the screen recording.
Pros
Loom has a free version
Users can utilize the software brand for business tools
It supports computer operating systems and mobile devices like Android, iOS, Mac OS and Windows
Cons
Loom is not completely free as it offers a paid version
It requires an internet connection
Loom screen recorder can only work on chrome extension
Conclusion
This article has vividly spelled out the pros and cons of using an online or offline screen recorder that records internal audio, but using the online/offline Uniconverter enrolls you with the benefit of using numerous media tools in an integrated software with just a token without neglecting the fact that it also offers a free version.
For Win 7 or later (64-bit)
For macOS 10.12 or later
