
Enhance Your Recording Experience-UniConverter
- Help you show a gaming session, make tutorial video with customized settings.
- Record screen, audio and webcam simultaneously.
- Help you record a screen while working on another screen.
- Useful record timer to help you set the start and stop time.
- Convert, compress, and edit the recorded videos.
Why do we need screen recorders?
A lot of PC users tend to make use of screen records mainly to store any information that appears on their screen. Such information includes; capturing song titles, copy of online videos that are a handful, storing important calls (video), and a lot more.
Screen recording allows the user to record video to get possible solutions to the problem faced or to allow you to show others how to deal with a problem faced on their own. It can also be used for different purposes such as valid evidence, education, and entertainment.
While there are multiple ways in which screen recorders can be advantageous, PC users need to have a vivid understanding of how screen recorders come with different features and functions. Here we list good screen recorders to help you.
In this article
Part 1. Helpful Screen Recorder software for PC
UniConverter
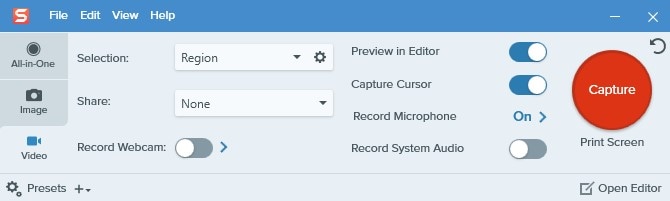
UniConverter is a screen recorder for PC which is used to screen record skillfully and efficiently with good quality files that can be outputted in any format of your choice. The software works in all versions of Windows and Mac which enhance recording on the system screen. Without much effort, the Desktop screen recording program with a lot of features that allow its user to crop, add, or change color, add text and subtitles, cut off unwanted sessions, use background music, adding of shapes, and others.
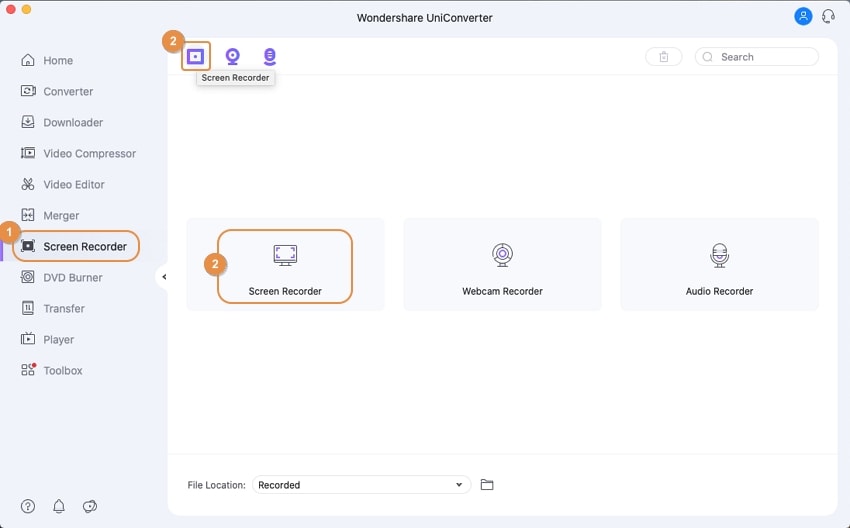
Step 1 Open Uniconverter and begin to record
Open the Software and click on 'screen recorder' on the drop-down menu on the left. Choose the Screen Recorder option from webcam recorder, audio recorder, and screen recorder.
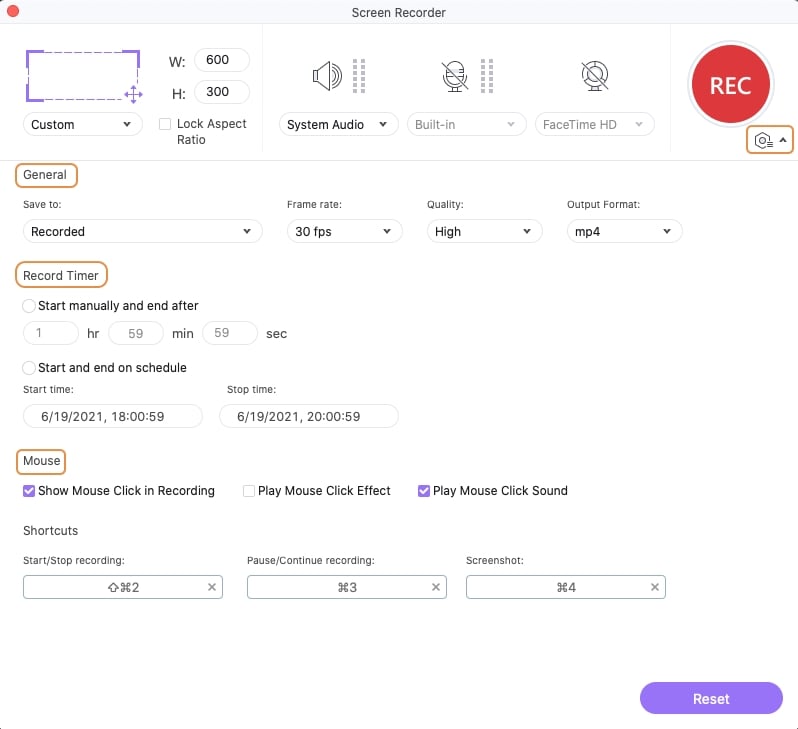
Step 2 Set your preference
You have to configure the part of the window you want to record. You can also input the size manually by increasing it vertically, horizontally, or at the edges. Choose your audio device, output quality, and format, and other options, and then click on the 'REC' icon to start recording.
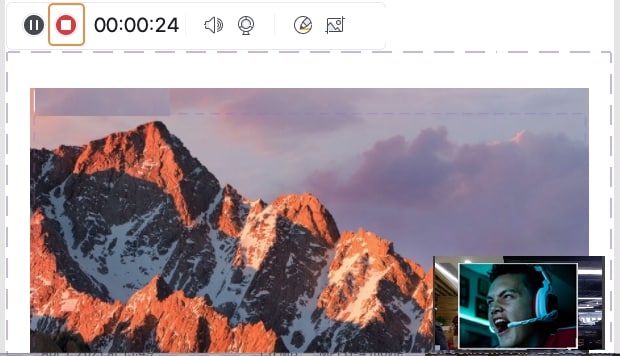
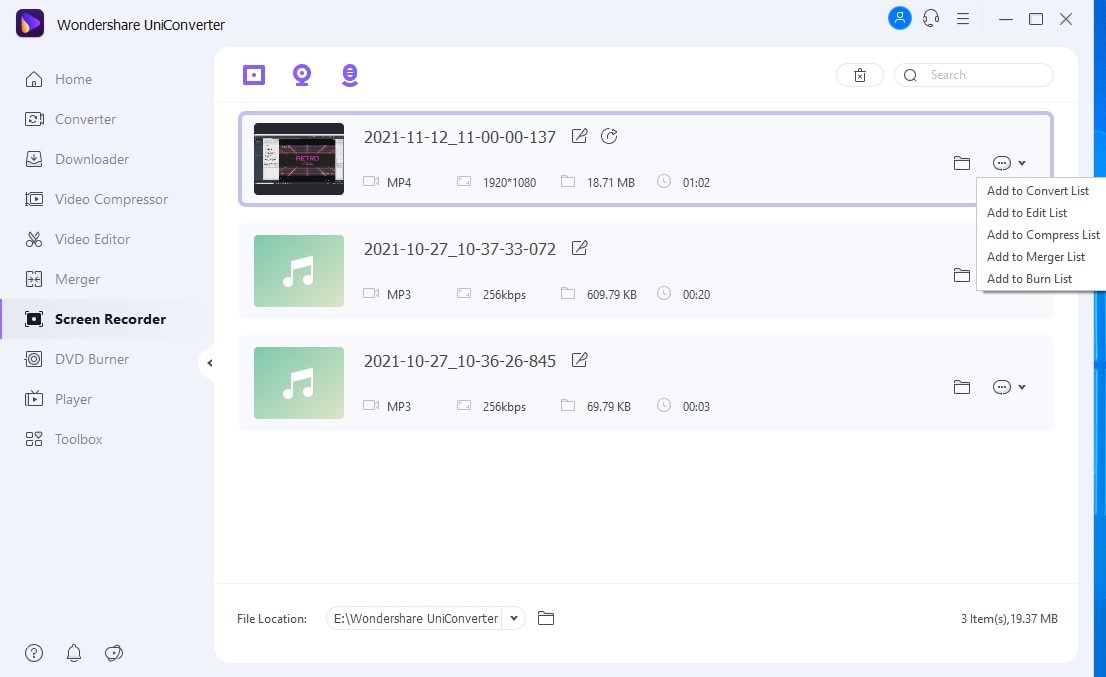
Step 3 Save your file
When you're done recording, click on the Uniconverter icon showing on your taskbar. You can pause and stop recording. Your recorded file will appear at the UniConverter’s interface, you can add it to other tasks like Converter, Video Editor, Video Compressor, Merger, and DVD Burner.
Pros
It is easy to use with less effort
Your files can come in a different format
It allows camera support which makes it easier to import videos from your mobile device.
Cons
The software is not free
It is not
It is not supported on Linux
For Win 7 or later (64-bit)
For macOS 10.12 or later
Snagit
Snagit is a screen capture tool designed for Windows and Mac. It is used to conceive videos by recording your computer screen, the movement of the mouse while operating, and capturing sounds. Snagit allows its user to show their subscriber how to create or do something with the help of screenshots and videos as guidelines, the software is also used to trim your video or use templates to build visual instructions. It is also designed to let you record yourself while teaching, creating, forming, or analyzing your work, the use of a webcam to screen record during a video is also allowed while using the software. Upon the completion of your recording, you can save it into your desired format and share it directly to your social media page and anyone around the globe.
How to screen record with Snagit
Step 1. Launch the software and initiate your capture. Open the Snagit software on your system or Mac, choose your capture settings from the three tabs made available. The tabs allow you to choose a particular capture be it 'video, image, or all in one.
Start your capture by clicking on the red button
Step 2. Select the desired area to be captured and audio. You can select the entire screen from the drop-down menu or a particular window to be recorded. The video tool allows its user to select audio and webcam at a go. Make sure the audio device is used and webcam material is working well.
Step 3. Edit your video. In the course of recording, you can pause and resume and even change the audio configuration. When you're done capturing your screen, click the stop button; the screen recorded will appear in the Snagit editor for you to preview your recording.
Step 4. Save the Video. Preview your video and save it to the most preferred location on your system, then your video is ready to be shared
Pros
It's very easy for you
It works well with other software
It can be used to create animated GIF
Cons
It is not free
You can’t extract words from images that are captured
The undo feature is a little bit difficult
LOOM
Loom is a desktop app for PC that gives a high-quality screen recorder to its users. The desktop app helps to develop your ability in communicating with your subscriber, client, co-workers, and friends around the globe. It helps to capture all activities on the PC screen in a professional manner because the default screen recorder for PC comes out in low quality.
Using Loom for different purposes helps your business to grow, helps you gain more subscribers, helps you to stay connected to maximize your potentials, and keeps your project work on point. It can be used to screen record in HD, which allows you to record the games you played on your PC and provide a link for you to share your videos with any of your friends.
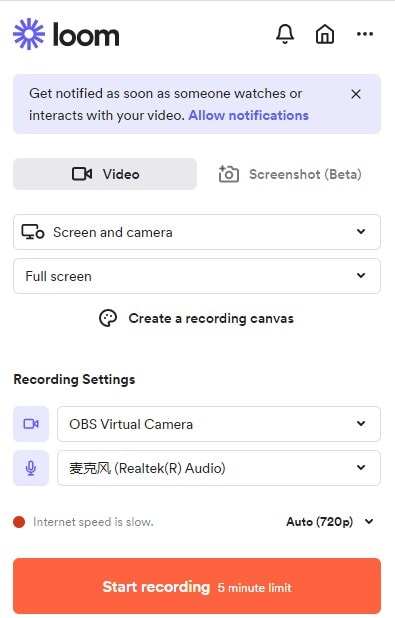
Steps in using Loom to screen record
Step 1. Click on the app icon to launch the recorder.. You can record in three ways; screen and the use of camera, screen captures only, and the camera only. Choose if you want to capture the whole screen, specific windows, or a customized area.
Step 2. Choose the recording settings. You have to choose your audio and camera in case you choose to make use of the “screen and camera options. Select the camera and microphone connected to your PC. Preview your settings by checking the audio indicator if your device is working perfectly.
Step 3. Start record and save the recording. Start recording and when you’re done recording, click the stop button on the control menu. You can pause or restart capturing from the control menu.
Immediately you’re done recording, your file will be exported to LOOM. There you can share the file with any other person across the world.
Pros
It allows the use of shortcut.
It is quite easy to use.
You can use it on any kind of PC.
Cons
It can't be used for advanced editing.
The app is glitchy.
The video doesn’t record for a longer period.
It needs internet to run.
Bandicam
Bandicam is an advanced good screen recorder that is user-friendly. The desktop software allows you to record every single thing you want on your PC. The app records and saves your file in different output/formats such as MP4, AVI, and other files. It is one of the best computer screen recorders for people who love to play games on their system, people who love to lecture, people who earn a living through video content, students that wish to share their knowledge with their other classmates or friends, a leader who instruct their followers, religious leaders that need to preach the gospel and lot more.
Bandicam software record file and save them in smaller sizes when compared to other software programs, the clip size is also unlimited as much as your hard drive has enough space. The editing features of the app include audio recording, video recording, webcam, mouse display, drawing, and a lot more.
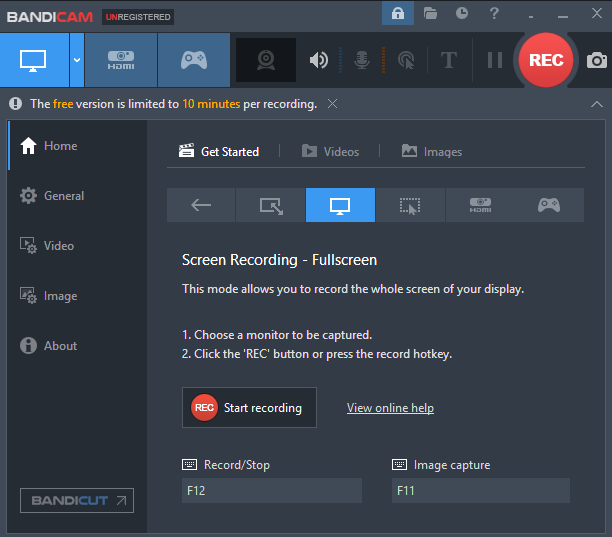
Steps in using Bandicam to screen record
Step 1. Open the application software
Step 2. Choose the recording mode. Start to record by choosing the full mode or you can also select the recording area just like other applications
Step 3. Start recording. Click on the red record button to start and stop the capturing. You can also make use of the F12 hotkey as a shortcut
Step 4. Save the recording. After recording and saving the file, press the home icon to edit, play, delete and upload your videos
Pros
It is good for game streaming
The interface of the desktop app is nice and user friendly
It's good for a 1080p screen recording
Cons
It's not free.
You can’t input your text on any part of the screen.
The watermark is frustrating.
Camtasia
Camtasia is an HD screen recorder that helps you build content your viewers or subscribers can watch and have a great interest in it. It creates a bridge that brings your viewers close to you by interacting well and helping your audience to learn more from you. It is a desktop app that does not require any professional skills or experience before you can create your high-quality video which is quick to learn. Camtasia provides features that'll make you screen record your video tutorials, instructional videos, explainer videos, presentation recordings, webinar recordings, youtube videos, training videos, meeting recordings, demo videos, and others.
The desktop software allows you to record every single piece of information on your PC websites, video calls, presentations, online games, software package and even add text, transitions, effects, and other tools for video editing. Other features include; template, simplified editing, screen recording options, web camera capture, audio recording, background music, media import, and annotations.
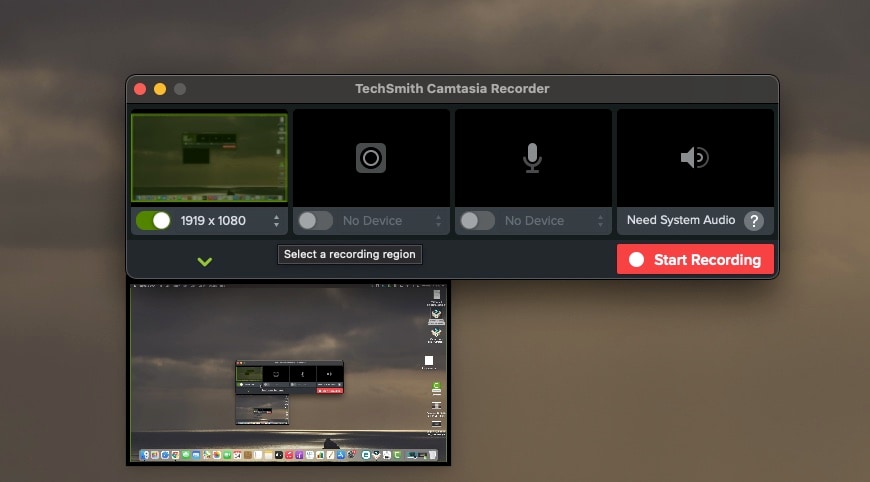
Steps in screen recording with Camtasia
Step 1. Open Camtasia. To start recording, you have to open the app, choose the then click on the red button at the top of the taskbar to start recording. It must be noted that by default settings, Camtasia will capture everything that appears on your PC.
You can change the settings by changing the recording region.
Step 2. Select the recording preference. Select all other options to record along with the screen such as the microphone audio, webcam, and system audio. After setting your preference then click on 'start' to begin the record.
Step 3. Start the recording.When you're done recording, click on the recorder icon in the toolbar to stop the action.
Step 4. Edit and save your file. You can delete the file or re-record, you can trim out an unnecessary section out of the video, furnish your file by adding annotations, effects, subtitles, and others.
Save your file immediately you're done previewing by clicking on the export button on the upper side of the taskbar, then select the file location.
Pros:
It’s easy to learn and operate
The desktop app has many basic features
The guideline is effective
Your recorded files can be shared on YouTube and Vimeo
Cons:
It misbehaves anytime the file is large
There are glitches in sharing files directly
This Recorder may be a little bit expensive.
Part 2. Good Online Screen Recorders.
Screencapture.com
Screencapture is one of the most convenient ways of recording the screen of your PC online without downloading the software. It works for both windows and mac computers with no limitations to time of record. You can record for as long as you want. It's awesome for recording gaming videos, conferences, online lectures, video presentations, messages to subscribers or friends, and much more. You can use the free online HD screen recorder with your microphone and webcam connected to your system to create high-quality screen recordings with the inclusion of audio and video.
Steps in using screen capture to screen record on PC
Step 1. make sure your PC is connected to a Wi-Fi connection to ensure smooth running, also your browser must support screen capture. Open your default browsers such as Firefox, Chrome, and others and log on to screencapture.com and click start recording
Step 2. there will be a pop-up message with options to record the full screen, single window, or choose the area you intend to capture and click on 'share'
Step 3. immediately you click on share, your capturing will begin, when you’re done, click the ‘stop recording’ icon and it will take you to a window to download your recording.
Pros:
Friendly interface
It is online
No Bugs
Cons:
It requires a strong internet connection
It does not work for all browsers
It does not come in a different format
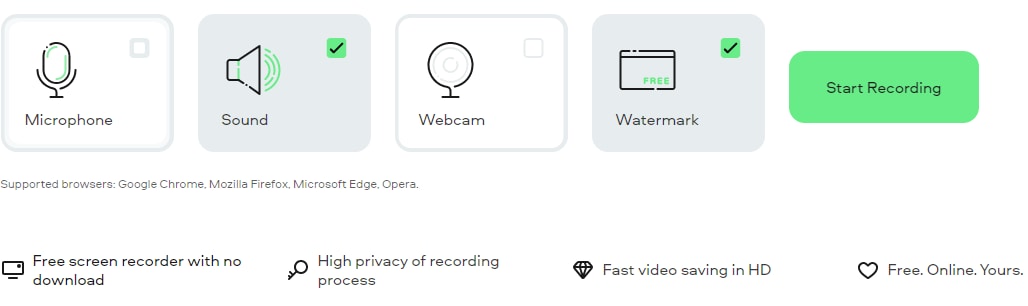
Capty,io
Capty.io is a key 1080p screen recorder that provides you everything you need to do a screen recording, capty.io features make everything looks simple by converting your video file to MP4 format for automatic compression. This screen recorder without the need of downloading the application trot out simple editing options like extracting audio from a video file and even timing your record.
You don't have to worry about sending huge emails to your friends, all you have to do is to record all the activities on your screen and send them as videos to your friends, subscribers, viewers, co-workers, and other people you're dealing with. Although the maximum time for recording is 30 minutes it's better than none.
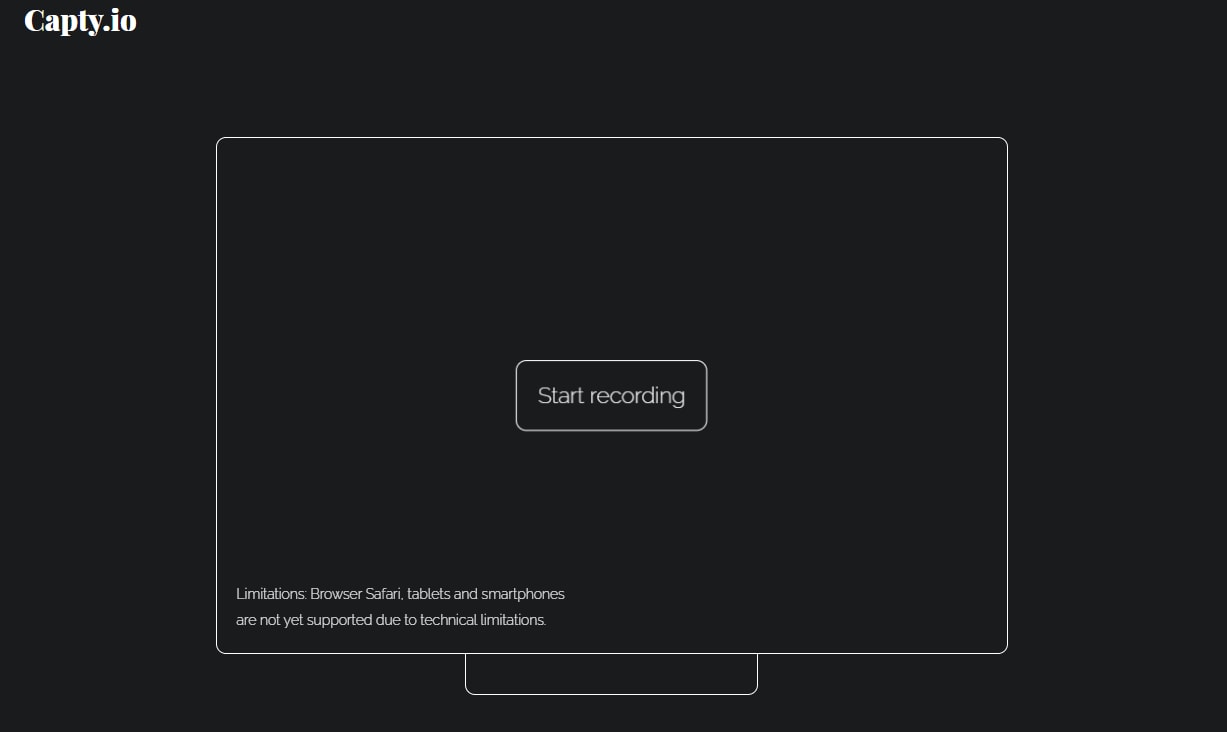
Steps in Using Capty.io to screen record
Step 1. visit the capty.io website on your browser, click start recording to capture what is showing on your screen. The browser allows you to use a microphone thereby you explain while recording the things you do on your PC.
Step 2. when you’re done recording, hit the stop button at the bottom of the screen, review the video and save it
Step 3. download the video directly from the server or copy the link and share it with your friends.
Pros:
It does not require downloading of any app
It is free and easy to use
Others can get your explanation vividly
Cons:
It can record for 30 minutes
It does not have enough features to edit the video
It does not work on all browsers
ScreenApp.io
Screenapp.io is a web-based online screen recorder that is used to record PC screens without downloading the app nor registering as a member, it does not require any extension before it works. It is designed to help its users record, edit and share their screen without spending a dime from their credit card.
The web-based tool record with the use of audio or without audio depending on the user’s preference. It allows trimming unwanted sections when previewing it before saving the file, it allows recording with more than a single app, recording tutorials, recording online conferences, recording YouTube videos, recording video games, and so on.
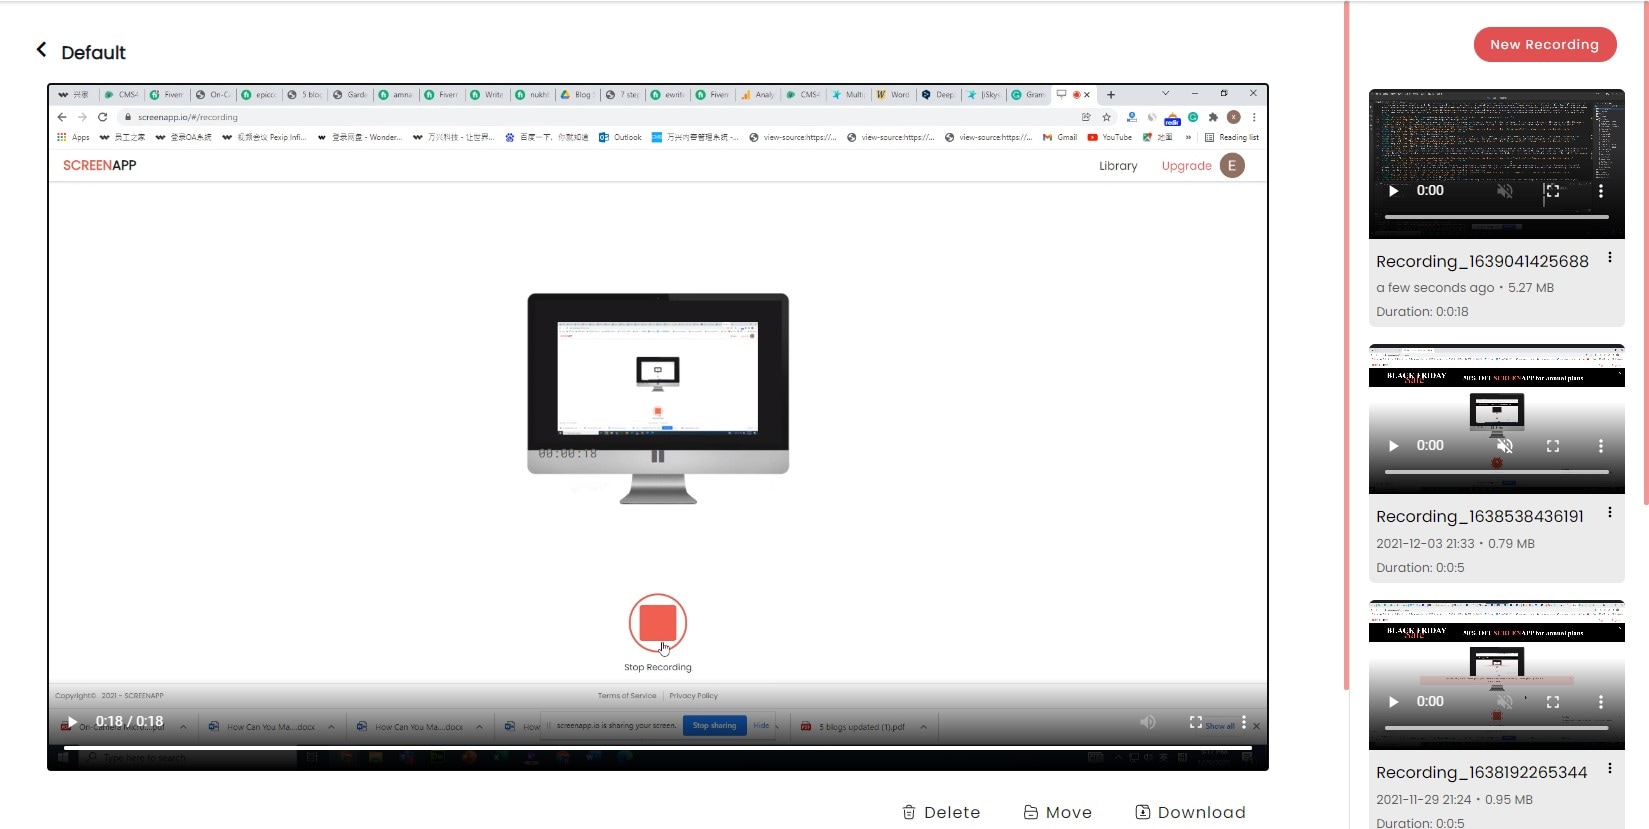
Steps in using ScreenApp
Step 1. Open your browser and navigate to screenapp.io’s website on your Windows or Mac PC. Make sure you've arranged all your activities before visiting the websites. It is important to note that it only works on PC and not on mobile devices
Step 2. click the get started button, you'll be asked to choose a different audio capture mode- capture without audio, capture with audio. After setting your audio mode then proceed to click 'share your screen', you'll be asked to give the website permission to capture your screen.
Step 3. tap on start recording when you’re done with the configuration to start capturing the activities of the screen whilst you explained along. Press ‘stop’ when you’re done recording.
Preview the video before downloading it and you can also share it with your friends, business partner, and social media straight up.
Pros:
It is easy to use
The return policy of the webpage is awesome
You only need a good connection and a browser on your PC
Cons:
It can’t be used on mobile devices
There are no proper video effect tools
It does not function well when the connection is not strong
Wondershare UniConverter 13 - A Complete Meida Toolbox
5,481,435 people have downloaded it.
UniConverter supports many formats and handles conversion equally, ensuring that high quality is delisered at all times.
During the conversion process, you may add multiple files since the program does batch conversion of files.
You can use the editing suite that covers subtitle editing, watermark editing, etc to make your results creative masterpieces.
This software facilitates file transfer to devices like Android and iPhone among others once the conversion is complete.
UniConverter is also capable of handling video compression hence ensures you acquire the video sizes you desire.
For Win 7 or later (64-bit)
For macOS 10.12 or later
