Enhance Your Merging Experience-UniConverter
- Make full use of your multi-core processor to speed up the merging process.
- Cut unwanted portions with the built-in trim feature.
- Support uploading multiple files .
- Merge and convert your videos clips into cumstom formats like MOV, MKV, and web formats.
- Compress, edit the merged video.
The best movies are better shot in short clips. The next thing to do is to start to combine the videos. Merging videos mainly involves combining multiple videos into one. Some of the best mergers can combine two or more videos of different formats ,so you don't have to mind the differences. Also, you do not have to worry about your videos losing quality. Merging videos with good video mergers ensures that you keep the format when combining the video. Merging videos is not a complex task, and it is very easy if you have a good video merger. We took it upon ourselves to research the eight best ways to merge your videos flawlessly.
Part 1. 4 Paid Ways to Combine Videos with Ease
If you need an all-in-one tool that can perform multiple video editing simultaneously, then Uniconverter is number one. It is multipurpose software that allows you to convert, compress, merge, download online videos, merge videos, burn DVDs, add and remove audio from videos, add and remove the watermark, create and add subtitles to videos, and so on. Uniconverter's merger function also allows you to make the best of your videos, you can compress each video before merging, and crop the videos before joining. Do you want to know how to merge videos with Uniconverter? Follow the steps below to learn how to merge videos using Uniconverter.
Steps to Merge Multiple Videos with Uniconverter
Step 1 Launch and Select Merger
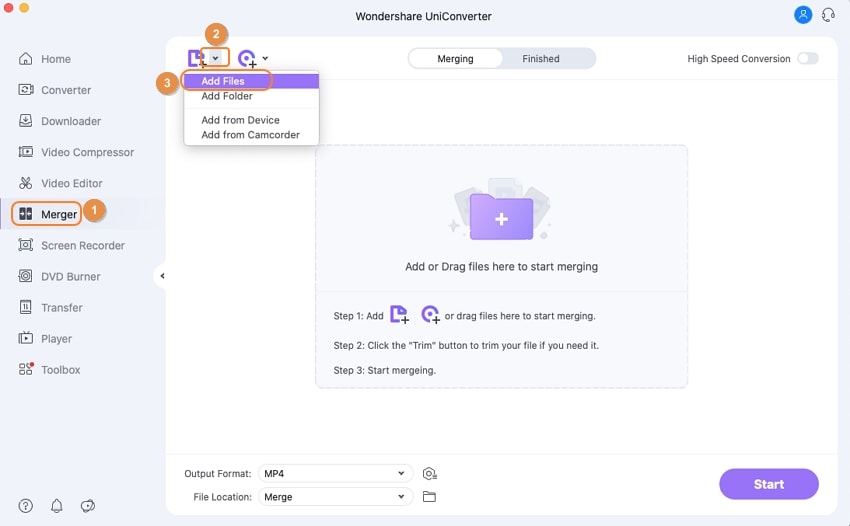
Download and Install the software if you haven't done so already. There is a list of tools on the left side on the main interface. Navigate and select Merger
Step 2 Upload Videos
When you click on the Merge tab, the interface changes, and you can now update your videos. Do this by dragging and dropping your videos into the interface, or you can just click on the purple folder icon in the middle of the interface and select the videos you want to merge.
Step 3 Edit and Merge
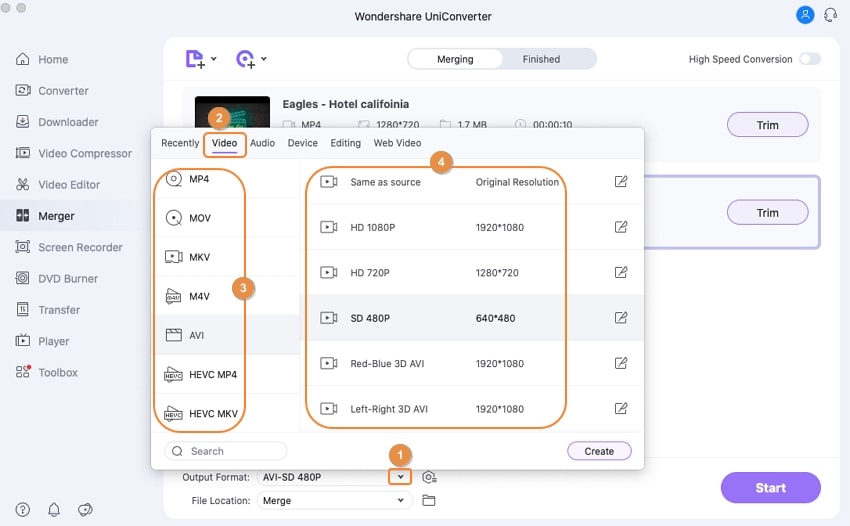
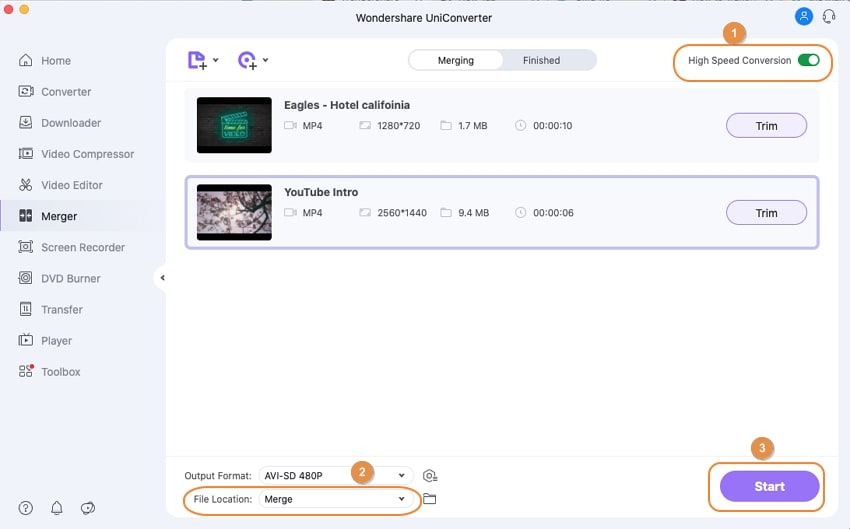
The upload time will depend on the size of the video. You should take note of this. If the uploading takes too much time, you can use the compress feature to reduce the size before uploading. You can also crop the videos before merging. Also, note that Uniconverter allows uploads of more than one format, i.e., you can upload videos of different formats and join. Click on Start All at the bottom of the screen to merge videos.
Step 4 Save
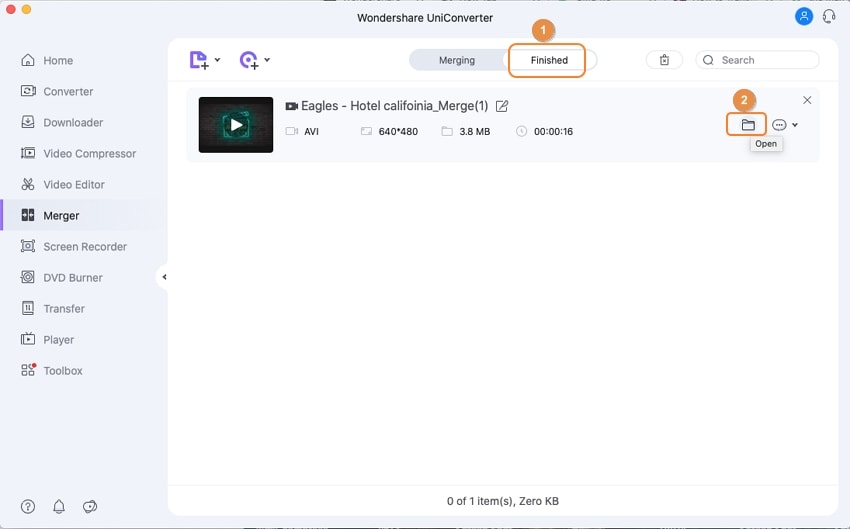
The video will automatically be saved to the Uniconverter folder in the Local Disk. You can change this by clicking on the File Location tab and the bottom part of the interface.
Pros
Uniconverter features lots of editing features
The high-speed conversion allows you to complete your video editing in a matter of seconds quickly.
Uniconverter supports 1000+ formats, including website and device formats
Cons
It is not free
The free trials feature a lot of restrictions
It is not available on Linux and mobile devices
Wondershare UniConverter 13 - A Complete Meida Toolbox
5,481,435 people have downloaded it.
UniConverter supports many formats and handles conversion equally, ensuring that high quality is delisered at all times.
During the conversion process, you may add multiple files since the program does batch conversion of files.
You can use the editing suite that covers subtitle editing, watermark editing, etc to make your results creative masterpieces.
This software facilitates file transfer to devices like Android and iPhone among others once the conversion is complete.
UniConverter is also capable of handling video compression hence ensures you acquire the video sizes you desire.
Camtasia
Pricing:
$299.99 – Individual and Business
$214.71 – Education
$268.99 – Government and Non-Profit
When we talk about video editing, we must mention Camtasia, one of the best video editing software out there, and its tools are also numerous. Camtasia is software built mainly for video creating and editing, so you can know what to expect from it. Camtasia features a series of effects like adding animations, cursor effects, adding voice-over, annotations, audio effects, and transition effects. With Camtasia, you can relax on video creation as Camtasia has all the tools to make your video look more professional.
How to Merge Video clips Using Camtasia
Step 1 Launch and Select Start a New Project
Launch the Camtasia software, there is a list of options you can choose from. Select New Project to get a Blank Template to start your work
Step 2 Import Videos
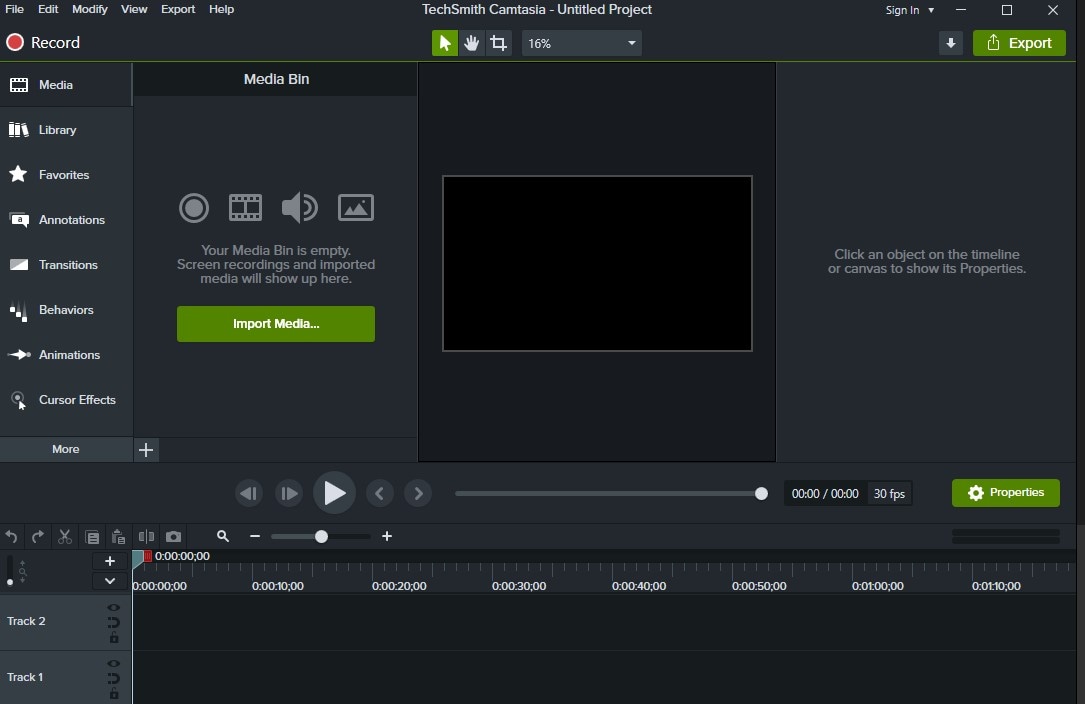
On the main interface, click on 'Import Media'; to upload your video. Alternatively, you can press Ctrl + I, and Mac users can press Command + I. This way, you can proceed to add more videos for your merging
Step 3 Add videos to the Timeline
The uploaded videos will appear in the 'Media bin'. It is also on the left side of the screen, while the timeline is at the bottom. The bin will only be created after you have imported your videos. Drag the videos from the container into the timeline at the bottom in the order you want them to be arranged. Camtasia will treat it as a blank screen if there is a space in between. You can also add transitions, images and animations, and other effects in this part.
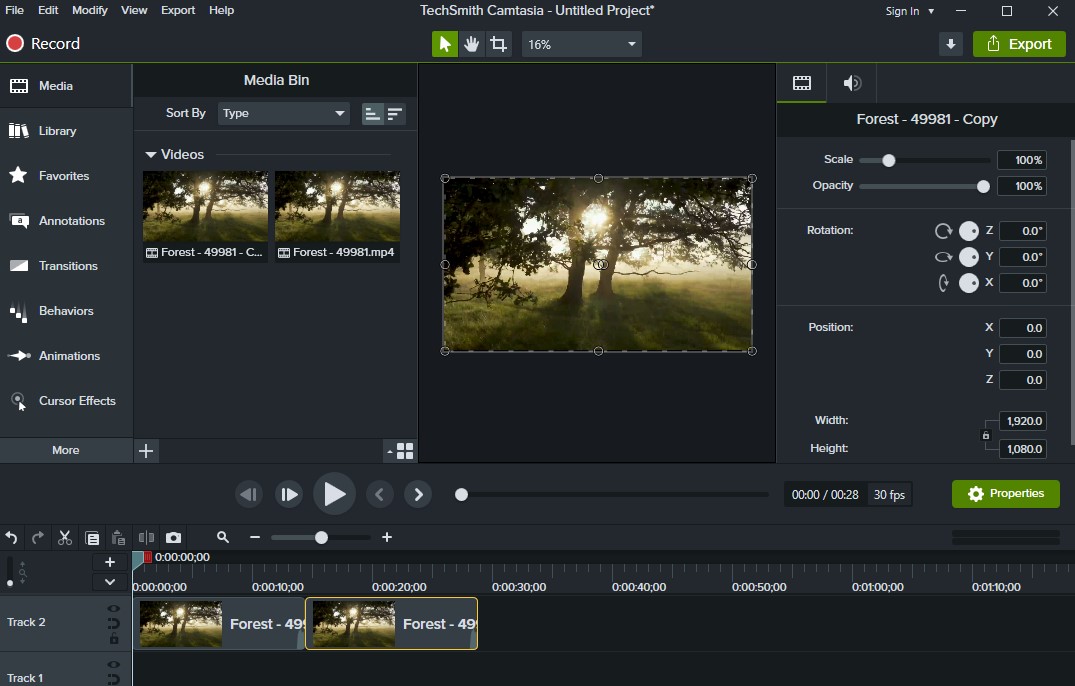
Step 4 Save
To save videos on Camtasia means to Export the video. Click on the export video on the top right corner of the screen. A list of options will become available to you, and you can choose where you want to save the videos.
Pros
Camtasia'sCamtasia's user interface is easy to navigate, and the functions are all inconspicuous areas
It features a whole lot of video editing features.
Camtasia allows the merging of videos from multiple formats
Cons
The processing speed is not that fast
Paid users still have to pay for new updates and upgrades
Camtasia is kind of heavy and requires a very high spec system to work efficiently
Joyoshare Vidikid is another video editing software that also functions as a screen and audio recorder, video compressor, video merger, and video converter. Not very popular, but still very powerful. Joyoshare Vidikid supports over 100 formats, and you can add and remove watermark. The screen and audio recording are also top-notch, and they can delete mute areas. Merging videos on Joyoshare doesn'tdoesn't even reduce the quality of the videos when combined. There is no limit on the number of files you can upload and upload files of different formats.
How to combine two videos or more on Joyoshare Vidikid
Step 1 Launch the software and Upload a video
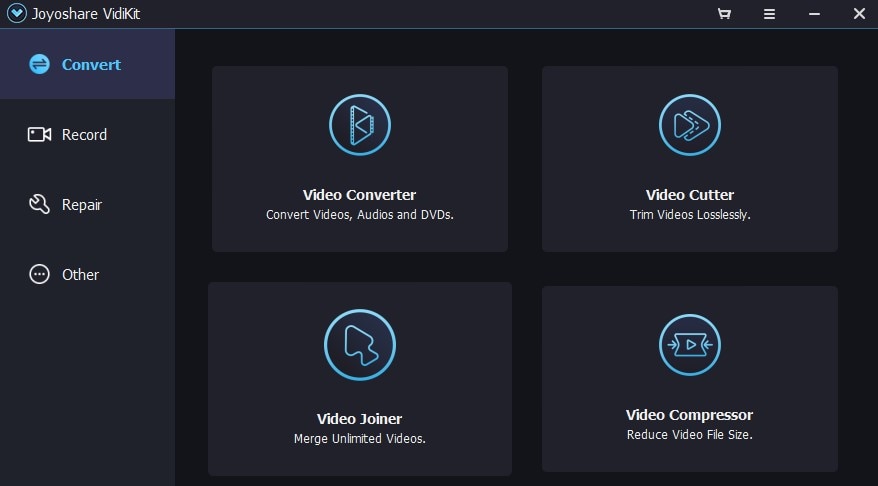
On the main interface of Joyoshare, choose the 'Video Joiner' option, then the screen is divided into two, the right side is for the video preview, and the left side is for uploading and editing. You can directly drag and drop your videos to the left screen or click on the small icon at the bottom of the screen to upload your video. You can re-arrange the ordered video by dragging them and changing their positions.
Step 2 Choose either High-Speed or Encoding mode
There are two modes of conversion on Joyoshare Vidikid software. The High-speed mode is for merging videos of the same formats, and the Encoding mode is for merging videos of different formats.
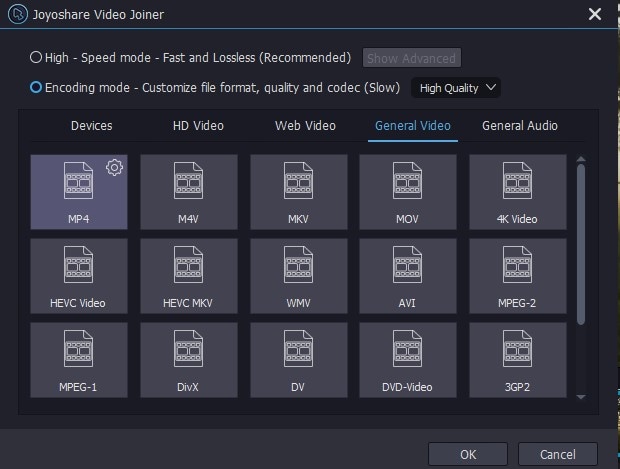
Step 3 Choose output format
You can now select the format in which you want the video to be exported. There is a variety of formats available on Joyoshare Vidikid. The choice is yours.
Step 4 Edit Video
After selecting the mode and format, you are sent back to the main interface. Click on any of the clips, and it will start previewing. You can now use the slider on the timeline at the bottom of the screen to trim unwanted video parts. You can also add effect, adjust brightness, change aspect ratio, insert subtitles, add watermark, etc.
Step 5 Merge and Save
Click on 'Convert' to start to combine video clips. The merged file will be saved to your local disk.
Pros
It serves as a converter, compressor, watermark, subtitle adder, and even repair videos.
Joyoshare Vidikid can add voiceovers and narrations to recorded videos and clips.
Merging multiple formats is easy with Joyoshare
Cons
It is not free
Free users have watermarks in their videos
Its processing speed is a little bit slow, especially if you are merging clips of different formats
Filmora
Pricing: Individual - $61.99/ Annual | $89.99/Lifetime
Business - $155.88/Annual
Education – Contact the site for deals
You can barely find a match for this particular online tool. In terms of functionality, it even overpowers some standard software even though it is an online tool. With Filmora, you can create the ultimate videos you have always dreamed of. Filmora mainly functions as a video editor to add video and audio effects, overlays, and transition effects. It is constantly being updated, so you should expect even more function in the future.
How to combine videos clips with Filmora
Step 1 Launch and Upload video
Click on the icon in the middle of the screen, or drag and drop the video from File Explorer.
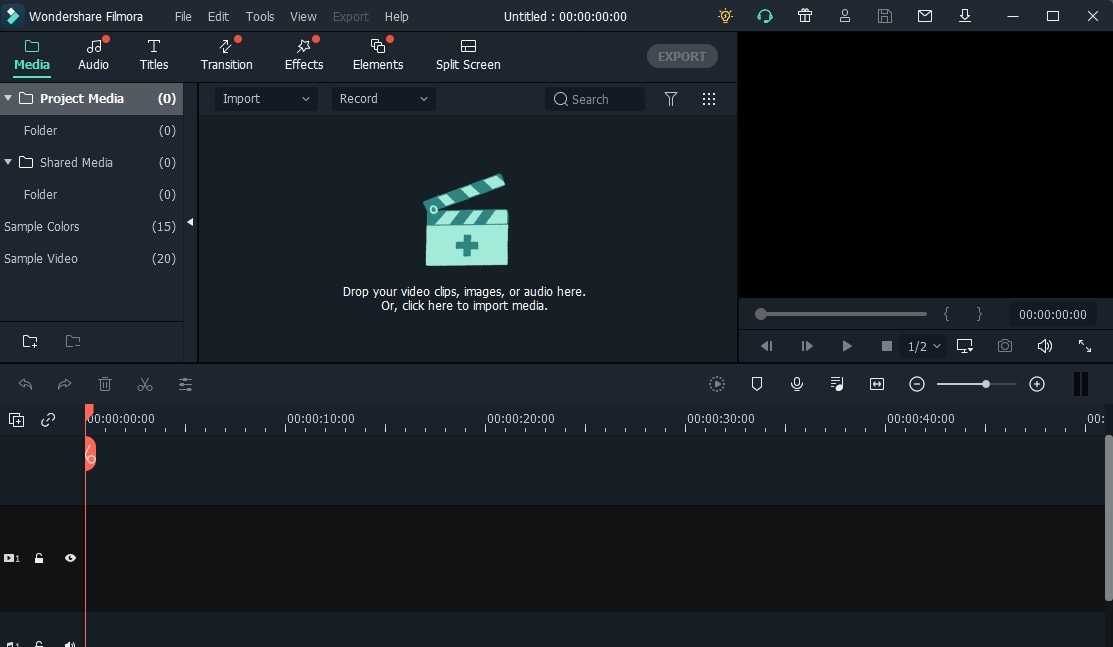
Step 2 Re-arrange and Edit videos
The added video will appear in the User's Album. Click on any of the videos to start a preview. You can drag the videos to change their positions and re-arrange the videos in the order that they will be merged. You can choose to add transitions to make the changing of videos look more stylish.
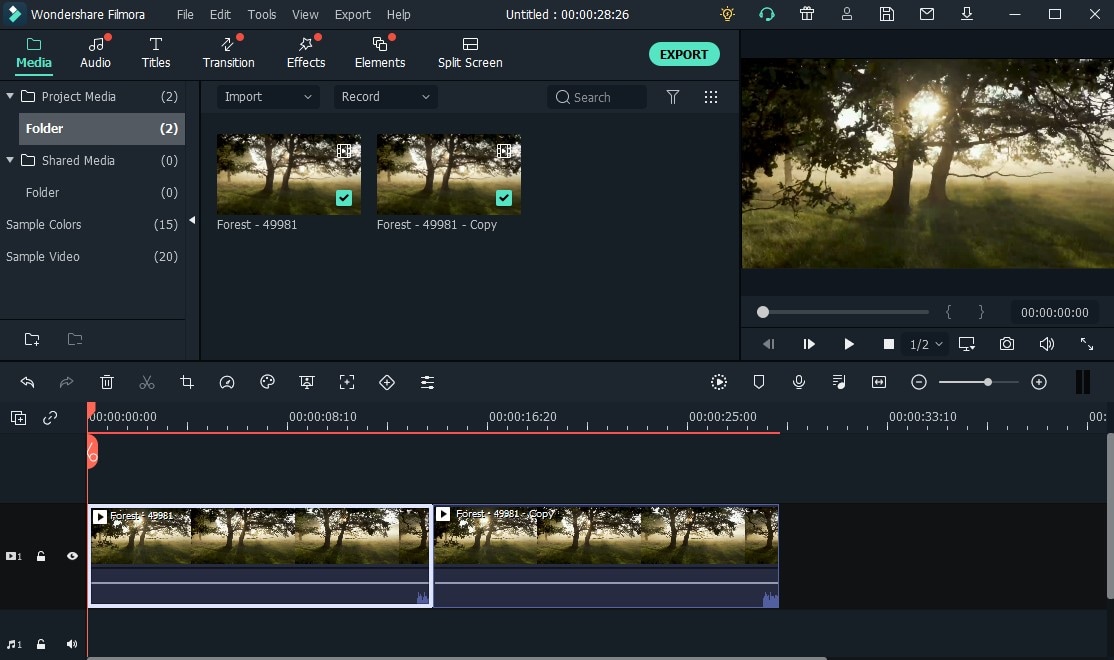
Step 3 Export and Save
The export button is at the top of the screen. Click on it, and you will be given the option to select which format you want to export your video. Here, you can change the destination folder and rename your video. Click on Export when you are done to save the video to your computer.
Pros
Merging multiple videos does not reduce the quality
It has a fast conversion speed
Can easily make Picture-in-picture videos
Cons
Closes down suddenly
The free version leaves watermarks on exported videos
It has batch processing, but it can become extremely difficult to handle when working with multiple videos
Part 2. 4 Recommended Free Ways to Help You Combine Videos
QuickTime
QuickTime is the built-in media player for Mac and iPhone users. It features basic video editing like converting, cropping, trimming videos. The QuickTime on iPhone is not the main one. It is just a plug-in that allows them to perform such functions of the Mac version. It can also perform some pretty advanced features like screen and audio recording with picture-in-picture and, you can combine video clips into one file using QuickTime. Follow the steps below to learn how to combine video clips.
Steps to Merge Video files on QuickTime
Step 1 Open QuickTime with the Video
The first step to merging videos together on QuickTime is to open a video with it. Open QuickTime, click on Open file under the File tab, and select a video.
Step 2 Add other videos and arrange the order
Now, drag and drop other videos into the timeline of the currently playing video to create a video with multiple clips. The clips will separate each video, and you can change the order by dragging the videos again.
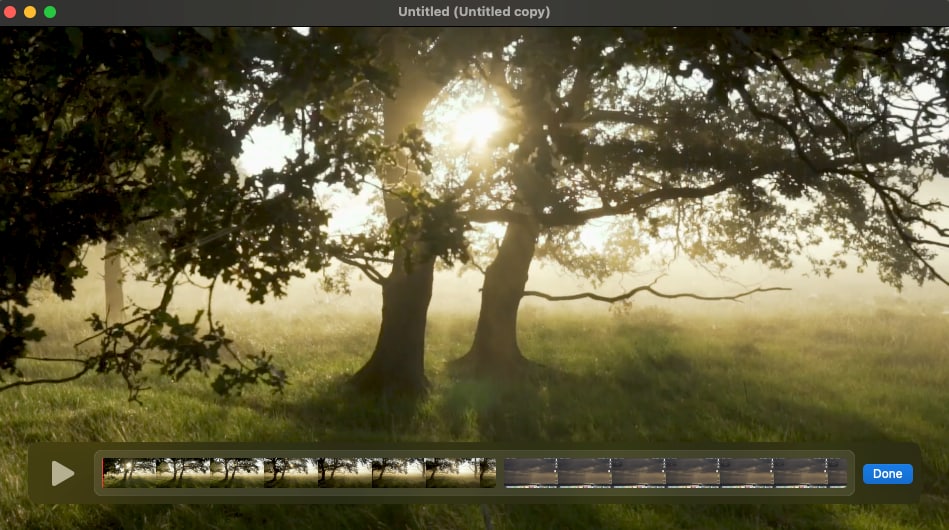
Step 3 Export
When you add another video to the initial video, a blue 'done' tab appears. When you are done, click on the done tab. Then click on File>Export as...> select the quality you want to export, and you can change the name of the video. The video will then be exported in MOV format. The time it takes to combine video files is not too long.
Pros
It is an Apple program so it syncs across all their programs, including iTunes
It can perform some basic editing features
Exported videos are usually in high quality
Cons
It cannot be used with Windows
All its files can only be exported in MOV format
It does not support formats like AVI, FLV, MKV. You will need to download an extra plug-in to play such formats
VLC Media Player
VLC is a freeware and open-source computer program that is extremely popular. Almost everyone has a VLC media player on their phone or PC. VLC is useful in many aspects, and it serves some very amazing functions. Many people only use VLC for its main functions, i.e., playing videos, but it has far more functions than that. Although it can't perform on the level of the specialized apps, it still can perform some video editing features. Want to learn how to merge two videos together?
How to Merge Videos Together Using VLC Media Player
Step 1 Launch VLC and click on Open Multiple Files
Open the VLC software and click on the File tab on the toolbar. From the dropdown box, click on Open Multiple Files…

Step 2 Select multiple videos
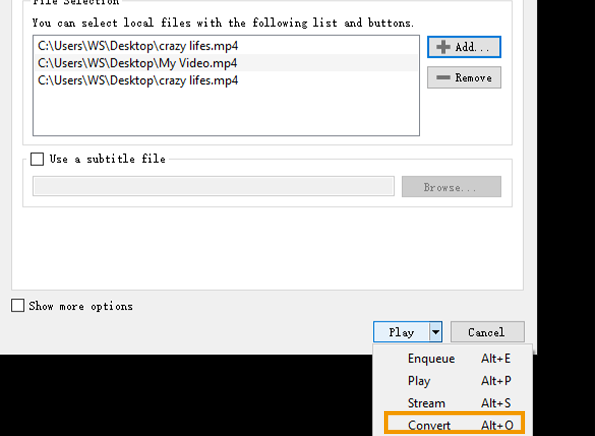
A file explorer window pops up, and you can now select the videos to be added. Next, click on the arrow beside 'play' to get the list of available options. Select Convert from the dropdown box.
Step 3 Convert and Save
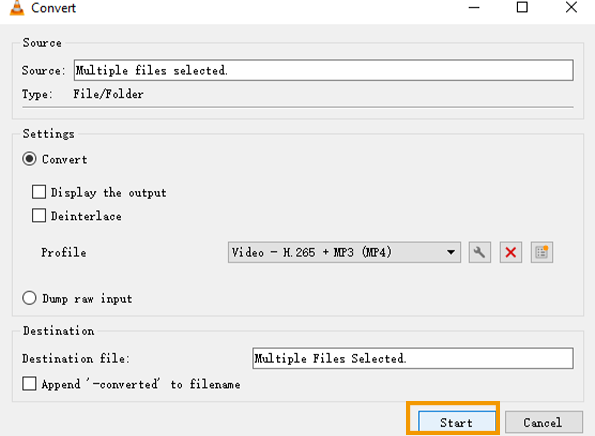
Clicking on convert will bring up another box. Look through the box and locate Profile. Make sure the profile is in a video format. Click on Browse to change the name of the video, and the location, then click on Start to begin to combine video files.
Pros
Works well with all popular devices; Windows, Mac, Linux, etc
It can stream videos online seamlessly
It supports a wide range of formats
Cons
The interface is too simple
Except for its advanced video playing capabilities, all its other functions are pretty basic
It is, however not ideal for music playing
Windows Movie Maker
Windows Movie Maker is freeware and was a built-in software program for Windows back in the day. It supports formats like mp2, mp2, avi, m1v, etc. and its main video format is WMV format. Windows Movie Maker allows you to trim, cut, crop, and merge videos. It doesn't feature luxurious features like transition effects and all the other merging effects, but it does allow you to trim unwanted parts from the video before adding. Merging on Windows Movie Maker is pretty easy. Follow these steps to learn how to combine two videos or more
How to Merge Videos on Windows Movie Maker
Step 1 Launch the Windows Movie Maker and Add video clips
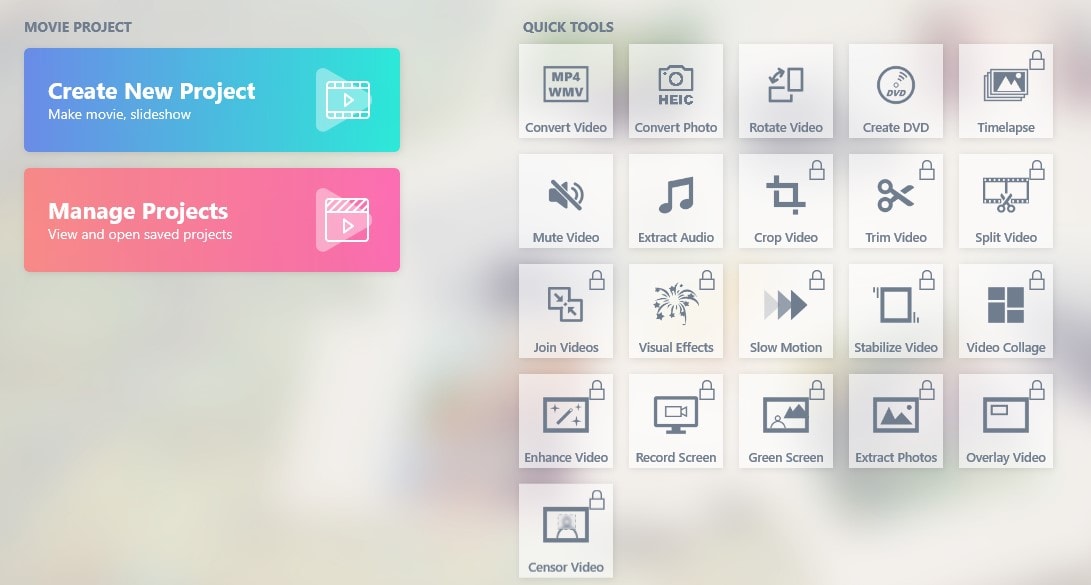
On the main interface, choose 'Join Videos', click on Add videos, and your file explorer pops up for you to select the videos you want.
Step 2 Arrange the Clips
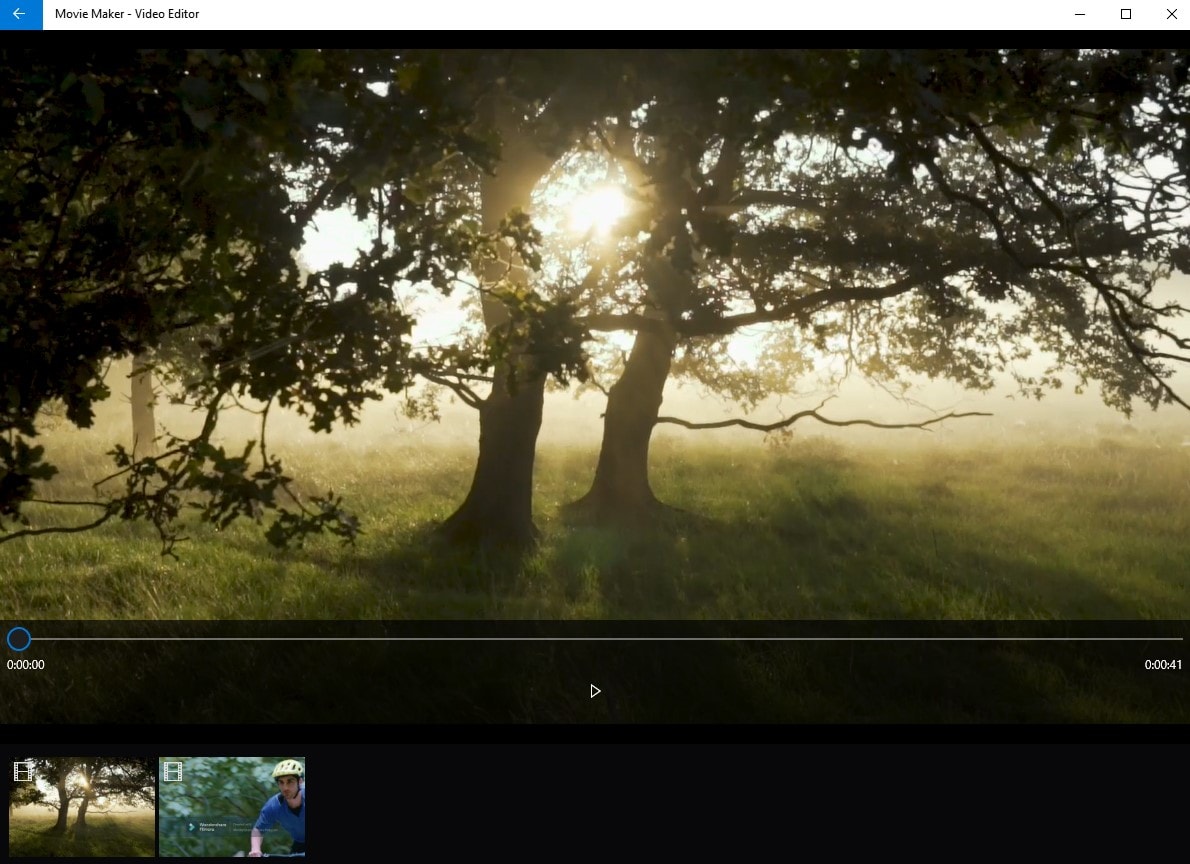
You can re-arrange the clips in the order you want by clicking and dragging them to the correct position. A break in the timeline will separate the clips.
Step 3 Save
After the setting, click on Play/Preview to see how well the videos blend together. If satisfied, select the Save Video to merge clips.

Pros
It has the sharing option that allows you to upload your edited video directly to the internet
Export in high-quality
Cons
It is no longer being updated
It does not have any editing features
Exported files are usually large
Flixier
Flixier is a professional video editing online tool that works well on just about any browser, as long as you have a very stable internet connection. It features many features like screen recording, audio and webcam recording, picture-in-picture, audio, and video conversion. All programs are cloud-based, so it is easy to collaborate with your team and/or employees. It also has the MP4 joiner feature, which allows you to add and merge video clips together. It is easy to use, and you can even add transition effects and join an unlimited number of videos together. Follow these steps to learn how to combine videos together.
How to Combine Videos on Flixier
Step 1 Visit the website and add the videos
After visiting the website, you will be required to get your account. Opening an account gives you access to a dashboard. This is where you have your library. You drag and drop videos from your file explorer into the library to add videos for merging. You can also paste YouTube links.
Step 2 Drag them into the timeline
When you add multiple files, the timeline becomes active. You can now drag and drop the videos into the timeline in the order you want to combine videos. At this point, you can add transition effects your
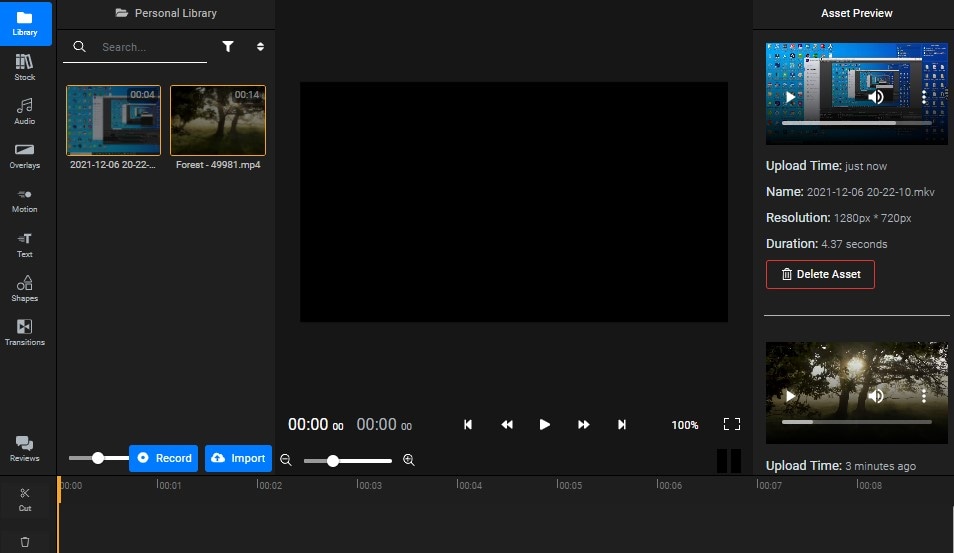
Step 3 Save your merged video files
When you are done with the settings, you can save by clicking on export. Wait for the exporting to finish and download it to your computer. Alternatively, you can share the file with your social media accounts. Note that you need to download the video before leaving the page. Else it will be erased, and you might need to do it again
Pros
High-speed conversion and processing speed
It is an online tool. As such, you don't need to download any software or additional plug-in.
It is safe and virus-free
Cons
It can only keep the videos for a limited amount of time
For Win 7 or later (64-bit)
For macOS 10.12 or later

