Enhance Your Merging Experience-UniConverter
- Make full use of your multi-core processor to speed up the merging process.
- Cut unwanted portions with the built-in trim feature.
- Support uploading multiple files .
- Merge and convert your videos clips into cumstom formats like MOV, MKV, and web formats.
- Compress, edit the merged video.
Merging videos is also one of the popular video editing features people use. To create a whole movie or video, you might need to make short clips of each one and then join them together later using video mergers. Merging videos is easy, but it is not without its fair share of trouble. Merging videos with some unimpressive video merger can ruin your creativity as such, we have come up with the five best solutions to help you merge videos on mac. There are lots of efforts that go into creating a video. You do not want some finishing touches to ruin your movie. Then go with one of these video mergers.
Part 1. How to Merge Videos on Mac with the Built-in Mergers?
QuickTime
QuickTime is not new to people and especially Mac users. It is their go-to app for multimedia solutions. QuickTime can be used as a player, a converter, a merger, and a series of other functions. It supports many formats, and it can even record screens and perform some audio recording. Its features are pretty basic, though, but they function for people who want something casual.
Steps to combine videos on Mac Using QuickTime
Step 1 Open the video with QuickTime
To merge the videos on QuickTime, you need to open the video with the app first. Launch QuickTime and click on File from the toolbar at the top of the screen. Click on Open file… and open the video.
Step 2 Add other videos and arrange the order
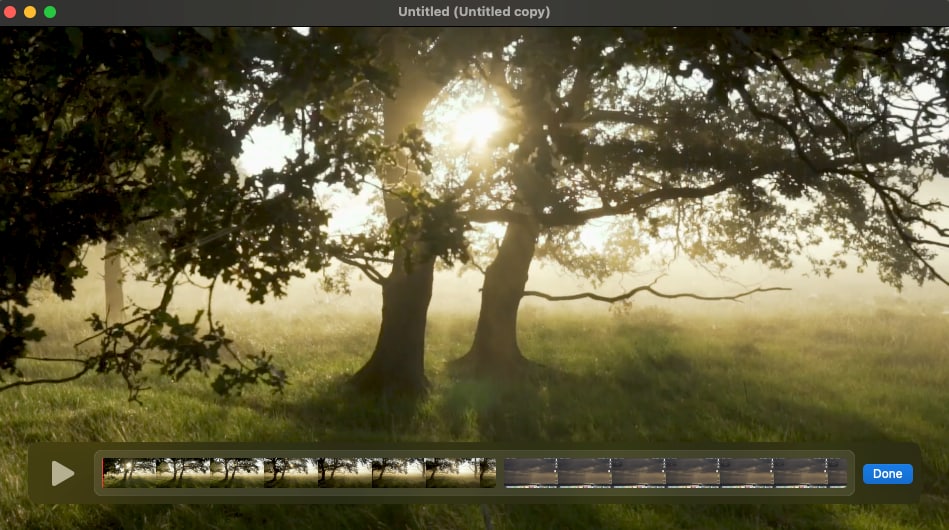
Once the video starts playing, a timeline appears at the bottom of the screen. You can now drag and drop other videos into the timeline. Add other videos to the timeline. You can add them according to their order. You can also rearrange them in the timeline, no problem.
Step 3 Export
When you are done, click on File, export as…, select the video quality, rename, and save. Your file will be exported in MOV. format
Pros
It is a built-in apple app, so it syncs with other Apple programs like iTunes
It can perform some basic editing features like merge, record screen, and audio.
It exports video in high-quality
Cons
It doesn't work with other PC, only Apple
It can only export files in MOV format
When you download an extra plug-in, it can only work with other formats like AVI, FLV, and MKV.
iMovie
iMovie is another software that is built-in for Mac computers. While QuickTime is mainly for playing videos and audio files, iMovie's main function is to edit videos. It is a video editor built by the Apple Company, and it functions as a video creator as well. With it, you can easily add photos to videos and merge videos on Mac seamlessly.
Steps to Merge Videos on Mac with iMovie
Step 1 Launch iMovie and start New Project
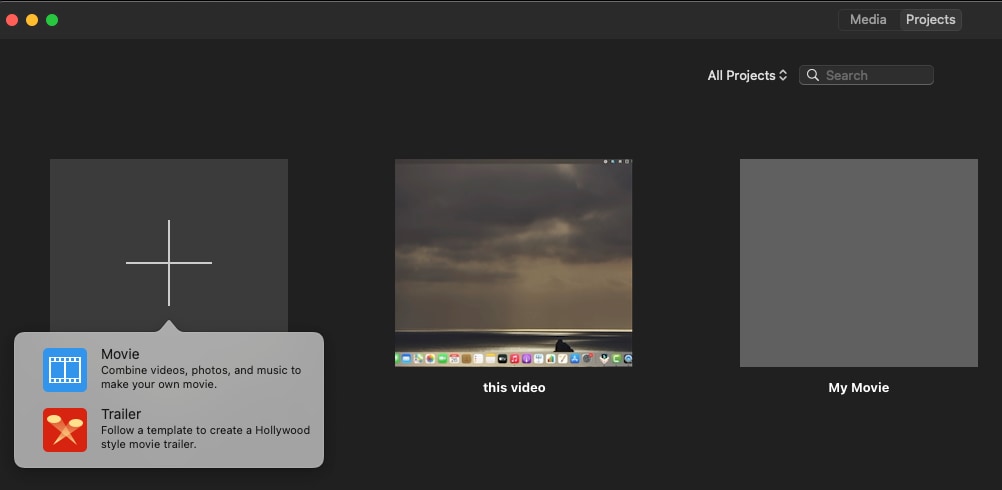
Launch the iMovie software first and on the toolbar, click on File and the first option New Project. The first box to pop up will require you to name your project.
Step 2 Import your videos
When the interface changes, click on File again and go to import, keep your cursor on the import button to reveal more options, click on Movies to add your videos.
Step 3 Arrange the clips
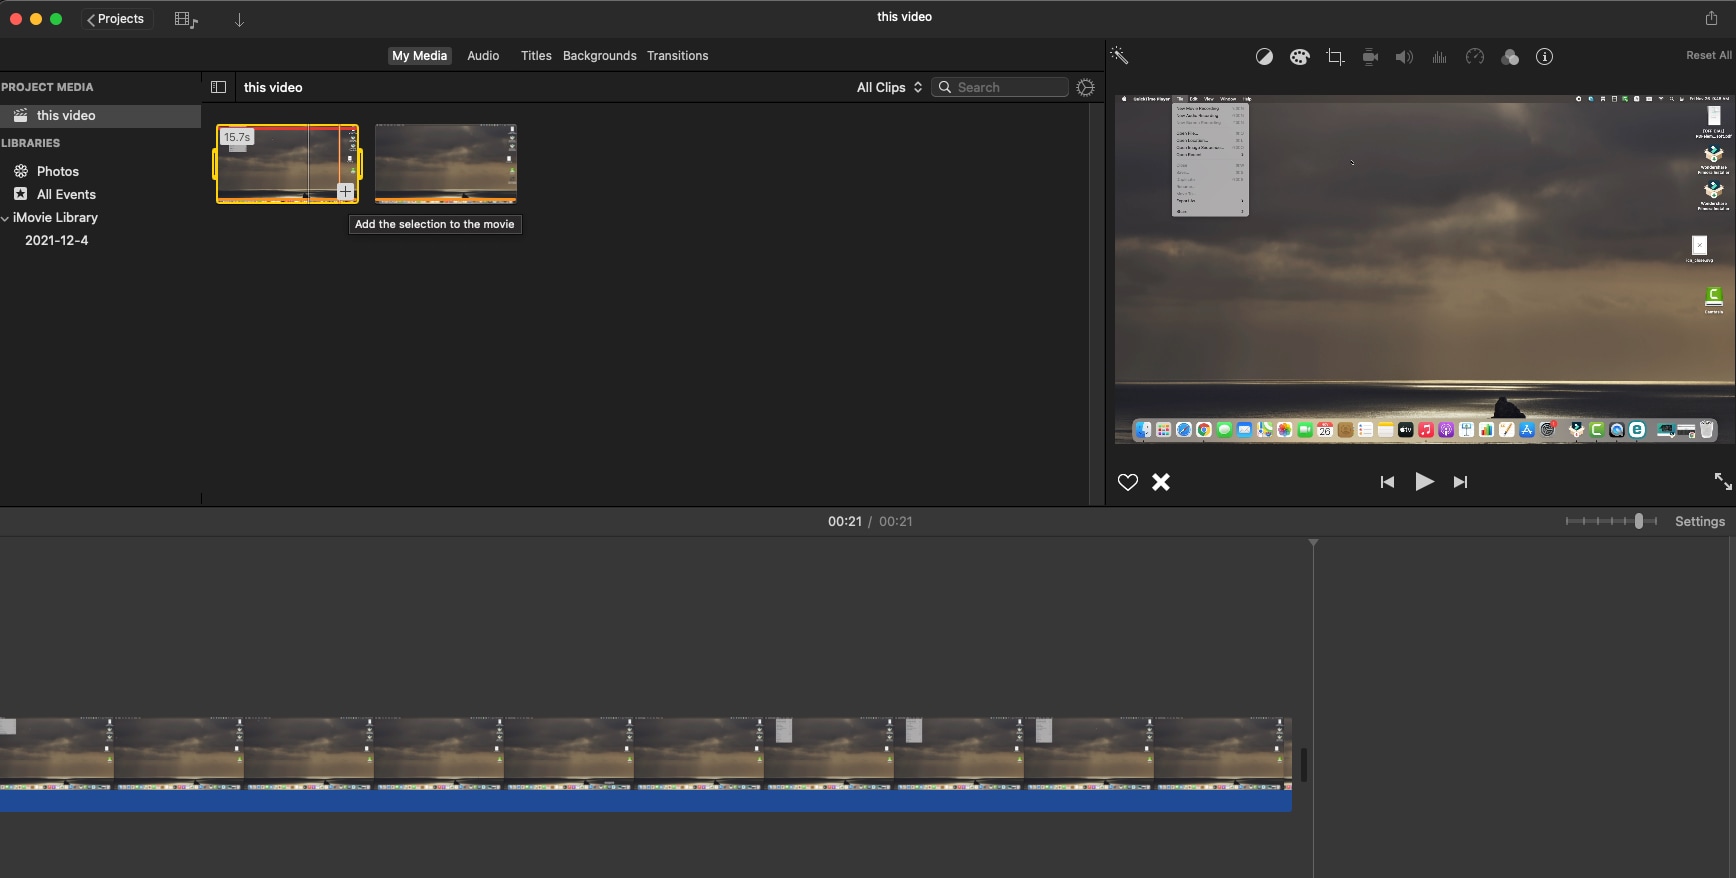
Add your videos to the software first, then drag them to the timeline in order. No worries, you can rearrange them by pulling on the timeline as well. A preview will be made available, and you can see how well the videos merge.
Step 4 Combine videos, save or share
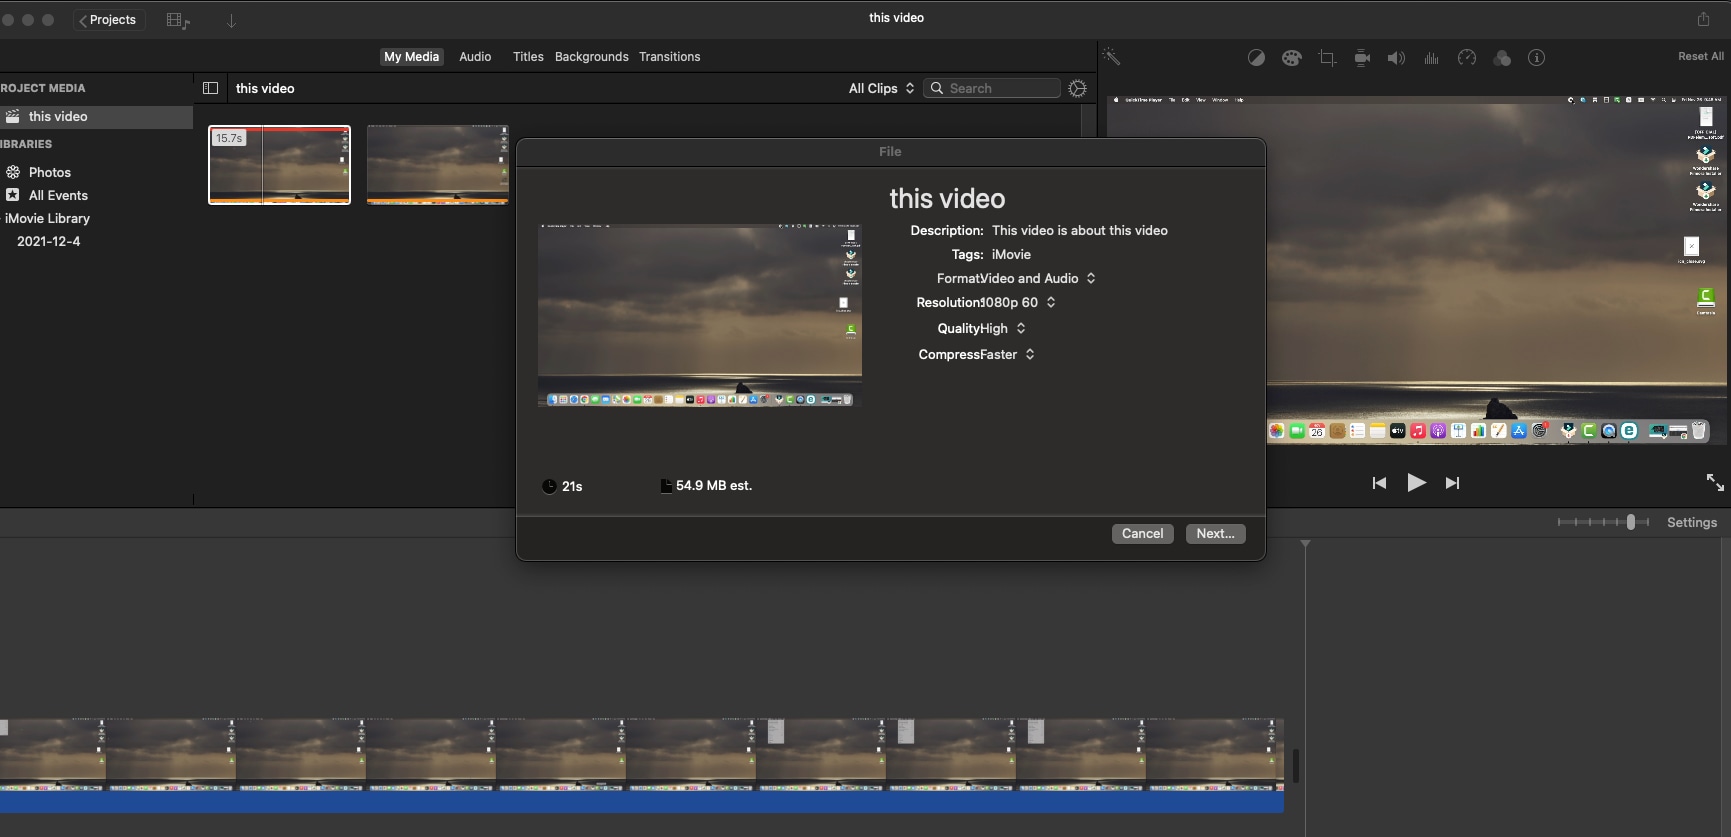
When everything is done, click on File again and navigate to Share. More options under share include sharing to social media or saving it to your computer. Click on File… to save it to your computer
Pros
iMovie can increase and decrease the playback speed of a video, thereby creating a slow-motion effect
iMovie can create an audio fade-in and fade-out
You can add transition effects to your videos with the software
You can merge and split videos
Cons
iMovie cannot export in other formats except MOV
It cannot add or remove a watermark
Part 2. How to Merge Videos on Mac with Advanced Mergers?
UniConverter 13
Uniconverter is an all-in-one solution to any of your video editing functions. You can convert videos, compress videos, merge videos, record screens, webcam, and audio, download videos online. It can batch process any of the functions. What's more? With the merging function, you can join an unlimited number of videos together, and you can even trim the video before merging. After you combine videos on Mac, you can convert, compress, or do some other editing with it.
Steps to Combine Videos on Mac Using Uniconverter
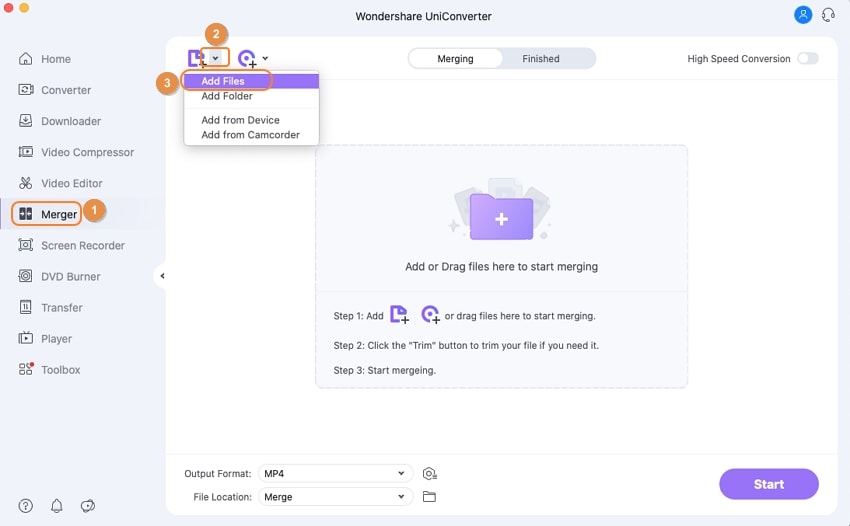
Step 1 Launch the Uniconverter software and upload your videos
On the main interface of Uniconverter, click on the Merger tool from the list on the left. Now, you can import videos into the software. You can either drag and drop the videos into Uniconverter or you can click on the folder in the middle to import videos.
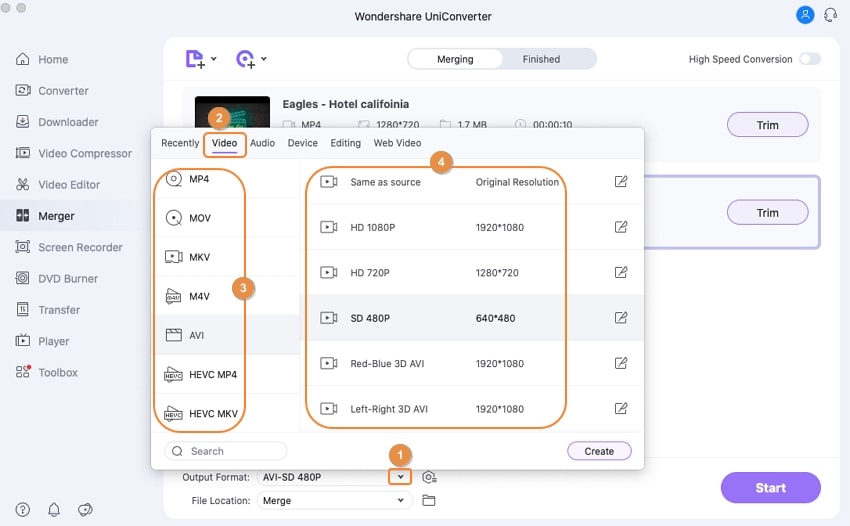
Step 2 Choose the output format
After upload your videos, click on Output Format and select the format you want.
Step 3 Start Merging and Save
Once you have uploaded all videos, you can trim the videos before merging to make your video even more perfect. Click on Start All at the bottom when you are ready. Please wait for it to finish processing and save.
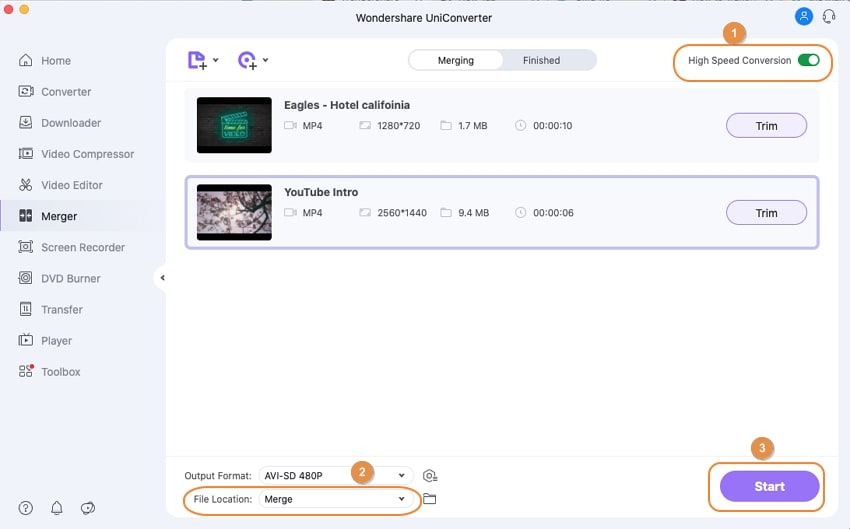
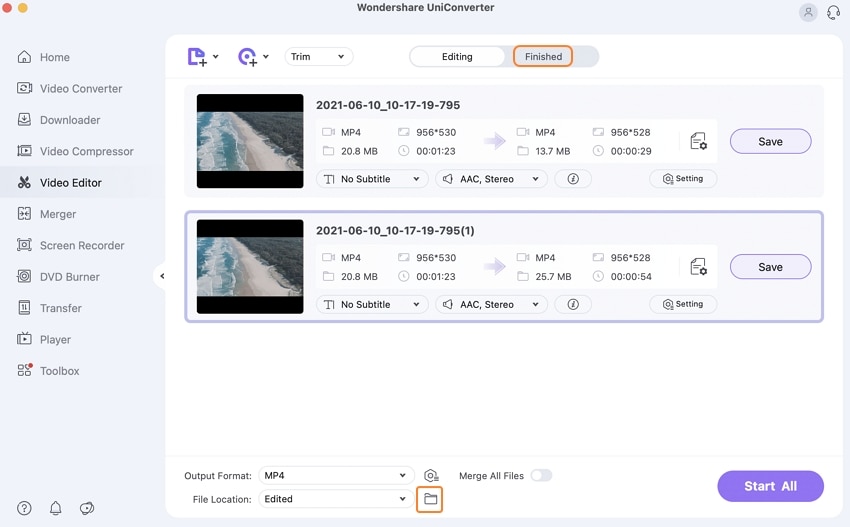
You can change the save folder by clicking on File location at the bottom of the interface.
Pros
It has a lot of editing functions
Uniconverter can batch process the features, batch convert, merge in batches, etc.
Supports conversion to and from over 50 video formats
Cons
It is not free
It is not supported on Linux
There are limitations in the free version

Wondershare UniConverter 13 - A Complete Meida Toolbox
5,481,435 people have downloaded it.
UniConverter supports many formats and handles conversion equally, ensuring that high quality is delisered at all times.
During the conversion process, you may add multiple files since the program does batch conversion of files.
You can use the editing suite that covers subtitle editing, watermark editing, etc to make your results creative masterpieces.
This software facilitates file transfer to devices like Android and iPhone among others once the conversion is complete.
UniConverter is also capable of handling video compression hence ensures you acquire the video sizes you desire.
Joyoshare Vidikid
Joyoshare is another very powerful video converter and merger, it has the screen and audio recording function and supports conversion to and from over 100 formats. The merging function is above average, and its processing speed is pretty fast. The quality of the video isn't affected, and there is currently no known limit to the number of videos you can upload. Videos of different formats for merging don't affect its functionality at all.
How to combine videos on Mac with Joyoshare Vidikid
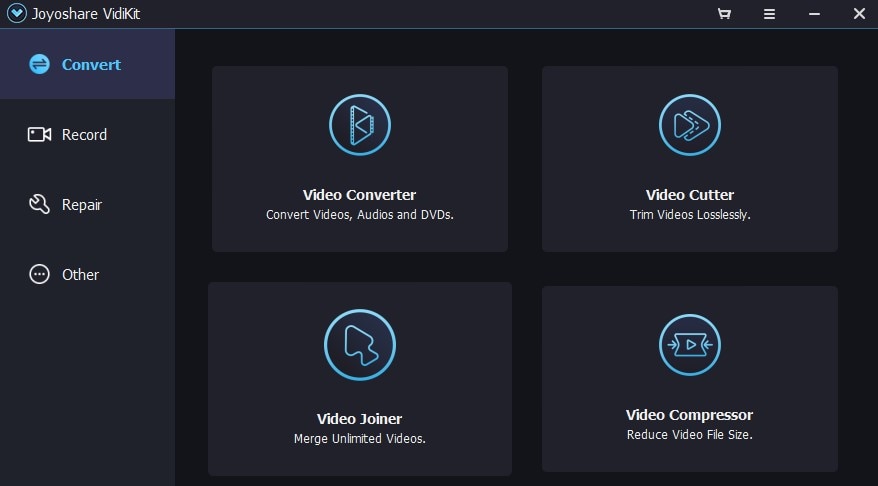
Step 1 Launch the software and Upload a video
Launch Joyoshare, then choose 'Video Joiner'. You would see that the screen will be divided into two parts, the right side for video preview and the left for videos to be merged. You can directly drag and drop the videos into the left side to begin the merging process.
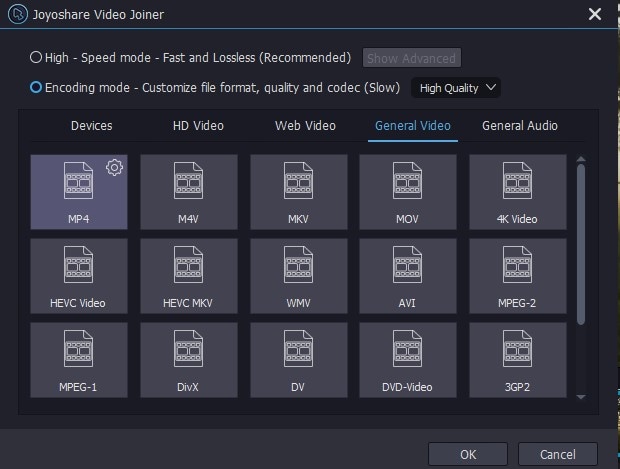
Step 2 Choose either High-Speed or Encoding mode
You can either use high-speed mode for merging or encoding mode. The high-speed mode is for joining videos of the same format, while the encoding mode is for integrating videos of different formats.
Step 3 Choose output format
Select the format in which you want the video to be exported on the next screen. Joyoshare supports a lot of formats, so there is a wide range of choices to choose from
Step 4 Edit Video
After selecting the mode and format, you are sent back to the main interface. Move the sliders on the left side to trim each video before merging. This is where you add effects, adjust brightness, change aspect ratio, insert subtitles, add watermark, and other editing functions you will find on this page.
Step 5 Merge and Save
Click on 'Convert' to start merging the clips when you are done with that setting. The merged file will be saved to your local disk.
Pros
It serves as a converter, compressor, watermark, and subtitle adder
It has the ability
Joyoshare Vidikid can add voiceovers and narrations to recorded videos and clips.
Merging multiple formats is easy with Joyoshare
Cons
It is not free
Free users have watermarks in their videos
Its processing speed is a little bit slow, especially if you are merging clips of different formats
Part 3. How to Merge Videos on Mac with Online Tools?
Clideo
Clideo is somewhat popular as an online video editor. You can see evidence when you visit their site. They have tools that can edit audio, video, and even images. You can create stickers and GIFs, and the output quality is pretty decent. Clideo can output videos in HD format, which is rare for online tools because of their limited resources. It can split and combine videos on Mac with ease.
Step 1 Visit the website and import your files
First, visit the Clideo website as everything will be done online. Navigate to its merger feature and choose the videos you want to merge.

Step 2 Merge
Before merging, you must ensure that your videos are in the right position. If not, you can drag the videos across the sliders to change their positioning. To finally begin merging, click on Export and wait for it to finish.
Step 3 Download the merged video
Watch a preview of your video and download it. If you need to change something, click on 'back to edit'.
Pros
Social media sharing
It has its collection of online resources to make editing either
You can increase or decrease the playback speed of your video
Real-time annotation
HD resolution for upload and download
Cons
The limit on size is around 650MB
No free trials
Adobe Spark
From the same company that made Photoshop and Illustrator, Adobe Spark is Adobe's answer to video editing. It has its fair share of powerful tools, there is a variety of online videos, music, and backgrounds for you to download, you can merge videos on mac with it, and you add and remove watermarks, you can enhance and reduce audio or remove it completely. Try out the app for more details on the fun features it offers
Step 1 Visit the website and choose your videos
On the Adobe Spark website, click on the merger function, and on the next screen, you will be able to upload your videos.

Step 2 Rearrange and Merge
Rearrange your videos by dragging and dropping. You can choose to trim your video before editing it as well. Editing features like trimming is feasible here. Click on merge to begin.

Step 3 Download
Wait for your videos to merge, and without further ado, download.
Pros
There is a catalog of online resources that you can download from
Allows simple editing
Can add and remove watermark from videos
Can correct aspect ratio
Audio enhancement features
Cons
It is a bit difficult to master
It cannot generate or edit GIF images
The arrangement of the tools limits the workspace given
Part 4. Q&As about Merging Videos on Mac
1. How do I combine videos in VLC on Mac?
People think VLC is just a simple video player, but it is more than that. It is not specialized for music, but it does well for video editing. Want to learn how to merge videos on Mac?
How to Merge Videos on Mac Using VLC Media Player
Step 1 Launch VLC and click on Open Multiple Files
Open the VLC software and click on the File tab on the toolbar. From the dropdown box, click on Open Multiple Files…

Step 2 Select multiple videos
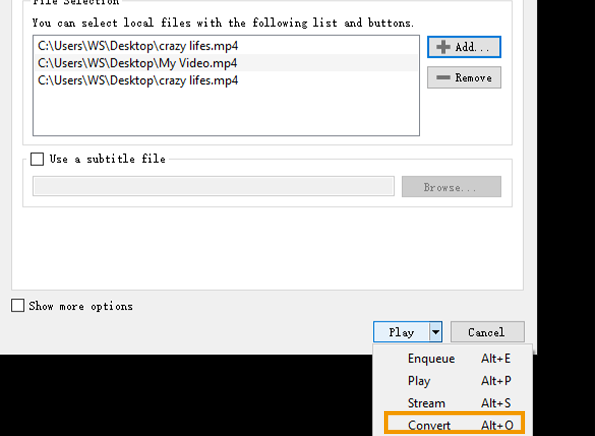
A file explorer window pops up, and you can now select the videos to be added. Next, click on the arrow beside 'play' to get the list of available options. Select Convert from the dropdown box.
Step 3 Convert and Save
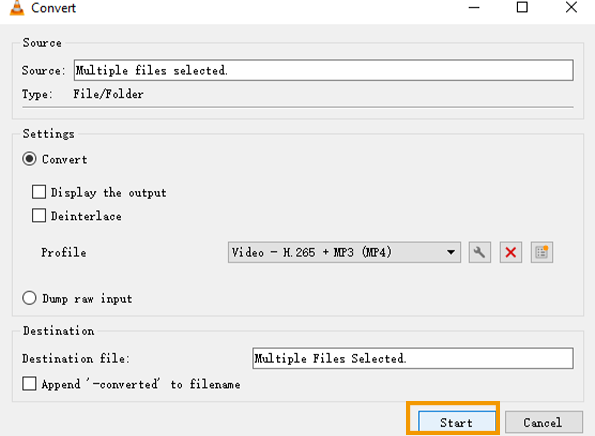
Clicking on convert will bring up another box. Look through the box and locate Profile. Make sure the profile is in a video format. Click on Browse to change the name of the video, and the location, then click on Start to begin to combine video files.
2. How to trim videos if I want to split the videos back again?
You can use the video trimmer to trim the videos.
We recommend Uniconverter video trimmer as it is fast and perfect for trimming.
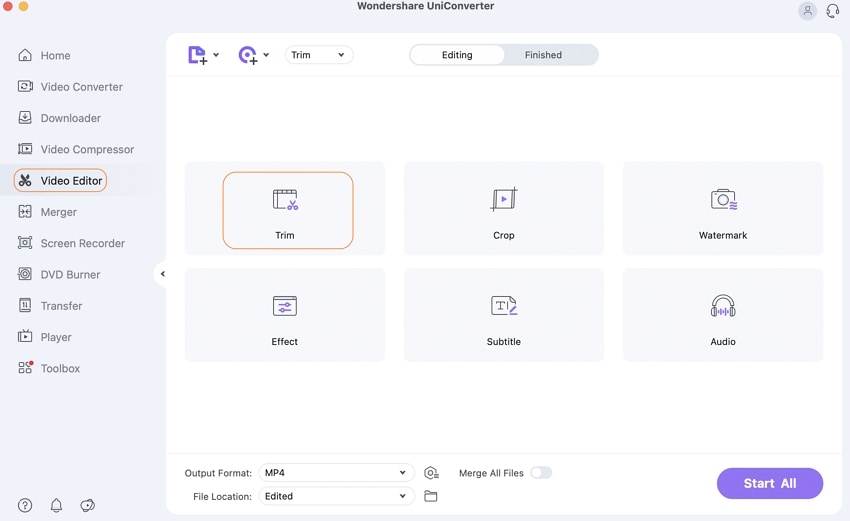
Step 1 Launch Uniconverter and click on Video Editor and Trimmer
Uniconverter has many features, but they are neatly arranged on the left side of the interface. Locate Video editor and click on it. You will be given some other options, select Trim
Step 2 Upload video and Cut
The next screen will enable you to upload your video. Click on the purple folder in the middle of the interface, or you can just drag and drop the video into the software. Wait for it to finish uploading, and you can now crop. Drag the sliders to crop, a preview will be made available, and you can watch how the video looks like.
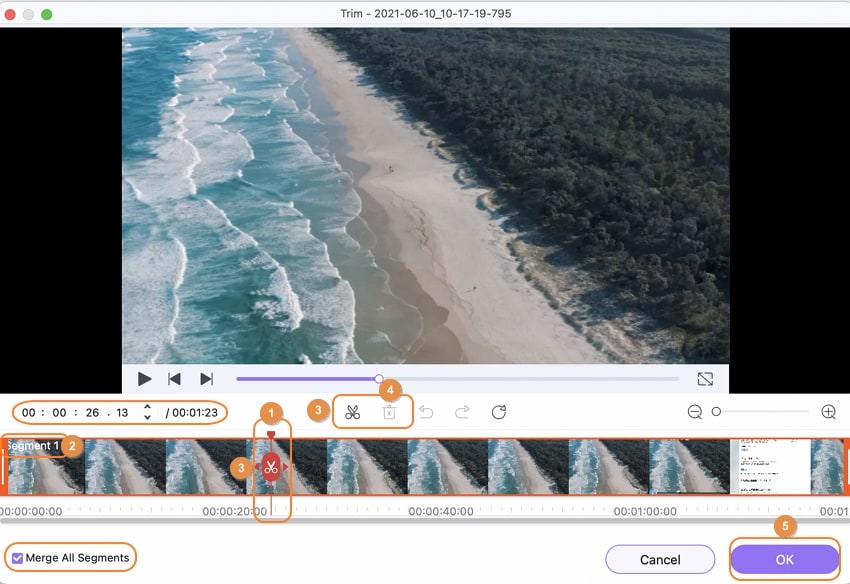
Step 3 Export your video
When you are done, click on OK at the bottom of the screen. Now, click on Start All to begin the trimming. Also, it is worth stating that Uniconverter can process videos in batches, i.e., you can trim more than one video at a time.
For Win 7 or later (64-bit)
For macOS 10.12 or later

