Smart trimmer - UniConverter
- Auto-trim video according to audio volume, playback length, and buffer.
- It supports a user-friendly timeline edit zone to make trimming fun and precise.
- Export trimmed files without losing quality.
- Edit video files with various tools after trimming.
- Other features include a converter, downloader, merger, compressor, and so on.
Deleting a video because of a simple mistake made during recording isn't the right decision that guarantees a better one. If you have recorded a video as supposed and a little error appears on your recorded video, all you need to do is trim the video using a good video trimmer. Sometimes, trimming the video might not be your problem but the software application to use. As we've always and would always be here for you, you don't need to take your mind on trips as we've provided 12 easy solutions to help you trim and strengthen your convictions against deleting any beautiful video you've recorded.
Part 1. 3 Built-in Solutions to Trim Movie on Windows & Mac
iMovie
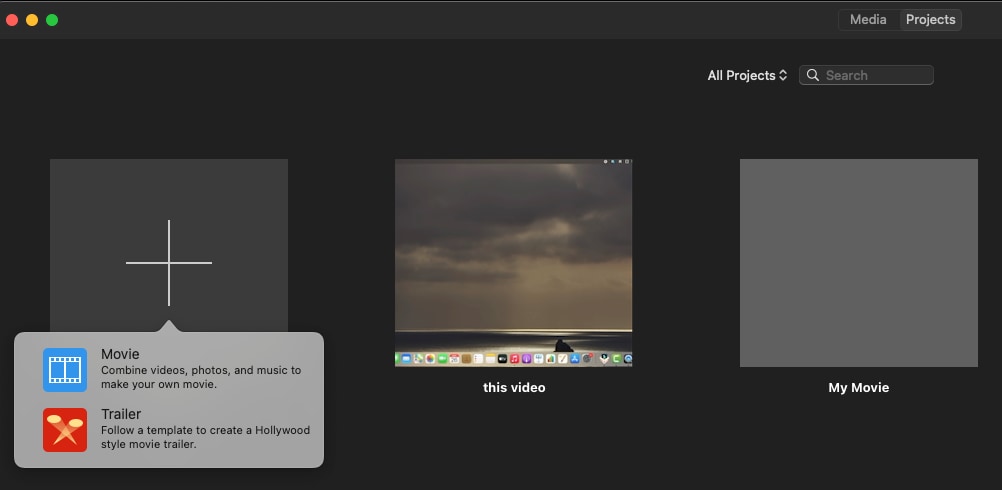
iMovie is a software you can consider if you choose to trim video. The property of Apple inc is a video editing software that permits users to record video and edit video whether it's recorded or imported by trimming, cutting adding effects, adding audio, and more. Now, if you're stuck on deleting your beautifully recorded video because of a casual mistake, then here is what you need to do.
STEP 1
Launch the iMovie software application on your PC > once the iMovie's interface is opened, from the "My Media" tab under "iMovie Library", open the folder that has the video you want to trim and drag it to the editing timeline below.
STEP 2
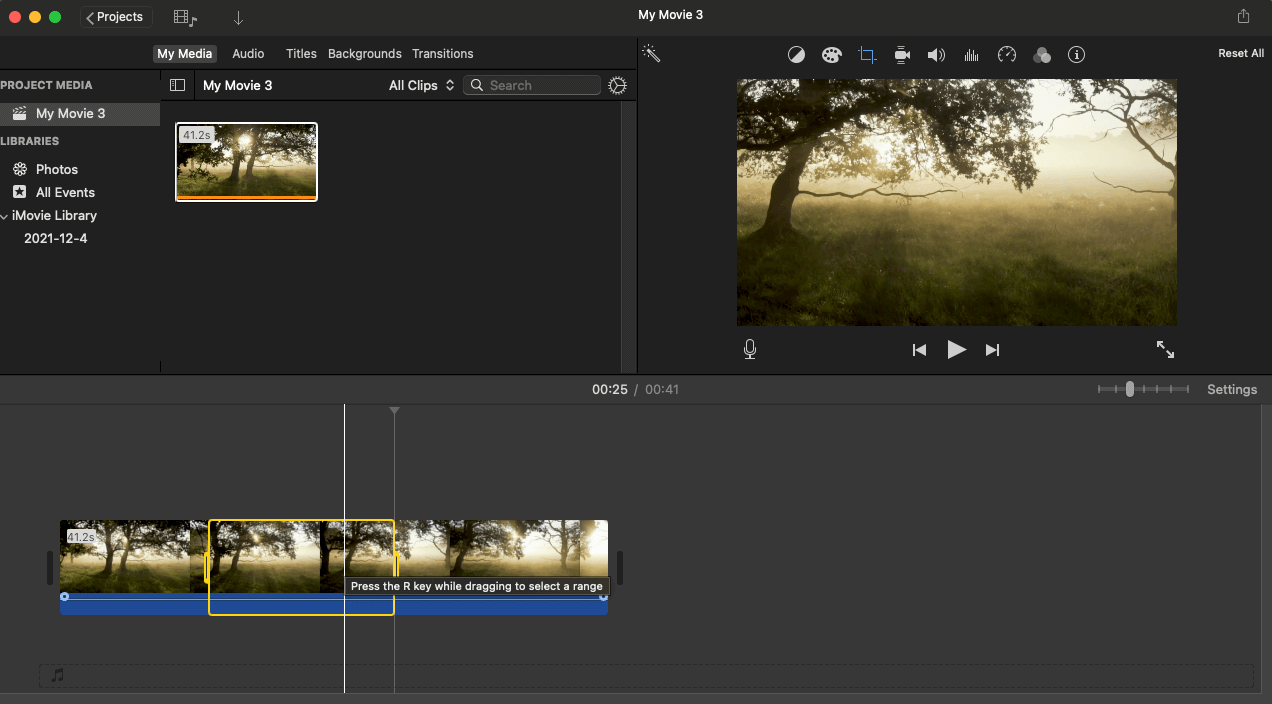
Once the video is dropped to the editing interface, click on the video strip on the timeline, and drag each of the edges of the video strip to trim the video. Alternatively, you can adjust the cursor to where you want the video to start and press "I" from the keyboard, move it to where you want it to end, and press "O" on your keyboard. After this, right-click on the selected portion and select "Trim Selection". If the part you wish to trim is at the middle of the video, then move the cursor to that part > right-click on it > select "Split Clip"> once the video splits, you can reduce each edge you had split earlier and merge them.
STEP 3
Once you're done, click the "Share" icon at the top right corner of the interface to save or export your trimmed video.
Pros
It is easy and understandable
It has a lot of video editing features
It supports File sharing via email, iCloud, social media platforms, and more
Cons
It offers a paid version
Edited video consumes a lot of space
It only supports macOS
QuickTime
QuickTime player is an Apple media playing software that allows users to edit videos and audio files and utilize the software as a recorder. The media player is known to play movies, songs, funny clips, and more. If you think it ends here, We're sure you don't want to be left out, as the software can be used to trim videos following these steps.
STEP 1
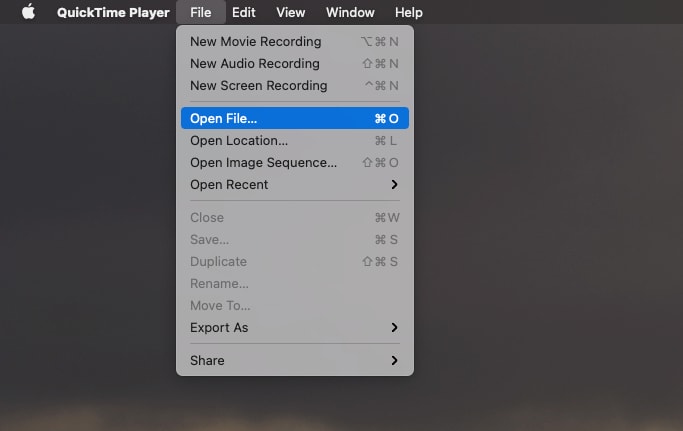
Open the video you want to trim using QuickTime Player. Alternatively, launch the QuickTime Player > click on "File" from the menu at the top of the interface> select "Open File…" to import the video to its interface.
STEP 2
From the menu bar, you'll see at the top of the interface, click "Edit" and select "Trim…" from the dropped menu. Now, you'll see a video strip at the downside of the interface, adjust the edges to trim the video as desired, then hit the "Trim" button on the right side of the video strip.

STEP 3
Finally, click on "File"> select "Export As" and select a quality you wish to export the trimmed video.
Pros
It has a recording feature
Users can export the trimmed video as an audio
Trimming with QuickTime Player is free
Cons
Users can't trim or remove an unwanted part that is not at the start or endpoint
A few editing features, and it is compatible with macOS only.
It doesn't support social media sharing
Photos App
Photos App is unlike the software mentioned above as it is a property of the Microsoft Corporation. The built-in tool primarily functions as an image viewer and organizer. Aside from that, it's also utilized as a video player and an editor, which brings you into a new dawn of using the software to trim a clip following the steps below.
STEP 1
Open the Photos App on your PC > choose and open the video you wish to trim >
STEP 2
Now, click on the "Edit & Create" dropdown option you'll see at the top right side of the interface> select "Trim" from the displayed options.

STEP 3
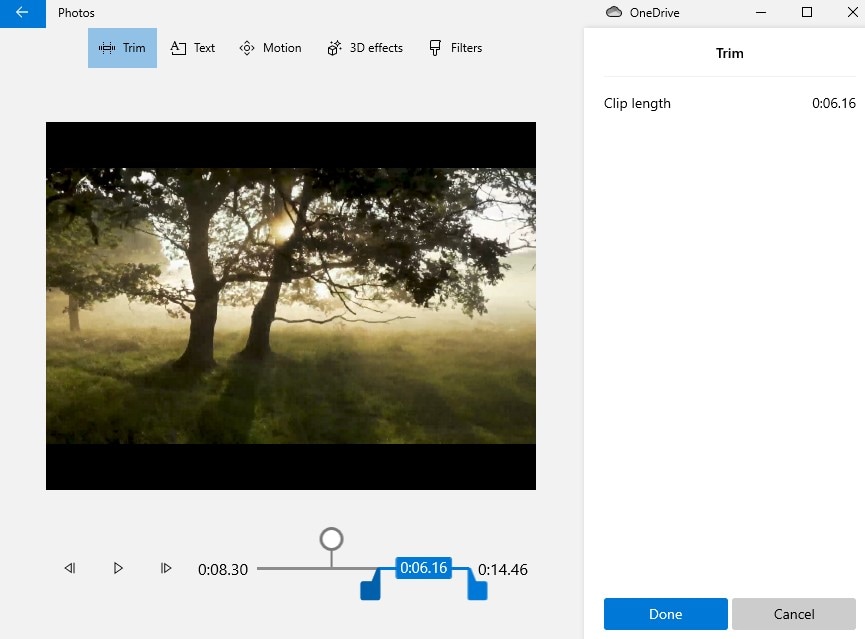
After this, you can adjust each end of the duration (video length) display you'll see at the bottom of the interface to your desired length. Finally, click the "Done" situated at the lower right corner of the interface.
Pros
It is easy and direct to access
It is free
It supports video editing with music, 3D effects, text, and transitions.
Cons
It only supports Windows 8, and later
Trimming and cutting in between the clip can't be achieved
The built-in software isn't channeled to any online streaming platform
Part 2. 4 Advanced Methods to Shorten Video Efficiently
UniConverter
UniConverter 13 is an excellent choice If you've decided to use an advanced method to shorten videos. The integrated software that houses several media editing and working tools permits users to seamlessly trim and cut a video, add effects, filters, and more, as desired. So, if you want a glimpse of this Intuitively packed software, you can utilize the guidelines below.
STEP 1
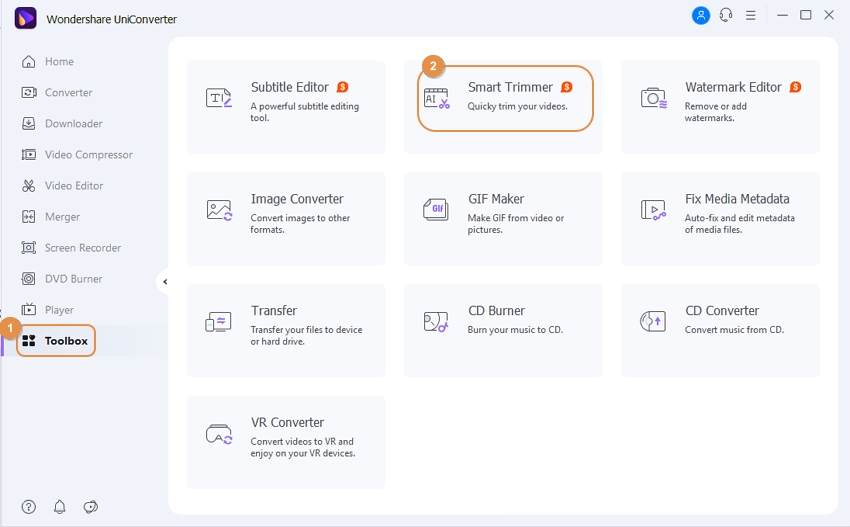
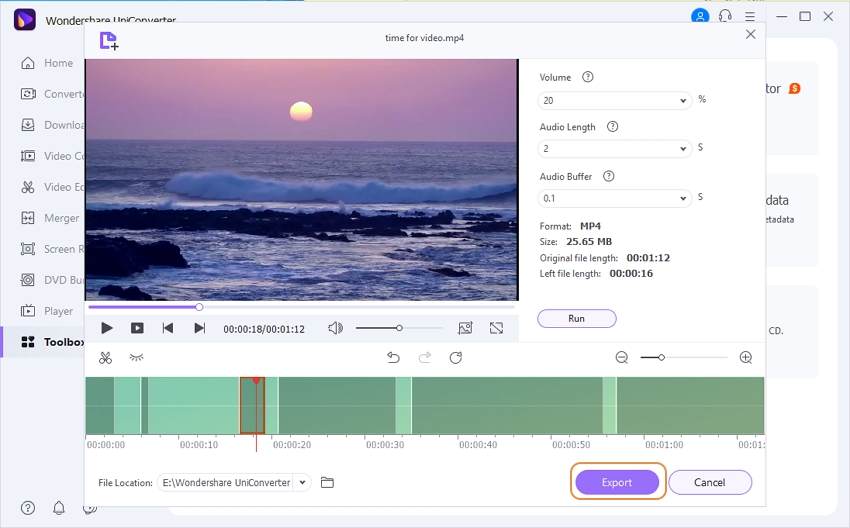
Download and install the Uniconverter on your PC. Launch it > firm the left side of the interface click "Toolbox"> select "Smart Trimmer" from the numerous available options in the toolbox. Immediately the Smart trimmer opens, click on the "Add File" icon you'll see at the top left corner of the interface to import the video.
STEP 2
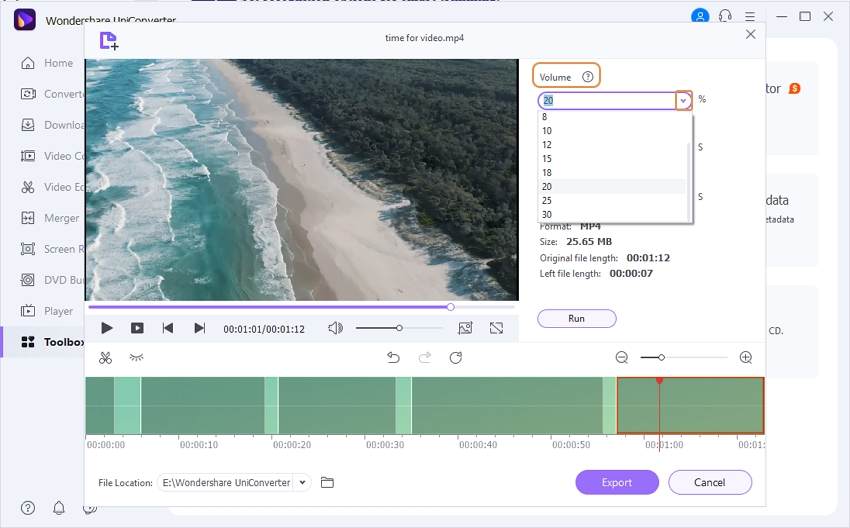
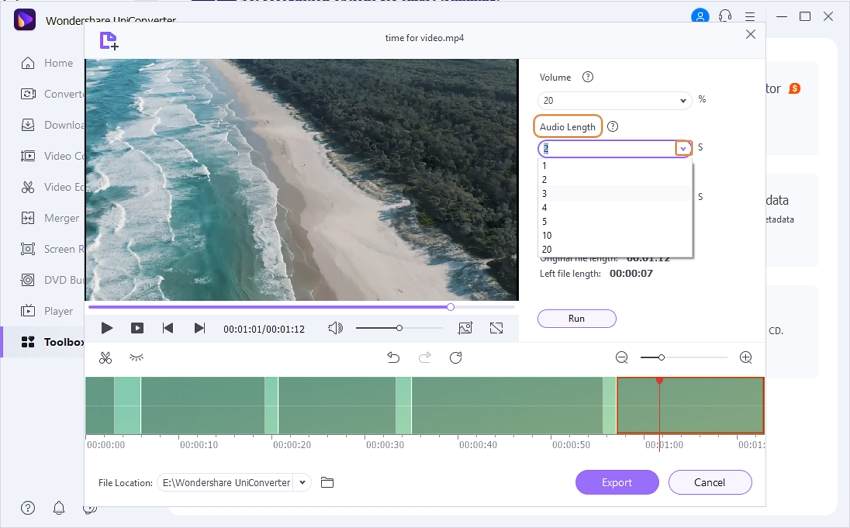
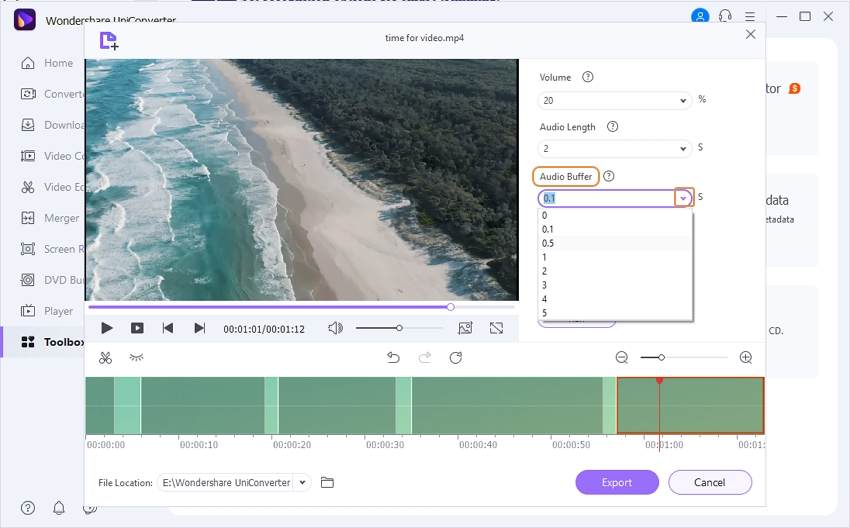
Afterward, click the "Volume" dropdown option > choose between 0% - 30% for the smart trimmer to automatically detect and delete parts that are lower than the selected volume preset > click the "Audio length" option and choose between 1 - 20 to automatically highlight and delete part without sound > after this, click on the "Audio Buffer"> select between 0 - 5 to adjust the buffer time.
STEP 3
Finally, click on the "Run" button below the big video thumbnail, then select the "Scissor" icon to cut the detected parts highlighted by the closed eye feature. Once you're done, click on the "Export" button.
Pros
The UniConverter offers an auto detector that highlights parts with irregular volume levels
Users can trim manually
It supports all kinds of video formats
Cons
It offers a paid (Pro) version
Free trial version users only get 30% of their conversion
It only supports Mac and Windows OS
Pricing
Smart Trimmer - $15.99/year
UniConverter Add-ons Package - $45.98/year

Wondershare UniConverter 13 - Best Video Converter for Mac/Windows
5,481,435 people have downloaded it.
UniConverter supports 1000+ formats and handles 90X faster conversion, ensuring that high quality is delivered at all times.
You can add the multiple files since the program does batch conversion of files.
The GUP acceleration can help you download online videos in high speed.
You can use the editing suite to remove video background, edit watermark and subtitle, and auto-trim videos.
This software facilitates file transfer to devices like Android and iPhone among others once the conversion is complete.
UniConverter is also capable of handling video compression hence ensures you acquire the video sizes you desire.
Filmora
Filmora is another beautiful product of wonder share, just like the UniConverter. Filmora is a media editing software that allows users to edit, trim, cut, split, add a background, add music, add effects to a video clip, and more. So, if you need to trim a video clip, then you can utilize the wonderfully made Filmora this way;
STEP 1
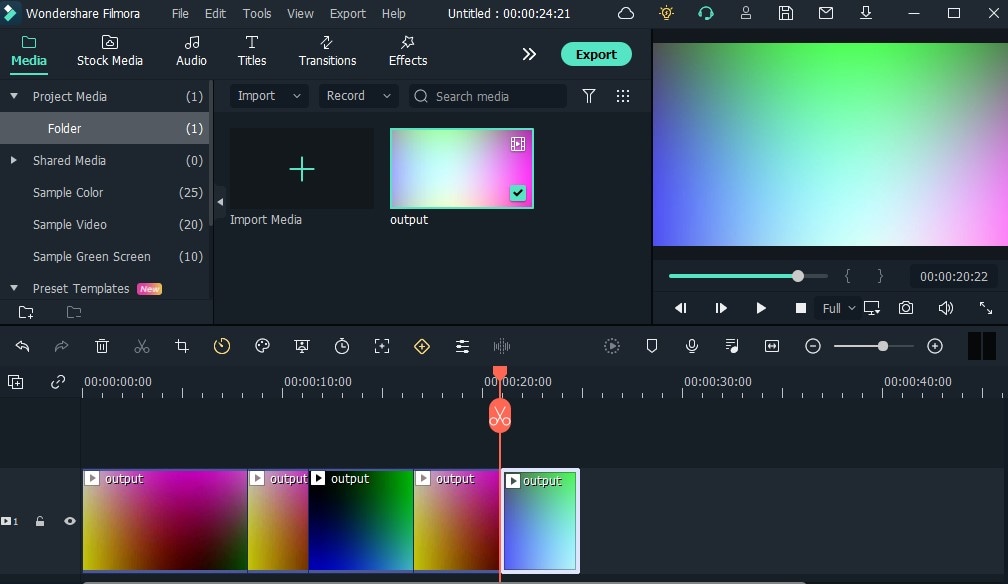
Download and Install Filmora on your PC > launch it once It's Installed > click the "Media" to Import the video you want to trim from the computer's library to filmora's media library.
STEP 2
From the media library of Filmora, drag and drop the imported video to the editing timeline > to trim the start or end of the video, adjust the in and out point respectively. If you want to delete an unwanted part at the middle of the video, move the play head to the beginning of the part you want to eliminate and click the "Scissor" icon and do the same for the end of the unwanted part, then click the "Delete" (Bin) icon to delete it.
STEP 3
Once you're done trimming, simply click on the "Export" option.
Pros
It supports multiple output formats
It supports sharing to other social platforms and devices
It supports all devices
Cons
Exporting duration takes longer than expected sometimes
It offers a paid version
The PC version only supports Mac and Windows OS
Pricing
ANNUAL PLAN - US$68.98
PERPETUAL PLAN - US$116.95
FilmForth
FilmForth is another advanced method that can shorten video file as the software has a trimmer incorporated with other media working tools like a video converter, video stabilizer, video rotator, and more. If you'd love to use the FilmForth to trim video files, then all you have to do is;
STEP 1
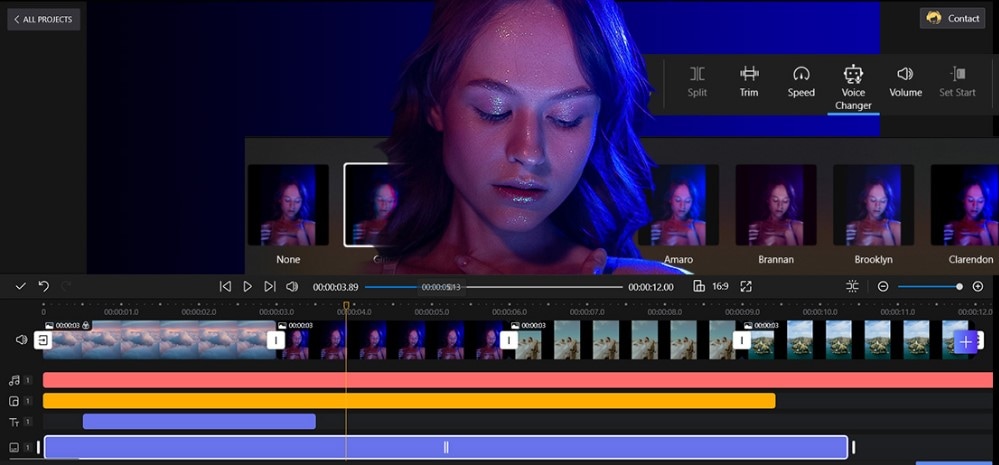
Download and Install the FilmForth on your PC > launch the software > click on" New Project" once the interface is displayed to import the video trimmed from your computer library.
STEP 2
Once the video appears on the interface, click the "Edit" option you'll find below the interface and select "Trim" from the displayed options. Now, you can drag the start point and the endpoint from the editing timeline below to trim the video. You can also trim the middle of the video by moving to the part and clicking "Split" and do the same for the end of the unwanted part > delete the trimmed part by clicking on the "Delete" option you'll see among the edit options.
STEP 3
Finally, click the "Save Video" button you'll see at the bottom right corner of the interface.
Pros
It has a lot of editing features
It supports multiple video formats
It's a video trimmer with no watermark exportation as users are allowed to uncheck it.
Cons
It Is only compatible with Windows 10 and later
It's not channeled to any social media network
It requires a little bit of learning for new users
Pricing
Unavailable
Snagit
Snagit is another amazing product of TechSmith that allows users to screen record, snapshot, create instructional how-to guides, and more. It also offers a feature that allows users to shorten a video as desired. If you're searching for a video trimmer app, then the TechSmith Snagit can be recommended too. If you want to trim a clip using Snagit, all you need to do is;
STEP 1
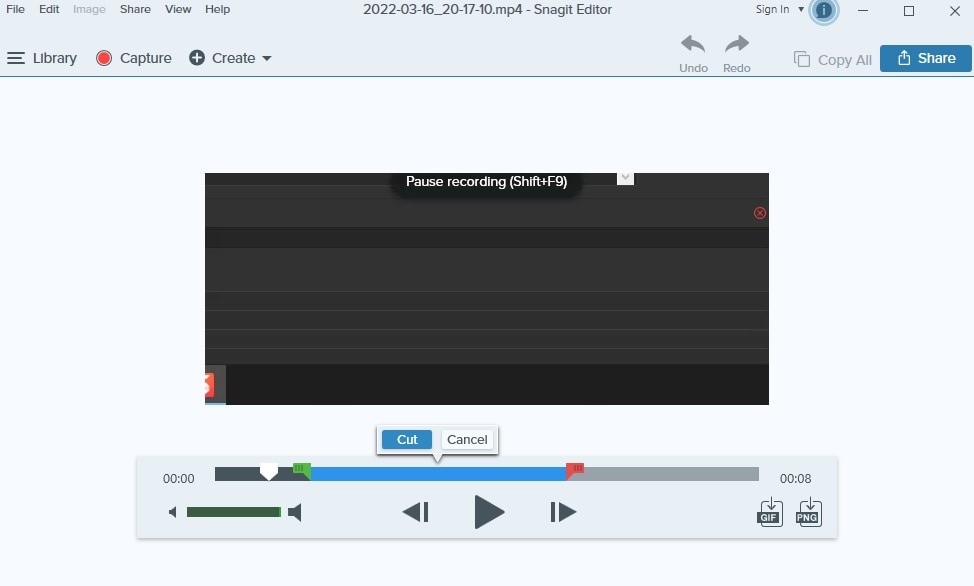
Firstly, open the video you want In Snagit's editor if you're not recording a new video with its recorder.
STEP 2
Once the video is available in the editor's interface, from the duration bar you'll see, adjust the green in and red out point to reduce the length or duration of the video as desired.
STEP 3
Once you're done making every necessary adjustment, just hit the "Cut" button to get your video trimmed. Afterward, click "File" from the menu bar at the top left corner of the screen > select "Save As" or "Export".
Pros
Snagit is easy to utilize
It supports mail file sharing
It has a free trial version
Cons
It offers a paid version
Only parts from the beginning and the end of the video can be trimmed
It can't be recommended for professional editing
Pricing
US$62.99 Per User
For Win 7 or later (64-bit)
For macOS 10.12 or later
Part 3. How to Trim A Clip with 3 Online Tools
Clideo
If you feel using the advanced method we've provided might be a bit strenuous for you, you can utilize an amazing online software like clideo as it gives users the chance to trim, merge, add subtitles, compress, and crop a video, and more. If you want to use Clideo to edit video length, then all you need to do is;

STEPS
Load Clideo to a browser on your device > from the list of tools, click "Cut"> click the blue "+ Choose file" button to import the video you wish to trim from your local library > once the video is in the editor's interface, adjust the start and endpoints as desired and select "Extract Selected"or"Delete Selected" depending on how you want to trim It > click on the blue "Export" button below when you're done.
Pros
It supports Google Drive and Dropbox
It's free
Clideo supports multiple video formats
Cons
The exported video carries a watermark
Users can't trim multiple parts of a clip at a time
Users can't trim video heavier than 500MB If you are on free trial mode
Kapwing
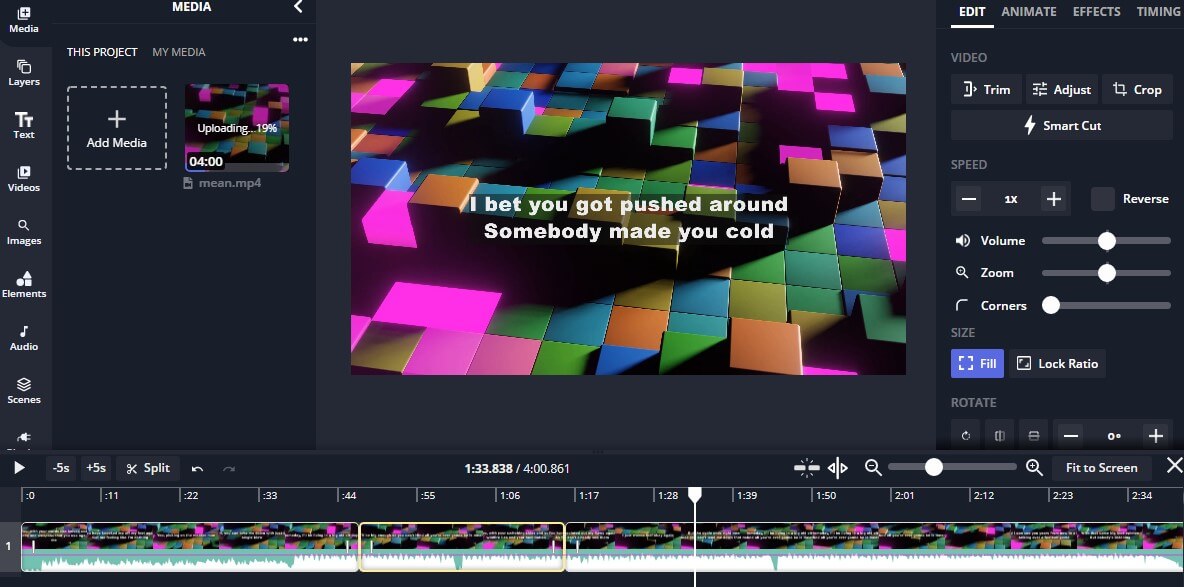
Kapwing is another online solution you can go with if Clideo doesn't suit you. With the online solution, users can trim and cut a video as Kapwing is a video editor that gives room for media editing. If you'd like to use the software for trimming, then here are steps you can follow.
STEPS
Load Kapwing on any browser available on your device > click on "Click to upload" to import the video to be trimmed > once the video appears on the interface, you can drag the video from each ends to trim the video > if there's a part you want to cut from the middle of the video, move the play head to the part > click "Split" beside the play button > repeat the same procedure as you move the player to the end of the unwanted part > click the "Delete icon" at the top of the interface to delete the unwanted part > merge the parts> click the "Export Video" option to save it
Pros
It has a lot of editing features
Users can export the video as mp3, gif, and more
Just in case you need a video trimmer to download video from YouTube, kapwing is at your recommendation
Cons
Exported video is watermarked
The quality of the trimmed video is reduced
Your device might be prone to bugs and viruses because it's an online software
Veed.io
Just in case you're searching for another online software that will give you the chance to trim, cut, add a background, and more, then you have Veed.io as part of the listed options you have at your disposal. You can conveniently trim video files using the online tool with the easy steps below.

STEPS
Load Veed.io to a browser on your device > click on "Upload Your Video"> click on "Tap to upload" to import the video to be trimmed > from the editing timeline, adjust both the start and endpoint by dragging the edges of the video strip to trim the video > once you're done with every necessary step, click on the "Export" option to have your trimmed video.
Pros
The web-based software is compatible with all devices
It supports URL pastings to download media files
It is free
Cons
Only cryptocurrency owners can purchase the bandkits
The software malfunction a times
It can't be recommended for professional use
For Win 7 or later (64-bit)
For macOS 10.12 or later
Part 4. Other Useful Ways to Edit Video Length
VLC
We know you'll be amazed as you get to know that the media player software you've kept on your system for so long can be used as a video trimmer. Please do not bother asking how I can use the VLC media player to trim video, as we'll show you the procedure in a summarized step.
STEPS
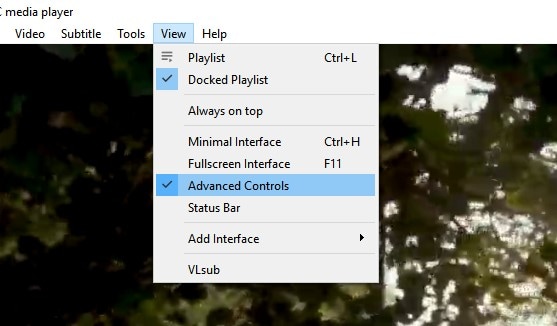
Open the video you want to trim with VLC or launch the VLC media player > click Media" from the menu bar > select "Open File" to import the video to be trimmed > now, click "Edit" from the menu bar > select "Advanced Controls". The advance control tools would line up above to play options > move the play head to the point your want to start trimming > click on the "record button" and "Play button" to start the trimming process > click the "Record button" again once you're satisfied. The trimmed video is automatically saved in the default folder (videos).
PowerPoint
PowerPoint is one of the Integrated tools packed in Microsoft Office. The software is a tool created to make electronic presentations during a meeting, whether an educational or business meeting by presenting the content in slides. We know this might be strange to you, but we confidently tell you that PowerPoint can be used to edit video length with the proof below.

STEPS
Open the Microsoft PowerPoint on your PC > from the menu bar, click on "Insert" and click on "Video" from the top right corner of the insert options > select "Video on my PC" to import the video > from playback options, click on "Trim Video"> from the displayed window, you can adjust the start and end time or resize the start and endpoint marker to edit the video length > Click "OK" once you're done.
Part 5. 2 Tips to Trim Clips
1. The differences between trimming and cutting
Undeniably, most people don't understand the basis of the two words but today that you've met with us, we'll shed light on them. Cutting is making a video into different segments, which on the other hand, you can call it splitting, while trimming involves reducing the length of a video to form a new clip
2. The Way to merge the clips in case you regret deleting the clips
No two ways about it but using the best video trimmer like UniConverter that offers a merger to join all your videos just at a click irrespective on their formats.
For Win 7 or later (64-bit)
For macOS 10.12 or later

