Help Upload QuickTime Video to YouTube-UniConverter
- Convert QuickTime video to YouTube-supported formats with 100% original quality and 90x faster speed.
- Edit QuickTime files before uploading them to YouTube.
- Download video/audio from YouTube and other 10000+ video and audio sites directly with one click.
- Convert YouTube to other 1000+ standard audio and video formats including device optimization.
- Other features include recorder, merger, compressor, and so on.
Mac users often use QuickTime Player to play, record, or edit videos. It's possible to upload QuickTime to YouTube on Mac, but sometimes we often meet some problems during the process, this is because of the following reasons:
1. Your video encode is not very compatible with YouTube.
The video encoder most accepted by YouTube is h.264, and the audio one is AAC-LC. The highly recommended format is mp4 and a standard aspect ratio of 16:9. Missing one of these requirements might lead to problems uploading the video.
2. Your file is too big
The default format for QuickTime or other Apple media players is MOV, and we all know that while MOV is true of very high quality, the size is also just as large. There is a 256GB size limit on YouTube videos, so this might be one of the reasons why you can't upload QuickTime to YouTube.
3. Your Internet connection is not stable.
Just as it is stated in the title, you need strong and stable internet connections to upload QuickTime to YouTube with ease.
So, how can you upload QuickTime to YouTube?
Part 1. Steps to Make Uploading QuickTime Video to YouTube Easier (UniConverter’s Solution)
To upload QuickTime to YouTube, you need to convert QuickTime to YouTube first, and when it comes to converting, there are a very small amount of other converters that can compete with UniConverter. It supports over 1000 formats, including audio, video, device, and even web formats. Using the web formats, you may not need to worry about any encoding as just choosing YouTube format will set everything in place for you to upload QuickTime to YouTube.
How can I Upload QuickTime to YouTube using UniConverter?
There are two ways to achieve this. As mentioned earlier, you cannot upload QuickTime to YouTube because your video is either not in the supported formats or is too large. The solution to these is to either convert or compress your videos, and in some cases, you might need to do both, i.e., if your videos are still past the size limit even after you convert QuickTime to YouTube.
How to Upload QuickTime to YouTube by Converting?
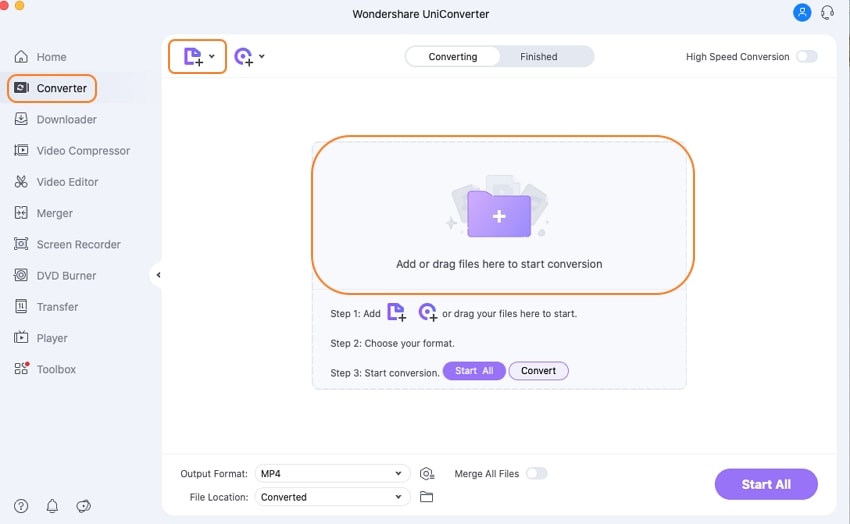
Step 1 Launch UniConverter and Click on Converter
After opening the software, there is a list of tools on your left on the main interface. Click on Converter and see that the screen changes. There will be a purple folder in the middle.
Step 2 Upload video
You have two ways to upload your video to UniConverter. You can either open your File Explorer or Finder, drag the file you want to convert and drop it onto the UniConverter interface. Alternatively, you can click on the purple in the middle of the interface to upload the file, which will appear after clicking on the Converter tab, as mentioned in step 1.
Step 3 Select Format and Convert
The next step and the most important is to select a format for your video. You can choose to convert your video to MP4 and select the quality you want, but the most recommended would be for you to convert the video directly to YouTube format. After uploading your video, click on the Choose format icon at the edge of the thumbnail of the video that you uploaded. Clicking on the icon will generate a new box that will contain all the UniConverter supported formats. Video, Audio, Device, and Web formats, click on Web formats and select YouTube from the options.
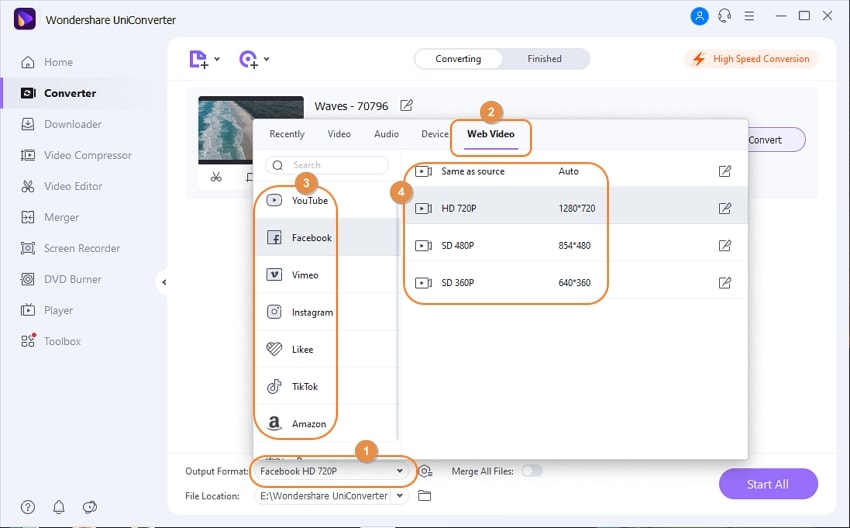
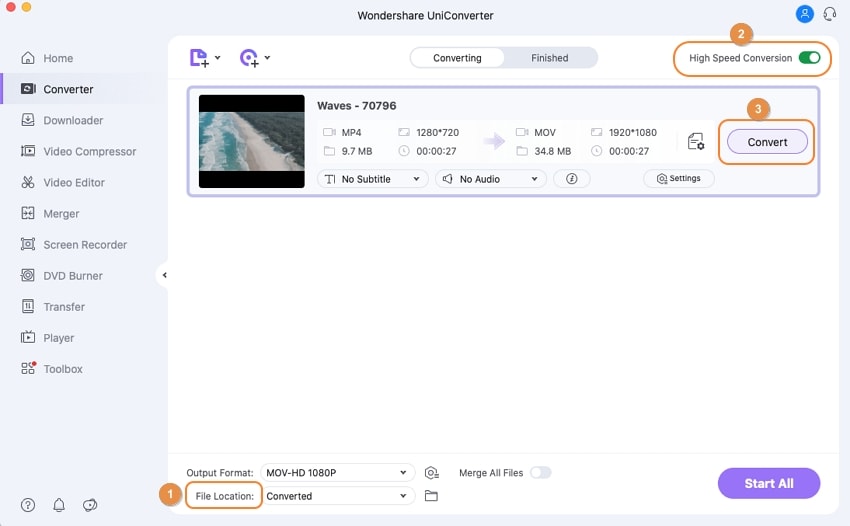
UniConverter will automatically adjust all parameters like the encoding, the aspect ratio, the resolution, and the format to suit a normal YouTube video. Click on Convert when you are done to begin the conversion. If you are converting more than one video click on 'Start All' at the bottom of the interface. You will get a ding when your file is done converting, click on the 'Finished' tab to check your converted video.
How to Upload QuickTime Video to YouTube by compressing
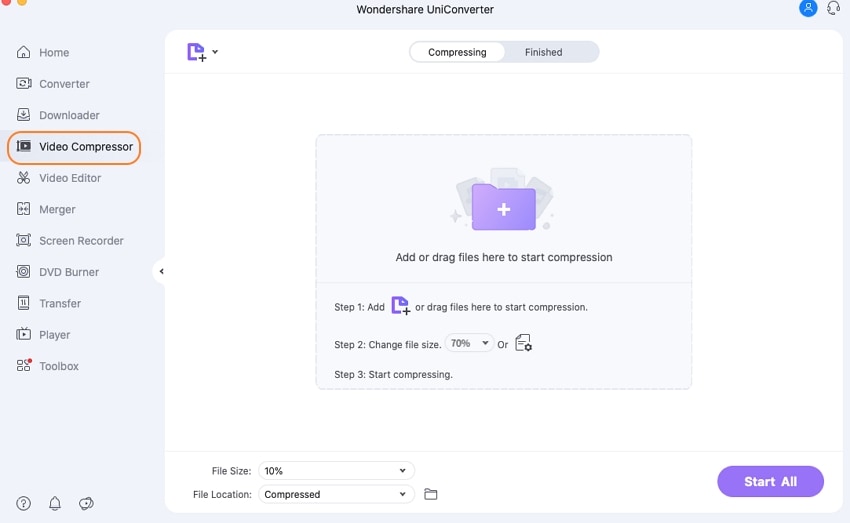
Step 1 Click on the Video Compressor Tab
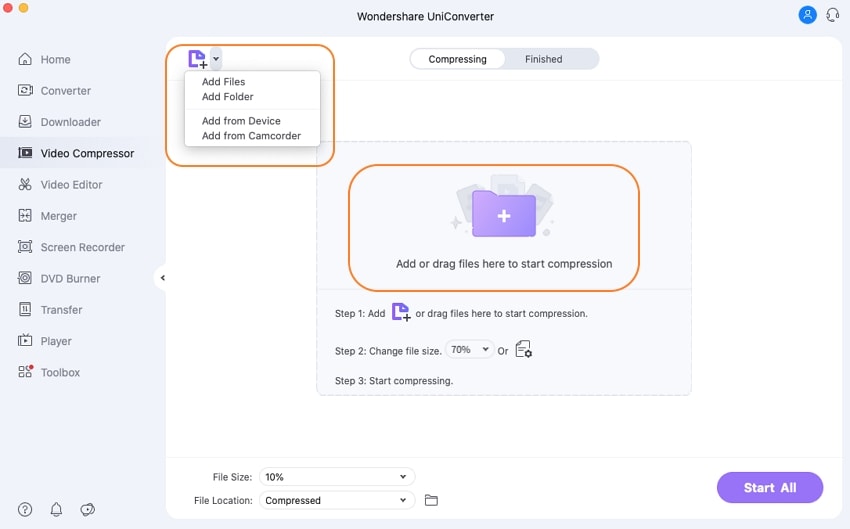
On the main interface of UniConverter, select Video Compressor from the list of tools on the left.
Step 2 Upload Video
Upload your video by clicking on the purple folder in the middle of the compressor interface or open a file explorer windows, then drag and drop the video of your choice into the UniConverter interface.
Step 3 Compress
Once the video has been uploaded, click on the settings icon, it looks like paper and the normal settings icon is placed just beneath it. This will pop up the compression box. You can now drag the slider and reduce the video size. On this same pop-up box, you can change the format of the video and choose your resolution. UniConverter can compress to about 70% of the original file size. UniConverter does the rest automatically. Just click on Ok and the Compress to start compressing.
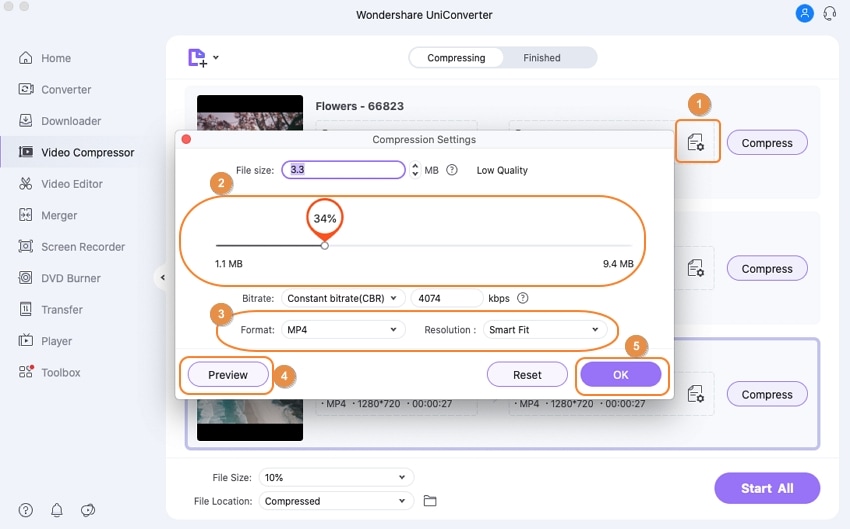
Note: Your processed videos, either converted or compressed will be saved in the UniConverter folder in your local disk. You can change the save location by clicking on the File Location tab at the bottom of the screen before starting the conversion or compression.
Pros
UniConverter supports a lot of formats. It makes things even easier by converting to YouTube formats, which saves the stress of changing aspect ratio, resolution, encoder, and format separately.
The processing is very fast, conversion and compression can be finished in minutes.
As long as you don't compress it too much, the quality of your video remains the same.
Cons
It is not free. There is a free trial but with lots of limitations
UniConverter is not yet available on Linux, so only Windows and Mac users can use it for now
Wondershare UniConverter 13 - Best Video Converter for Mac/Windows
5,481,435 people have downloaded it.
UniConverter supports many formats and handles conversion equally, ensuring that high quality is delivered at all times.
During the conversion process, you may add multiple files since the program does batch conversion of files.
You can use the editing suite to make your results creative masterpieces.
This software facilitates file transfer to devices like Android and iPhone among others once the conversion is complete.
UniConverter is also capable of handling video compression hence ensuring you acquire the video sizes you desire.
Part 2. Can You Upload QuickTime to YouTube with Online Tools?
You ask yourself 'Can I upload QuickTime to YouTube without downloading any software?' Short answer; Yes. There are many online tools out there that can compete with some standard software, and one of such online tools is Media.io. It can convert to and from over 200 formats and finish conversion and compression in a matter of minutes.
Step 1 Visit the Media.io website
Visit https://www.media.io/ to start the conversion process.
Step 2 Select File, format, and encoder
You will see a big purple tab with Add Files written on it on the main screen. Click on it, and your file explorer will pop up. Select the video you want to convert, and media.io will upload it. Now, select the format you want to convert it to. After this, click on the settings icon, and a box will appear. It is divided into video and audio. We only deal with the video here, so click on 'encoder' and select H264. If you are converting more than one video, don't forget to tick the 'apply to all video conversions' box before clicking on OK.
Step 3 Convert
Click on Convert to start converting your video. Your video will be saved to the download folder on your device.
How to Upload QuickTime to YouTube by compressing
Step 1 Switch to Compress Video tool
On the main interface of Media.io, click on the arrow facing down, which is at the top right corner of the screen, to reveal all other options of media.io.
Step 2 Upload Video
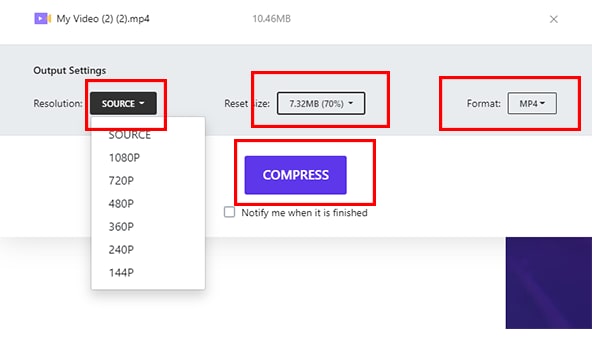
On the Compressor's interface, click on the purple tab to upload your video. You will be given three main options; Size, Format, and Resolution. You can select a preset size from the ones provided, but they are only in the tens. If you want a more specific compression size, click on the settings icon and move the slider to achieve this.
Step 3 Compress
Click on Compress to start compressing the video. Your video will automatically be saved to downloads.
Pros
It supports a lot of formats, both video and audio formats
It has a lot of other functions that might prove especially useful for video editors
Cons
It is limited by internet connection
The compression is limited to 500MB, and unless you subscribe, you can't upload a larger size
Conclusion
These are, in short, the two ways to do any video editing. Either by using software that allows you to work offline or using online tools that work online but require no download. Video editing software usually requires a powerful system and specs. If your computer doesn't meet the requirements and still needs to do your video editing, you can always opt for online tools. The only downside to online converters is that they still lack in terms of functionality as compared to software.
For Win 7 or later (64-bit)
For macOS 10.12 or later

