Record audio-UniConverter
- Record system audio with high quality.
- Record your microphone voice without lossing quality.
- Record audio from system and your microphone simultaneously.
- It has a useful video recorder for capturing all computer screen activities.
- Additional features include video converting, downloading, editing, compression, and others.
Recording audio is a natural way of getting a person's voice or sounds of any moment down into your storage. Everyone has a thing or two they know about recording audio on iPhone. You can record audio on iPhone to get notes, classroom lectures, online lectures, music and musical notes, and more. Recording audio is a very useful tool because they help you playback moments and hear them as was being said. There are some editing options available for audio files and recordings are not an exemption; you can edit, compress and convert your audio to other formats with relative ease, but what is important about audio recording is the quality, and we have made a list of the best audio recorder for iPhone.
Part1. How to Record audio on iPhone Using Voice Memos
Android users should recognize their built-in voice recorders, and many iPhone users also know that iPhone comes with its voice recorder called Voice Memos. Voice Memos is a free, built-in app that comes with iOS devices; it is a fantastic app with a ton of other features that make it more fun and less boring. It can record up to 101 minutes as long you have the storage space to support the size. Although voice memos voice recorder iPrecorhone does not have advanced features, it does support multiple formats, and the quality of the Record is still above average.
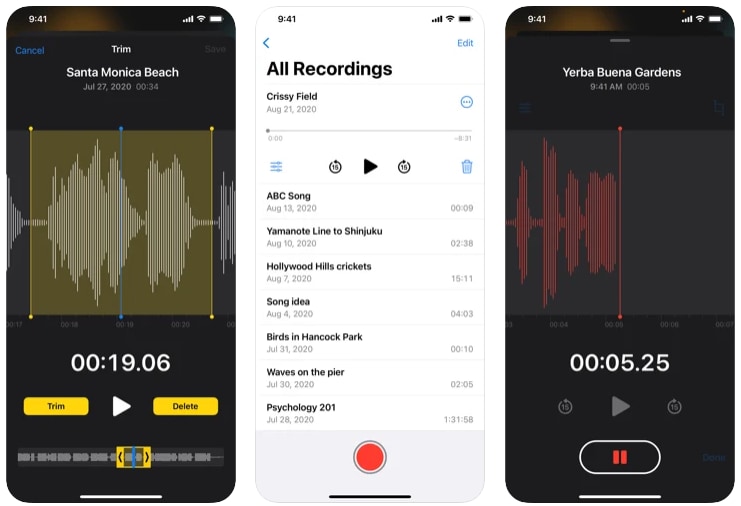
Steps to record audio with Voice Memos:
Step 1 Launch the Voice memo app
Located under the utility folder is the Voice Memos app
Step 2 Press the record button to start recording
The Record is the big red button at the bottom of the interface. Clicking on it will start the recording.
Step 3 Pause/Stop the recording.
Once the recording starts, all engaging keys will move away from the screen to prevent mistakes. To bring them up, click on any space on the screen. You can pause your recording at any moment and begin later or stop it to save your recording.
Pros
Sharp audio quality
Editing options
Sharing options
Cons
No option to transcribe text
It has no additional features
Limited supported formats
Part2. Voice Memos Can't Work? Try Other Voice Recorders on iPhone.
Built-in apps are always programmed to be simple and easy to use. Simple interface and straightforward functions and to make using the phone easier. Third-party apps, however, have been created for the sole purpose of making the easy easier; and to get you more functions that you can’t get from built-in apps. If you want advanced features and functions, then you won't find them in built-in apps. After rigorous scrutiny, we have come up with the list of iPhone recorders that are better alternatives; no, best alternatives to voice memo iPhone recorder.
Voice Recorder – Audio Record
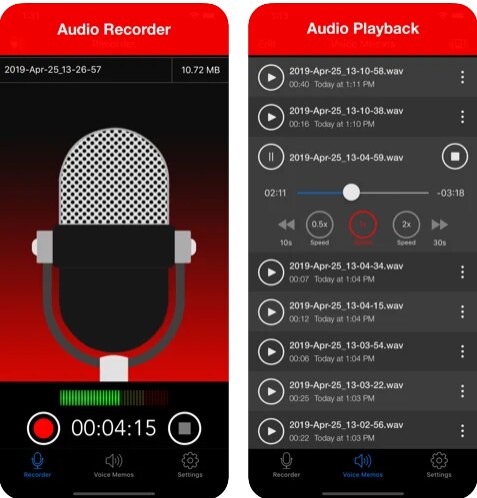
Do you enjoy audio playback and editing? Then you should try out this voice recorder on iPhone 11 and later versions. Record sound on iPhone in great quality with this app and dive into the editing function later. With its noise reduction and noise cancellation options, you can rest assured that recording in a rowdy and noisy environment won’t be a problem. It also has a direct sharing option to share your recording to social media platforms directly from the app and a really neat interface for a voice recorder iPhone. It also can record a voice message on iPhone.
Key Features
-
High-Quality Audio Recorder
-
Supported formats (M4A, record mp3 on iPhone, CAF, WAV)
-
Record stereo sound iPhone and supports Bluetooth Mic
-
Noise reduction function
Step 1 Record your audio in simple steps.
Step 2 Launch the app, and on the main screen, you will see the record button, which is the red button to start recording on iPhone.
Step 3 When you are done, click the stop button, which is the one with a square.
Step 4 Check your recording(s) by clicking on the voice memos tab at the bottom of the screen.
Step 5 Click on the three dots to see editing options
Pros
Noise reduction function
Can perform conversions to mp3 and m4a
You can append a record into an existing record
Cons
Limited editing options
Cannot share large audio files
No speech-to-text feature
Voice Recorder and Audio Editor
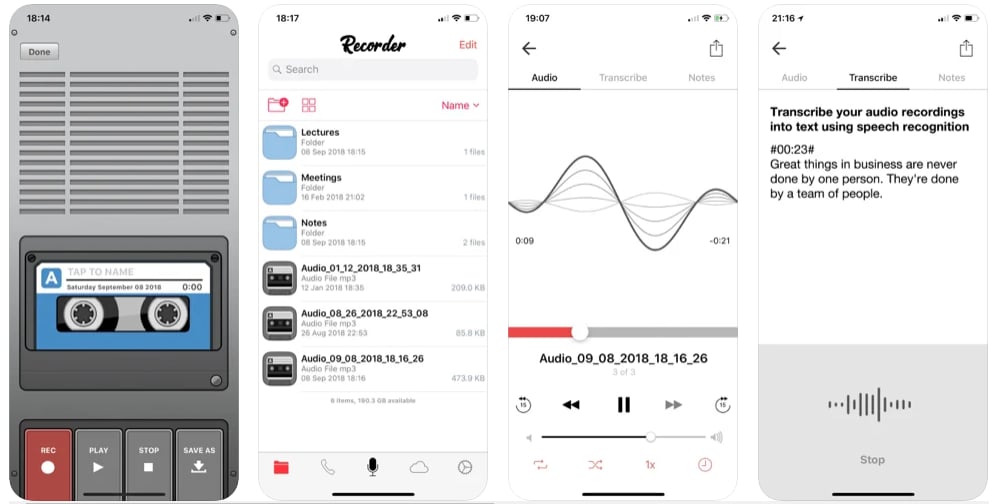
Another very cool and innovative audio recorder. It boasts of having a high-quality recording, which is not affected even with conversions. It allows you to record audio and record sound on iPhone for as long as you want, with no time limit as long as your storage space is available. It also lets you upload your recording to the cloud-like Dropbox, Onedrive, iTunes/iCloud, etc., and your social media platform. Finally, it has one of the rare but most craved functions in recorders, transcribing speech-to-text. You can transcribe your audio file into texts with this iPhone recorder.
Key Features
-
Cloud Support (Onedrive, iCloud, Dropbox, etc.)
-
Transcription (paid)
-
Passcode protection for recordings
-
Trimming and simple editing
Steps
Step 1 Launch the app, and on the main interface, there is a list of options at the bottom. Click on the red ‘rec.’ to start recording. The middle of the interface has a cassette that starts to roll one recording is ongoing.
Step 2 To stop, click on the stop button with a square underneath. Then, click on the play to listen to the recording.
Step 3 Click on Save as to save the audio recording to your phone.
Pros
It has no time limit on recording
It can transcribe audio recording to text, although you have to pay to use this advanced feature.
High-quality audio recording output
Cons
All advanced features are paid
A new file begins to record when you press the stop button
Limited supported formats
AudioShare
Last but not least and one of the best ways to record audio on iPhone. It is a free voice recorder for iPhone that allows you to create, manage, import, and export high-quality audio files. It is popular among sound and music creators because of its main function, which is the management of audio files. It also has editing features like converting, normalizing, exporting and importing, compressing, and zip and transfer. It can record voice over apps for iPhone and can record a voice message on iPhone.
Key Features
-
Organizing and managing audio and recordings
-
Records and play in multiple frame rates (96k, 22k, 48k, 11k, etc.)
-
Has the ‘open in..’ function to open the audio with another app
-
Easy import, export, and transfer
-
External record stereo sound on iPhone
Steps
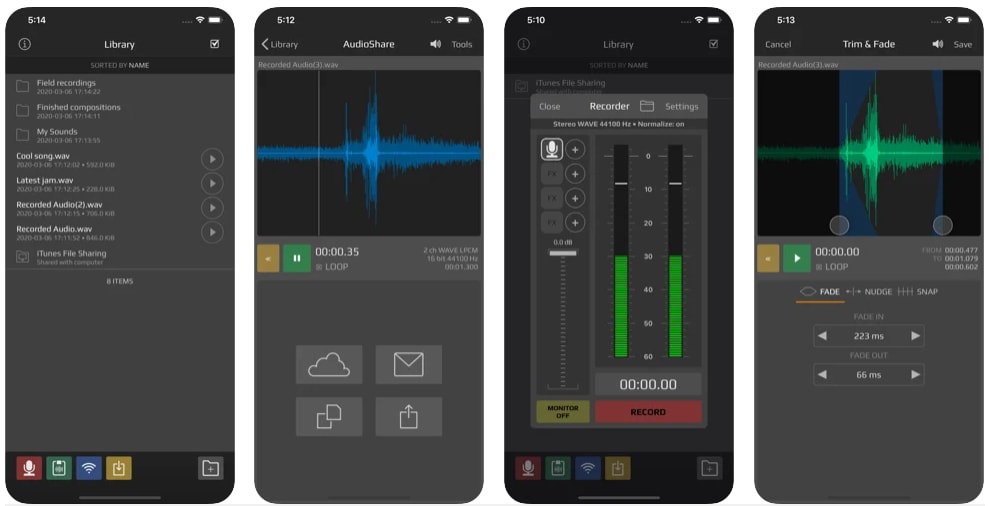
Step 1 On the main interface, the Audioshare screen is split in two. The left side is for file management and organization, while the right side is for everything record and audio editing.
Step 2 At the bottom of the screen on the left side, there is a list of colored functions Record in (red), copy and paste files (green) right next to rec, Wi-Fi (blue), which allows you to import, export, and transfer files, import, and export to and from the cloud (yellow)
Step 3 Click on Record, and a new box pops up on the right side of the screen. This box contains features to start and stop the recording as well as modify record settings.
Step 4 To change settings, click on the Setting tab at the top right corner of the box, and you can adjust the sample rate and bit rate.
Pros
Perfect for music creation
Allows easy sharing to the cloud and social media
Makes management of audio files easier
Cons
The interface is rough and not very easy to navigate
The pricing may be expensive
Part3. How to enhance Your Recording after You Record Audio on iPhone
All these apps can record voice on iPhone, and some of them can perform some basic editing options. Why not leave the editing to professional apps created for the sole purpose of editing media files? I need advanced editing options to enhance the audio recording; you can use UniConverter.
UniConverter is an all-around software for editing audio and video files. It can perform a whole lot more editing options than these voice recorder iPhone apps can. Talk about converting files to multiple formats like mp3, WAV, FLAC, WMA AMR, m4a, AAC, and video formats; it can convert to mp4, MOV, MKV, AVI, WMV, and so on. UniConverter also performs compression functions; you can compress your audio and videos to less than 10% of their original size without losing original quality. What's more? Merging of audio and burn to disc coupled with advanced editing options like adding subtitle caption to the video, adding a cover photo for music/audio,
Wondershare UniConverter 13 - Best Video Converter for Mac/Windows
5,481,435 people have downloaded it.
UniConverter supports many formats and handles conversion equally, ensuring that high quality is delisered at all times.
During the conversion process, you may add multiple files since the program does batch conversion of files.
You can use the editing suite that covers subtitle editing, watermark editing, etc to make your results creative masterpieces.
This software facilitates file transfer to devices like Android and iPhone among others once the conversion is complete.
UniConverter is also capable of handling video compression hence ensures you acquire the video sizes you desire.
Steps of Record Audio and Edit Audio Using UniConverter 13
Recording audio on UniConverter is not a hard task; it straightforward
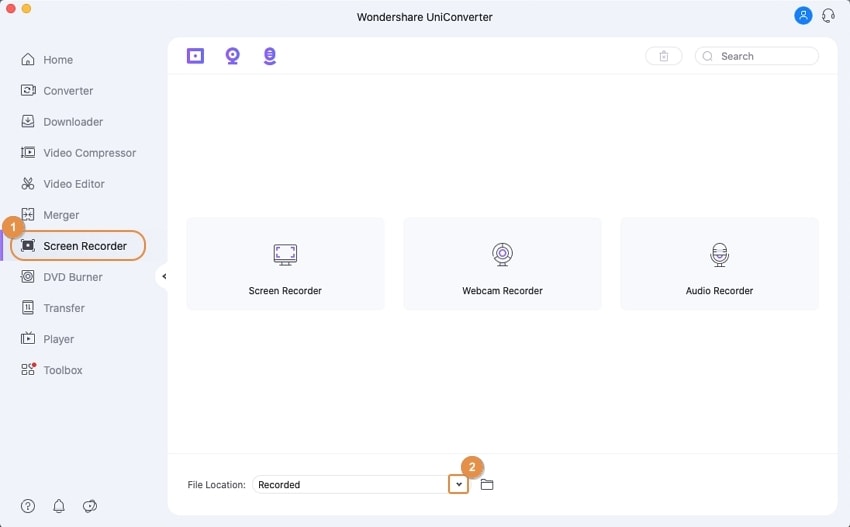
Step 1 Launch UniConverter and select Screen Recorder
Launch the UniConverter software and from the list of tools on the left side of the interface, click on the Screen Recorder.
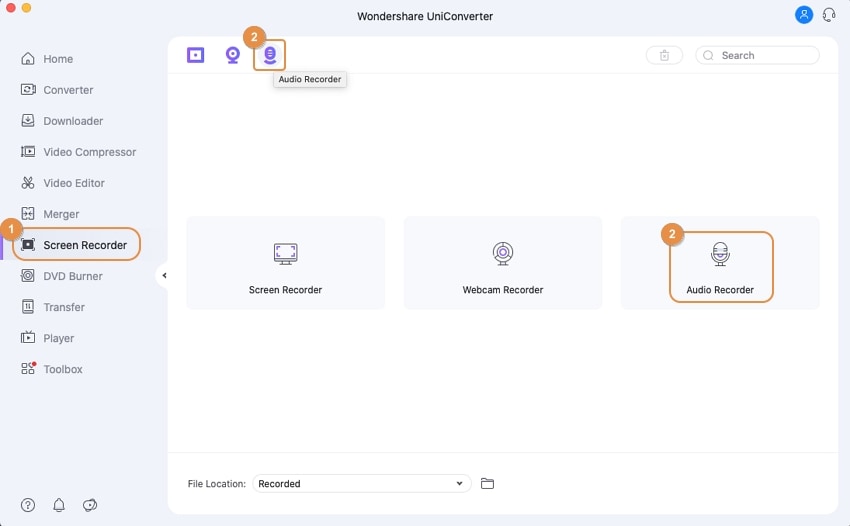
Step 2 Select Audio Recorder and start Record.
The screen changes, and you will see three tabs; Screen Recorder, Webcam recorder, and Audio recorder. Click on Audio Recorder, and the recorder window will pop up.
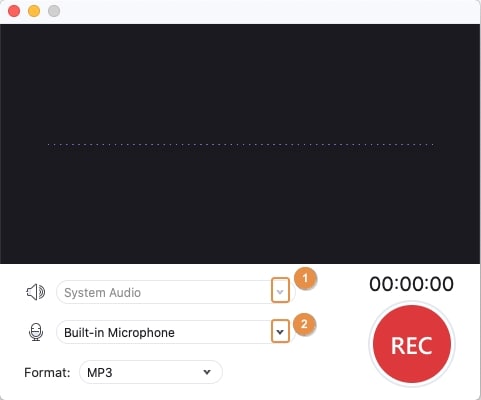
Step 3 Select speaker and start recording
You can choose to use your system's built-in speaker, or you can connect an external mic to make them sound sharper and clearer. Click on the REC button to start record. A countdown begins, and you can take this moment to prepare to start. Click on the red stop button to stop the recording.
Step 4 Editing
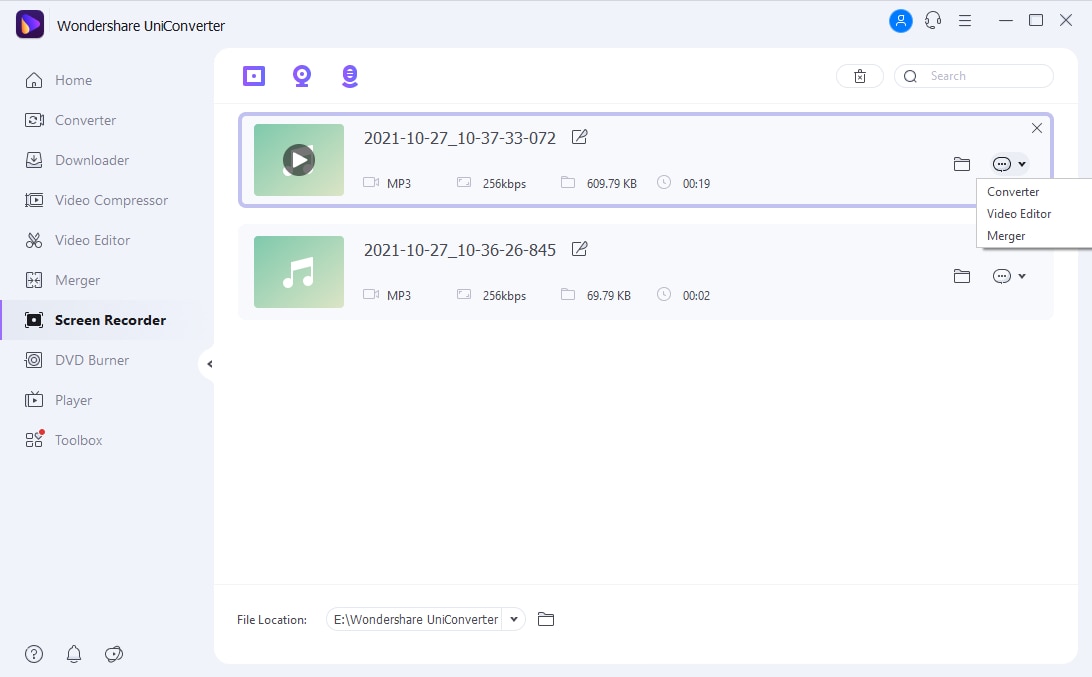
Once a recording is done, a thumbnail will be created for the file automatically. Click on the message icon to see the list of editing options; you should have converting, video editing, and merging. Choose whichever one to continue your edit.
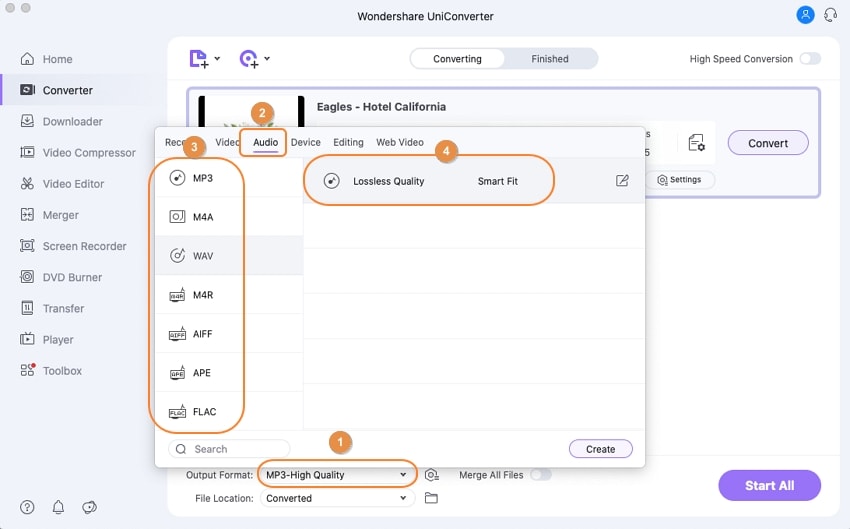
To Convert, you click on Converter; the audio file would have been added to the Converter interface. Next, click on the Choose Format tab, and a format list will show up. They have been categorized into Video, Audio, Device, and Web Video. Clicking on any of the categories will reveal the supported formats you can convert. When you have selected a format, click on Convert to start converting; if the audio is more than one, click on Start All.
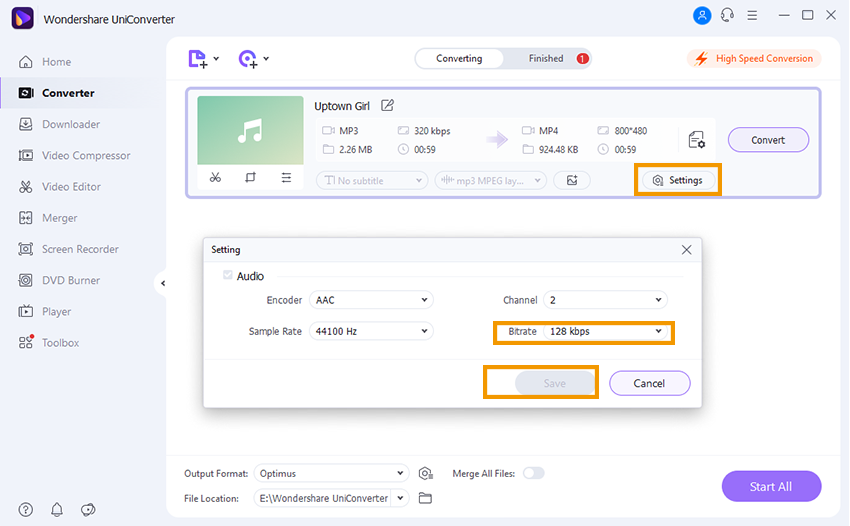
To Compress, stay at the Converter interface, click on Settings on the template. Adjust the audio size by changing the bitrate. Then click Save then Start All to finish the compression.
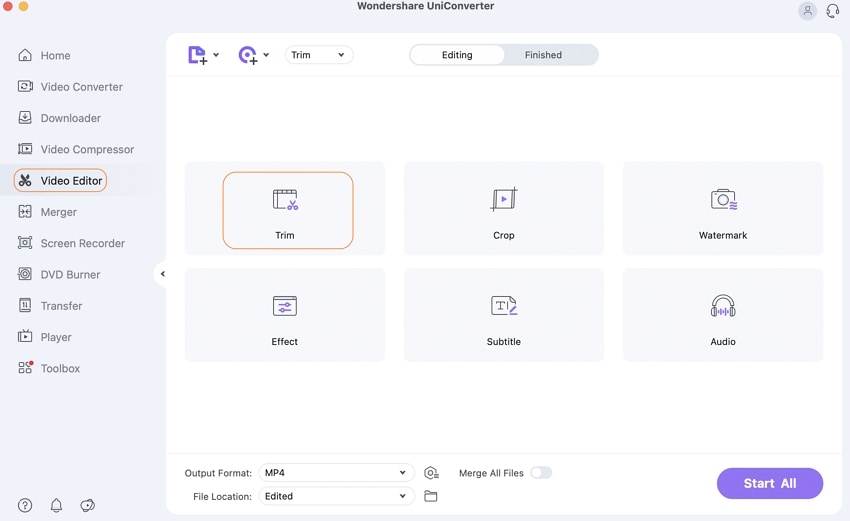
To edit, click on Video Editor from the message icon; after recording, the audio file will be added to the editor page. Now you can trim, crop, and add effects to your audio. There is also the option of adding a cover photo for your recording. Advanced editing includes changing the encoder, sample rate, bitrate, and channel.
For Win 7 or later (64-bit)
For macOS 10.12 or later

