Help Upload MOV Files to YouTube-UniConverter
- Convert MOV to YouTube's most supported format with original quality and high speed.
- Compress large MOV files to make YouTube upload easier.
- Convert MOV to other 1000+ standard formats.
- Download video from 10000+ sites with one click.
- Other features include recorder, merger, editor, and so on.
Do you think something is wrong with YouTube when you upload your MOV video, and it is not working? Before you come to this conclusion yourself, why don't you see if it is something you are doing or something you are not doing? Why is it difficult to upload MOV to YouTube? In short, the upload process is influenced by three factors: the One, formats and encoder, two, file size, three, internet connection status.
Part 1. Easy Steps to Upload MOV Files to YouTube
Uploading a file on YouTube is not a hard task, it is incredibly easy. MOV is a default format for all Apple QuickTime-made videos, and they are quite high quality and high in size.
YouTube supports MOV, so if you don't know how to upload it, here are the steps to follow. If you know the way to upload video on YouTube, you can skip this part and go to the next part directly.
Steps to Upload MOV file to YouTube
Step 1 Visit YouTube page
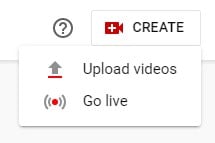
To upload YouTube videos, first, you go to the official YouTube website and click on the camcorder icon with a plus in the middle of it. The icon is just right beside the search box, you wouldn't miss it. Alternatively, you can visit studio.youtube.com to go to the upload page directly.
Step 2 Select or Create a Video
You will have the option of creating a video, doing a live stream, etc. Click on Upload Videos, and a new box will appear where you will be able to drag and drop the video you want to upload or click on the select files tab and upload the video.
Step 3 Upload
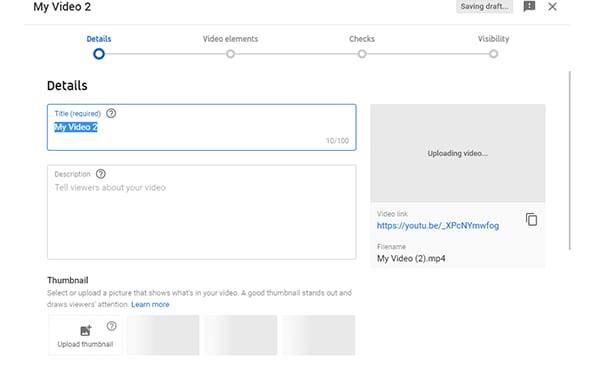
After selecting the video, YouTube will analyze it to see if it matches all recommended parameters, and this is where the problem comes most of the time. If it doesn't meet up with the required settings, the video will not be recognized, but if it is, then you can proceed to upload the video. On the screen that shows after you have selected your videos, there are a series of settings that you can edit before posting the video, like the recommended age for viewing, if it contains scenes not suitable for general viewing, the summary, if you want to add additional comments or links, feel free to explore to see if there are things that can make your video reach the desired audience sooner.
Part 2. Tips to Facilitate MOV Files to YouTube Upload
1. Convert MOV to YouTube Format
YouTube supports MOV, but if you cannot upload MOV to YouTube, consider converting your video to YouTube's most supported format. The number 1 recommended app that can easily achieve this is Uniconverter. It supports over 1000 formats and can even convert your video(s) directly to YouTube format, meaning that you don't need to worry about parameters and requirements, once you choose the YouTube format, Uniconverter adjusts the video to fit all parameters.
Steps to Convert MOV to YouTube using Uniconverter
Step 1 Launch Uniconverter and Select Converter
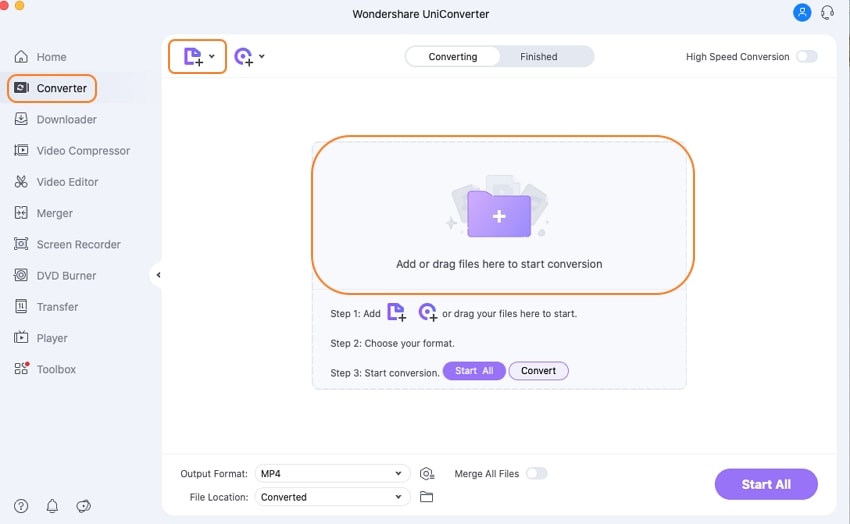
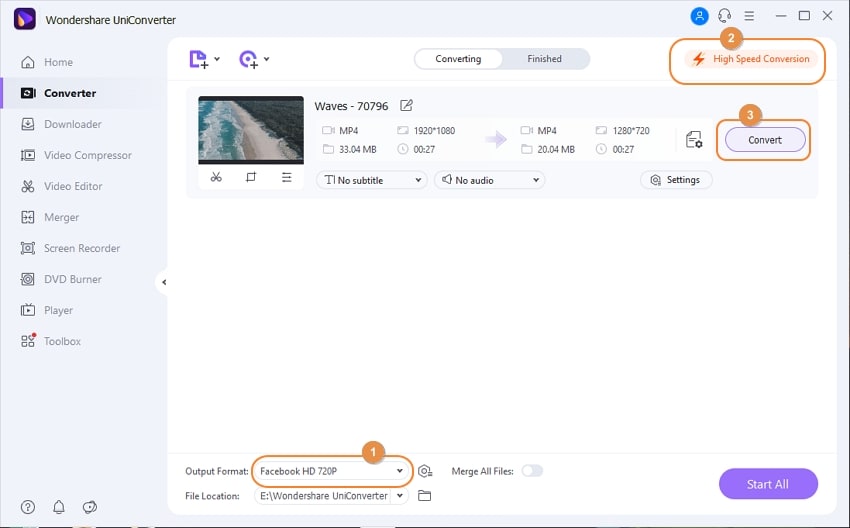
Download and install the latest version of Uniconverter if you are yet to do so. On the main interface of Uniconverter, there is a list of tools and editors on the left side of the screen, click on Converter to convert your file, which will, in turn, allow you to upload MOV to YouTube with relative ease.
Step 2 Select File and Format
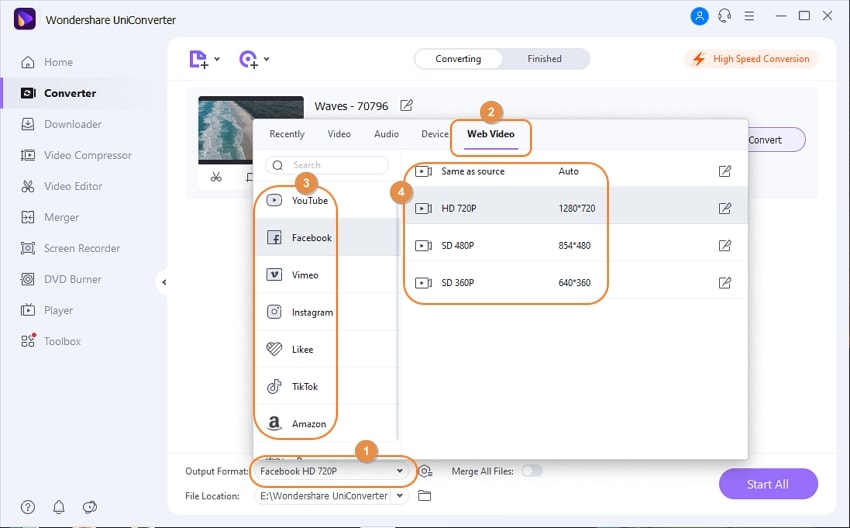
Click on the purple folder in the middle of the screen to upload your MOV file, you can also choose to open a file explorer, locate the file you want to upload, then drag and drop it into the Uniconverter interface. Upon uploading, a thumbnail will be generated, and right beside the 'convert' tab, there is an icon: 'select format', which allows you to choose from all the available Uniconverter. Since there is a web format for YouTube, it is advisable to opt for this option and let Uniconverter handle the rest. You don't need to worry about resolutions or aspect ratio or codec, choosing the YouTube format will adjust all the video parameters to match YouTube requirements.
Step 3 Convert and Upload your video
Click on convert to start converting your MOV video. If you are batch converting, i.e., click on Start All to do all conversions simultaneously if you upload more than one video for conversion. After the conversion is finished, you can now upload your video to YouTube again. If you have difficulty locating your file, Uniconverter has its own folder in the Local disk, inside is a separate folder for each of the tools so you can find your converted video in the 'Converted' folder. If you want to change these settings to stop Uniconverter from saving to such a far location, click on File Location at the bottom of the screen to select your preferred save location. Do this before converting your file though.
2. Compress MOV Video with High Quality before Uploading It to YouTube
In case you don't know, YouTube limits how big and how long a video can be. The maximum length for a YouTube video is 2hours, and the maximum size is 256GB. MOV files have high quality, but have large size. And the longer the video, the bigger the size becomes, the more difficult to be uploaded on YouTube. So, compressing can help you upload MOV on YouTube more easily.
Steps to Compress MOV video for YouTube Upload using Uniconverter
If we want to upload MOV to YouTube without needing to resort to file conversion, then the best way is to compress it to reduce the size to fit YouTube requirements
Step 1 Launch Uniconverter and Select Video Compressor
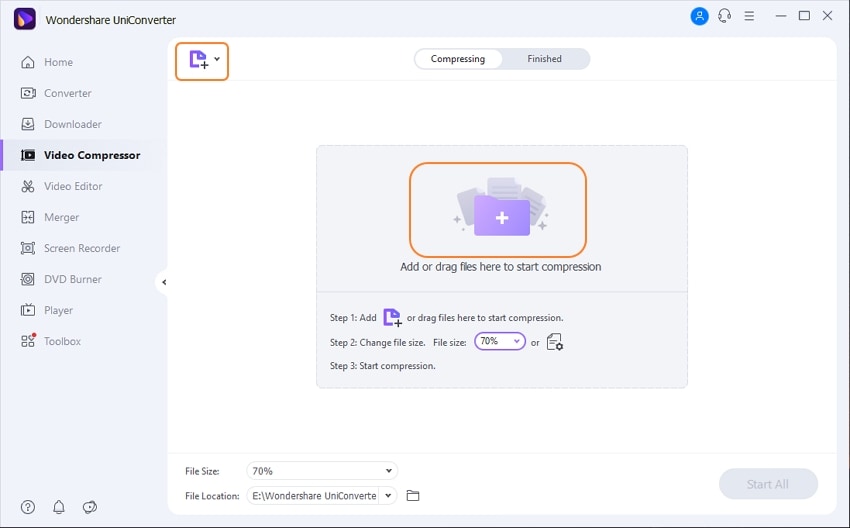
You should have the latest version of the Uniconverter software because of its improved performance. Launch the Uniconverter software and look to the left side of the main interface. By default, the software will open on the Home screen, where it will display some of the tools of Uniconverter. Click on Video Compressor from the list on the left, and the screen will change to the Compressor screen.
Step 2 Add Video and Choose Compress Options
Once the screen changes, you will see a purple folder in the middle of the screen, click on it to upload your MOV file. Uniconverter has the batch processing option so that you can add more than one video at a time for compression. After adding all the videos, click on the settings icon to show all options for compressing videos on Uniconverter; the icon is located in the uploaded video thumbnail. When you click on the settings, a new box will pop up, you will notice a slider, and obviously, that's how you choose the degree of compression for your video. You can also change formats, resolutions, encoder, aspect ratio, and audio codec in this same box.
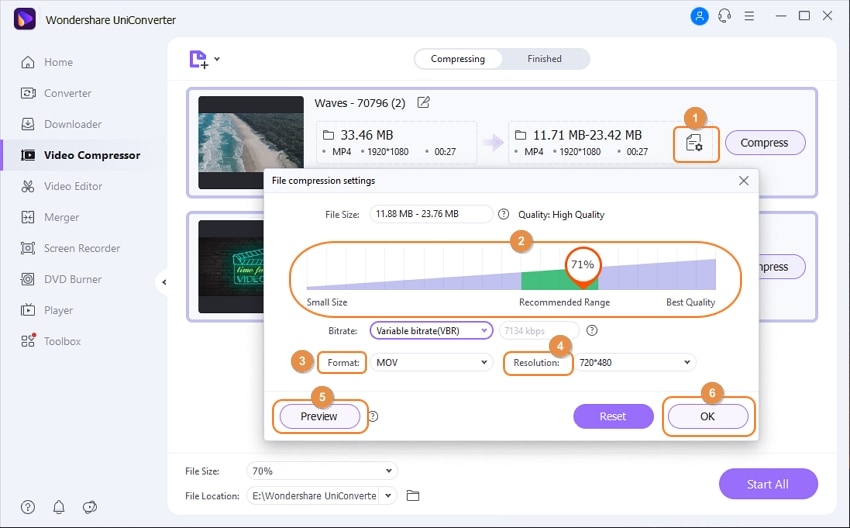
If you upload more than one video, each one of them will have its compress setting so that you can choose a different option for each one. If you want one compress option for all, click on the percentage bar, which is at the bottom right of the screen but using this means you won't be able to change other options.
Step 3 Compress
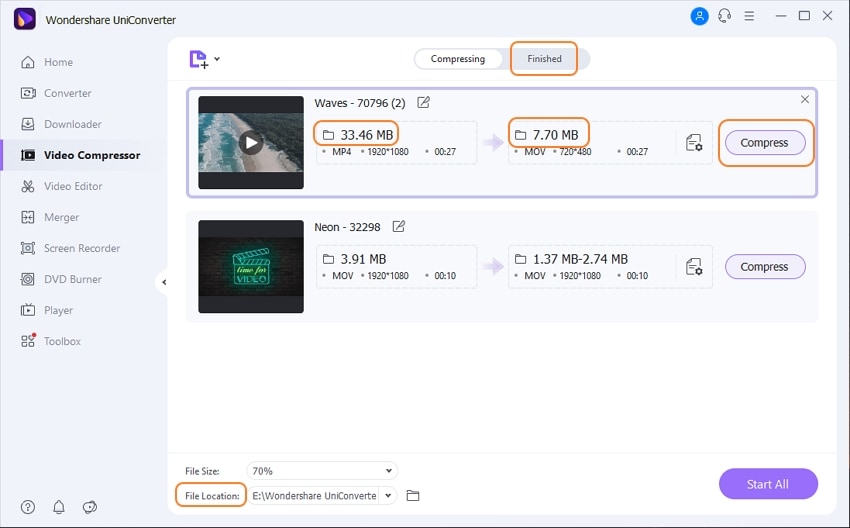
After setting all the options to your preferred settings, click on OK on the options screen and then click on Compress to start compressing. If you are compressing more than one video, click on Start All if you don't want to start clicking on a compress for all videos. When your video is done compressing, Uniconverter will notify you, and you can check your video in the 'Finished' tab. You can find your download in the Uniconverter folder on your local disk. However, you can change the destination folder if you click on File Location, which is at the bottom of the interface, but you have to change the location before converting. Take note.
Part 3. FAQs about Uploading MOV Files to YouTube
1. Is MOV Good for YouTube?
Although the most recommended and the most commonly used video format for uploading videos on YouTube is MP4, YouTube supports various other formats such as AVI, MOV, FLV, MOV, WebM, WMV, MPEG-PS, 3GPP. So yes, you can upload MOV files to YouTube. The only thing you need to watch out for is the codec, mp4 codec is just right for YouTube uploads and some other video-sharing sites, but other formats like MOV, you might need to change the codec to and try to change the aspect ratio as well, since different websites and social media platforms have their requirements, YouTube has its own as well. You will notice that there is always more than one quality for viewing on YouTube, all these requirements work towards producing the best and higher quality videos on YouTube.
2. Can Windows Movie Maker Upload MOV to YouTube?
Windows Movies Movie Maker doesn't support MOV files, so there is no way to upload MOV to YouTube with Windows Movie Maker. What's more, YouTube doesn't allow us to upload videos from any third party.
Wondershare UniConverter 13 - Best Video Converter for Mac/Windows
5,481,435 people have downloaded it.
UniConverter supports many formats and handles conversion equally, ensuring that high quality is delivered at all times.
During the conversion process, you may add multiple files since the program does batch conversion of files.
You can use the editing suite to make your results creative masterpieces.
This software facilitates file transfer to devices like Android and iPhone among others once the conversion is complete.
UniConverter is also capable of handling video compression hence ensuring you acquire the video sizes you desire.

