Recommended 5 Easy Ways to Add Audio to MP4 Videos
by Brian Fisher Proven solutions
As there are thousands of applications and devices, so we have thousands of ways of editing and adding audio to mp4 as desired. As humans, the best part of us tends to look for the simplest way to add music to mp4 for our known reason. Adding audio to video could be fun and at the same time interesting when the output delivered is in the satisfaction of your desired content. Whether you’re a MacBook or Windows or other PC user and you’ve got the perfect track for your video, all you need to do is use any application that permits you to add music to mp4 files.
Part 1: How to Add Music to MP4 Using UniConverter 13?
UniConverter 13 is a full feature and intuitive software with a complete toolbox that provides you the opportunity to convert media files to any desirable format, compress media files, edit videos, add subtitles to video, add music to mp4 files, use DVD burner, screen recorder and more. With UniConverter 13, adding audio to your mp4 file won’t be an issue at all. All you need to do is download UniConverter 13 on your computer, whether you’re a Windows or macOS user, and enjoy all the never-tiring features and quality of your edited content. Aside from all of these, UniConverter 13 enrolls you with the benefit of editing your media files online/offline with or without a subscription plan.
UniConverter
- Support to over 1000 formats and devices for conversion.
- Batch processing at super-fast speed (30X faster).
- Lossless quality conversion.
- Built-in editor with features like crop, cut, trim, add watermark, effects, and more.
- Video download from more than 10000 sites like YouTube, Vimeo, and more.
- Additional features like video recording, transfer, DVD burning, image conversion, compression, and more.
- Support to all latest Windows and Mac version (including latest Mac version).
If you’ve downloaded and installed the UniConverter 13 on macOS or Windows PC, and you’ve wished to add audio to mp4 or MOV or better still any other video supported format, all that needs to be done here is:
Launch UniConverter 13
You’ll have to launch the installed UniConverter 13 on your computer. After this, the UniConverter 13 window opens. When you see the window opened, click on the Converter tab on the home menu of the window to begin the whole adding process.

On the user interface of the converter tab, click the Add files icon or the drop-down option to import the video you wish to add audio to. Should in case you don’t want to go through the stress of clicking the add files options, you can easily drag&drop your video into the converter’s user interface.
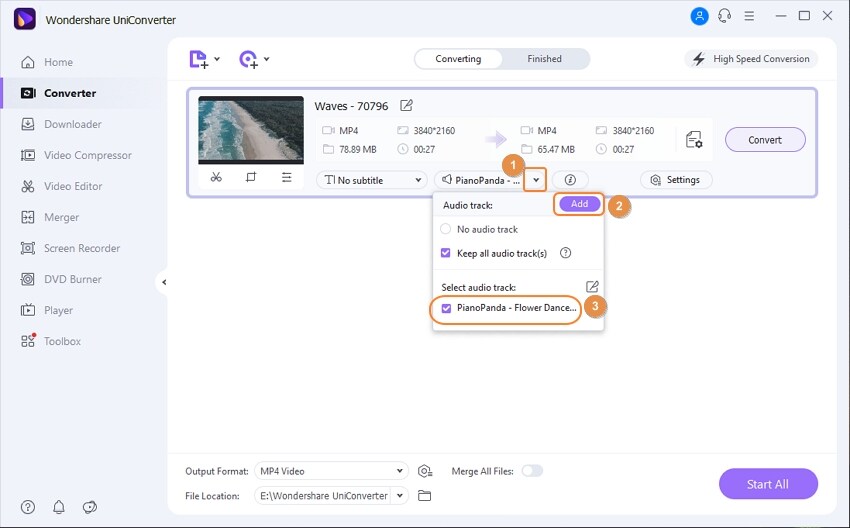
Add your Audio Files
Since you’ve added your desired video file to the converter’s user interface, now you need to add the audio or music you feel is perfect for you. On the imported video bar (taskbar) displayed, you’ll see a select audio option next to the subtitle option, click the drop-down option close to the audio track option, and select add button to add your desired audio file.
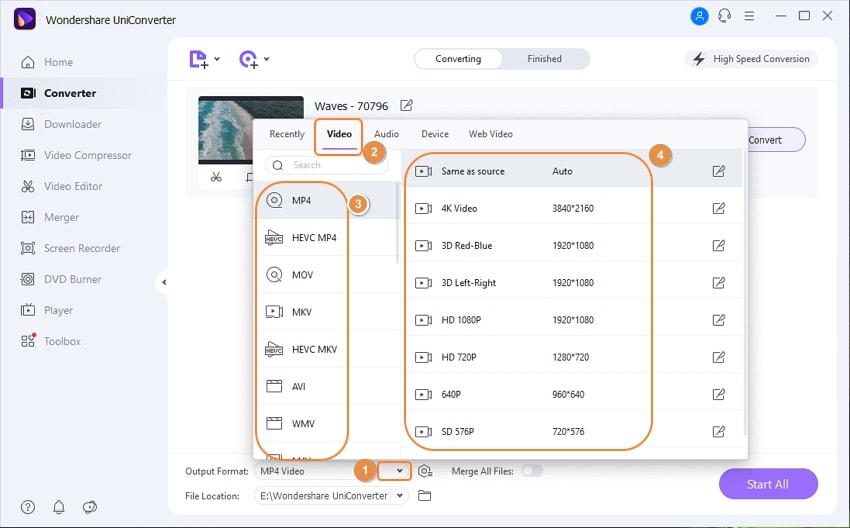
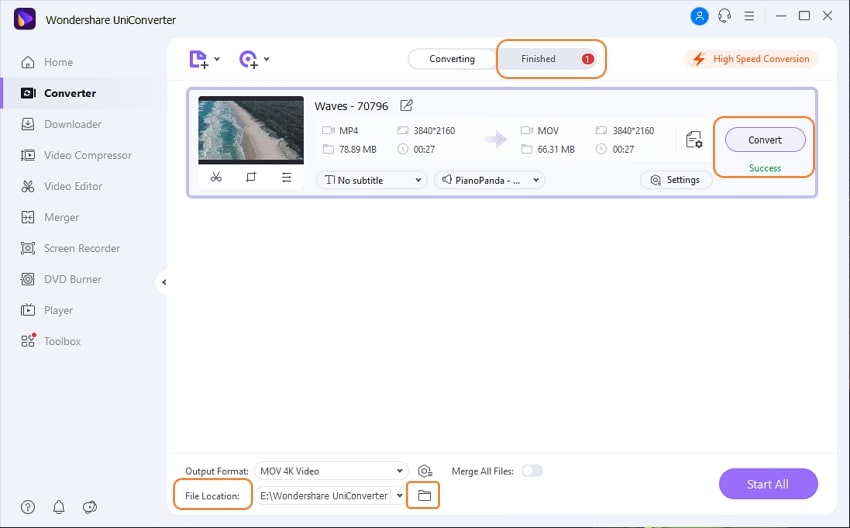
Convert and Output Your Video
After adding your MP3 or audio to the video, if you wish to change the format of the video, you can select the output format option, click the video tab, and select any output format of your choice. Once this is done, click the Convert or Start All button to complete the task. After the conversion, you’re allowed to view the output of the conversion by opening the Finished tab.
Part 2: Other 4 Good Ways to Add Music to MP4 Video
Aside from UniConverter 13, you also have alternatives you can use to add audio to mp4 files.
Clideo is another amazing online software with an easy-to-use interface that grants users the access to merge audio/ video files, Compress media files, add subtitles, resize and cut files, video maker, meme maker, and more. Just like UniConverter 13, Clideo also allows you to paste URLs to download media files. One wonderful feature about Clideo despite being an online video maker or video editor is its versatility and ability to supports multiple inputs and outputs formats. If it’s in your decision to use Clideo to add music to your MP4 file, you can follow the steps below for a successful conversion:
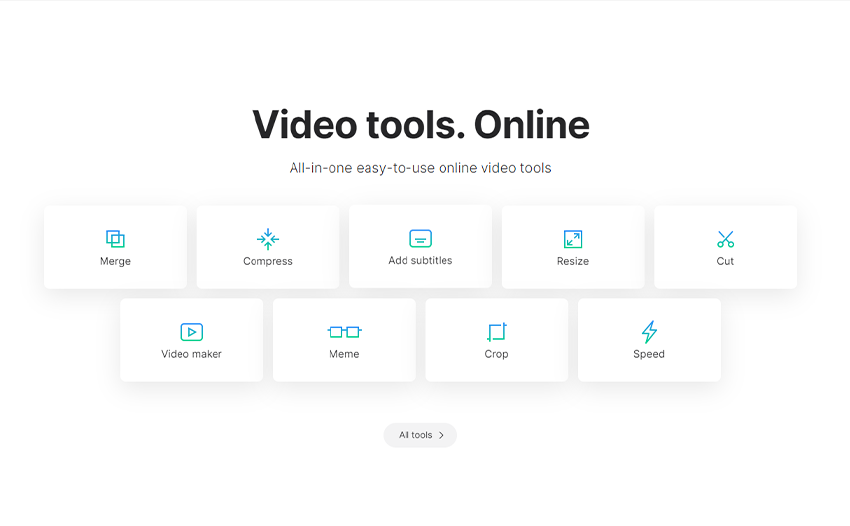
If you’ve got a PC whether it’s macOS, Windows, or devices like Android, or iPhone, launch the online Clideo software, when the online software opens, click on choose file options to import files from Google Drive, Dropbox or better still paste URLs.
After uploading the video to Clideo. If you wish you can trim, cut or crop your video, increase or decrease the volume of the video. Once you’re done editing your video or audio, choose your desired format then click on Export
After this just click download and save your edited video back to your Google Drive, Dropbox account.
Pros:
- With Clideo, if you intend to increase or decrease the video and audio volume, or you’ve chosen to balance both the MP3 and MP4 volumes, you are provided with an editing option that allows you to utilize this feature to your satisfaction on your device.
- Clideo offers you an editing feature that allows you to cut, trim, and crop your media file on your device.
Cons:
- Just as every software have their benefits, the same applies to them having their limitations. When you use Clideo the conversion process is time-consuming.
- Clideo is only available online and you’re not permitted to add audio to mp4.
VideoLAN client popularly known by the acronym VLC is completely a free media player that supports all types of operating systems whether it’s macOS, Unix, Windows, Linux, Android, or iOS. This fully functional software that plays the role of a media player allows users to add audio to mp4 files. Aside from that, the VLC media player allows users to play audios and videos of any format since it’s compatible with multiple media formats. If you wish to use VLC to add audio to your mp4, all you need to do is follow the steps listed below.
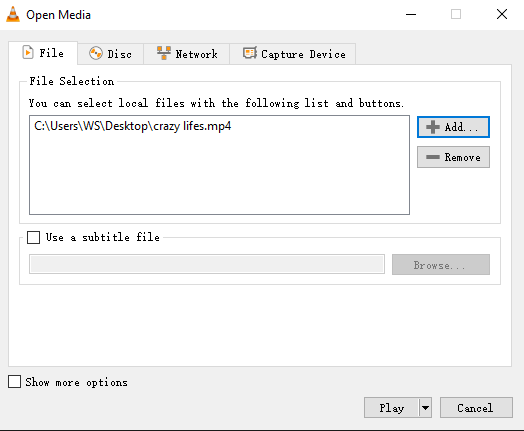
Launch the VLC media player, as the VLC Player opens, go straight to media then select multiple files. After selecting the option, a window appears, select add from the window.
Imports the video you intend to add audio to, then below the window click on the Show more options box to tick the option. Do the same for Play another media synchronously. After ticking all these options, click browse then another window pops on the screen.
On the second opened window, click +add to load your preferred audio. After that click select on the second window display and play from the first window.
When the video starts playing, click on the audio option that appears at the top of the VLC media player display, then a drop-down menu appears, select Audio track then Track 2. Only after then, The audio file will be added to the video.
Pros:
- Unlike other software, you won’t believe that the VLC media player is free even with its exclusive and intuitive features and functions that include converting media files into a supported format, play audios and videos of any format, download web videos, and more.
Cons:
- Despite being a very good media player that supports multiple formats, the VLC media player does not guarantee 100% output when it comes to the quality of the converted media file.
- As intuitive as a VLC media player is, inexperienced users still require steep learning to work on the software since its conversion process is a bit complicated.
Movavi is a macOS and Windows compatible software that allows you as a user to access a couple of features that permits you to create movies, splits videos, merge files, add effects to video, edit and convert images, add audio to MP4, crop and resize media files, enhance quality and more. Keeping all these editing features aside, with Movavi you can capture videos from your PC screen, webcam, Tv, and more, record sound, extract audio files from videos, burn CD/DVD, function as a media player. If you decide to go with Movavi as an option to add music to your mp4 file, simply follow the steps below;
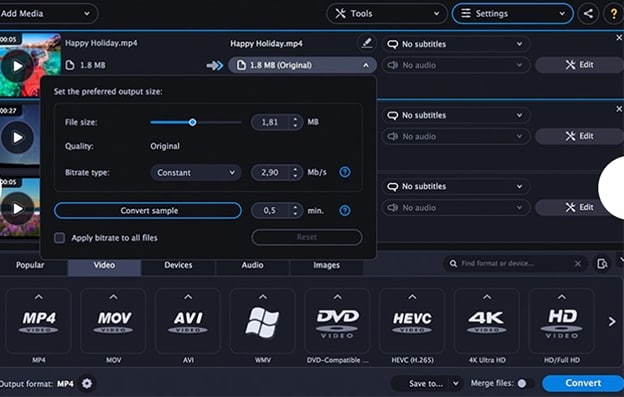
Launch the Movavi software on your PC whether it’s macOS or Windows and upload your video to its interface. After this, you can now switch the original sound of the video off by clicking the loudspeaker icon at the left bottom of the editing window.
Now you can import your audio files into the editing window by dragging and dropping your selected audio file from the folder where it is located in.
From the audio properties, you can set the volume for the entire track. After every necessary adjustment, you can now save your edited media file or content by clicking Export.
Pros:
- This macOS and windows compatible software has a very unique feature that allows you to add multiple audio files to video files. Apart from the fact that you are allowed to add multiple audio files to a video, Movavi has shown its uniqueness in the sense that users are permitted to use the software’s built-in audio or music file without importing any audio outside the interface.
Cons:
- Despite its uniqueness, Movavi is not completely free. After the user has exhausted the free trial, the user must subscribe to a plan just to use the software’s features that were available in the trial mode.
Filmora is another amazing product of Wondershare with fully functional features and intuitive designs and an interface that allows both experienced and inexperienced users to work easily without facing operational stress whether you’re a macOS or windows user. Asides from using this software for the intended primary objective which is adding audio to mp4, Filmora gives you as a user the chance to access features such as GIF maker, advanced text editor, 4k editing support, scene detection, video stabilization, audio mixer, and an audio equalizer. Should just in case you're willing to use Filmora to add music to an mp4 file, here are steps to follow below:
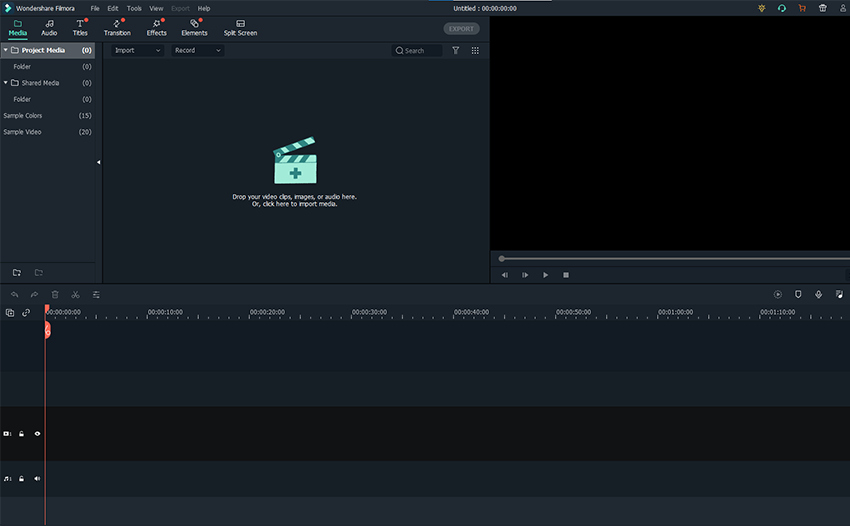
Launch Filmora software on your PC. From the Media tab click the import button to upload your selected video into the software’s interface. Notwithstanding, you can simply use its drag and drop feature.
Once this is done, what you’ll do next is mute or detach audio from the video. To accomplish this task you’ll have to click the video clip on the timeline then select Audio detach or mute.
Now add audio to the MP4 by the simple drag & drop method. You can click the scissor icon to trim and cut unwanted parts. Once you’re done with everything, click create to save and export your video.
Pros:
- Talking about Filmora, this software has an easy-to-use interface that permits both inexperienced and experienced users to operate on.
- Filmora allows you as a user to increase or decrease the volume of your media file during editing on Filmora’s easy-to-use interface. Asides from that, you are provided with multiple effects to use when editing on the software .
Cons:
- Despite having all these features, Filmora adds a watermark on exported videos if you’re on trial mode. The only way to remove or eliminate the watermark from your export is to buy a pro version of the software on your MacBook or Windows PC.
If you want the best software to use to add audio to mp4, convert video to any desired formats, compress media file, edit video, media player, screen recorder, DVD burner, meme maker, GIF maker, and more for free or with a penny as a subscription, the online/offline UniConverter 13 is best at your recommendation.
MP4
- 1. Convert MP4
-
- 1.1 Convert MP4 to MOV
- 1.2 Convert MP4 to AVI
- 1.3 Convert MP4 to WMV
- 1.4 Convert MP4 to VOB
- 1.5 Convert MP4 to MKV
- 1.6 Convert MP4 to FLV
- 1.7 Convert MP4 to MPG
- 1.8 Convert MP4 to MTS
- 1.9 Convert MP4 to 3GP
- 1.10 Convert MP4 to XviD
- 1.11 Convert MP4 to M4R
- 1.12 Convert MP4 to M4V
- 1.13 Convert MP4 to WebM
- 1.15 Convert MP4 to DivX
- 1.16 Convert MP4 to SWF
- 1.17 Convert MP4 to DV
- 1.18 Convert MP4 to iTunes
- 1.19 Convert MP4 to OGV
- 1.20 Convert MP4 to MP2
- 1.21 Convert MP4 to Video
- 1.22 Convert MP4 to GIF
- 1.23 Convert MP4 to AVI with VLC
- 1.24 Convert MP4 to Video_TS
- 1.25 Convert MP4 to WMV using VLC
- 1.26 Convert MP4 Using HandBrake
- 1.27 Convert MP4 to YouTube
- 1.28 Convert MP4 to iMovie
- 2. Play MP4
-
- 2.1 MP4 Player
- 2.2 MP4 Player for Mac
- 2.3 MP4 Player Apps
- 2.4 Play MP4 on Mac
- 2.5 Play MP4 on iTunes
- 2.6 Watch MP4 on Mac
- 2.7 Windows Media Player Play MP4
- 2.8 Play MP4 on PS3
- 2.9 QuickTime Play MP4
- 2.10 Play MP4 on Realplayer
- 2.11 Samsung MP4 Player
- 2.12 Play MP4 on PSP
- 2.13 Play MP4 Video on Xbox
- 2.14 VLC Play MP4
- 2.15 Play MP4 on GOM Player
- 2.16 Play MP4 on TV
- 2.17 Download Long YouTube Video
- 3. Edit MP4

Brian Fisher
chief Editor