How to Save iMovie Project to Quicktime Movie
by Brian Fisher Proven solutions
How do I save an iMovie project?
If you have created your movie and would like to email it to your friends, burn it to a CD or upload it to the web, then you might want to know how to save iMovie project as a QuickTime movie.
iMovie
iMovie is a software which is developed and maintained by the Apple corporation for the iOS and Mac operating system devices. The iMovie application offers you several features for editing your videos which makes your videos perfect to post on the social media sites and sharing it with your friends. It comes with an inbuilt player which allows you to play the videos in the app itself. The software comes with the option that allows you join several video clips together and then you can create a single movie with those clips for creating movie with the special effects.
QuickTime
QuickTime is a video player offered by the Apple to play the videos in the iOS devices. This player is capable in handling various audio video formats for playing in the iOS devices. It can play mostly all popular audio video format files. The player is available for the Mac and windows both operating system devices but company has stopped giving new updates for the windows version. With video playing the software also supports very basic editing of the video files.
Part 1: Guide to save iMovie File to QuickTime Movie
Open iMovie and then open the project which is ready and completed by you. After opening the project click the “File > Export” button.
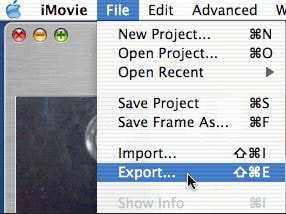
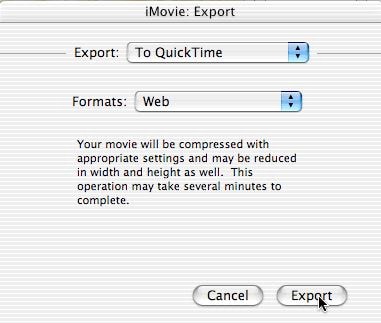
After hitting the export menu you need to click the “To QuickTime” option. Now select the output format. You will need to choose the location where you want to save the movie and you will be asked to enter a file name for the QuickTime movie. Now the iMovie will start exporting the video to QuickTime. It will be finished in some time depending on the quality and length of your movie. These are the steps for iMovie export mp4 format.
Part 2: How to Convert iMovie Videos to QuickTime MOV by using UniConverter
Wondershare UniConverter is desktop software available for the windows and Mac users. It is complete multimedia files solutions software that allows you to do whatever you want to do for making your videos perfect. The program comes with the powerful features such as downloading videos, editing, recording, converting, burn DVD etc. The convert feature of the software comes with the powerful format compatibility which supports more than 1000 audio video file formats with the 30x faster speed as compared to the any other software. It also supports converting videos for different devices so you can directly select the device from the format list and convert the current video format directly in the target device compatible format. There is no limitation in converting the files while using the software so you can easily convert multiple files in batch.
UniConverter
- Convert files in over 1000 formats including MO4, MOV, FLV, and others.
- Batch processing to convert multiple files at a time. The software can convert even 100 files at a time without any issues.
- Lossless quality conversion.
- Built-in editor to customize files using features like crop, trim, add effects, and more.
- Video download from over 10,000 sites supported with video recording.
- Additional features supported like fixing metadata, compression, image conversion, and more.
- Windows and Mac support with support OS version support added regularly.
Steps to Convert iMovie Video to MOV with UniConverter
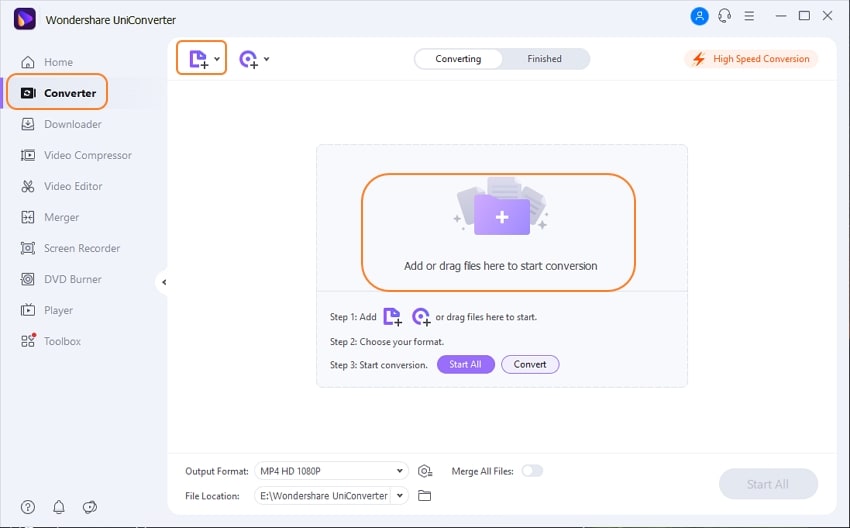
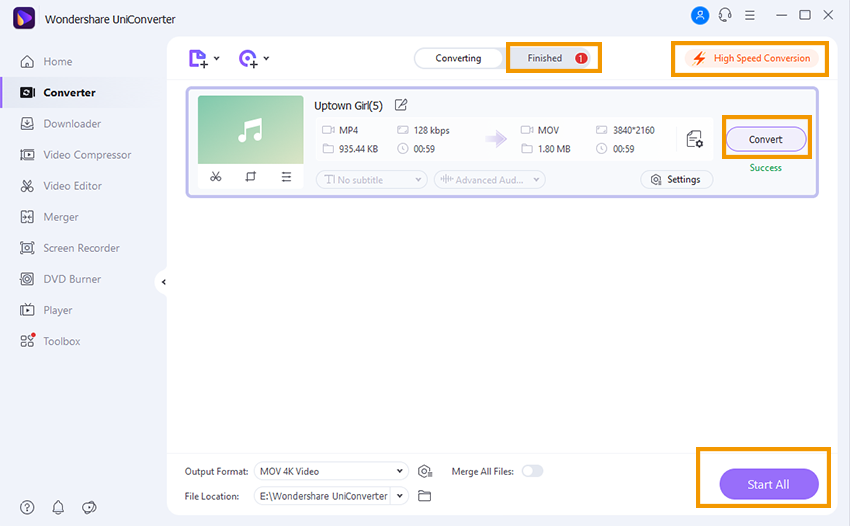
Download, install the Wondershare UniConverter from the official site and run it. After running the software you need to click the “Converter” tab. Here click the “+” icon to select the iMovie video file from your computer or you can also drag & drop the files.
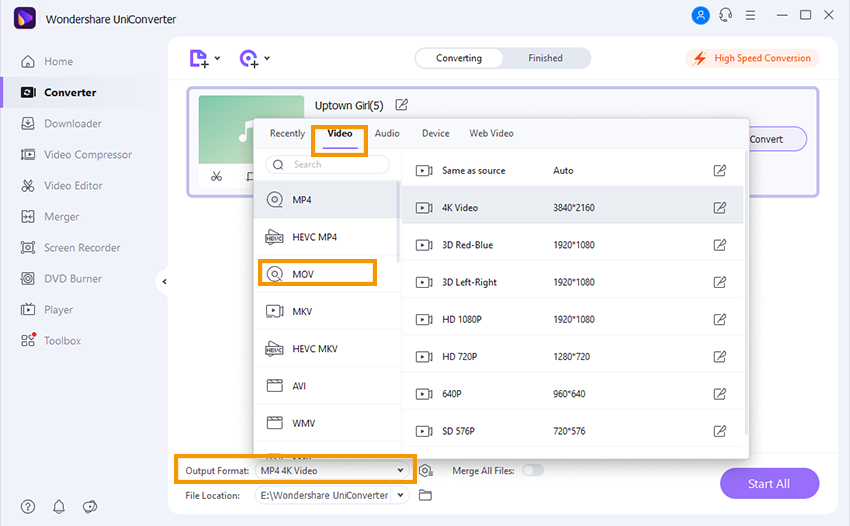
After adding the video you have to select the output format. To select output format you need to click the Output Format option at the lower side above the “File Location” then select the “MOV” format from the “Video” tab and choose the resolution for your output video.
After selecting the output format simply clicks the “Convert” button which is available in the next to your added video or "Start All" botton. UniConverter will start convert MOV to mp4 process now and it will finished in some time by 30x faster speed depending on the size of your movie. This is the way for iMovie export mp4 format with Wondershare UniConverter.
Part 3: Export Settings for iMovie to Quicktime
Steps to Follow:
- Open the completed project in iMovie software project library then select the “Share > Export Using QuickTime”.
- Enter a title for the movie in the “Save As” field with name you want to save on your computer. Select the location where you need to save the file. Now choose the output format from the popup. You need to hit the “Options” button to view the by default compression settings.
- Hit the “Settings” button if you want to change compression settings with the frame rate, quality etc. Whatever output format you choose, the software will show you different types of compression and codecs options depending on the format.
- Once everything is perfect and you are ready click the “Save” button to export the movie to QuickTime. This is how to iMovie save to mp4 with the expert settings.
Part 4: How to Put QuickTime Videos to iMovie
Sometimes you may need to import the QuickTime movies in the iMovie as well. If you are also looking to import the videos in iMovie then you can use the below steps.
Steps to follow:
- Run QuickTime on your computer and then open the movie file which you need to export in the iMovie.
- Open the “File > Menu” then you need to press the “Export” button.
- Go to the drop down menu in popup and then select “DV Stream”.
- Finally click the “Save” button then the QuickTime will start converting the file in the iMovie format. After completing the process QuickTime will show you a notification and the process completion.
MOV
- 1. Convert MOV
-
- 1.1 Convert MOV Mac
- 1.2 MOV to MP4
- 1.3 MOV to MP3
- 1.4 MOV to WMV
- 1.5 MOV to AVI
- 1.6 MOV to MPG
- 1.7 MOV to M4V
- 1.8 MOV to FLV
- 1.9 MOV to WebM
- 1.10 MOV to SWF
- 1.11 MOV to MKV
- 1.12 MOV to XviD
- 1.13 MOV to VOB
- 1.14 MOV to DVD
- 1.15 MOV to GIF
- 1.16 MOV to iPad
- 1.17 MOV to iPhone
- 1.18 VLC MOV to MP4
- 1.19 FFmpeg MOV to MP4
- 1.20 Online MOV to MP4 Converter
- 1.21 Online MOV to WMV Converter
- 1.22 Free MOV to WMV Converter
- 1.23 MOV VS Other Formats
- 2. Import MOV
- 3. Convert to MOV
-
- 3.1 MP4 to MOV
- 3.2 VOB to MOV
- 3.3 AVCHD to MOV
- 3.4 WLMP to MOV
- 3.5 M4V to MOV
- 3.6 AVI to MOV
- 3.7 WMV to MOV
- 3.8 ASF to MOV
- 3.9 MTS to MOV
- 3.10 MOD to MOV
- 3.11 FLV to MOV
- 3.12 MKV to MOV
- 3.13 MPG to MOV
- 3.14 3GP to MOV
- 3.15 DivX to MOV
- 3.16 3G2 to MOV
- 3.17 DAT to MOV
- 3.18 Free MP4 to MOV
- 3.19 Online MP4 to MOV
- 4. Play MOV
- 5. Compress MOV

Brian Fisher
chief Editor