- Convert video to MOV, MP4, MKV, WMV, FLV, MP3, M4A and other 150+ video/audio formats.
- Convert video to iMovie, Final Cut Pro, Windows Media Player, Windows Moive Maker, ect. for further editing.
- Embeded video player streams MP4, MOV and any media files.
- Download videos from YouTube, Facebook, Vimeo and over 1,000 popular sites.
- Burn video to DVD with free attractive templates.
- Built-in video editor allow to trim, crop, add subtitle, watermark, effects to the video.
- Transfer video to iPhone, iPad, Android and other devices easily.
- Powerful toolbox includes: Fix Metadata, GIF Maker, Screen Recorder, Video Compressor, etc.
QuickTime to Windows Movie Maker: How to Import QuickTime MOV to WMM Easily
by Brian Fisher •
Yahoo Question: Does Windows Movie Maker support MOV?
I don't know how to convert my QuickTime (MOV) videos to Windows Movie Maker. Windows Movie Maker can't recognize them. I want a QuickTime to Movie Maker converter that can easily change a video from QuickTime to something compatible with Windows Movie Maker!
The kind of flexibility portrayed by the QuickTime file format allows any kind of media to be stored in a track of its kind. The QuickTime framework does support quite a number of video as well as audio compression and decompression that are commonly used nowadays. However, this flexibility is a disaster for Windows Movie Maker. It can't recognize your QuickTime video when you try to import them to Windows Movie Maker for editing. If you want to edit QuickTime MOV video with Windows Movie Maker, convert QuickTime MOV to WMV, here get the must-have tutorial guide.
- Part 1. How to Convert convert QuickTime MOV to WMV in Windows Movie Maker
- Part 2. How to Import Windows Movie Maker Videos to QuickTime on Mac
Part 1. How to Convert convert QuickTime MOV to WMV in Windows Movie Maker
Windows Movie Maker provides the best support for WMV video files. So if you want to play video from QuickTime on Windows Movie Maker, you will have to convert the QuickTime MOV file to WMV first. Only in this way, there won't be any problem to edit QuickTime video with Windows Movie Maker. Here we highly recommend you UniConverter to convert QuickTime videos to Windows Movie Maker.
Video Converter for Windows - UniConverter
Complete Conversion from MOV to WMV within Seconds:
- Three simple clicks to convert QuickTime MOV videos to WMV, as well as 150+ video and audio formats.
- Convert online videos from 1,000+ sites like YouTube and then convert them to any format as you want.
- Edit your QuickTime MOV videos before converting to WMV with inbuilt editing features like trim, crop, add effects.
- Burn your MOV or WMV videos to DVD or copy to various to DVD as backup if you need.
- Transfer your converted MOV or WMV videos to your mobile devices like iPhone, iPad, etc. to enjoy on the go.
- Fully compatible with Windows 10/8/7/XP/Vista and macOS 10.15 Catalina, 10.14 Mojave, 10.13 High Sierra, 10.12 Sierra, 10.11 El Capitan, Yosemite, Mavericks, Mountain Lion, and Lion.
How to Import QuickTime to Movie Maker in Windows 10/8/7/XP/Vista
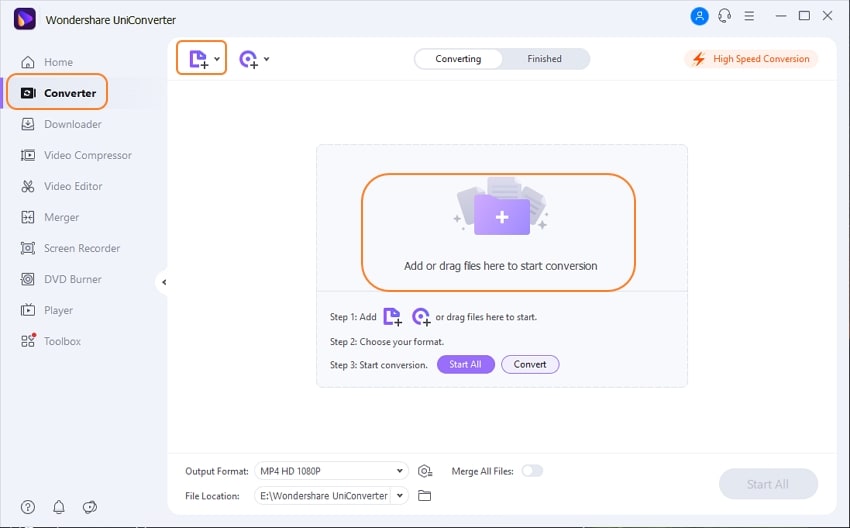
Step 1. Add QuickTime MOV files
First, download and install the program. When done, launch UniConverter from the Start menu or by clicking the program icon on the desktop. After that, drag and drop your QuickTime MOV video to this program. Or use the "Add Files" button to import MOV files to the windows converter.
Step 2. Choose WMV as the output format
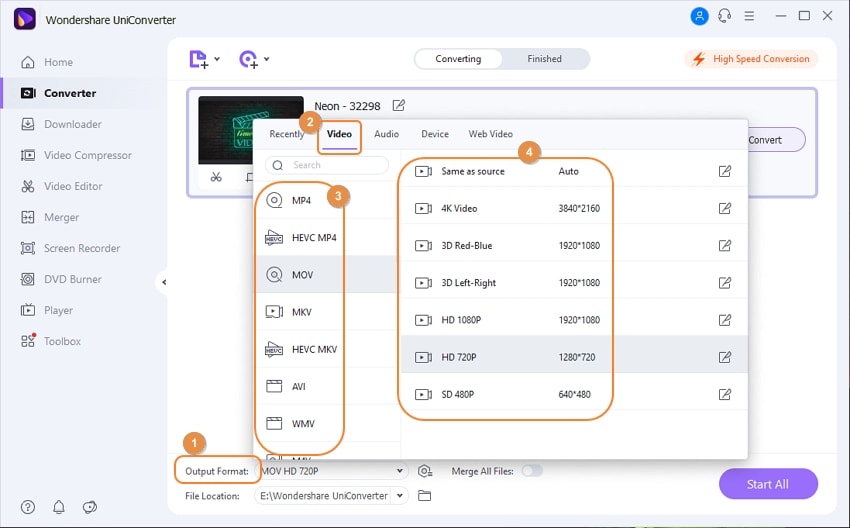
On the bottom, choose "WMV" as the output format. If you want to make changes to the video settings like resolution, bit rate, and other video settings, click the pen icon beside to modify configurations as you like.
Step 3. Convert QuickTime to Windows Movie Maker video
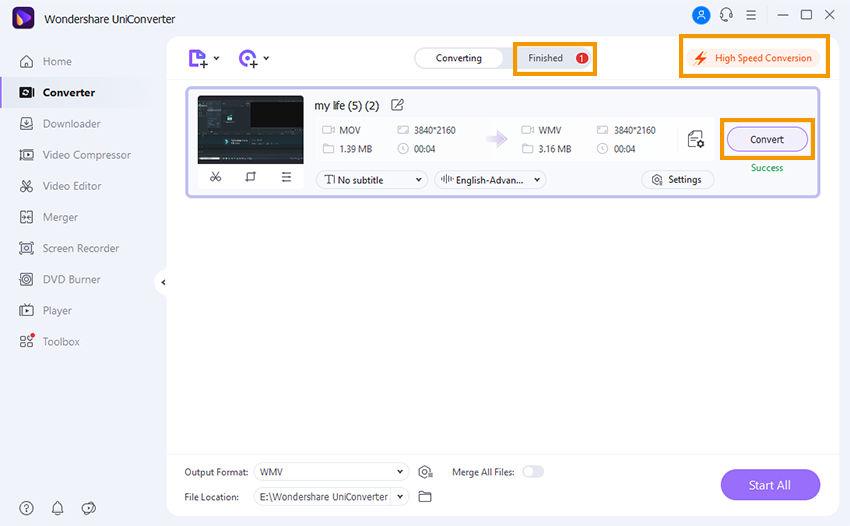
When settings are done, click the "Start All" button and the conversion tasks will start quickly by this QuickTime Movie Maker Video Converter. Alternatively, you can click the "Convert" button in each video clip if you want to convert a certain one first. Once completed the conversion, you can easily import the converted WMV video to Windows Movie Maker for editing.
Bonus: UniConverter comes with basic video editing features, including Trim, Crop, Effect, Watermark and Subtitle. If you just want to do this editing with Windows Movie Maker. You can simply get it done with this QuickTime to Movie Maker converter before conversion. No need to use Windows Movie Maker.
Part 2. How to Import Windows Movie Maker Videos to QuickTime on Mac
On the contrary, UniConverter can easily import and convert QuickTime MOV to WMV into QuickTime MOV format. The resultant video will have the same quality as the original, thanks to the lossless feature of this tool.
Best Video Converter for Mac - UniConverter
Easily Convert Windows Movie Maker Videos to QuickTime MOV Format.
- Compatible with 150+ Video Formats – Convert Windows Movie Maker (WMV) to QuickTime MOV easily. You can easily import over 150+ video files and output them into a single file.
- User Friendly – The user interface is designed to make the process of converting videos easy for you.
- Lossless Conversion – Support to convert video with encoder losslessly at 90X faster speed.
- Inbuilt Editing Features – Crop, trim, rotate, or add special effects, watermark, etc. before converting to the final MOV.
- Transfer to Devices – Easily transfer your MOV or WMM video to mobile devices like iPhone, iPad, Android phones and tablets, etc.
Guide on How to Import Windows Movie Maker Videos to QuickTime
Step 1. Load the WMV files to the MOV converter
Drag and drop the WMV files into the conversion application. You can also use the "Add Files" button to locate the WMV files on your computer. For any video saved in your mobile devices, just sync them to your Mac, and click the drop-down icon beside the "Add Files" button to directly load from your devices.

Step 2. Choose export to QuickTime
On the right side of the window, you will see a format tray, which shows the various formats that you can export to. Select "MOV" from the Video tab as your output video and then customize the type of MOV file that you want by selecting a resolution, quality, encoder, frame rate, bit rate, etc. You can choose from the presets or leave it as default.

Step 3. Export and Convert WMV to MOV
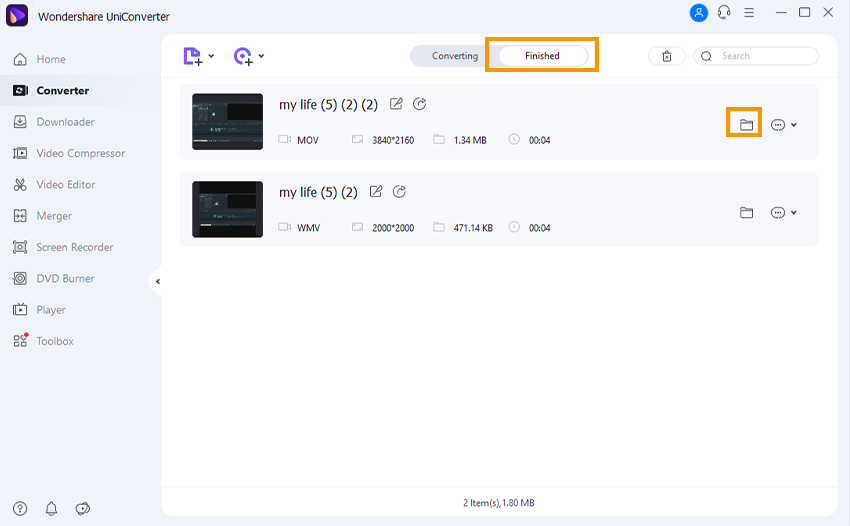
Once you have chosen the output settings, click on the "Convert" in the video clip or "Start All" at the bottom right so the files can be saved as MOV files. This process may take a little while to be completed. On the bottom left, you will see an alarm icon, from where you could schedule this converter according to your need, such as shut down the computer once completed tasks.
With this speedy and versatile video converter, you can import any video file and convert it to any format that you would like.
Optional: Free Online QuickTime MOV to Windows Movie Maker Converter
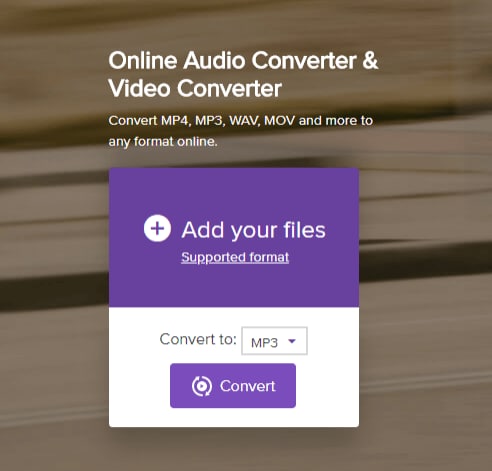
Online Audio Converter & Video Converter is a web-based free online converter that allows you to convert QuickTime MOV to WMV (Windows Movie Maker) format easily. Here is the step-by-step guide on how you can convert the videos.
Step 1. Open your browser and visit media.io website.
Step 2. Next, you will see an interface that allows you to convert files. Under the Add files option, click on the “Add your files” button to be able to add an MOV file to the website.
Step 3. After that, click on “Convert to” and choose the “Video” option. Then select “WMV” format.
Step 4. After setting the right output format, you can now click on the blue “Convert” button.
Online Audio Converter & Video Converter will begin to convert MOV to Windows Movie Maker immediately. You can accelerate the speed of the conversion on the screen. That is how fast you can convert MOV to WMV files.

Brian Fisher
chief Editor