by Brian Fisher • • Proven solutions
-“How do I minimize video size?”
So, your storage space shrinking down to your spirits and pushing you to delete your classics? And you fret as to how on earth do I compress video file size without losing quality? Well, it isn’t a rocket science or a tough thing to do. You needn’t to be a pro either. As, there are some great converters useful in compressing videos size. We’ve streaked down the most effective solutions essential in driving how to compress video file to make it space friendly. Unveil them now!
- Part 1. How to Compress Video Easily
- Part 2. How to Compress Video in Batch Quickly
- Part 3. 3 Ways to Compress Video Online
- Part 4. How to Compress Video in QuickTime
- Part 5. How to Compress Video in VLC
Part 1. How to Compress Video Easily
To have a holistic experience of compressing files (video or audio, doesn’t matter), UniConverter is an impeccable one-stop tool for all your needs. It serve your different needs like to download, convert, compress, edit videos/audio. It is flared to stretch compatibility with 150+ file formats effectively. See the main features of it below:
Get the Best video compressor:
- Compresses, converts most of the popular formats including MP4, HD, MKV, FLAC, WAC, AVI, FLV, AAC and 150+ others.
- Speedily converts any kind of 90x speedy in a lossless manner.
- Allows batch conversion of different file formats easily.
- Incorporates a great type of functions like cropping, trimming, resizing as well as dash in a couple of effects.
- Download video from 1000+ sites, including YouTube, Vevo, Netflix, Facebook, etc.
- Burn videos to DVD/Blu-ray disc with free templates.
- Compatible with macOS 10.7 Lion to 10.15 Catalina, and Windows 10/8/7/XP/Vista.
How to Compress Video in An Effortless Manner
Step 1. Add video to iSkysoft Video Compressor
Start with downloading UniConverter on your PC. Open interface and proceed with Toolbox option in navigation panel. Now, click on Video Compress button over the program. It will direct to a screen with a magnificent “+” sign in the center of the window. Tap on it and add the required video file accordingly.

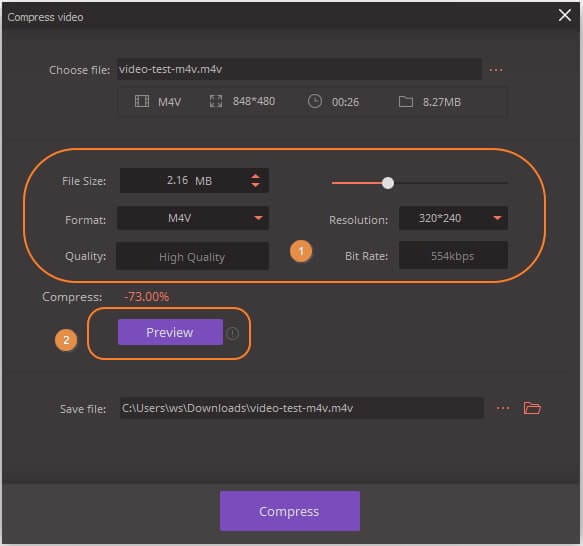
Step 2. Perform needful Compression Settings
As soon as you add the file, “Compress Video” pop up window will appear. Set the parameters for format and file size. There are file size, format, quality, resolution and bit rate available.
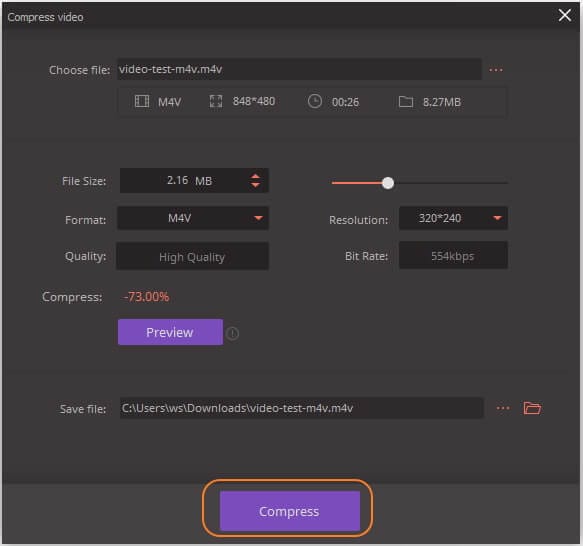
Step 3. Compress video in no time
Gain Preview if needed and hit the Compress icon lastly.
Part 2. How to Compress Video in Batch Quickly
Here is the comprehensive guide to process batch compression of multiple files together using UniConverter.
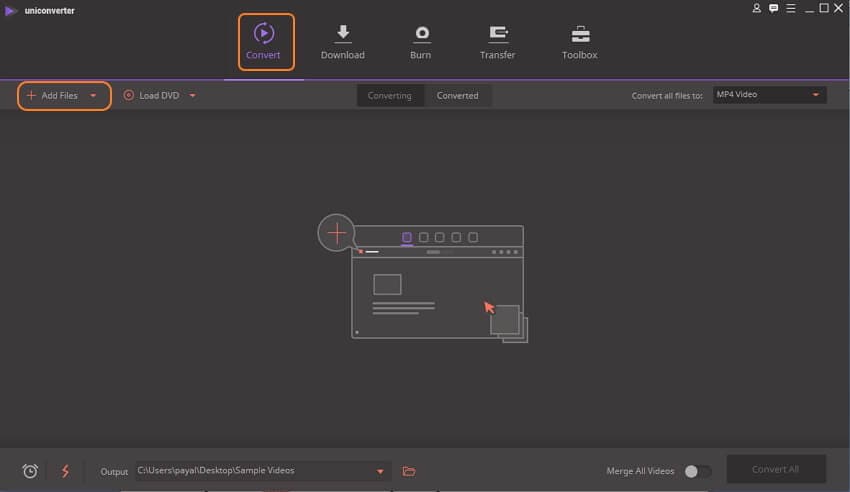
Step 1: Launch program and add files
First and foremost, load UniConverter on your working PC. From main interface, get under the Convert tab and click on +Add Files button placed over the top left bar to add files for compression.
Step 2: Opt for the required output and do settings
Now, use Convert all files to: tab and opt for Video section, then select MP4 or any other format as per your preference. Then, you need to hit on the Create Custom button which will prompt up another settings window. From here, set parameters for Resolution, Bitrate, Sample Rate, etc. and click on Create.

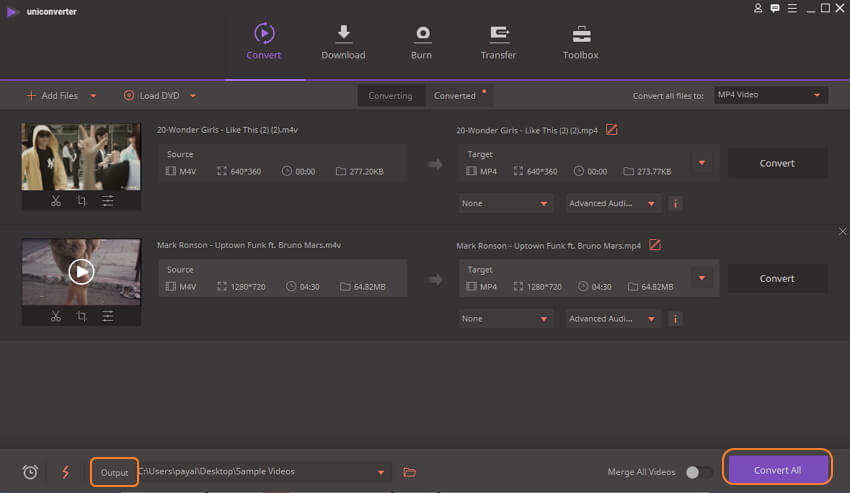
Step 3: Compress video in batch
Once you’ve applied down all settings accordingly, simply tap on Convert all option and you’re all set to enjoy all your compressed files from Converted section.
Part 3. 3 Ways to Compress Video Online
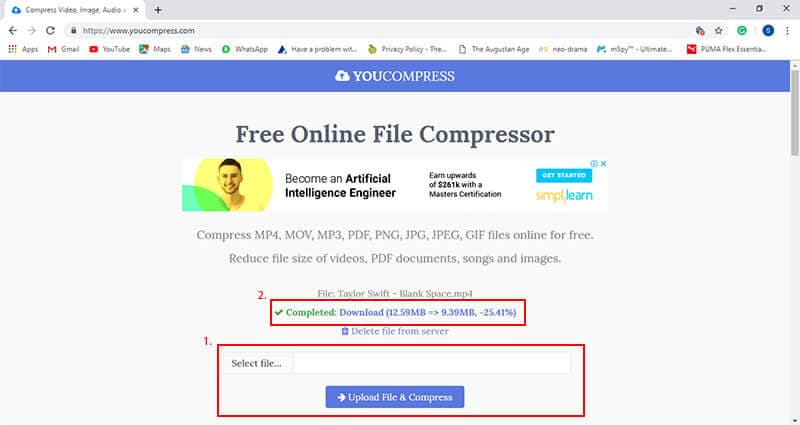
1. YouCompress
Link: https://www.youcompress.com/
YouCompress is an online converter capable of performing compression on the popular file formats. You can conveniently shrink file size of PDF documents, songs as well as the images.
Pros:
- Certainly no requirement of undergoing age-long registration process to utilize.
- Users can be assured of getting no watermark of the software over output of video file.
Cons:
- There is no provision for customizing compression rate.
- Batch conversion of multiple files are not supported by YouCompress.
Follow down the complete guide on how to compress video files online
Step 1: First of all, visit the website of YouCompress from your native PC/Mac. The next basic step is to add the file over the program. Just, use “Select Files” option and surf for the file from PC.
Step 2: Once file gets loaded, hit the blue icon of “Upload File& Compress”. Allow program to process the compression of file. Then, complete sign will occur with the download link.
Note: Please note that the program will automatically draw compression over file.
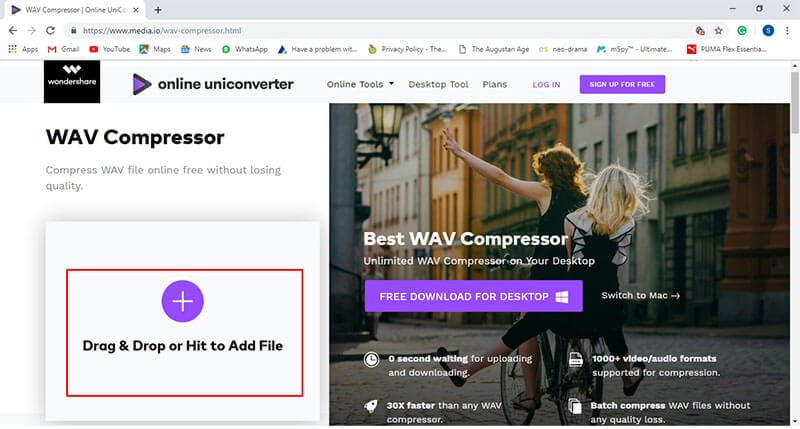
2. Online uniconverter
Link: https://www.media.io/
From the gig world of Wondershare, online uniconverter is one of the good examples for compressing video files without losing down the quality of file. It manages to perform several functions, such as the resolution etc.
Pros:
- Does not have any irking advertisements while processing compression of file.
- The files are secured in the HTTPS (SSL) connection for ensuring the security of uploaded files.
Cons:
- Takes a lot of time in uploading the file over program.
- Lacks the facility of providing advanced level of features.
Follow down the complete guide on how to compress a video online
Step 1: Launch the program by locating it on your computer. Then, click on “+” icon to insert the video you wish to convert.
Step 2: The program may take a while to load the file over the program. Thereafter, flare up the parameters in the “Resolution” and “Reset size” section duly followed by tapping on “Compress” icon. Finally, click on “Download” button and the output will directly get stored in the PC respectively.
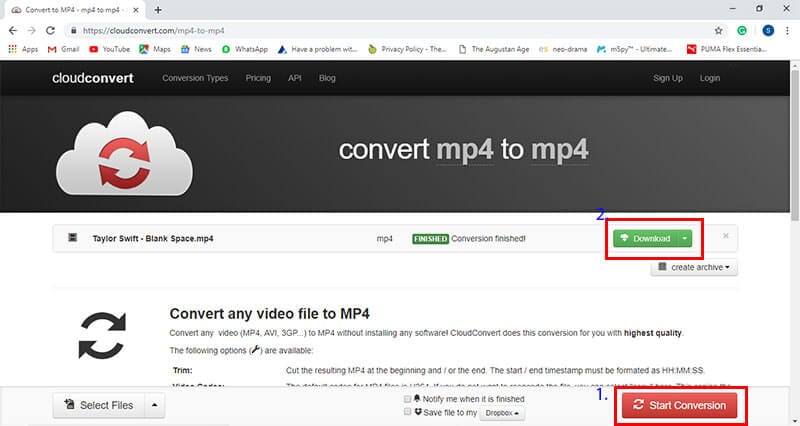
3. CloudConvert
Link: https://cloudconvert.com/
CloudConvert is also a considerable means of compressing video file or size. It stretches compatibility with 218 formats of the audio, video formats. One can reap the advantage of processing audio codec or bitrate.
Pros:
- Allows users to transpose the desired video.
- Can copy the subtitles from input to output file.
Cons:
- Users cannot perform batch conversion over multiple files.
- Does not offer video editing features.
Follow down the detailed account of guide to understand the functionality of Cloudconvert.
Step 1: Load CloudConvert on your browser and click on “Select File” button to insert the files from PC. Now, add in the “Output format” and tap on the editing icon for making further enhancements and click on “Okay” option.
Step 2: After through with the settings, just tap on “Start Conversion” button at the bottom to fire up the process. Then, download the file.
Without any speck of doubt, compressing video online is very easy to process. For there is no need of downloading the software, installing codecs or make purchases. But, working with online converters are useful to some extent. There are some loopholes, one cannot overlook, look below.
- Compulsion of Internet Connection: It is very important to have a good speed of internet connection for processing compression of video size.
- Less scope for batch conversion: Most of the online converters does not have any provision for converting multiple files simultaneously.
- Cannot intake larger files: In some converters, there is a size limit defined. They cannot intake file exceeding the set limit.
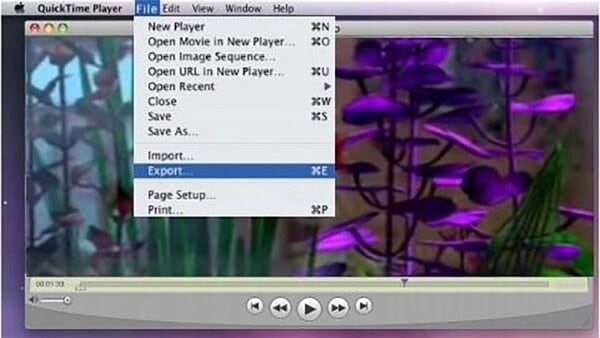
Part 4. How to Compress Video in QuickTime
Apple’s QuickTime is a multimedia player that plays down a number of file formats with much ease. Users can easily compress the size of the video, without denting an inch over the quality. It offers a good range of advanced features for making the video file more presentable.
Pros:
- Has the feature of converting image to a number of formats.
- The interface is very crisp and offers a pool of features.
Cons:
- The program may crash if the OS is not updated on timely basis.
- QuickTime fails to support verb basic formats such as the DivX, WMV and .mkvs etc.
How to compress video file with QuickTime
Step 1: The very first step is to download QuickTime Pro from https://support.apple.com/kb/DL837?locale=en_US for the Windows/Mac versions. Do ensure to register and create your account. (In case you have the account, simply open the program).
Step 2: Then, visit “File” menu and tap on the “Open File” option. From here, just surf for the desired file on your PC and open it. Now, that video is loaded, play it and ensure sound is able to sync down with video. Synchronize audio and video to export file for using web. Tap on the “File” tab and opt for “Export” which will direct the “Save Export File As” screen.
Step 3: From the “Save Export File As” window, ensure to tap on “Export” and choose for “Movie to QuickTime Movie” settings.
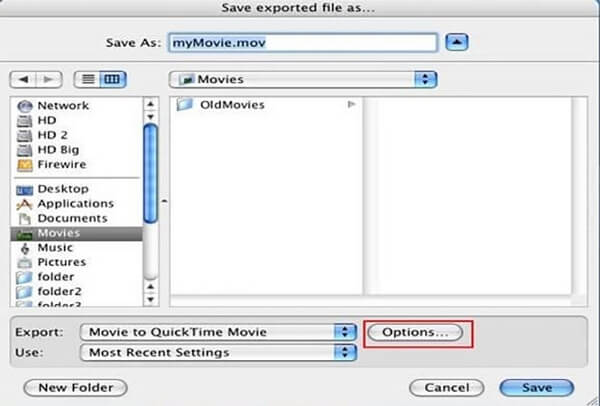
Step 4: The program will throw up a new window, where one has to tap on “Options” button placed at the lower audio and video settings. Here, you can change Video and Sound selection parameters. After this, tap on “Settings” button for duly changing the compression type of your video to a lower bitrate.
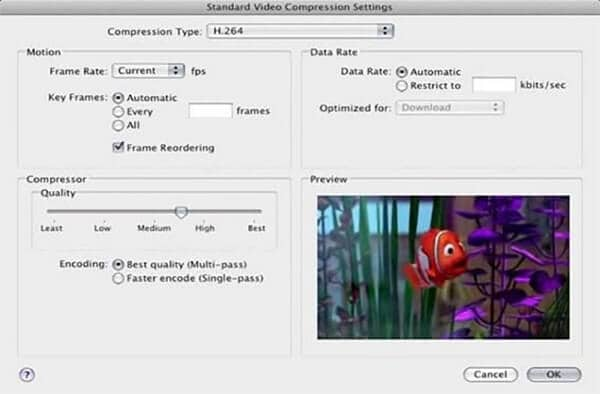
Step 5: For changing video dimensions and frame size, hit the “Size” button and opt for the smaller size. At last, click on “OK” and leave to the “Save Export File As screen”. For the compressed file, enter name and set location over computer’s hard disk to save it. Then, click on “Save” button to head on to launch compressing and exporting video.
Part 5. How to Compress Video in VLC
One of the prominent examples for compressing down the video file size is by using VLC Media Player. This cross-platform media player is essential in playing videos, making due changes over the file(s) etc. Users can be assured of performing compressions of a range of file formats such as the DVD-Video, Video CD etc.
Pros:
- Demonstrated to be compatible with the popular operating systems such as android, iOS, Windows, Mac and Linux etc.
- Has the provision of supporting batch conversion of multiple files.
Cons:
- Cannot directly transfer the output file to your phone or any other device.
- The process is quite a time eating and involves a ladder of complex procedures.
Here is a quick guide to understand how to compress a video file size using the VLC Media Player:
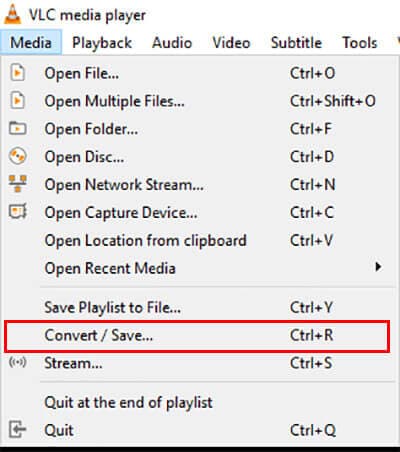
Step 1: First of all, start with opening VLC Media Player on your Mac/PC or download it from the internet and then proceed. Ensure to click on the “Media” menu placed at the upper section. Under it, surf and select “Convert/Save” option.
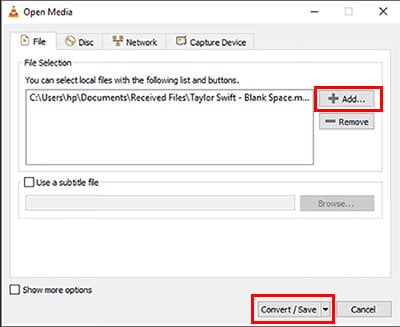
Step 2: Move ahead to insert file using “+Add” button. After the file loads, click on “Convert/Save” button respectively.
Step 3: The following Convert window will be surfaced. Ensure, to duly customize size from Profile section and choose the size accordingly. In addition to this, select the destination location by tapping on “Browse” button.
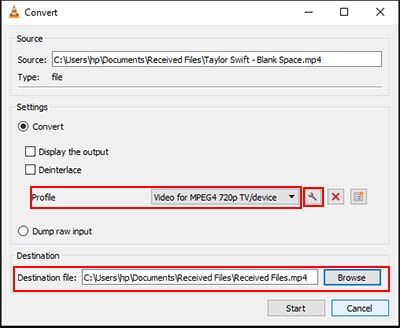
Step 4: For compressing video file, click on the settings icon in the Profile section to make change over the values of “Codec”, “Bitrate” etc. After that, hit the “Save” button. At last, VLC Media player will execute compression of the file. Thereafter, get hold of your file from destination folder which you opted previously.

Brian Fisher
chief Editor