- Easily compress QuickTime video without losing quality.
- Compress video by changing video size, encoder, resolution, bit rate, quality, etc.
- Convert video in 150 formats, like MOV, MP4, FLV, MKV, MPEG, AVI, etc.
- Allow you to edit video with the powerful built-in editor.
- Download or record video from 1000+ video streaming sites including YouTube.
- Burn videos to DVD with templates.
Fast Ways to Compress QuickTime Video on Mac
by Brian Fisher •
With too many QuickTime videos on your Mac, accommodating the files become difficult due to the shortage of storing space. So instead of deleting your favorite files, you can keep all them by resizing and compressing their size. Changing the file parameters and trimming unwanted parts helps to compress QuickTime video using a professional compression program. So if you are looking for the fast ways on how to compress QuickTime video, read below.
- Part 1. Best Way to Compress QuicklyTime Video with UniConverter
- Part 2. How to Make a QuickTime Video Smaller with QuickTime Player Pro
- Part 3. UniConverter vs QuickTime Player Pro
Part 1. Best Way to Compress QuicklyTime Video with UniConverter
You can attain high-quality files at a fast speed when compressing your QuickTime videos on Mac using UniConverter. The software is compatible with working on Mac and Windows system and facilitates file resizing in a hassle-free manner. Single or multiple files as needed can be compressed without losing quality using the software. File parameters like resolution, quality, frame rate, and resolution can be edited for shrinking the file size of the videos. In addition to Quicktime, other formats are also supported by the software for the process.
- Easily compress QuickTime video without losing quality.
- Preview function facility to check the changes made.
- Allows trimming and cutting unwanted file parts for file resizing using the built-in editor.
- Supports batch processing to compress multiple files at a time.
- Convert video in 150+ formats at 90X faster speed, including MP4, MOV, AVI, MPEG, FLV, etc.
- Download video from online sites like YouTube, Facebook, Vevo, Vimeo, and more.
- Burn DVD/CD, record video, make GIF images, fix video metadata, etc.
- The software supports Windows and Mac system
Guide on how to make a QuickTime video smaller using UniConverter
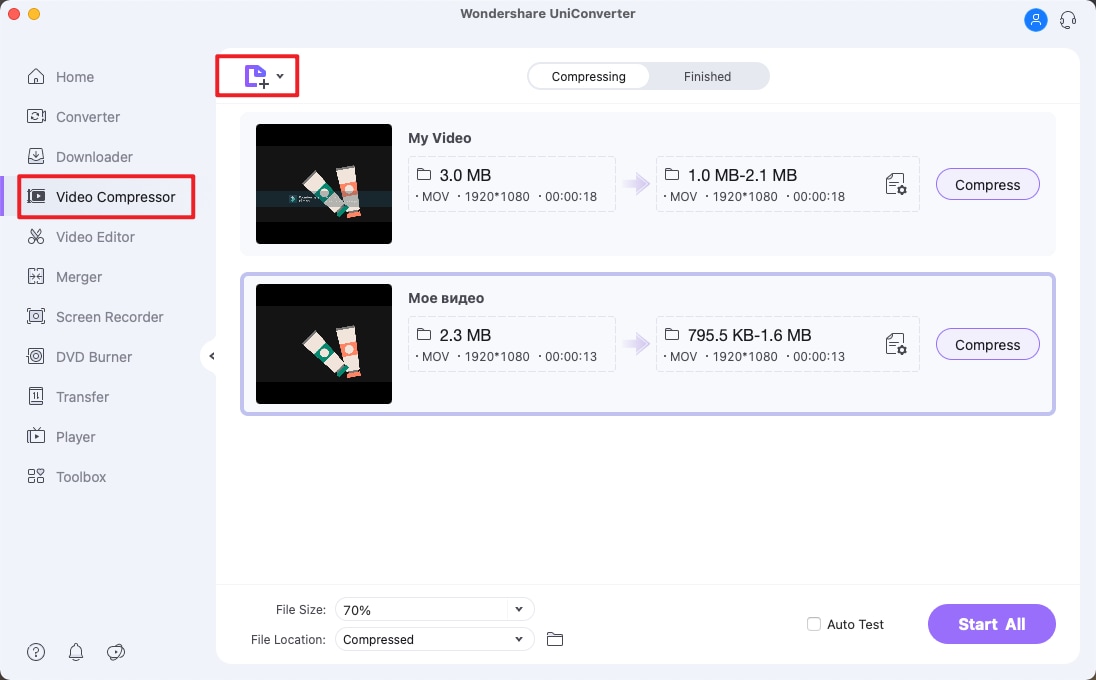
Step 1. Add QuickTime video to iSkysoft Video Compressor
Open UniConverter on your Mac and select Compress Video option from the Toolbox section on the main interface. A new window will open allowing you to add the QuickTime video from your Mac by clicking on the + sign.
Step 2. Select compression settings for QuickTime video
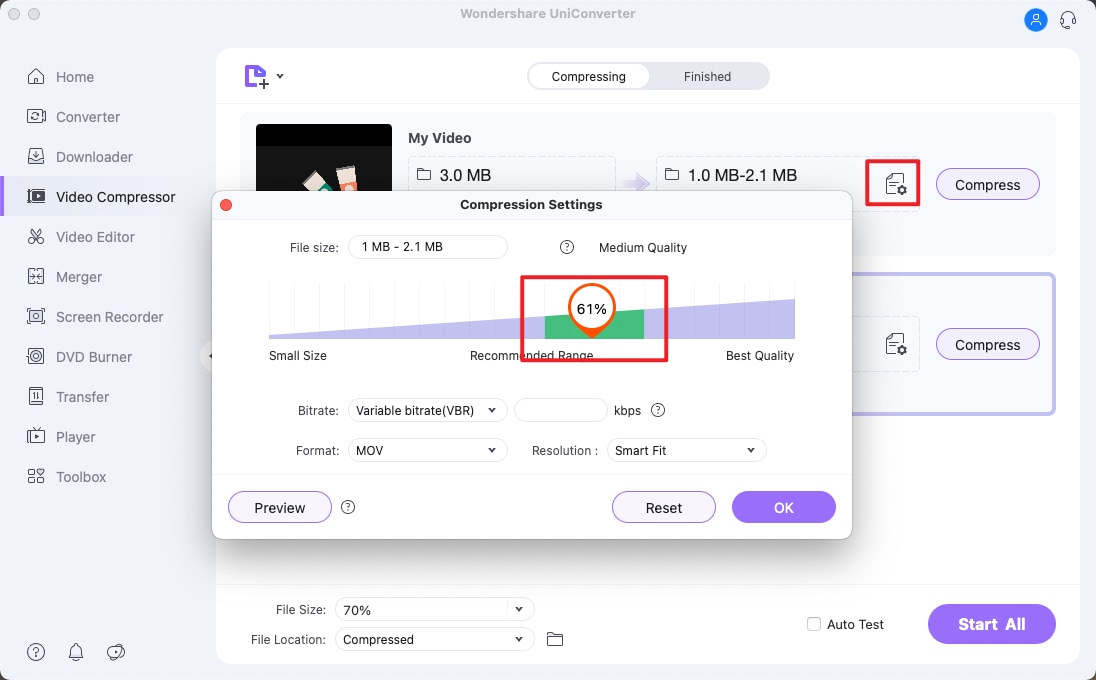
On the Compress Video window, the details of the added file and the options for selecting compression settings occur. You can move the slider at the interface to select your desired compression percentage and accordingly the file values related to the resolution, quality, and bit rate changes. If needed, you can even manually select the file parameter values.
Step 3. Preview and reduce the QuickTime file size
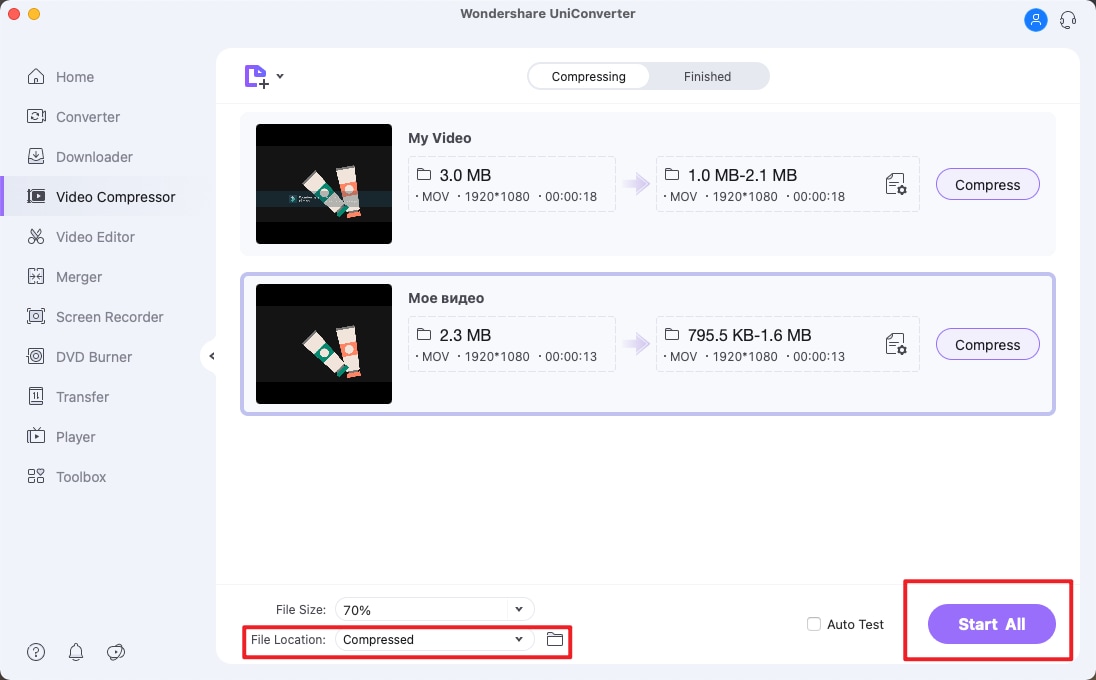
Click on the Preview button to check the file. At Save file section, select Mac location to save the compressed file. Click on the Compress button to start resizing the added QuickTime video.
Part 2. How to Make a QuickTime Video Smaller with QuickTime Player Pro
Quicktime Player Pro is the advanced version of the QuickTime player app on Mac. In addition to video playback in a number of formats, the player app also supports a host of other features including video compression. Using the app you can change the size and other parameters of the file so as to shrink the added video.
Guide on How to Compress a QuickTime video using QuickTime Player Pro
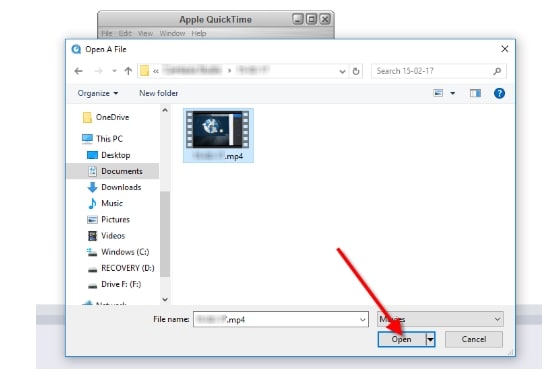
Step 1: Download, install and open the QuickTime Player Pro app on your Mac system. Select File > Open file option to browse and add QuickTime video from your PC.
Step 2: Once the video is selected and added, again click on File > Export option.
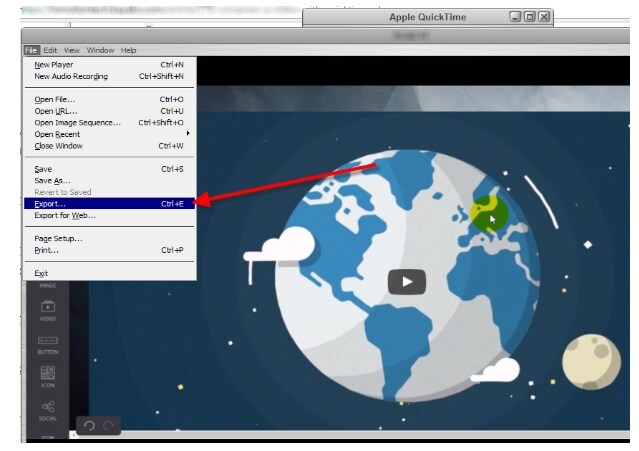
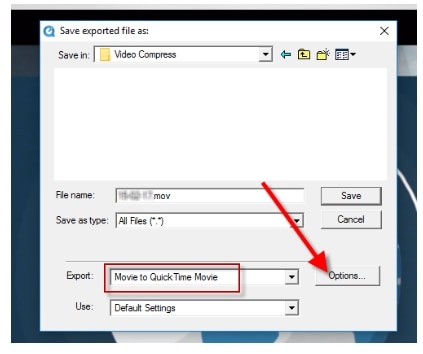
Step 3: A new Save exported file as: window appear from where choose desired file name and location of the processed file. At Export section select Movie to QuickTime Movie option and then click on the Options button.
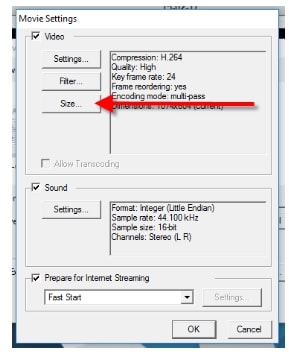
Step 4: Choose the Settings tab that will open a new window from where you can select the desired compression type, frame rate, data rate, and file quality. The Size tab helps you to select the lower size options. Click on the OK button to confirm all the settings.
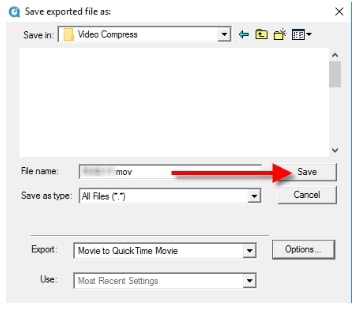
Step 5: Finally, hit on the Save button that will start processing and compressing your added videos.
Part 3. UniConverter vs QuickTime Player Pro
The table below compares iSkysoft software and Quicktime player Pro on the basis of an array of features.
| Features/Tool |
UniConverter
|
Free Video Converters
|
|---|---|---|
| Compatible with OS | Windows and Mac | Mac |
| Supported formats | Almost all of video & audio formats | Limited to MP4, MOV, and a few others woring on Mac |
| Video compression through change in parameters | Supports editing an array of parameters like bit rate, resolution, quality, format, encoder, and others | Allows to change basic parameters like resolution, bit rate, and quality. |
| Video editing | Comes with a complete editor that support to trim, cut, crop, and perform other editing functions | Not supported |
| Preview function | Yes | Not supported |
| Batch processing | Yes, support processing multiple files at a time | Not support |
| Transfer compressed files | Transfer video to iPhone, iPad or Android device | Not support |

Brian Fisher
staff Editor