- A sampling of AVCHD files into Premiere Pro for further editing processes.
- Personalize your DVD videos with the built-in templates.
- Compress big video files using the Video Compressor option.
- Supports nearly 30 languages. Provides a comfortable and user-friendly environment for worldwide users.
Try this Useful Tips for Importing AVCHD to Premiere Pro
by Brian Fisher •
You would have come across a lot of video editing software in the current market. Had you ever heard about Adobe Premier pro? In this article, you will learn in detail about the pros and cons of Adobe Premier Pro and the issues faced in the import AVCHD to Premiere Pro platform. At times, even branded and sophisticated software could not handle large size video files for further processing. The below compilation will be interesting for the professionals.
- Part 1. What is Adobe Premiere
- Part 2. The Most Effective Way to Import AVCHD to Premiere Pro
- Part 3. What is the Best Format for Adobe Premiere
Part 1. What is Adobe Premiere
The Adobe premiere is a prior version of Adobe Premiere Pro. People start using this ultimate video editor in the year 1991. The next Pro version came into existence in 2003 with some added features. To your surprise most of the big shots in the field of entertainment like Movie makers, Television serial creators started to make use of this Premiere Pro to make their videos to be persuasive. You can perform a lot of inspiring video editing like audio sampling, 3D editing, etc.
Despite innumerable advantages, the Adobe Premiere Pro faces great drawback in importing the AVCHD files for the editing process. When you try to upload the AVCHD file from Sony Handycam, you will receive an error message as Unsupported file. So what do you think will be the best solution to redesign this tool as AVCHD Premiere Pro? Conversion of AVCHD to a compatible format is the only remedy to fix this issue.
Part 2. The Most Effective Way to Import AVCHD to Premiere Pro
Highly recommended method to import AVCHD to Premiere Pro is that conversion. You have to convert the large size AVCHD video file into a suitable format. The incredible tool to perform this conversion process is UniConverter. It is a hassle-free tool which has ease installation with excellent performance. Most of the professionals and well-experienced editors recommend this software due to its remarkable features. This software is simple and elegant.
Main Features of UniConverter:
- The best AVCHD to Premiere Pro video converter yielding high-quality results.
- It is the perfect platform to carry out the batch video conversion process.
- Merge videos to connect the meaningful memorable clippings.
- Receives the input for conversion process from various sources like camcorders, local files, external devices such as Android/iPhone/iPad/Tablets, etc.
How to convert AVCHD files to Premiere Pro compatible format.
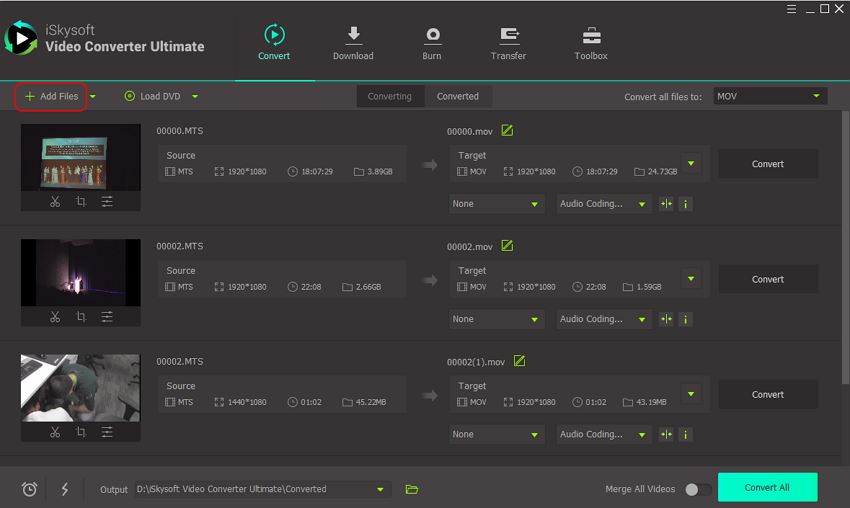
Step 1: Add the AVCHD file into the UniConverter
To add the AVCHD files on this platform you have to carry out a few clicks. See to that your camcorder is connected to the PC before trying out this step. Select the +Add Files option at the top left side of the screen and choose the Add files from Camcorder to upload the AVCHD file.

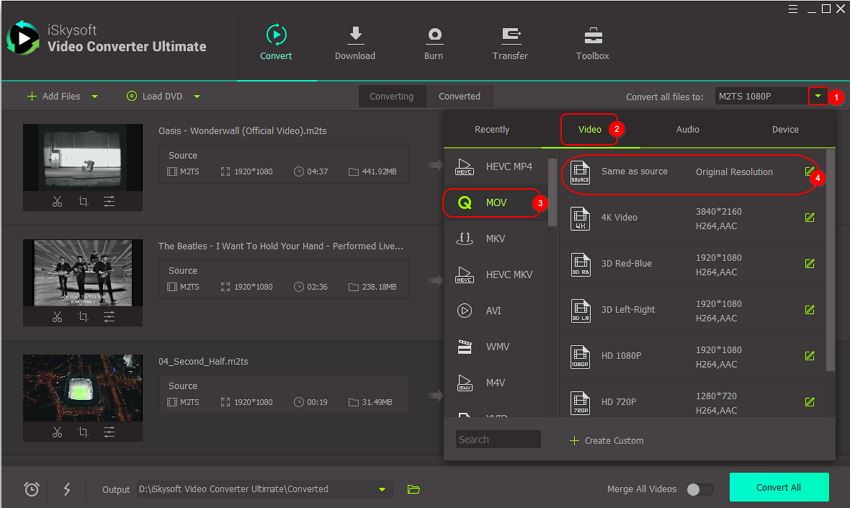
Step 2: Set attributes to convert AVCHD to Premiere Pro
To convert the file type compatible to feed the Adobe Premiere Pro you have to tap the dropdown icon beside the Convert all Files to label then choose the Video move on with the MOV file type and resolution value the Same as Source. These settings are sufficient for successful conversion.

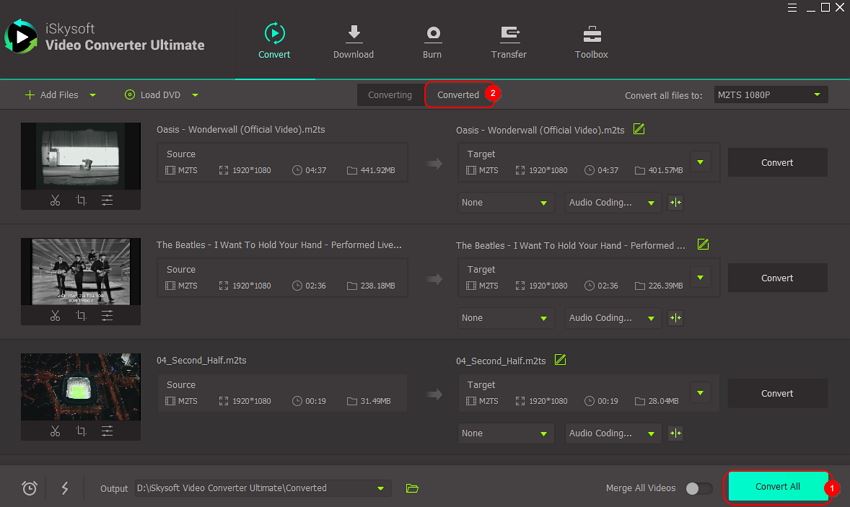
Step 3: Enable the converting AVCHD to Premiere Pro
To initiate the conversion procedure you must hit the the Convert All button at the right side of the screen beside the added AVCHD file.And you can find the output file in the Converted section.

Part 3. What is the Best Format for Adobe Premiere
The Adobe Premiere Pro’s perfect compatible file format is MPEG, MKV, AVI, MTS, MXF, MOV, VOB, , XAVC(S), Prores 422 HQ or Prores 444, and DNxHD. For editing purpose, most of the professionals prefer to convert the files to MPEG format because the quick fix is possible in this codec.
Depending on the end-use of the files you can select the format in Adobe Premiere Pro. In case, if you are planning to upload the files on social media like YouTube, Vimeo, etc soon after the editing process then go for format. This format enhances ease streaming and consumes less time to complete the process.
For backup purpose then opt for Prores 422 HQ or Prores 444 format. This type of codec suits better for backup since it retains the quality of the video. DNxHD format is the best choice is you want to work further on the edited videos in the Windows OS. This format performs well in this platform.
Now, you must be clear in choosing the right format according to the requirements. Take a closer look at each format before commencing the editing process in Adobe Premiere Pro.

Brian Fisher
staff Editor