by Brian Fisher • • Proven solutions
MP3 file format is the easiest and convenient audio format for listening to your favorite music. Compared to MP3, other audio formats do not seem convenient for playing audio files in media players/devices. That’s why our professionals have created an amazing user guide, where you can learn how to convert Music files to MP3 with mutiple tools like iTunes, iMovie and UniConverter. Out of these 3 methods, UniConverter is the most recommended method, as it can convert any audio file with only 3 simple steps along with original audio quality. Now have a look at all the 3 methods, and find out which one is the best and effective method for converting iTunes music to MP3.
- Part 1. How to Convert iTunes Music to MP3 within iTunes
- Part 2. Three Easy Steps Conversion with Best iTunes Alternative
- Part 3. Tutorial Guide on Converting iTunes to MP3 in iMovie
Part 1. How to Convert iTunes Music to MP3 within iTunes
Basically, purchased and protected iTunes are always found in AAC format, and the disadvantage with this is that you cannot copy or share these files directly. It is also not desirable for the user to convert or edit them. While, MP3 file format is compatible with almost all devices and hence it is also known as a universal audio file format. Here you will find 2 easy methods to convert any iTunes Music files to MP3 within iTunes.
Method 1: Convert Music Files to MP3 within iTunes
Step 1: Launch iTunes and Select Preferences
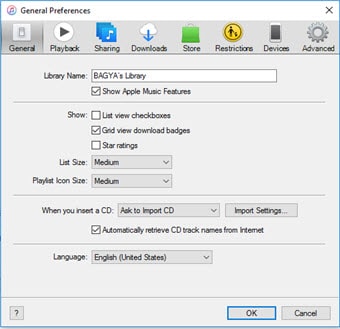
First of all, launch iTunes to open or add your favorite music files, select ‘Edit’ from the home menu and then click ‘Preferences’.

Step 2: Edit Import Settings and Select Preferred Format (MP3)
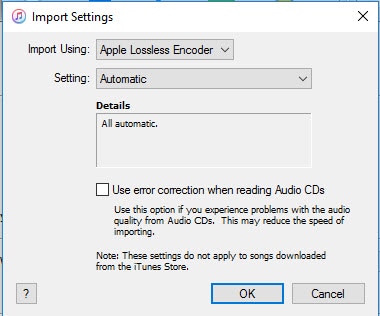
From the General Preference, tap on ‘Import Settings’ button. A new window Import Settings Window will appear, where you need to choose ‘MP3 encoder’ out of the drop-down options for ‘Import Using’ settings option. Change the output quality settings if needed. Audio Quality setting can be enabled through Settings Option. Then Click ‘OK’.

Step 3: Convert/Create MP3 Music File
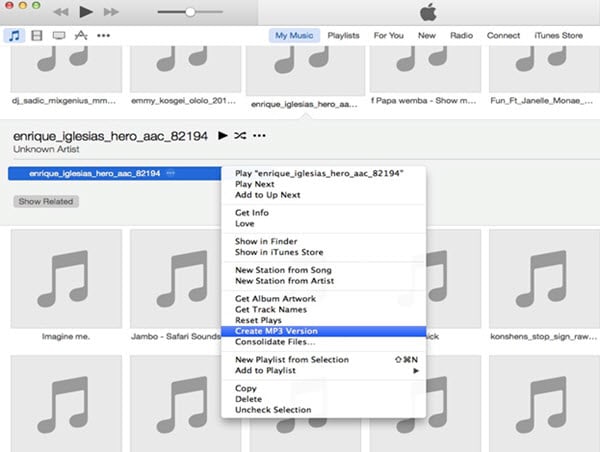
Configure settings and then select any music file from your iTunes library. Select ‘File’ menu in iTunes, and then select ‘Create New Version’ to select ‘Create MP3 Version’.

Method 2: How to Convert DRM Protected iTunes Music to MP3
Most of the Music files in iTunes, comes with DRM protection to curb unauthorized sharing of songs or music albums. Follow this simple steps, to convert DRM protected iTunes Music to MP3.
Step 1: Upgrade Music Files
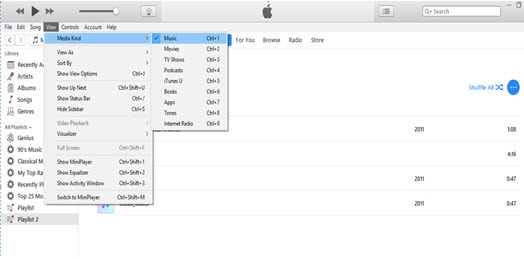
Firstly, check whether the files are in protected mode. To check it, go to ‘View’ menu and then select ‘view Options’. Check whether the box next to ‘kind’ is marked with a check mark. This will show tracks that are under protected mode.

Upgrade the Songs by right clicking it, and then select Upgrade option. This action may account a charge of $0.30 fee for each song. After that, your file is ready to be converted into MP3 format.
Step 2: Conversion Process
From here, you can just follow the steps in Method 1 to easily convert DRM protected music to MP3. Every step goes the same with the MP3 conversion process.
Part 2. Three Easy Steps Conversion with Best iTunes Alternative
UniConverter is the most powerful & efficient program which is capable of performing various multimedia functions such as play, edit, organize, convert and download audio files. It is one of the best audio converting tools, which can convert any media file at a faster rate with enhanced original quality. It provides a wizard style interface with optimized pre-sets to make the conversion process much quicker and easier.
Get UniConverter - Video Converter
- Easily convert any media file into MP3 from more than 150+ audio and video formats, such as MP4, WMA, AAC, AIFF, etc.
- Integrated with video editor that trims, crops, rotates, splits, and adjusts volume, saturation, ASR, brightness and adding effects.
- Ultimate Audio Converter with all essential customization tools & functions you need to convert and edit video with no quality loss.
- Perfectly compatible with your devices, such as iOS devices, Android devices, and game console such as PSP, PS2 XBOX, etc.
- Support Windows 10, 8, 7, XP and Vista whereas the macOS supported version are macOS 10.13 High Sierra, 10.12, 10.11, 10.10, 10.9, 10.8, and 10.7.
3 Easy Steps to Convert iTunes to MP3 with UniConverter
Step 1: Upload Music Files for Conversion.
Open UniConverter and start adding songs or music files needed to be converted into MP3. Use ‘Add files’ option to load the audio files or drag & drop your favourite music files in the program. You can also load music files from DVD.
![]()
Step 2: Choose MP3 as Preferred Format.
Before choosing output profile, you can modify the audio settings, such as audio quality, bit rate, channel, audio encode settings or volume settings by clicking the settings gear option from menu. You will find 6 different categories to choose an output profile. Go to ‘Audio’ category and choose ‘MP3’ as your preferred output audio format.
![]()
Step 3: Convert Music Files into MP3.
You need to choose an output folder from any specific location or folder. Alternatively, you can also create a folder if needed. Now, select ‘Convert’ to start the Audio file to MP3 file conversion. The files will be converted in a jiffy. That’s it! Now, you can listen to your favourite music anywhere you want.
![]()
Part 3. Tutorial Guide on Converting iTunes to MP3 in iMovie
As another software developed by Apple, converting iTunes to MP3 in iMovie is to much extent similar to the steps above in iTunes. Below is a simple iMovie guide for converting iTunes music files.
Step 1: Launch iMovie
- Launch iMovie and drag the Audio file which needs to be converted and create a new project.
- At the top of the menu bar, click on ‘Share’ and select ‘Export using QuickTime’. You can also specify the name of the file and save it in the pop-up window.
- Click ‘Export’ option and select sound to AIFF. By doing this, you can get the best audio quality settings via ‘Options’. After that edit, and then Click ‘ok’.
- When all the settings are done, click ‘Save’ button.
Step 2: Edit Preferences
- Go to ‘Edit’, select ‘Preferences’. Then, select ‘General’ and then click ‘Import settings’.
- Choose MP3 encoder from the ‘Import using’ option.
- Save your settings by clicking ‘OK’.
Step 3: Start Conversion
- Import the AIFF files in the iTunes library/playlist which needs to be converted.
- Choose ‘Create MP3 version’ option by right clicking the audio file. This step is necessary to save the AIFF file into MP3 format.
- Thus, the desired MP3 file is obtained by using iMovie software.
Within iTunes the audio files can be in the protected or unprotected mode. Choosing the right method is very essential which can convert MP3 audio files in an efficient and effective manner. Therefore, UniConverter is recommended for converting Music files as this tool is equipped with all the essential functions and customization tools for making your conversion easier and faster with original audio quality.

Brian Fisher
chief Editor