Convert MP3 to iTunes-UniConverter
- Convert MP3 to iTunes or other 1000+ video & audio formats.
- Batch converts MP3 to iTunes in 90X high-speed.
- Convert online videos from 1,000 popular sites to iTunes.
- Transfer iTunes files to iPhone, iPad, Android, and other devices.
- The powerful toolbox includes Fix Metadata, GIF Maker, Screen Recorder, VR Converter, etc.
Listening to a song for the first time can leave a profound impression on you. You start to take an interest, and if it clicks, you try to look for where to download or buy it so you can listen to it more and more. The thing is, you only know how good a song truly is when you hear it in the highest possible quality. Sure, MP3 is widely compatible, but it is a lossless format emphasizing size over quality. So once in a while, you might need to convert MP3 to iTunes for the best music experience.
Part 1. How to Convert MP3 to iTunes with Mac Built-in Apps?
1. iMovie
iMovie can be said to be the video editing tool for Mac. It comes built-in with the computer and can perform a variety of video editing features, one of which is converting. It is free to use, which is the case for most built-in apps, but it can take a little bit of getting used to because most of the tools and functions are placed in diverse locations, so you have to go around looking for each one of them. Another thing is that it can only perform basic editing and can't go into advanced features. Still, it is the best converting solution for casual users and mp3 to apple music iPhone.
Steps to Convert P3 to iTunes using iMovie
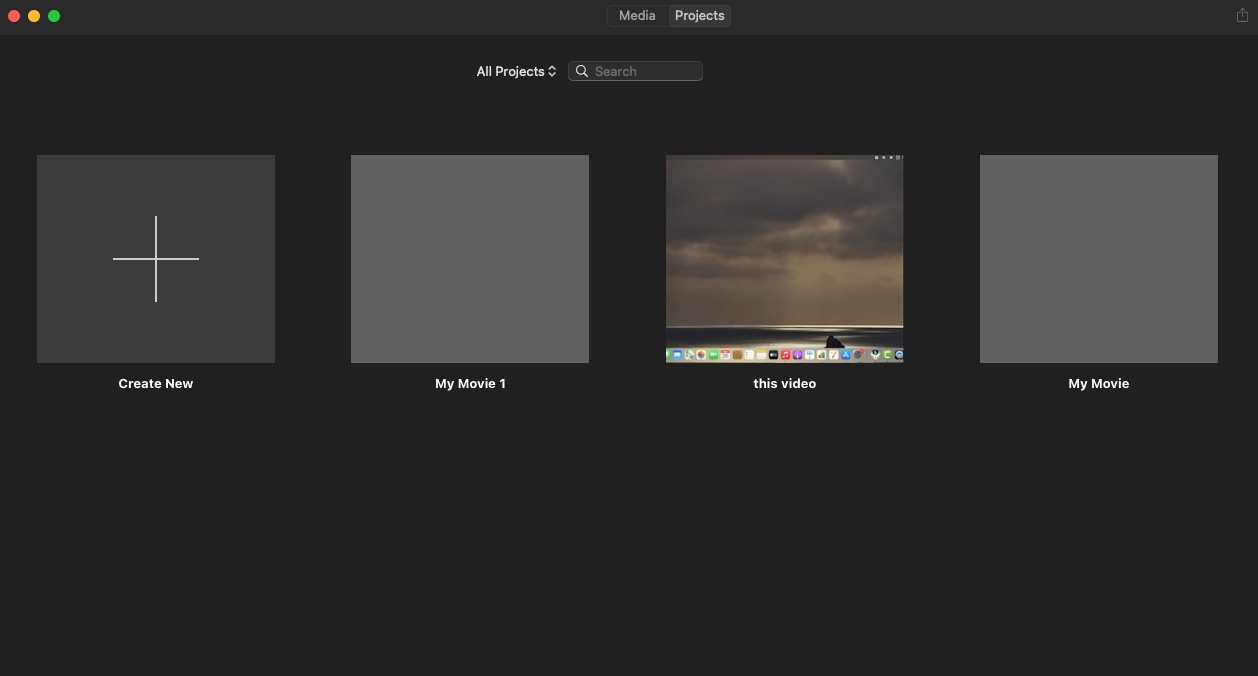
Step 1 Launch iMovie and Add Music
Launch the iMovie software and click on Start New Project so that you can start on a blank page. To add an MP3 file, go to file and click on Import Media, and let it open your Finder. Then, locate the MP3 and import it. You can also open your Finder separately and use the drag and drop function to add the music.
Step 2 Share and Choose Export Format
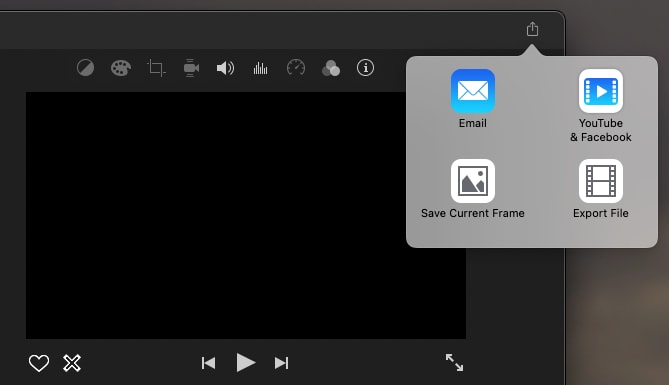
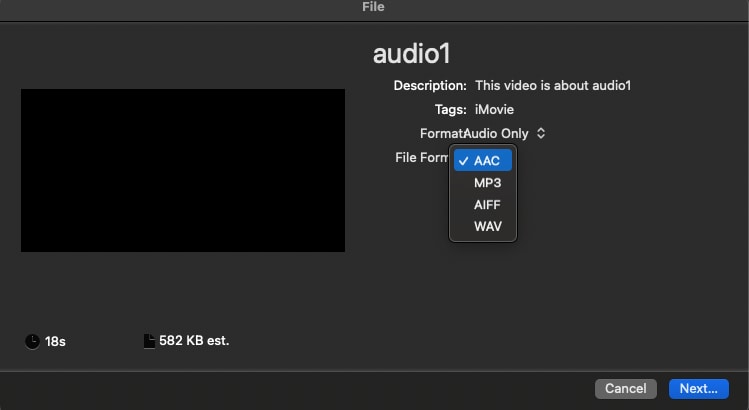
Once the audio has been added, you need to locate and click on the Share button. It is mainly located at the top right corner, and the icon that represents it is a square with an arrow pointing upward. When you click on Share, you will be given a few options. Click on File. A new pop-up box appears, and from there, you can rename your music and change the format and quality. For the format, click on the tab and change it from Video and Audio to Audio only. Then you get to choose which format you want to convert it. By default, it will be on AAC, and AAC is the format for iTunes. So go ahead and click on Next.
Step 3 Export
The save location box pops up, and you can select where you want to save your video. Click on Save to start converting MP3 to iTunes.
Note: If you can't get your iMovie to import an MP3 file only, you might need to add a silent video and then add the music afterward, and since you are exporting with Audio only, the result will be an audio-only file.
2. QuickTime
QuickTime, just like iMovie, is a default app that comes built-in on Apple devices. This is because not only is it the primary video player for Apple devices, but QuickTime is also known for being a video editor. One of its editing functions includes Converting. QuickTime as a converter does pretty well since it can convert to and from most popular media formats like MP4, MOV, MP3, AAC, M4V, etc. It can quickly convert mp3 to iTunes ringtone or for any other purpose.
Steps to Convert MP3 to iTunes using QuickTime
Step 1 Launch QuickTime and Play Audio
Start by launching QuickTime and playing the MP3 file you want to convert.
Step 2 Export to iTunes
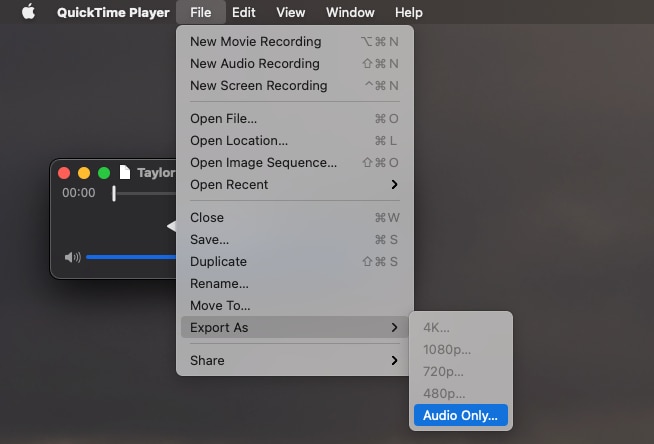
Once the MP3 has started playing, click on File, then Export as, and choose Audio only. This will immediately begin converting the file to iTunes format.
Step 3 Choose a File location and Save
If you want your converted file to be saved to a different location, click Export as to change the destination folder. You can also rename the Audio file...
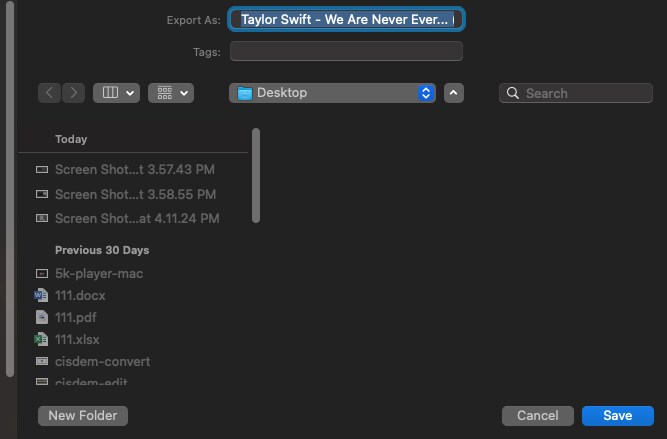
Limitations of using the built-in converters: One major flaw found in most built-in tools is that they cannot perform advanced functions, and this may or may not be exactly what the user needs. Built-in converters are primarily for casual conversions. They only support a few formats and are not as flexible as other software converters.
Part 2. How to Use Uniconverter for Converting MP3 to iTunes Quickly?
Uniconverter is a multipurpose video editor that can handle a whole lot of advanced features, one of which is the converter function, whether for your mp3 to iTunes apple music iPhone or mp3 to iTunes ringtone. Uniconverter's Converter feature can convert to and from over 1000 video and audio formats with little to no quality loss. An additional function of the Converter feature is that you can also select the quality of the exported file, i.e., you are free to change the quality of the media. Not only that, Uniconverter supports high-speed conversion, and this makes things easier when converting MP3 to iTunes.
Steps to Convert MP3 to iTunes
Step 1 Open Converter and Add MP3
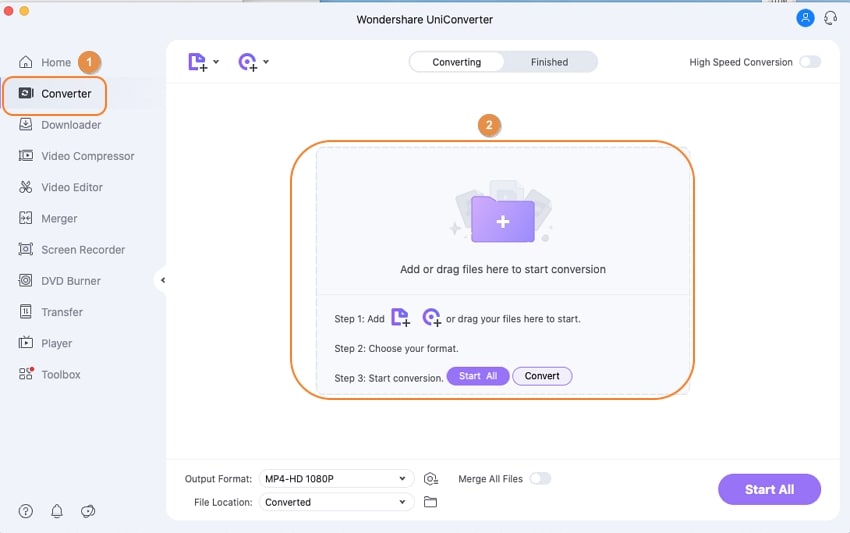
On the main interface of Uniconverter, which is the Home screen, click on the Converter tab from the list on your left. When the screen changes, click on the purple folder in the middle of the interface to add an MP3 file. You can also use the drag and drop function to add the media by dragging the media from your file explorer into Uniconverter. Uniconverter supports batch conversion, so you can add as many MP3s as you want
Step 2 Choose Format
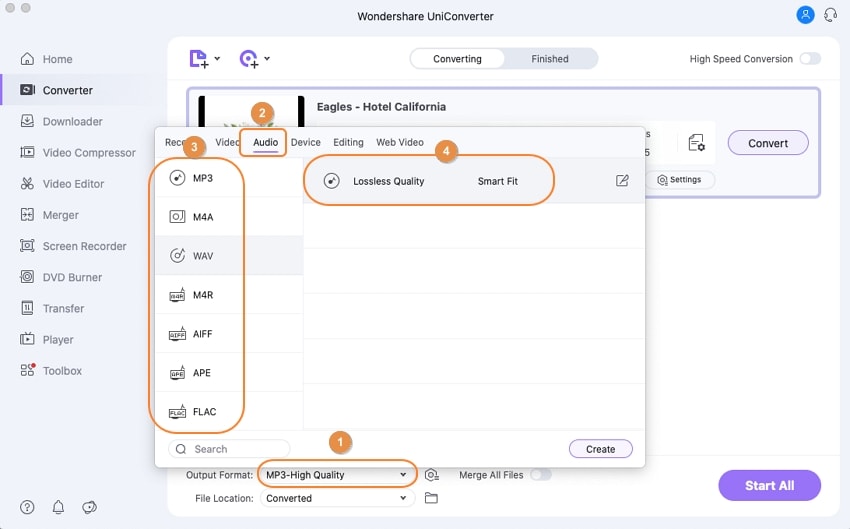
One thing to note is that when you convert MP3 to iTunes, you are not converting to 'iTunes' because there is no such format. Instead, you are converting to iTunes's main format, AAC/M4A. Once a file has been added to the Converter, a thumbnail will be generated. Right beside the purple convert tab, there is the Choose Format icon, click on it, and a new box will pop up. Go to Audio and search AAC or M4A, select any of the two, and choose the quality.
Step 3 Export
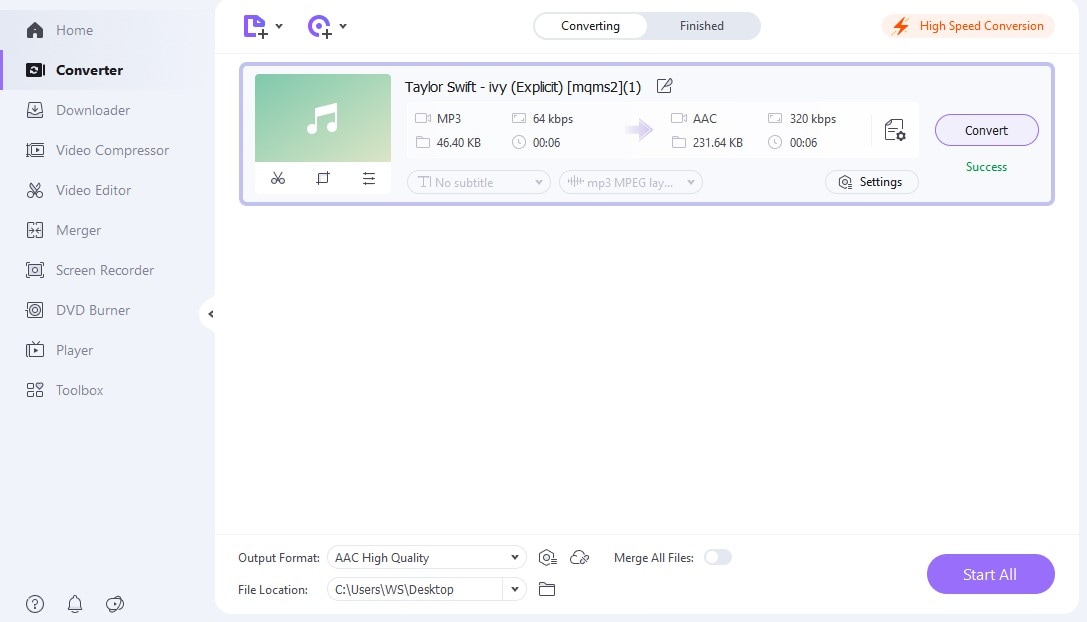
You can wait until this step to add the other files if you will be batch converting. Now you can click on Convert to begin converting your iTunes audio. If you are batch converting, then use the Start All option at the bottom right of the screen.
Pros
Supports importing and exporting of more than 1000+ formats
Uniconverter can convert media in batches effortlessly
90X conversion speed
Available on Windows and Mac
Cons
It is not free
Too many restrictions on the free trial
Not available on Linux
Wondershare UniConverter 13 - Best Video Converter for Mac/Windows
5,481,435 people have downloaded it.
UniConverter supports 1000+ formats and handles 90X faster conversion, ensuring that high quality is delivered at all times.
You can add the multiple files since the program does batch conversion of files.
The GUP acceleration can help you download online videos in high speed.
You can use the editing suite to make your results creative masterpieces.
This software facilitates file transfer to devices like Android and iPhone among others once the conversion is complete.
UniConverter is also capable of handling video compression hence ensures you acquire the video sizes you desire.
Part 3. How to Use Online MP3 to iTunes Converters?
Built-in tools are inevitable, they are on your system whether you like it or not, but they can't provide advanced services sometimes, and they are not flexible. While Uniconverter requires you to download the software, it is not a free mp3 to iTunes converter. Then you can use online converters. They do not need to be installed, and although they can't match the perfections of standard software, they still get the job done.
1. Zamzar
Zamzar is a peculiar online mp3 to iTunes converter in the sense that it is one of the online converters that tries to bring innovations to the conversion equation. It not only converts audio and video but also supports converting document formats as well. This online tool supports a little more than 300 formats and can export to more than 250 formats. It is free, and although you cannot select the quality, which is just one price to pay on the bright side, AAC and M4A are formats that have been guaranteed to be of high quality nonetheless.
Steps to Convert MP3 to iTunes on Zamzar
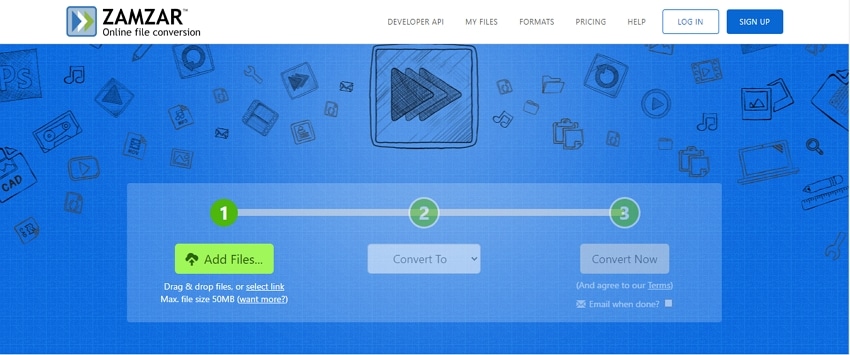
Step 1 Visit the website and Add MP3
To start with, you need to visit the website. Once the page has been loaded, you will see a large tab with Choose files. Clicking on it will allow you to upload an MP3 from your local disk, and you can select as much as you want, but Zamzar can't add by folder. Clicking on the drop-down arrow will allow you to upload from Dropbox, Google Drive, etc.
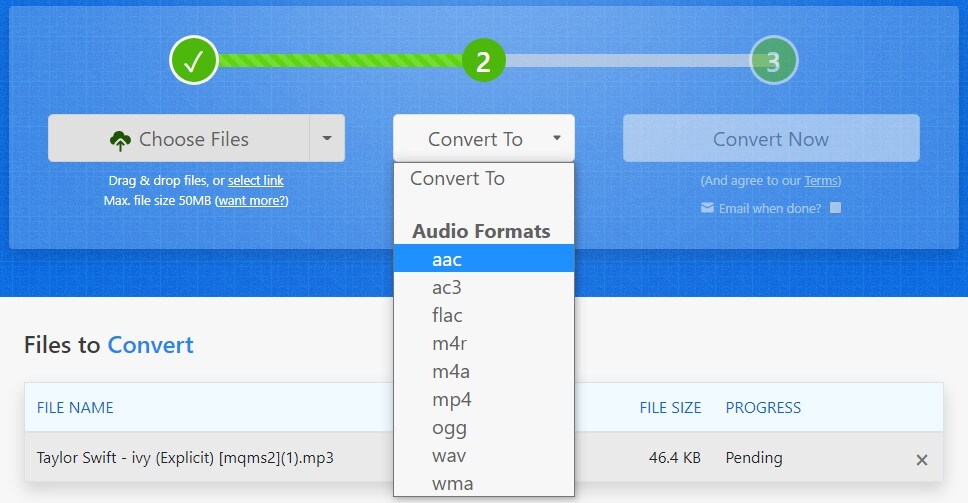
Step 2 Choose Format
When you are done uploading the MP3, click on the next tab to select the export format. Zamzar does not have M4A, so we go with AAC since it is the same thing.
Step 3 Convert
The last tab starts pulsating when it is ready to start converting. Click on it, and the converter will begin immediately. For online tools, converting is not the end, you still need to download it.
Pros
It is free
It supports a lot of formats ranging from audio to video and documents
Breakneck conversion speed
Cons
Cannot add folders for conversion
Converted files disappear if you close the page without downloading, so you might need to convert again
2. Media.io
Also called the online Uniconverter at some point. Media.io supports just as much format as any other standard converter software. It has proven to be more than a match for some other mp3 to iTunes converters. Media.io can stand at the peak of online conversion tools by comparing their utility and features, and only a few other online tools can tackle it. When converting MP3 to iTunes, Media.io takes almost the same approach as Uniconverter. It is quick and precise and reduces little to no quality during conversion.
Steps to Convert MP3 to iTunes using Media.io
Step 1 Visit the Website and Add Video
Go to the address media.io. On the home screen, two options are laid bare for you. Other tools are available at the bottom if you are interested. Click on Converter and let load the converter page. Click on the Choose file tab to select MP3 from your local disk. You can choose multiple MP3 files as well for batch conversion. You can also upload a file from Dropbox or Google Drive.
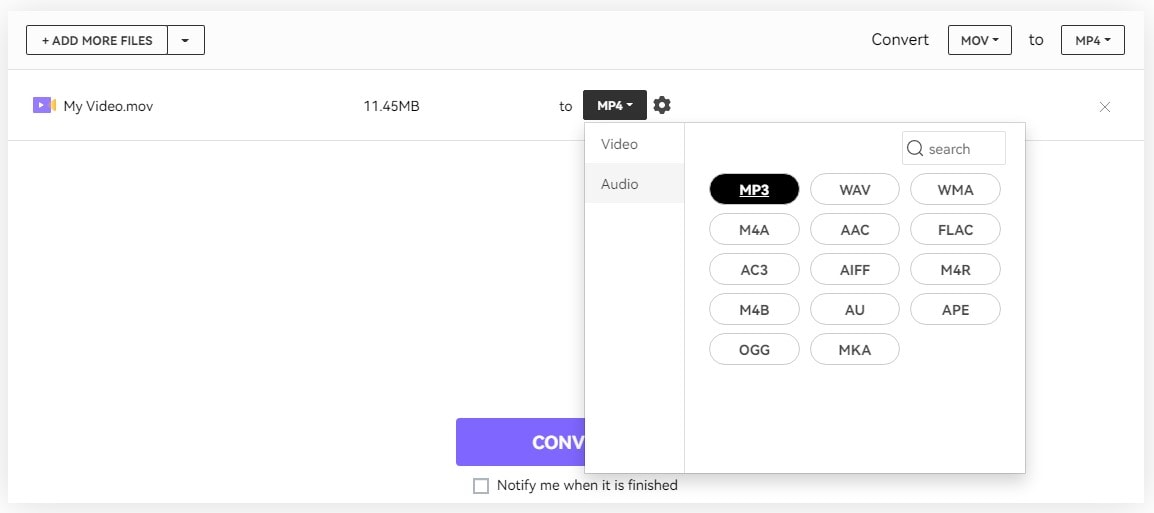
Step 2 Choose Format
To choose a format, use the one at the top to apply the format to all uploaded videos. But if you want to convert each video to a different format, use the options in front of each MP3 file. When you click on the tab to select a format, a new box will appear with Video and Audio formats. Choose Audio and select anyone of AAC or M4A.
Step 3 Convert
Click on Convert to start converting MP3 to iTunes at once. Once done, you can now download it. If you have created an account on Media.io, they can help you keep your converted files for 24 hours before deleting them. This means that you don't need to download your MP3 to iTunes conversions immediately and can come back to it later.
Pros
High-Speed conversion
No Ads
No quality loss
It adds no watermark even for free users
Cons
It is not free
There are a few limitations for free users
For Win 7 or later (64-bit)
For macOS 10.12 or later

