Convert CDA to MP3-UniConverter
- Convert CDA to MP3 or other 1000+ video & audio formats.
- Batch converts CDA to MP3 in 90X high-speed.
- Convert online videos from 1,000 popular sites to MP3.
- Transfer MP3 files to iPhone, iPad, Android, and other devices.
- The powerful toolbox includes Fix Metadata, GIF Maker, Screen Recorder, VR Converter, etc.
CDA is an abbreviation of CD Audio shortcut, which serves as a file extension of shortcut format that does not contain original audio. Much vintage music we enjoy listening to is from CDs, and CDA files can be played on CDs, but now, most computers don’t even come with a built-in CD/DVD drive. So, if we want to play music on other platforms or devices, we either need to convert CDA to MP3 with software or convert CDA to MP3 online and here, we list some software to convert CDA to MP3 easily.
Part 1: UniConverter - A Fast Way to Convert CDA Files to MP3
To convert CDA to MP3 means ripping the CD. UniConverter is one of the top tools you can use to Rip CDs and DVDs with its CD Converter function. Most converters do not possess the ability to convert CD through ripping, and UniConverter does this. It even combines some more editing functions that can make your CD ripping easier. For example, you can trim the audio as you want after ripping. If the size of the music is a bit high, you can also employ the compression tool of UniConverter to help you tone down the size without affecting the quality of the MP3. Other advanced editing features like changing the bitrate, channel, and sample rate are best left to those that know.
Steps to Convert CDA to MP3 with UniConverter
Step 1 Insert a CD
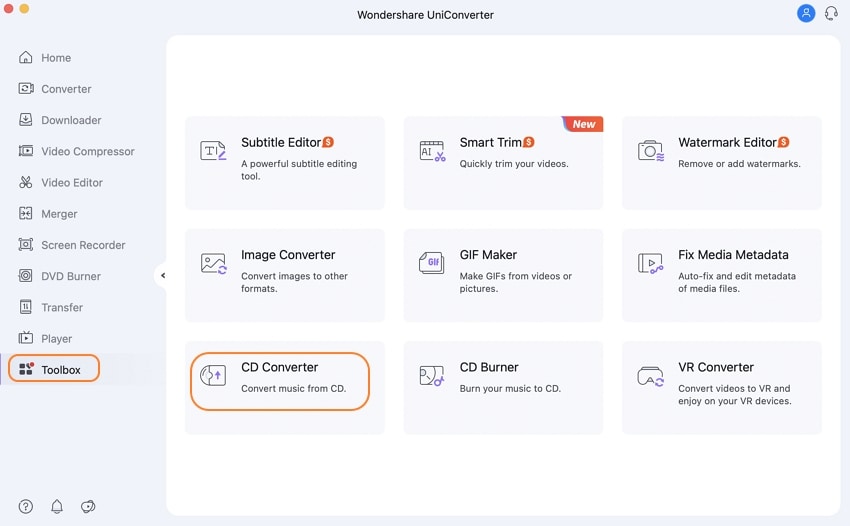
Insert a CD into your PC disc drive, then launch the UniConverter. From the options on the left side, click on Toolbox. This is because only a few advanced tools are placed on the main screen. The toolbox tab will open up more of UniConverter’s functions. Locate CD Converter, the UniConverter tool for converting CDA files to MP3, and click on it.
Step 2 Choose Output Format
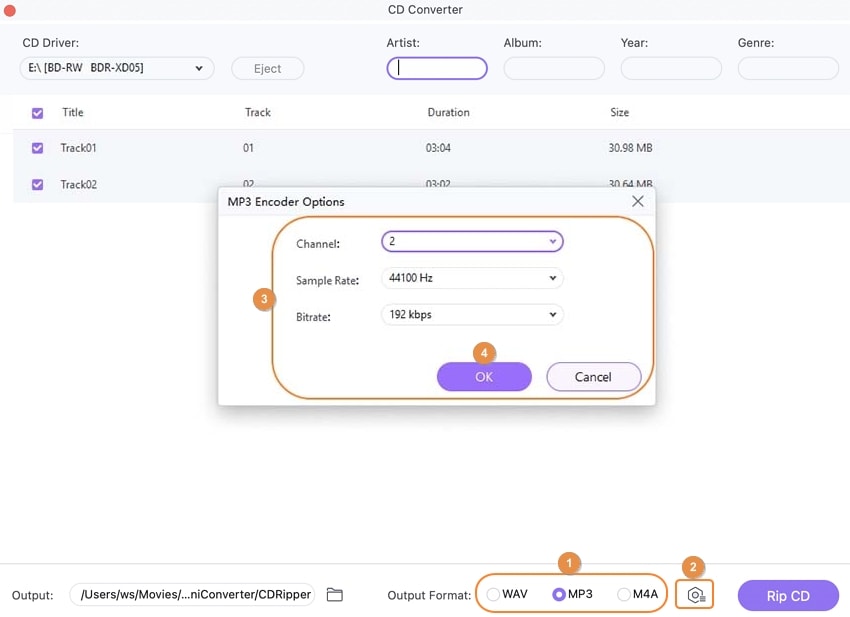
On the next screen, UniConverter will analyze your disc drive and generate the details of the disc on it. Then, you can play the audio and choose the format on this same screen. For CD conversion, UniConverter supports three options WAV, MP3, and M4V. Look at the bottommost part and tick the circle beside the MP3.
Step 3 Rip CD
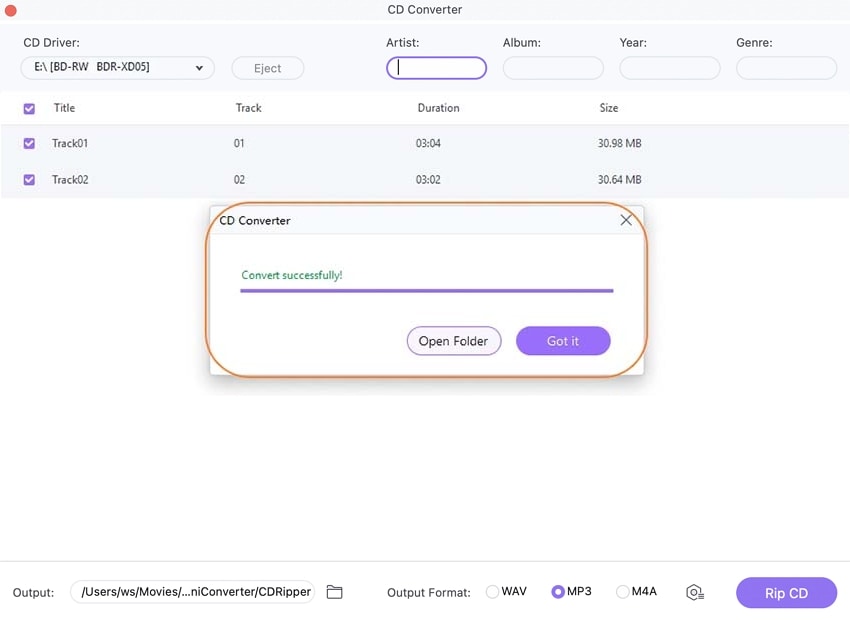
When everything is done, click on the purple Rip CD tab at the bottom right corner
Pros
90X conversion speed
It features other editing features to enhance your new MP3 further
Trimming feature for your MP3 file
Cons
It is not available on Linux
It might fail to recognize disc sometimes
Wondershare UniConverter 13 - Best Video Converter/Editor for Mac/Windows
5,481,435 people have downloaded it.
UniConverter supports many formats and handles conversion equally, ensuring that high quality is delisered at all times.
During the conversion process, you may add multiple files since the program does batch conversion of files.
You can use the editing suite that covers subtitle editing, watermark editing, etc to make your results creative masterpieces.
This software facilitates file transfer to devices like Android and iPhone among others once the conversion is complete.
UniConverter is also capable of handling video compression hence ensures you acquire the video sizes you desire.
Part 2. How to Convert CDA to MP3 for Free with iTunes?
iTunes is a media player, media editor, and library on iOS devices. Usually, it lets users of iOS devices organize and arrange their library while also saving everything on the cloud to be synced across their iOS devices. Nonetheless, when it comes to Rip CD, iTunes still works wonders. It is a built-in tool for iOS devices, which makes things relatively easy for Mac users, especially if they are using other iOS devices like iPod, iPhone, iPad, etc., since the files that have been ripped will be stored in the iTunes library and appear on all other devices as well.
Steps to Convert CDA to MP3 with iTunes
Step 1 Insert Disc
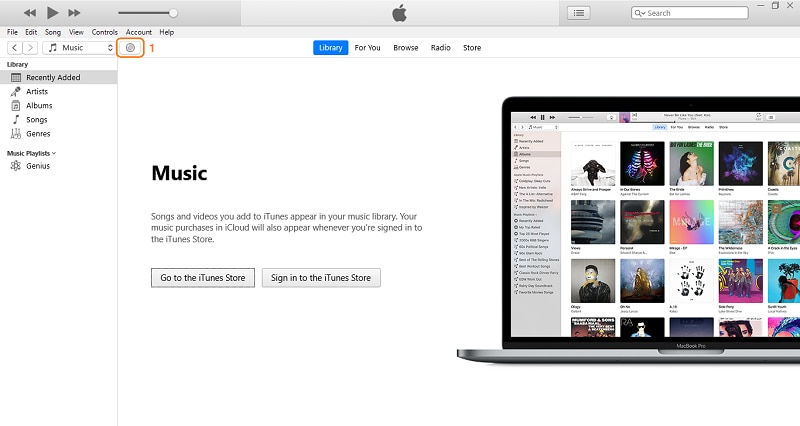
For users of Mac, iTunes comes pre-installed on their system, so all they need to do is locate and launch the software. You can now insert the CD that you want to rip. It will take a while, but iTunes will analyze the CD. From the top left of iTunes’ interface, click on the “Discicon” and view all the tracks and tags (Name, Time, Artist, Album, and Genre)
Step 2 Import CD
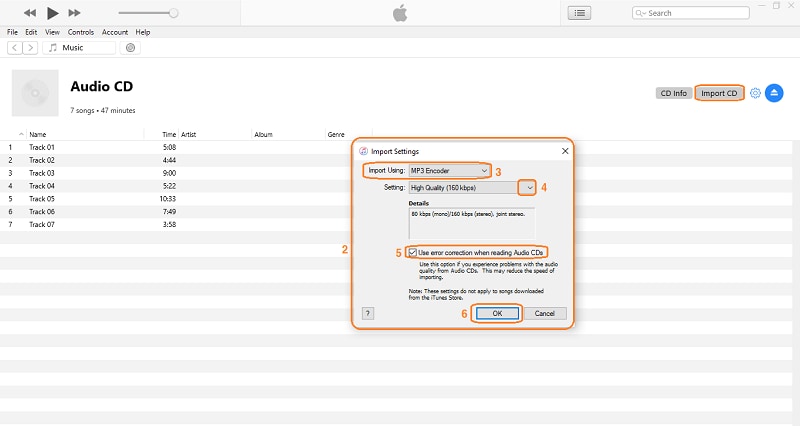
From the top right side, there are two tabs and two icons. The first tab is CD info. Clicking on it will display additional and in-depth information on the disc, while the second is the CD import which allows you to rip the CD to iTunes. Click on Import CD to begin the CDA to MP3 conversion journey.
Step 3 Select Format and Quality
A pop-up box appears when you click on the Import CD tab. Click on the Import Using dropdown option and select MP3 Encoder from this popped-up box. Again, click the Setting dropdown option that’s High Quality(160kps) by default to pick an available quality or make a custom (it’s advisable to choose quality as high as 320kbps) from the displayed list. Afterward, Mark the “Use error correction when reading Audio CDs”
box and click “OK”.
Step 4 Rip CD
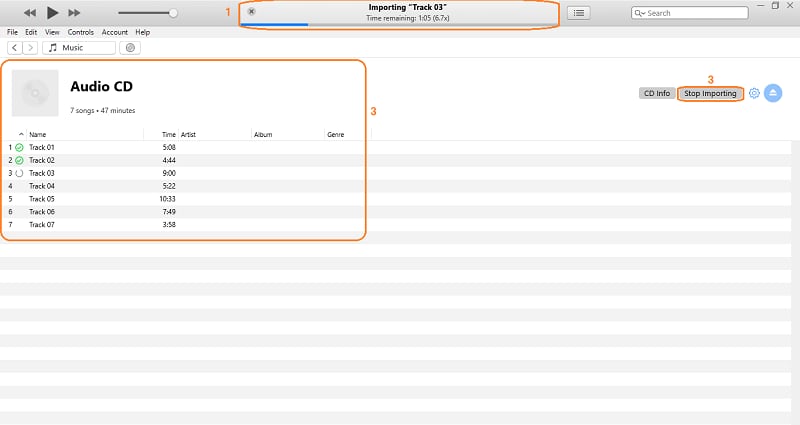
After clicking on “OK”, iTunes starts ripping the CD immediately. You will see a progress bar at the top of the interface, a rotating icon beside the current track that is being ripped. A green tick icon will appear beside the track when it is done ripping. If you’d like to stop ripping off track as MP3, click on the “Stop Importing” button. When all of the tracks have been ripped, you can remove the CD and go back to your library to locate the new MP3 files.
Pros
Saves directly to the iCloud, which syncs the ripped CD to all your Apple devices
Allows for users to select the audio quality
Can correct errors on CD automatically while ripping
Cons
Only available on Mac and Windows
It takes time to rip tracks, and CDs contain multiple tracks, so it can be said that iTunes has a fairly slow ripping speed
Part 3. How to Convert CDA File to MP3 on VLC Media Player?
VLC Media Player is a natural at CD Rip. It is mainly a video player. It supports all video and audio formats virtually, so you can be sure that whatever format your CD comes in, VLC will be able to recognize it and transform it to MP3. One of the advantages VLC Media Player has over some other tools on this list is that it is entirely free, and its conversion is at the same fast.
Steps to Convert CDA to MP3 with VLC Media Player
Step 1 Insert Disc and Add to VLC
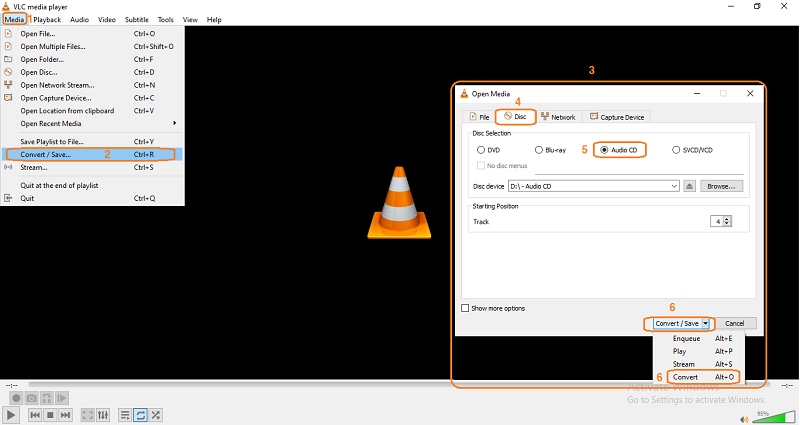
First, you need to insert a disc into your computer, wait for the system to recognize it, and open the VLC. Next, click on “Media” from the toolbar at the top of the screen, move to “Convert/Save”, click on it, and a new box will pop up. Change the option at the top from File to “Disc” in the pop-up box and tick the “Audio/CD”option. Next, click “Convert/Save” or its dropdown key and select Convert Alt+O”.
Step 2 Choose Output Format
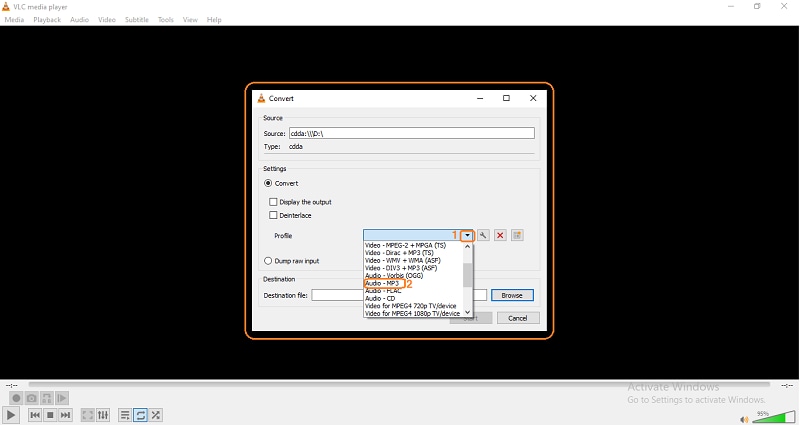
A new box displays afterward. Click on the “Profile”dropdown options from the newly revealed box and select “Audio – MP3”.
Step 3 Save
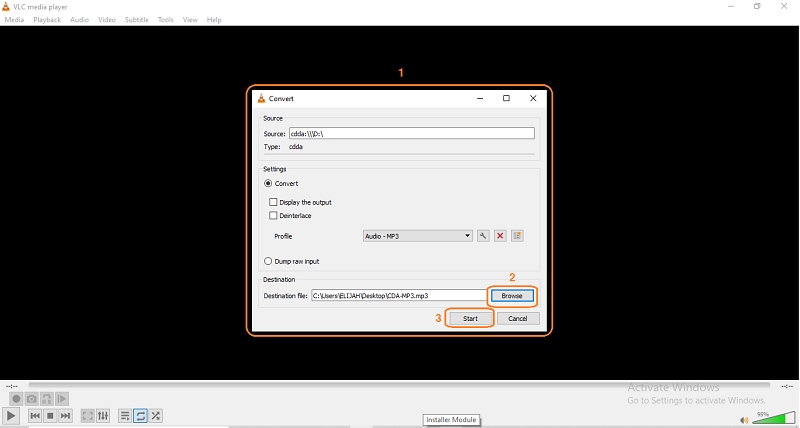
Before finally converting the CDA file to MP3, you can select the destination folder by clicking “Browse”. Then, finally, click on Start to begin to convert CDA to MP3 free.
Pros
It is free
It supports a lot more audio formats
Cons
The process might take the time or get confusing for beginners
Speed is not VLC’s strong suit
Part 4. Simple Guide to Convert CDA to MP3 on Windows 10 Built-in Player
If we talk about a built-in tool for converting CDA to MP3 on Mac, then it is only natural to talk about how to convert CDA to MP3 on Windows 10 using Windows built-in tool for CDA to MP3 conversion. The Windows Media Player is a popular solution for Windows system users to Rip CDA audio files to MP3. The Windows Media Player apparently can deal with CDs that have huge sizes with relative ease, and it is free, plus you don’t need to download it, so it is, of course, one of the best ways to change CDA to MP3.
Steps to Convert CDA to MP3 Windows 10 with Windows Media Player
Step 1 Insert Disc and Add to Windows Media Player
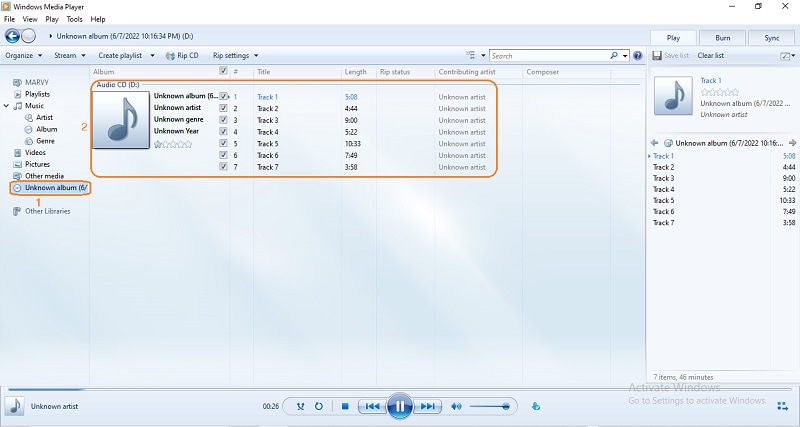
You can either launch Windows Media Player before inserting your CD or insert CD before launching Windows Media Player. Either way, make sure that the disc is properly inserted. If the system does not recognize the disc, then there is no way the player will as well. Go to the disc section on your Windows Media Player. This is usually Drive E: click on it and wait for the player to generate your CD information.
Step 2 Choose Output Format
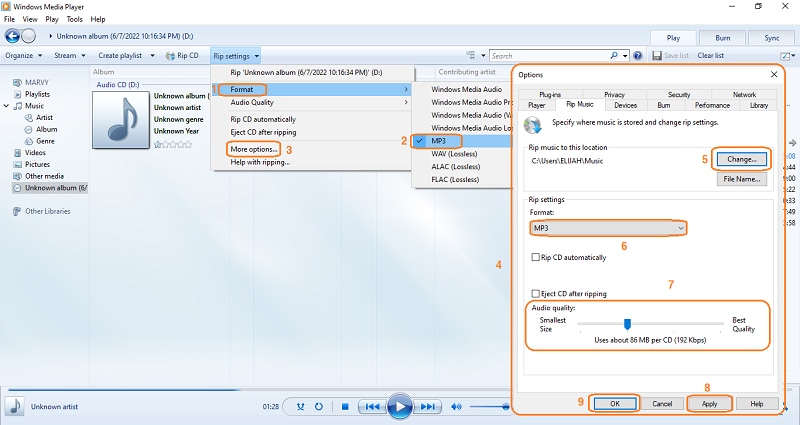
Rip CD and Rip Settings will become active on the bar at the top of the screen once you have inserted a CD. Click on “Rip Settings” first, navigate to “Format” on the menu, and select “MP3” from the submenu. Alternatively, to convert the CDA file to MP3, click on “MoreOptions…” to allow the options window to display. Then, from the newly appeared window, click on “Change” to choose file location, “Format:” to select MP3 format, and “Audio quality:” to adjust the file size and Quality. Afterward, you can click on “Apply” and “OK”.
Step 3 Rip CD
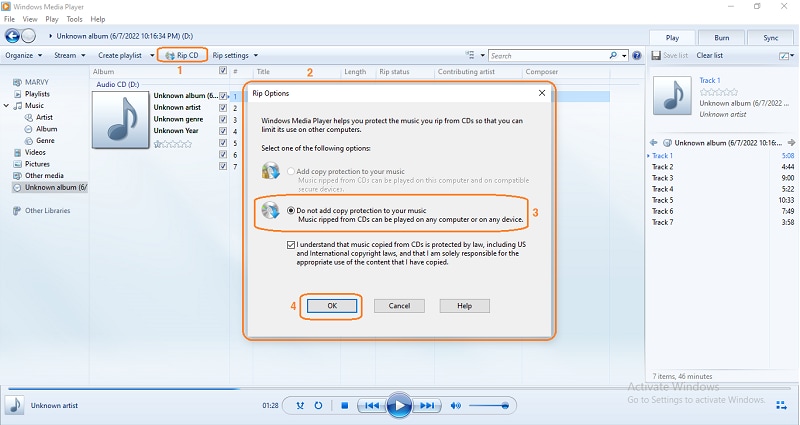
Finally, hit the “Rip CD” button from the top of the media player’s interface, tick and mark the displayed options as it is in the image below if this is new to you, and click on “OK”. Afterward, waiting patiently for the CD to be ripped.
Pros
Rip CD very easily, and the steps are not complicated. Even beginners can get used to it quickly
Rip CDA to MP3 speed is also very fast
Allows selection of audio quality
Cons
Only convert CDA files to MP3. It does not support any other editing options
It might take time to generate CD details
For Win 7 or later (64-bit)
For macOS 10.12 or later

