Convert Garageband to Quality MP3-UniConverter
- High-speed conversion in lossless quality.
- Batch Processing to convert multiple files to MP3 at a time.
- Custom quality options are available.
- Transfer of converted audio or videos to iPhone, iPad, and other devices.
- Additional features include video download, recording, compression, and others.
Garageband is a digital audio workstation that allows the creation and editing of music and podcast with relative ease. But many users find that the project can only be played on Garageband itself. In addition, it can only convert the music to AIFF, AAC, and MP3 with limited quality options. Therefore, in this article, we show how to convert Garageband to mp3 in three ways so that you can share your music on multiple platforms.
Part 1. Simple Guide on How to Export Garageband to MP3 On Garageband Itself
Garageband brings out the music inspirations in you with its complete set of music-making tools. As long as you have the idea, you can always get the tone on Garageband. It features a lot of instruments, voice presets, and a vast number of guitar, drum, and percussionists' collections. Garageband also allows you to prepare for your podcasts and make them as smooth as possible while it is ongoing. Not only that, but you can also learn to use instruments live on Garageband. You learn, record, play and share your music with friends and the world. But how to save the Garageband project to MP3? Here is the first method:
Steps to Convert Garageband to MP3
Step 1 Share and Export
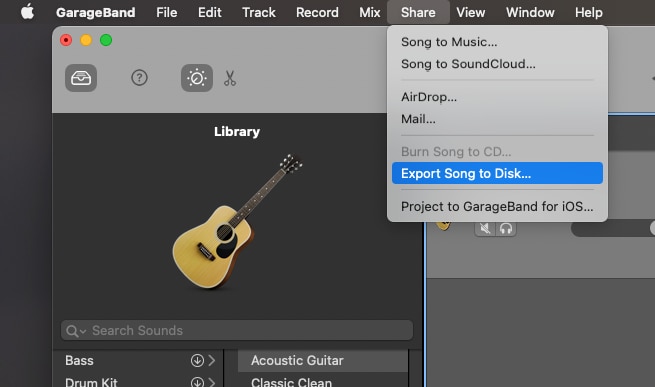
From the list of tools at the top of the Garageband interface, click on Share, and from the drop-down menu, click on Export song to disk. A new window pops up, which allows you to save the name and format.
Step 2 Rename and Select Format
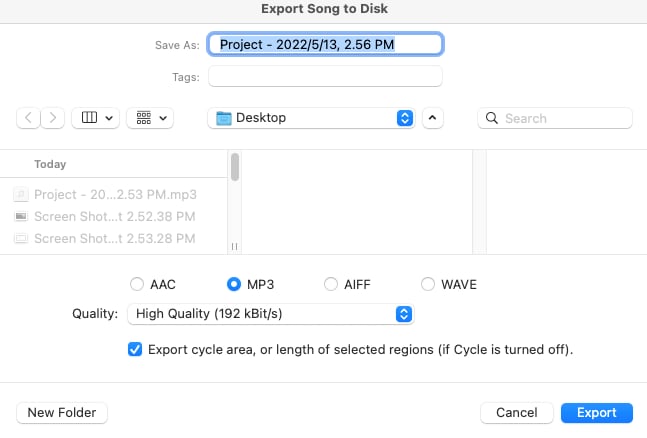
Choose the destination folder, i.e., where you can save your video and name it, there is also the space for adding tags (optional). Then, at the bottom of the dialog box, there are three selectable formats to convert your audio to, AIFF, AAC, and MP3, here, we choose MP3. As an additional option, you can also change the audio quality to suit your preference.
Step 3 Select Area to Export
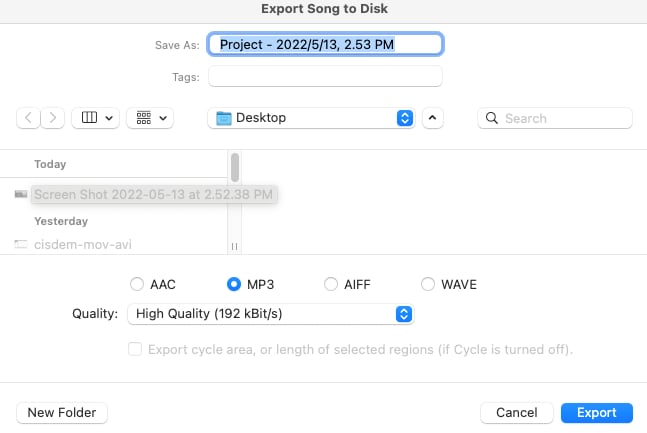
Check the box 'Export cycle area only' if you don't want the whole audio exported, but you must have selected the area before attempting to save the audio. If you want to export the entire video, then uncheck it.
Step 4 Export
Just click on Export when you are done with all the above steps, and you get your audio saved as MP3.
Limitations of using this method: Looking at the explanation and description of Garageband above, then you know that there is one major flaw to this nigh-amazing application, it just doesn't support enough formats. Three formats are not enough for professional music creators. Whatsmore, more quality options would give more editing options and would have made this software application perfect. The export quality of GarageBand can also be unsatisfactory, and producers usually like to experiment with their creations, and supporting such little format will limit their work options.
Part 2. How to Convert Garageband to MP3 with iTunes?
For professionals who cannot be satisfied with the limited quality that Garageband to disk option offers, use the Song to Music icon. iTunes is a music application by apple and is supported on all their devices. It brought innovation into the music world as it allows you to download, listen and buy your favorite songs, podcasts, and movies. iTunes automatically syncs to all your devices when you log in. It brought relative ease to Apple users as they don't have to start downloading their playlist again. An advantage of exporting to iTunes over exporting to disk is that it supports more quality of the mp3 format, so if you want to convert Garageband to mp3 but with more quality options, convert Garageband to iTunes.
Steps to Convert Garageband to MP3 iTunes
Step 1 Share and Export to iTunes
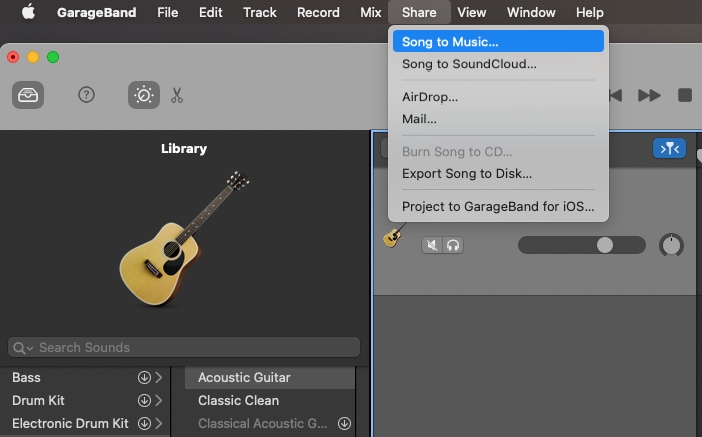
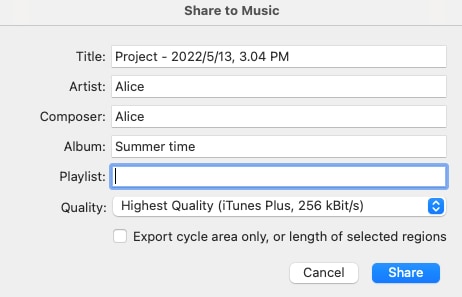
Click on the Share option on the toolbox and select the 'Song to Music' option. A dialog box pops up, and you can proceed with naming your audio before exporting.
Step 2 Naming and Select Quality
In the new dialog box, you get options like naming the title of your audio, the artist, the composer, the album name; if you so wish; iTunes playlist, and of course, quality; Garageband to iTunes gives you six options: uncompressed, highest quality iTunes plus, high quality, medium quality, low quality.
Step 3 Choose the Output Format and Quality
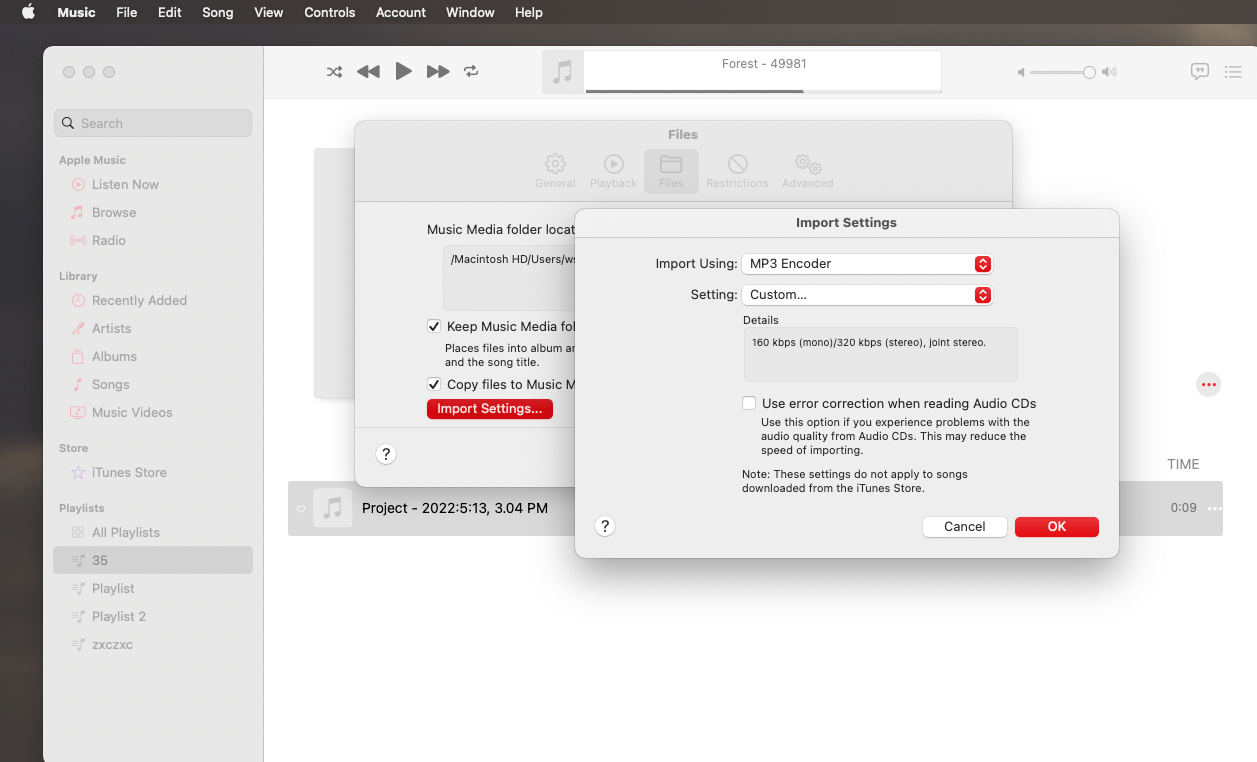
To finally begin to export your audio, check the select cycle area box and click on Share. The audio saves straight to your iTunes. Access your iTunes and click on the "Preference" from the "Music Menu", then from the pop-up window, locate the "Files" section, and click "Importing Settings". Then a new page will show on the screen, from where you can choose the "MP3 Encoder" as the format and select the custom quality.
Step 4 Export Garageband as MP3
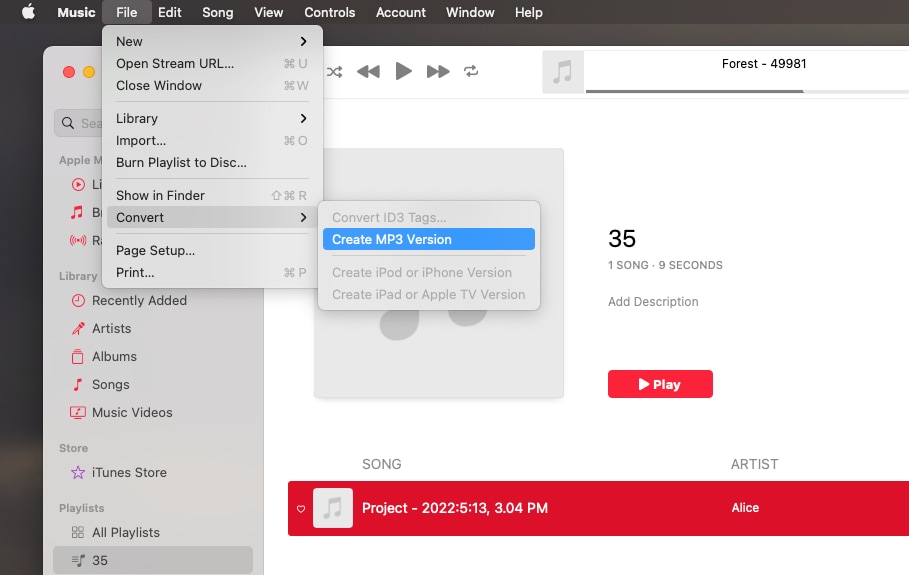
Back to the main interface, locate the "Convert" option from the "File drop-down menu", and choose "Create MP3 Version" to save the file..
Part 3. How to Save Garageband as MP3 with UniConverter?
Uniconverter is a multimedia tool that supports over 500 formats, including device and web formats. The conversion speed is very fast, and using a premium will give you access to an even faster processing speed. Uniconverter is also a powerful tool that can convert multiple files simultaneously, even if they are in different formats. Uniconverter does not only convert, you can also do compression; it can compress videos to at most 70% of their original size, it also works as an online video downloader, video merger, and DVD burner. The possibilities on Uniconverter are nigh unlimited.
Steps to Convert Garageband file to MP3 with Uniconverter
Step 1 Upload Audio
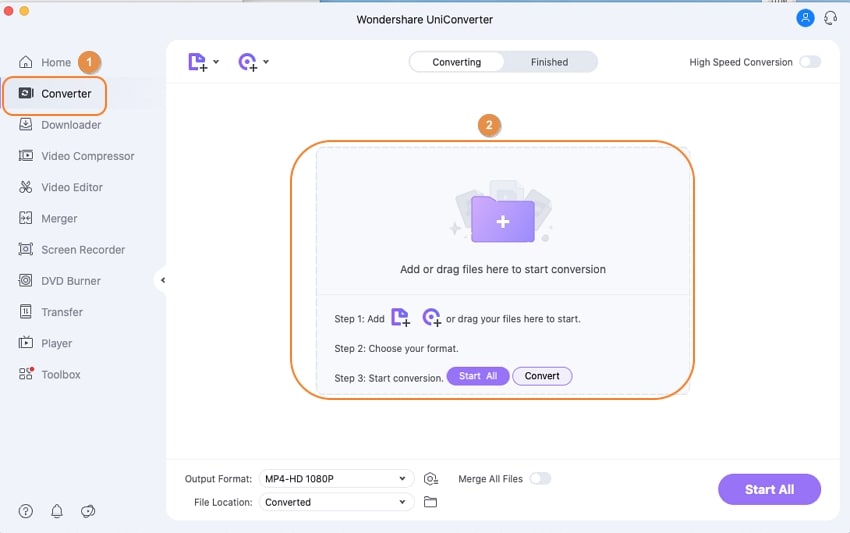
After you export Garageband to mp3, launch Uniconverter. By default, Uniconverter opens on a home screen which displays some of their recommended tools but to convert, you need to switch to the converter feature. To access the converter tool, click on the Converter tab from the list of tools on the left side of the screen. Once the screen changes to the Converter screen, you can now import the GarageBand audio by clicking on the Add file icon at the top left corner of the screen, or you can drag and drop the video directly from your Finder.
Step 2 Select Format and Quality
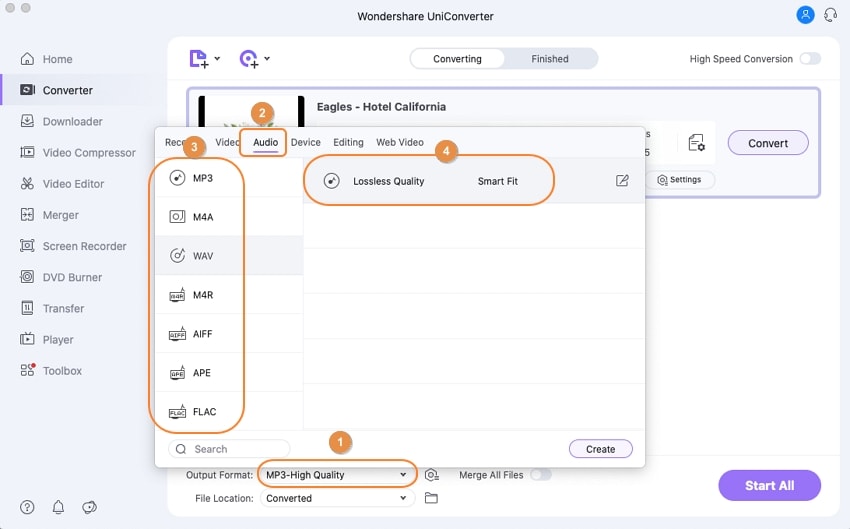
A thumbnail will be generated for the audio once it has been uploaded. You have to click on the icon beside the purple 'convert' tab. A new window will be generated, and all the formats supported by Uniconverter will be displayed. Navigate the Audio options and see the list of possible audio conversions. To save garageband as mp3, choose MP3 as the output format. The quality options also become available, so it is on this screen that you select format and quality.
Step 3 Convert
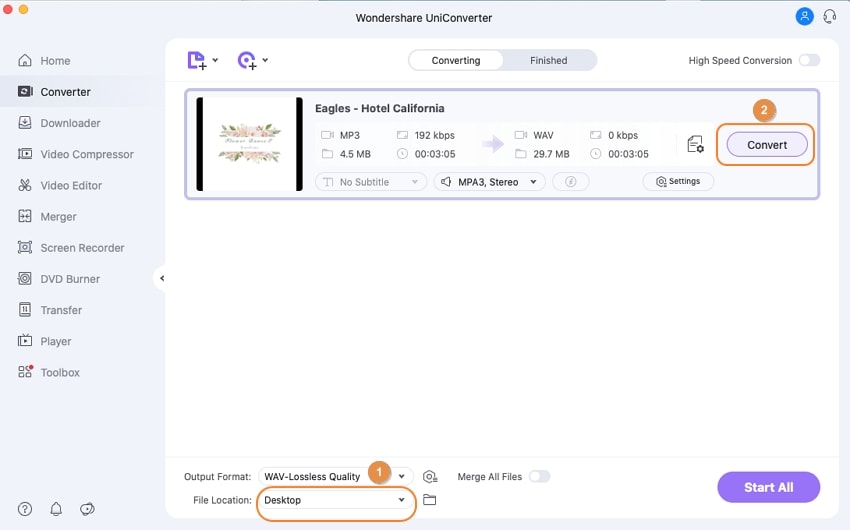
Choose the destination folder before conversion. By default, Uniconverter saves processed media to its folder in the local disk, including converted files, compressed files, downloaded files, etc. This folder can be hard to find, so you might need to change the save location to somewhere easier to find. Do this by clicking on the File Location tab and selecting your preferred location from the pop-up. Next, click on the purple convert tab, and Uniconverter will begin conversion immediately. It mostly takes a few minutes to finish the conversion. When it is done, the converted file will be displayed in the 'finished' tab. Uniconverter also gives you the option to preview your video.
Wondershare UniConverter 13 - A Complete Meida Toolbox
5,481,435 people have downloaded it.
UniConverter supports many formats and handles conversion equally, ensuring that high quality is delisered at all times.
Record webcams, gameplay, video calls, audio, and microphones at will.
You can use the editing suite that covers subtitle editing, watermark editing, etc to make your results creative masterpieces.
This software facilitates file transfer to devices like Android and iPhone among others once the conversion is complete.
UniConverter is also capable of handling video compression hence ensures you acquire the video sizes you desire.
Part 4. Q&As about Garageband to MP3
1. How to Import MP3 to Garageband?
We have treated the steps to convert Garageband to MP3 using iTunes, Uniconverter, and Garageband itself, but how can you import mp3 to Garageband for you to work on? The best way to import MP3 to Garageband timeline is to:
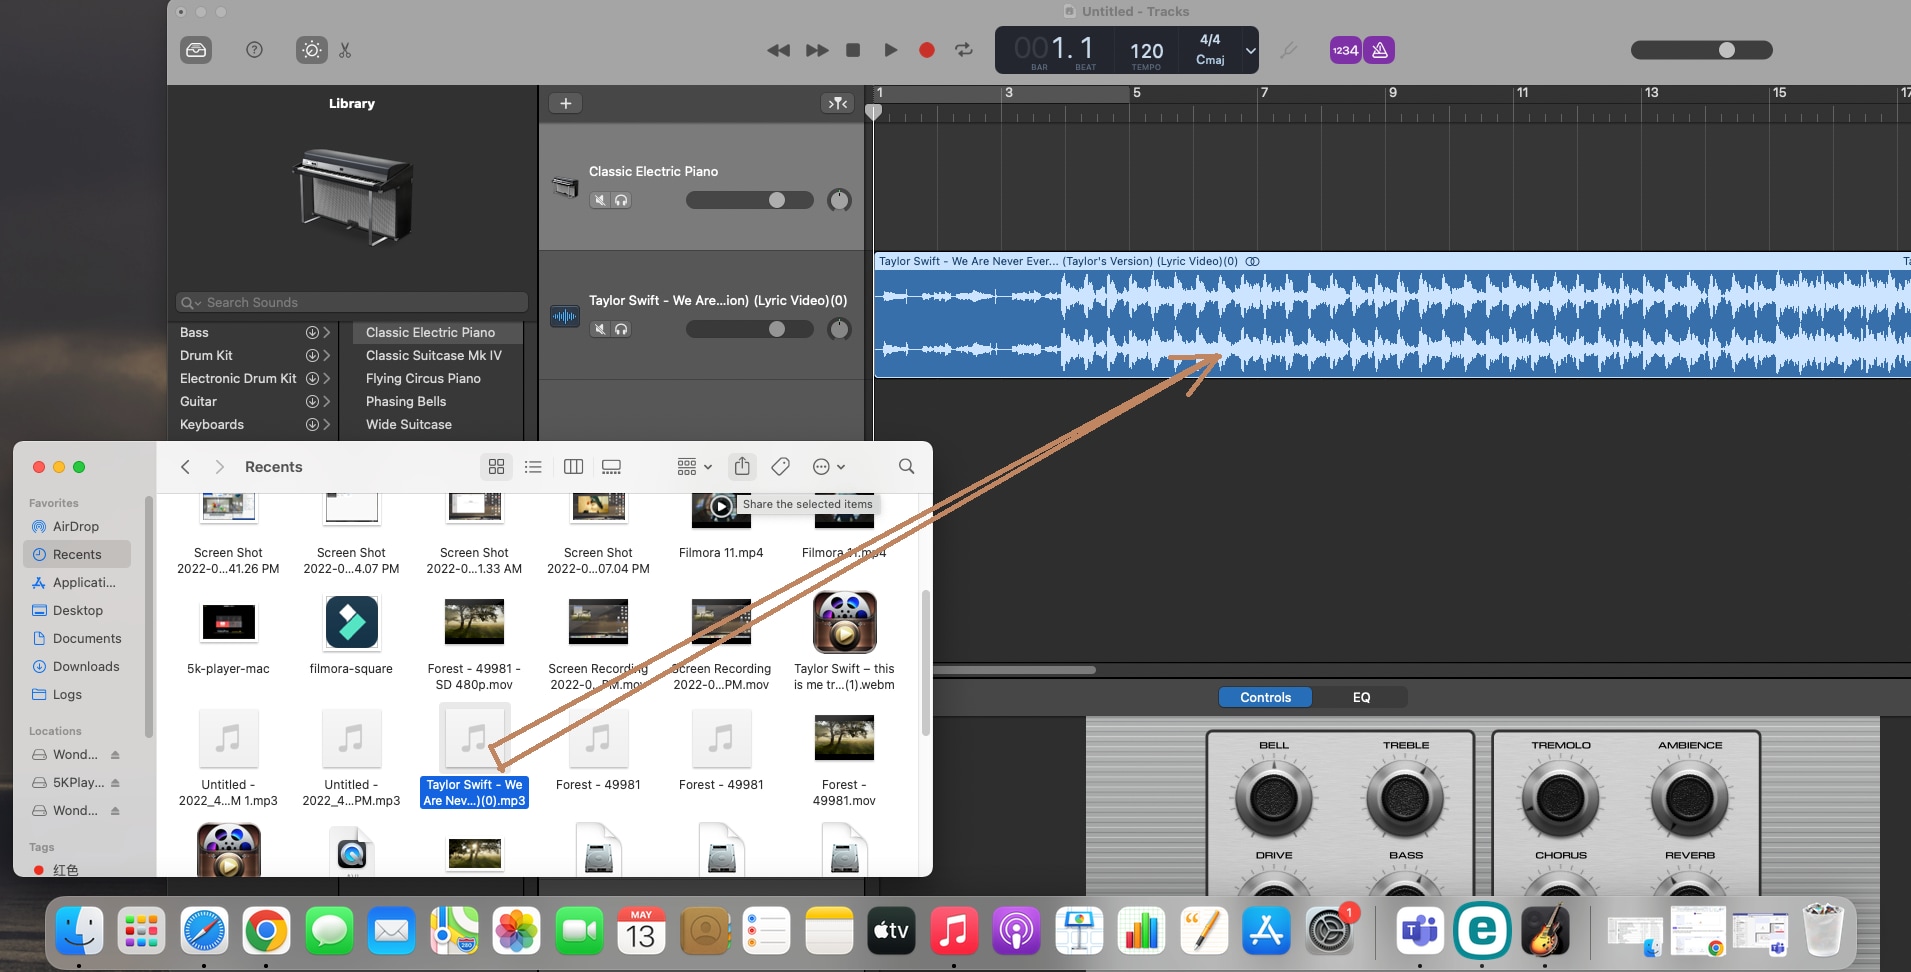
Step 1. Open your Finder. Open the audio file location in your Mac Finder and locate the video
Step 2. Upload the Audio. Drag the audio file or files from the Finder and drop them in a space on the Garageband timeline. New wave lines will appear on the space to signify that the video has been added. In Garageband, you can move any individual wave line to any position. You can add more than one audio simultaneously, and every time you add new audio or effect, a new wave line appears.
Step 3. Begin mixing. You can import mp3 to Garageband. Garageband also works with CAF, AIFF, AAC, and WAV formats. Add more effect and audio and start working on making that perfect tune.
2. Can iMovie Convert Garageband to MP3?
It is impossible to save Garageband as MP3 using iMovie because iMovie does not support Garageband projects. If you want to export Garageband to MP3, you must convert Garageband to other formats like WAV.
For Win 7 or later (64-bit)
For macOS 10.12 or later

