Convert MP3 with the Best MP3 Free Converters (With Guide)
by Brian Fisher Proven solutions
MP3 is not a new concept to anyone, we all know that either your audio is in mp3 or it is not an audio. iPhone users might have come in contact with other formats since the iPhone stores audio in another format. There are loads of other audio formats like WAV, M4A, WMA, FLAC, AAC, OGG, and so on. Most of these formats either have high quality or larger size or both and they are not as universally accepted as MP3 but if you do not care for any of the limitations and still want to convert, here are the top mp3 free converters that can make your journey smooth.
Part 1. Recommended Free MP3 Music Converter in 2021
Freemake Audio Converter is a free mp3 converter that is one of the top competitors among conversion tools and software. It supports up to 100 formats both input and output formats. Meaning that as a free MP3 converter, Freemake supports the uploading of more than 50 file formats and it can convert to a wide variety of formats as well. However, Freemake is not only limited to free MP3 conversion, it is also a video converter. While it is very good for free MP3 conversion and video conversion, Freemake has limited features in the sense that apart from converting, the only other useful tool it has is the ability to upload your files directly to iTunes, cloud, and your phone after conversion.
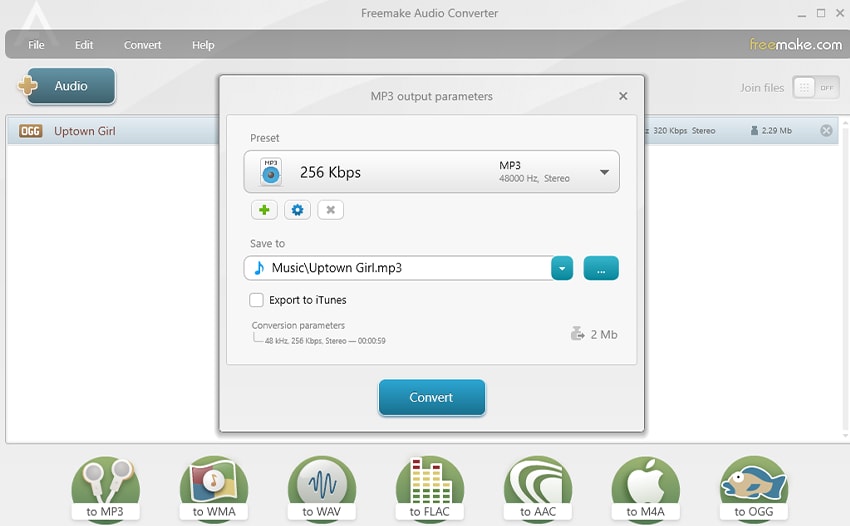
Step 1. Add your file to Freemake free MP3 converter. Add/Import/Upload your file to Freemake free MP3 converter by clicking on the +Audio button
Step 2. Select your preferred format. In the next screen, you can now choose to select any format you want to convert your mp3 to with the free MP3 converter.
Step 3. Convert Audio File. A new window pops up where you can select a preset/profile. You can choose to use the system’s built-in presets or you can create your own. When you are satisfied with the changes, you can now click on Convert to begin your conversion immediately.
Pros:
- It is a highly recommended free MP3 converter because of its easy use and simple steps. It contains no complicated features and goes straight to doing what it was meant to do.
Cons:
- It is a freeware, the customer support and software updates are irregular. Imagine the last update was 2017 although it still works fine
VLC Media Player as the name suggests is originally and just meant for playing any media file but recently, people have been discovering the hidden potential in this beloved media player. VLC can convert, crop videos and audios, and add subtitles to videos. I bet there are still a lot more features we are still not aware of, maybe to come or still hidden. VLC is a cross-platform multimedia player that is available on virtually all popular devices like Android, iPhone, Windows, iPad, Macbook, Linux, and many more. It is hailed as being one of the best media players of all time and with new updates every once in a while, it is obvious that VLC is still taking us a long way and of course, we are still here.

Step 1. Add file. To add a file on VLC, look on the toolbar at the top of the software and click on Media, from there click on Convert/Save. On windows, you can just the ‘Ctrl + R’ shortcut. A new window appears, click on the ‘Add’ tab and select the file to be converted and click Convert/Save.
Step 2. Select Format from Audio Codec. In the next window, go to profile, click on the tab with Audio-MP3 and you will see a list of other formats that VLC can convert to, select one of them. However, it doesn’t end there. Click on the ‘Settings’ icon beside the tab. Leave ‘Encapsulation’ and go to ‘Audio codec’ you will see more formats here and you can choose anyone you want and it will replace it from the one you chose first.
Step 3. Set Destination Folder and Convert. Even after selecting your format, you would notice that the save tab will still be greyed out. This is because you have not chosen your Destination folder. Click on browse at the bottom part of the box to choose the location to save your converted file. Now you can start conversion.
Pros:
- It is a multimedia tool that encompasses other functions as well. It is free and doesn’t take up much space.
Cons:
- The features are not well arranged and may confuse users. It is only effective for the media player for now.
iTunes is a leading innovation in the world of mp3 players and downloaders. As a store on its own, you can buy and download premium and exclusively released songs, movies, movie clips, and podcasts. It arranges your library for you and the best part is that you can access your files across all your iOS devices with the help of iCloud. It automatically transfers all downloaded audio to your Apple Music or for the downloaded podcast; Apple Podcasts. Even though it is an iOS-based app, you can use iTunes on Windows but it still has to be linked to an iCloud account so you can use it on your iPhone, iPad, and iPod.
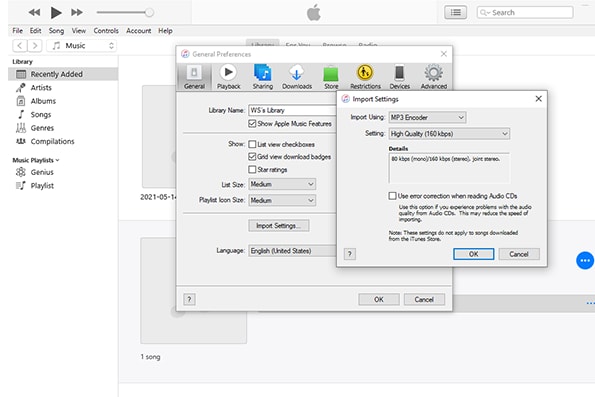
Step 1. Launch iTunes for Windows. You can find and download iTunes for Windows on many sites but be careful that it is not a malicious site full of viruses, only download from sites your trust. Download and launch iTunes for Windows.
Step 2. In the menu bar, choose Edit, and under edit click on Preference. From Preference, click General and search for Import settings, click on it and a new window appears. Choose the format you want to convert to and click OK.
Step 3. Select the mp3 file you want to convert. After that, click on File > Convert and then lastly Create. The conversion starts and the new song will automatically appear in your library.
Pros:
- It has cloud support where all your files are added to the cloud and can be accessed on multiple devices. It is a stable and multipurpose tool.
Cons:
- Its regular update which is supposed to be a good thing turned disadvantageous because of its space-consuming. Each update consumes more and more space so it is not suitable for devices with small storage space.
Funny thing is, Cloudconvert takes things up a notch by having a document section. Yes, you can convert PDF to Word (DOC) and some other formats. It is not only a free mp3 converter. Among all online converters, Cloudconvert is one of the best, believe it! Although they have a limit on the size of file they can convert. Their conversion is among the fastest among online converters as well albeit not as fast as software converters but when compared to other online converters, it still surpasses them. On an advanced level, its advanced options let you change the audio and video codec, select resolution, and adjust bitrate, aspect ratio, and fps.
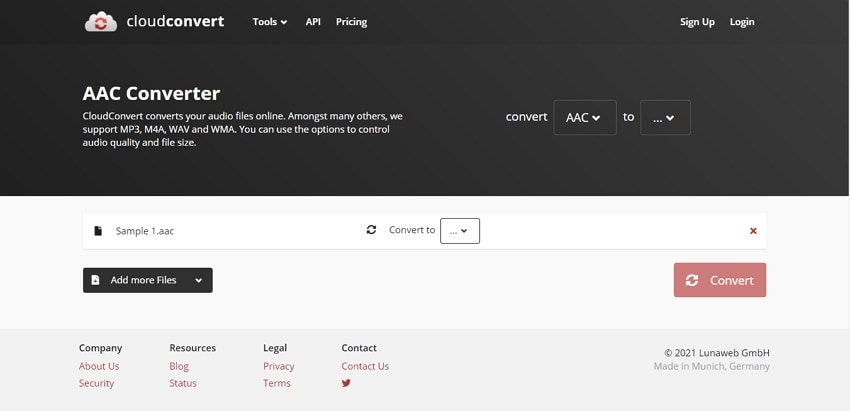
Step 1. Select and Add file. Click the ‘Select file’ tab to choose your file from your file explorer. Or clicking on the drop-down arrow beside the ‘Select file’ tab will enable you to choose other upload options like pasting URLs and uploading from the cloud. Cloudconvert can upload from Google Drive, OneDrive, and Dropbox.
Step 2. In Cloudconvert, the section for input format and output format differs You might decide to choose. The input might unnecessary because except for a few exceptions, Cloud convert automatically detects the format of the file you uploaded.
Step 3. After everything is set, click on the big red ‘Convert’ tab to start.
Step 4. As an online converter, the converted file will be stored on their database after conversion, you will still need to download your converted file after it has been converted. How long they will store your file is not stated so it is advisable to download it immediately.
Pros:
- It is safe, fast, and reliable. The interface is so straightforward you can finish your conversion without any hassle.
Cons:
- The controls, settings, and locations of the file formats are a bit tricky to handle such that if you aren’t careful, other formats will keep getting in the way when you are trying to select an output format.
Part2. How to Convert Music to MP3 with UniConverter 13?
As one of the converters standing at the pinnacle, you don’t expect such a converter to come with half-assed deals right? Yes, especially with the new version 13, UniConverter now has added new tools to its arsenal. You’ve never used UniConverter and don’t know its importance? Let’s run you through UniConverter real quick.
The tools Uniconverter possesses are enough to bury some other competitors in the dust, especially its free mp3 converter. Although it is not completely free, it has a free version with some limitations, and we will start with the tools it has. As soon as you open the software, you will be greeted with at least 3 tools and on the left side, you will see the rest of the main tools. The Converter allows you to convert files from one format to another, and UniConverter supports a wide variety of formats, there’s also the Video Compressor which allows you to resize your videos, there’s the Video Editor, Video Downloader, Merger, DVD Burner, and Player.
UniConverter 13
- Support to over 1000 formats and devices for conversion.
- Batch processing at super-fast speed (30X faster).
- Lossless quality conversion.
- Built-in editor with features like crop, cut, add effects, and more.
- Video download from more than 10000 sites like YouTube, Vimeo, and more.
- Additional features like auto-trimmer, watermark editor, subtitle editor, video recording, transfer, DVD burning, image conversion, compression, and more.
- Support to all latest Windows and Mac version (including latest Mac version).
Steps in Converting MP3 using UniConverter 13:
Go to the Convert Screen to Add MP3 file
To convert, you would need to click on Converter from the list of tools on the left side of the screen. The screen changes and you click on the Add file icon at the top left corner of the screen or the one in the middle of the screen. If you want to have fun while doing it, just drag and drop the file straight from your file explorer into the UniConverter interface but the file explorer mustn’t be the one opened by UniConverter.
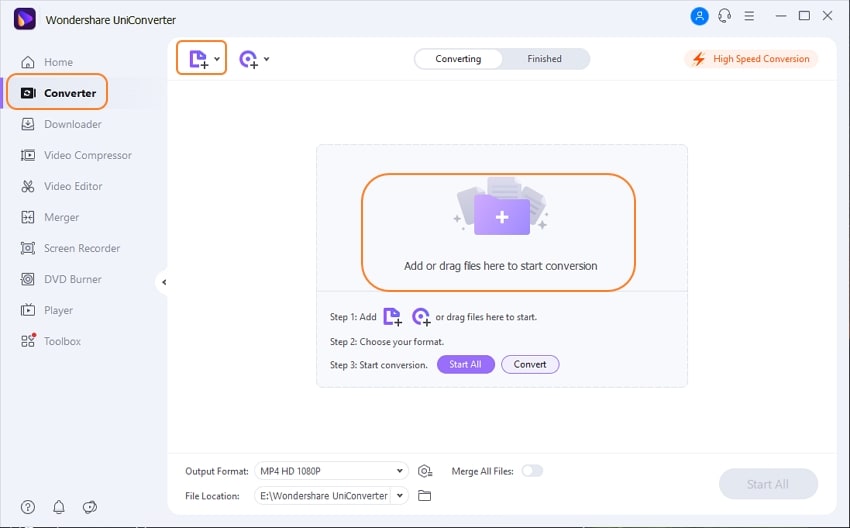
Choose Output Format and Quality
After you select the audio file(s), the screen changes again and this is where you can select your preferred format. UniConverter supports more than 50+ formats so feel free to choose any one by clicking on the Choose Format icon located beside the Convert tab. From the new window that comes up, click Audio and see the list of the supported output format. You aren’t sure, you can just select Device and see if your device is there. After choosing a format, a list of available qualities appears, feel free to choose from any of them. Just know that the higher the quality the higher the size; this is true most of the time.
Convert
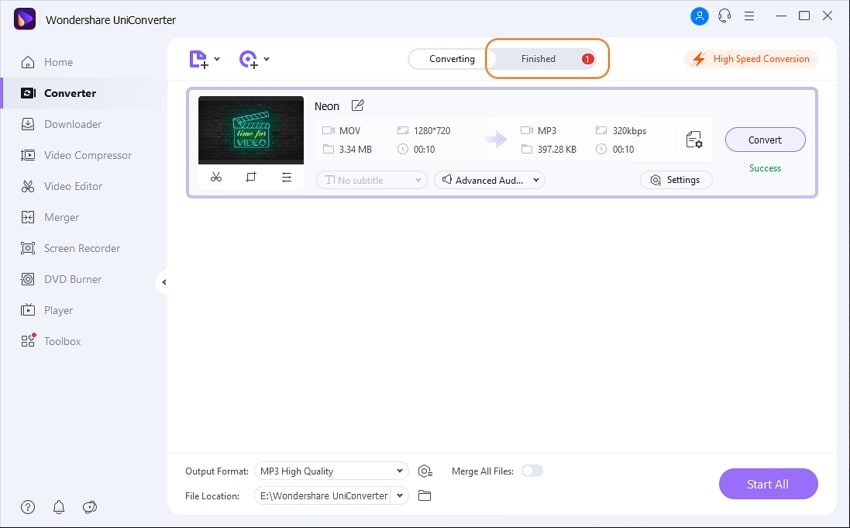
When you are done with selecting output format and quality, you can now start your conversion by clicking on Convert or Start All. After this, the output audio will show at the Finished section.
Is UniConverter Free?
There is a free version but UniConverter is not totally free. To unlock all the features without limitations, you can spend little and enjoy the true form of UniConverter. The pricing is not expensive at all.
Does UniConverter have an online version?
Yes, and the link to the online version of UniConverter is https://www.media.io/index-new-html. Although like its software counterpart the online UniConverter is a step ahead of others in terms of features and functionality, there is just so much that an online converter can do. To enjoy more features, use the software.
MP3
- 1. Convert Audio to MP3
-
- 1.1 Convert Audio to MP3
- 1.2 Convert AC3 to MP3
- 1.3 Convert AAC to MP3
- 1.4 Convert WAV to MP3
- 1.5 Convert FLAC to MP3
- 1.6 Convert AMR to MP3
- 1.7 Convert APE to MP3
- 1.8 Convert CAF to MP3
- 1.9 Convert OGG to MP3
- 1.10 Convert WMA to MP3
- 1.11 Convert AIFF to MP3
- 1.12 Convert M4A to MP3
- 1.13 WAV to MP3 Converter
- 1.14 Convert Podcast to MP3
- 1.15 Convert AAC to MP3 on Android
- 1.16 AAC to MP3 Converter
- 1.17 Convert RealPlayer Audio to MP3
- 1.18 Convert Apple Audio to MP3
- 1.19 Convert MP2 to MP3
- 1.20 Convert M4R to MP3
- 1.21 Convert GarageBand to MP3
- 1.22 Convert iTunes to MP3
- 1.23 Convert M4B to MP3
- 1.24 Convert M4P to MP3
- 1.25 Convert CAF to MP3
- 1.26 Convert SoundCloud Music to MP3
- 1.27 Convert WAV to MP3 on macOS 10.11
- 1.28 Convert WAV to MP3 on Android
- 2. Audio to MP3 Converter Online
- 3. Programs to Convert Audio to MP3
-
- 3.1 Convert WAV to MP3 Using Audacity
- 3.2 Convert WAV to MP3 on Windows Media Player
- 3.3 Convert WMA to MP3 in Windows Media Player
- 3.4 Convert M4A to MP3 in Windows Media Player
- 3.5 Convert WMA to MP3 on iTunes
- 3.6 Convert to MP3 in iTunes
- 3.7 Convert M4A to MP3 in iTunes
- 3.8 Convert AAC to MP3 on iTunes
- 3.9 Convert FLAC to MP3 using VLC
- 3.10 Convert FLAC to MP3 in iTunes
- 3.11 Convert WAV to MP3 in iTunes
- 3.12 Convert WMA to MP3 using VLC

Brian Fisher
chief Editor