Easy Guide on How to Trim Videos in Windows Media Player
by Brian Fisher Proven solutions
Undeniably, Windows PC is among one of the most popular operating systems (OS) with lots of exclusive features. As window users, we sometimes use our PCs as an entertaining device when we watch movies, play music, view photos, and more from its media player. Sometimes, we might intend to trim or cut audio and video files possibly because we want a scene or part of the played media file but still search for how to trim videos using several and trimming software on your Windows PC. You have nothing to worry about, if you wish to know how to trim videos on Windows Media Player, just scroll down and make everything easy for you and yourself.
Part 1. Easy Steps to Trim Videos Using Windows Media Player
If you’ve decided to use Windows Media player to trim your videos or cut your videos, you’ll have to download and install an additional plug-in called SolveigMM WMP on your Windows PC. Once you’re done downloading and installing the plug-in software, you’ll need these steps to guide you on how to trim videos on Windows Media Player:
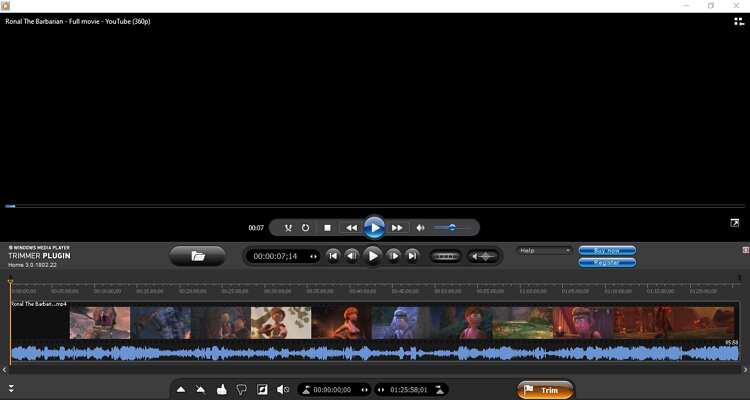
- Step 1. Open the Windows Media Player on your PC. Once the player is opened, at the top right of the window display on the menu bar click on Tools, then select Plug-ins, then add the SolveigMM WMP Trimmer Plug-in Home Edition. After selecting the plug-in, you’ll see it display at the bottom of the media player.
- Step 2. Now you can import or add the video you want to trim from any of the displayed folders or media category at the left side of the media player display.
- Step 3. After importing the video you want to trim, you can now click the Edit File button, select the part you’d like to trim, choose the location you’d like to save the trimmed video.
- Step 4. Once you’re done with step 3, you can now joyfully click on the Trim button to start the whole conversion process on the Windows media player.
Part 2. A Good Windows Media Player Alternative to Trim Videos (Not Just Edit!)
Instead of dealing with the stress of downloading and installing a plug-in before a Windows media player permits you to trim videos on your PC, why not use a media player that gives you the access to cut, trim, edit, convert, compress, Merge, change formats of videos and more without downloading or installing any additional plug-in to support the function of the software. This exceptional software for trimming videos and other features is – Uniconverter 13. The Uniconverter 13 offers more than just a media player. You have the access to use its downloader, video compressor, screen recorder, subtitle Editor, Toolbox, and more, for any type of media conversion or Editing. To trim videos on your Windows PC easily, just download and install the Uniconverter 13, then follow the steps below:
UniConverter 13
- Support to over 1000 formats and devices for conversion.
- Batch processing at super-fast speed (30X faster).
- Lossless quality conversion.
- Built-in editor with features like crop, cut, add effects, and more.
- Video download from more than 10000 sites like YouTube, Vimeo, and more.
- Additional features like auto-trimmer, watermark editor, subtitle editor, video recording, transfer, DVD burning, image conversion, compression, and more.
- Support to all latest Windows and Mac version (including latest Mac version).
Steps in trimming videos with UniConverter 13:
Upload Video File on UniConverter 13
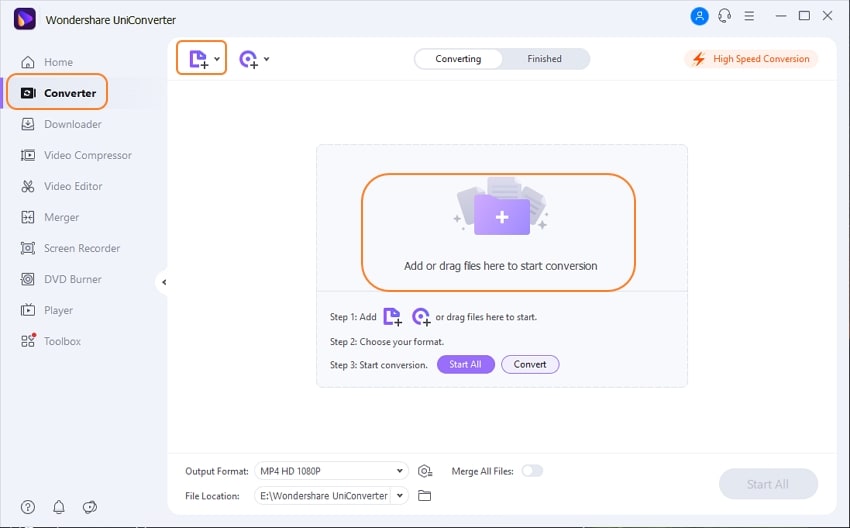
Once the Uniconverter 13 has been installed on your Windows PC, Launch the software then click the Converter tab. After opening the Converter tab, click on the Add File icon or dropdown option to import the video to be trimmed.
Trim the Video
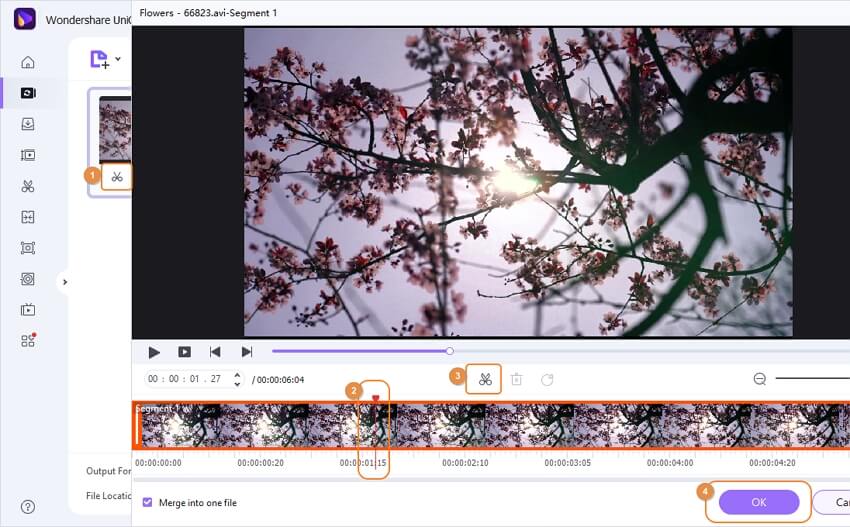
Once the video file has been uploaded to the Converter’s interface, you’ll see a video bar displayed. Under the video thumbnail on the video bar, you’ll see a Scissor icon. Once you Click the Scissor icon, the trimmer window appears. From there, you can adjust the orange slider bar as desired, then click OK to save the trimmed video
Select the Output Format
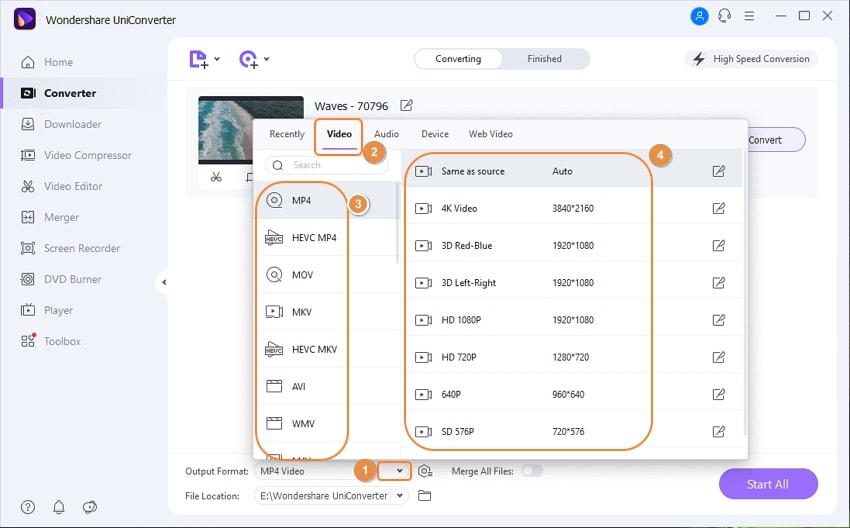
After this, if you’d like to change the format of the video file, then click the Output Format drop-down option at the bottom left of the converter tab, then select the video from the appeared menu and choose a desirable format.
Save the Trimmed Video
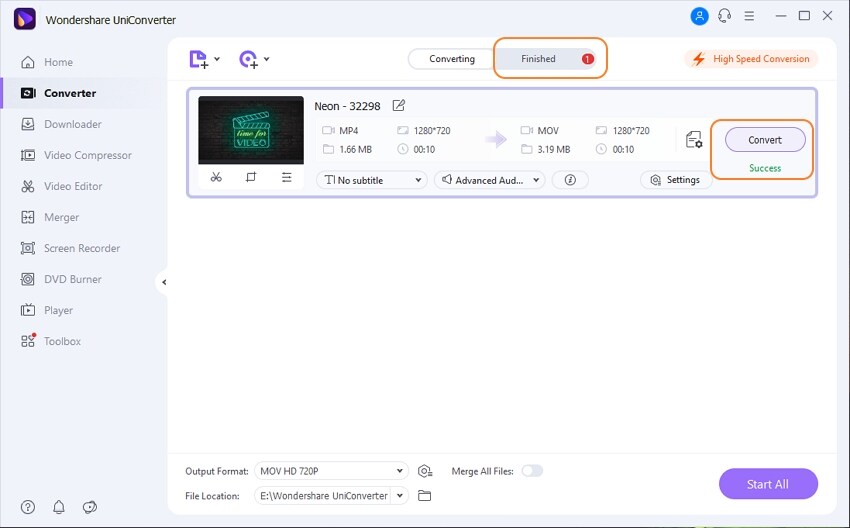
Once all of this is done, choose a path you’d like to save your trimmed video file by clicking the file location drop-down option. After this, click on Convert or Start All to begin the conversion. Once the conversion is done, you can access the trimmed video file from the Finished tab
Part 3. Online Windows Media Player Alternative You Can Choose to Trim Video
If you feel downloading and installing Window media player or the offline Uniconverter 13 to trim video files would be uneasy and stressful, Uniconverter also offers an online version where you don’t have to download or install any software on your Windows Pc. To use the online Uniconverter, you only have one requirement – an Internet connection.
Just in case you’d like to use the online Uniconverter-this trimming website, you can follow the steps below:
- Step 1. Launch the desktop-based software from your Windows PC browser. After the online Uniconverter opens, you can add videos from your PC’s internal storage, Google Drive, and Dropbox.
- Step 2. To trim the video, use the video slider or timeline to set the beginning and end of the video as desired.
- Step 3. Now choose an output format for the video. Once you’re done with that, click on Export to start the conversion. Then, you can download and then save the trimmed video file to your internal storage, Google Drive or Dropbox.
If you’re looking for a way or how to trim videos on Windows media player easily, you’ll see from this article that the online / Offline Uniconverter offers the best features you can use to trim video files, change video formats, add subtitles, edit videos, compress videos on your Windows PC. So there’s no need to stress, Uniconverter is best at your recommendation.
M4V
- 1. Convert M4V
- 2. Convert to M4V
- 3. Play M4V


Brian Fisher
chief Editor