by Brian Fisher • • Proven solutions
Sharing videos with others, you may attach them to your email and send to your friends. Or you can upload them to some video supported forums or video sites for sharing on line. Occasionally, you would fail to stream your videos onto the internet because of your unaccepted file formats or large video size. The article here focuses on the problem of uploading M4V files to the internet by converting M4V to FLV on Mac (High Sierra, Sierra, El Capitan, Yosemite, Mavericks, Mountain Lion and Lion included). It chooses FLV as the output format for FLV is a delivery file format widely used online.
Easily Convert M4V Videos to FLV
And the M4V to FLV Mac conversion is finished with the help of a reliable and easy-to-use UniConverter. UniConverter is a powerful video converter, which is now the leader in the world. It is able to convert video of all sorts whether HD or standard. It works very fast and this helps you do your projects within a short time. One of the most astonishing features is the way it does not compromise the quality of the video being converted. This is truly an amazing video converter.
Get the Best M4V to FLV Video Converter:
- Converts 150+ video and audio formats – this is a versatile tool that will convert a wide range of video and audio formats.
- High speed conversion – you can convert your video projects at speeds of 90X.
- Keeps quality intact – the fact that you are converting at high speed does not translate to loss of quality; the quality is kept intact.
- Inbuilt video editor – you can now edit your video with ease, using this editor; add watermarks, subtitles and other effects to make your work shine.
- Write to DVD and other devices – you can burn your project onto a DVD when you are done. You can also upload it to Facebook, YouTube and Vimeo. You can even send to your iPad or iPhone.
- Compatible with macOS 10.15 Catalina, 10.14 Mojave, 10.13 High Sierra, 10.12 Sierra, 10.11 El Capitan, 10.10 Yosemite, 10.9 Mavericks, 10.8 Mountain Lion and 10.7 Lion.
Follow the step-by-step tutorial to convert M4V to FLV format on Mac
Step 1. Load M4V files to the Mac software
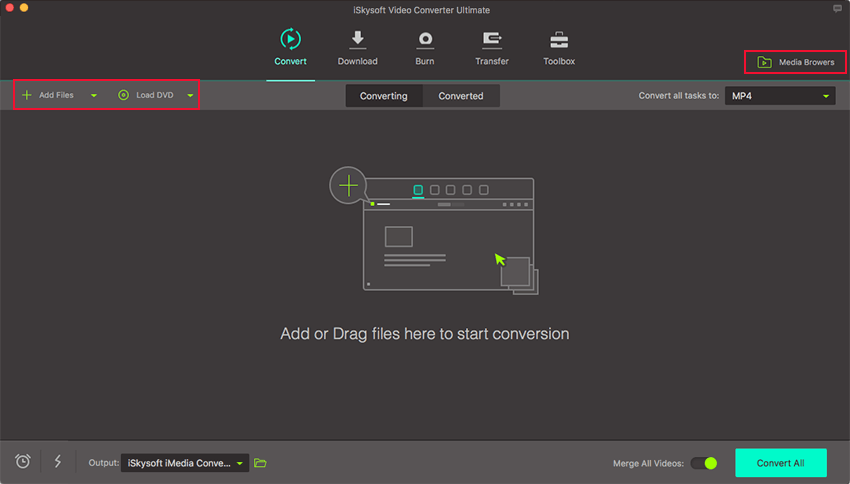
Run the Mac Video Converter and directly drag your M4V files to the Mac program; or go to the main interface, choose "Add Files" to locate the M4V files you want to add.

Step 2. Choose FLV as the output format
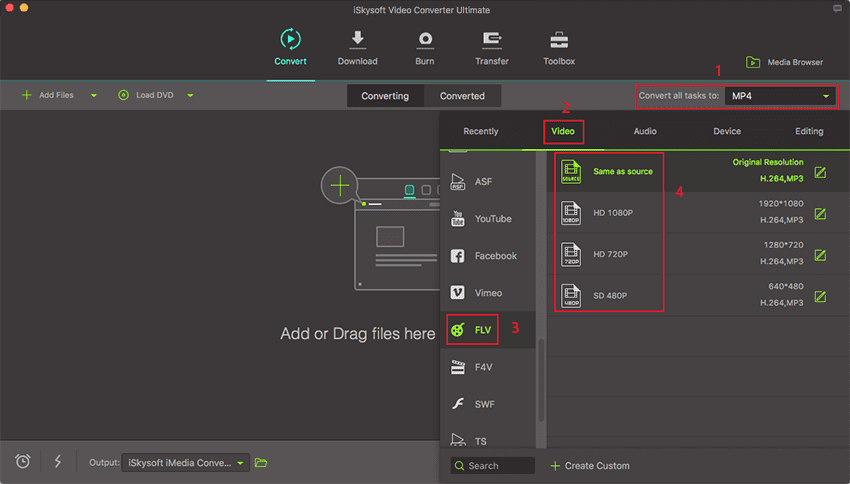
Go to the format tray and click "FLV" under the "Web Sharing" category. You can also set the related video parameters (resolution, frame rate, video encoder, bit rate, sample rate and audio channel etc. Mouse over the FLV format icon, you will see a gear button appeared, click it to set your video parameters.
In addition, you are allowed to edit your video files by cropping, splitting or adding effects to your videos with the Mac software. To learn more about the edit function, you can read the guide of UniConverter.

Step 3. Start M4V to FLV Mac conversion
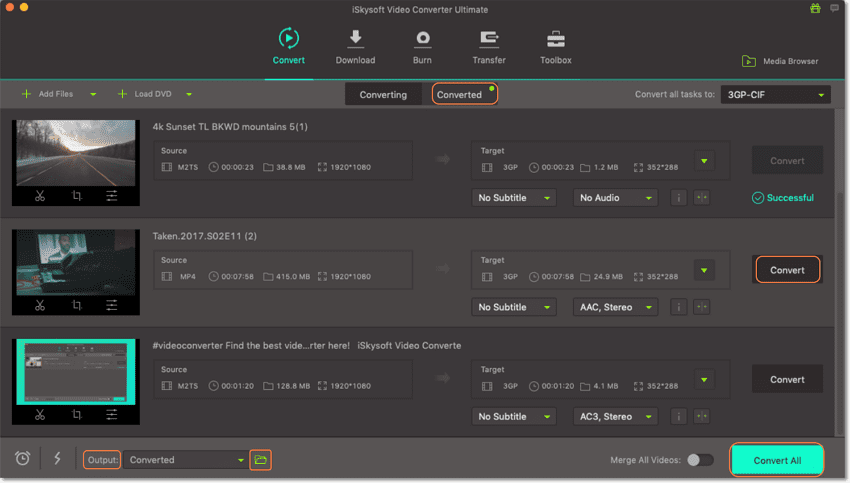
Click the "Convert" button and let this smart Mac Video Converter do the rest for you! The converter also works on MacBook, MacBook Pro, MacBook Air, iMac.

Optional: Online Tool to Convert M4V to FLV
If you want to convert M4V videos to FLV without installing a desktop software program, just try this free online M4V to FLV video converter below:
Tips: How to Stream FLV to Your Website
At the end of the article, we here would show you a small trick about streaming the FLV to your website: add the following HTML code into web page on your site, and now you can inform your friends to share it! Moreover, you can also set any height and width values if needed.

Brian Fisher
staff Editor