by Brian Fisher • • Proven solutions
How do I save an iMovie project?
If you have created your movie and would like to email it to your friends, burn it to a CD or upload it to the web, then you might want to know how to save iMovie project as a QuickTime movie.
- Part 1. Guide to Save iMovie File to Quicktime Movie
- Part 2. How to Convert iMovie Videos to QuickTime MOV (with Guide!)
- Part 3. Export Settings for iMovie to Quicktime
- Part 4. How to Put Quicktime Videos to iMovie?
Part 1. Guide to Save iMovie File to Quicktime Movie
1. Open your completed project in iMovie and click File > Export... on the iMovie menu.

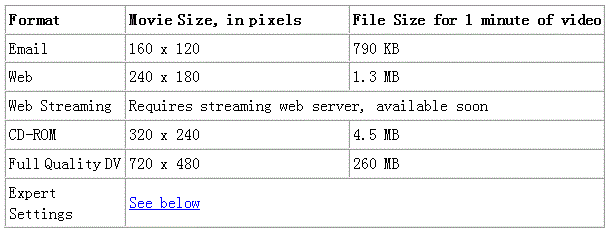
2. In the iMovie: Export window choose To Quicktime from the Export drop-down menu, if necessary. Choose an appropriate format from the Formats menu. The chart below may help you decide between the various formats.

3. After selecting your format, click Export.
You will be prompted for a filename for the Quicktime movie and a location for saving the movie. The length of time it takes to create your Quicktime movie will depend on the length of your movie, the format you choose, and the speed of the computer but may range from about 2 minutes per minute of video using the Email format up to over an hour per minute of video using the Full Quality DV format.

Part 2. How to Convert iMovie Videos to QuickTime MOV (with Guide!)
UniConverter is a powerful video converter used to convert a wide range of video formats on both Windows and Mac. It converts video at speeds of up to 90X and does not lose any quality. You can save your projects and export them to QuickTime movies with ease.
Get the Best iMovie to QuickTime Video Converter - UniConverter
- The Fastest converting speeds – This is the fastest video converter on the market today.
- Works with over 150 video formats – You can covert both standard and HD quality videos in various formats.
- Download online videos – You can download videos from your favorite video sites and then convert them.
- Edit videos with the inbuilt video editor – create fantastic videos from your clips using the inbuilt editor.
- Output to several devices – you can send your final video to CD-ROM, DVD, iPhone, iPad and on internet sites such as Facebook, Vimeo and YouTube.
Step-by-step instructions on how to convert your iMovie videos to QuickTime
Step 1. Import iMovie videos
Now you can drag and drop your iMovie videos to the software program, or go to the main menu then choose "Add Files" to import your iMovie files.
![]()
Step 2. Choose the conversion format
At the right of the window, you will see some conversion presets in the format output tray. Select the Video tab and click "MOV".
Step 3: Convert the iMovie video
Click on the “Convert” button to convert the iMovie project into QuickTime MOV. The time it takes for this project to be converted will depend on the size and quality of the resultant QuickTime video. However, you can be sure that this tool will work faster than any other tool that you may have tried in the past.
![]()
Part 3. Export Settings for iMovie to Quicktime
1. Each format listed in the above table for exporting to QuickTime uses video and audio compression format, viewing size and frame rate which will make the movie in a file size suitable for a particular purpose. If you want to make your QuickTime movie adopting a specific size, frame rate, or compression format, you might select Expert Settings in the Format menu, then click Export.
2. By doing this, you will get a prompts window for you to set the file name and destination for the QuickTime movie. In the Use option, you can get more built-in output formats.

3. For even more control over your Quicktime movie, click the Options... button.

4. Then you will go to the Movie Settings window. It will display all the settings you have selected for particular use in the above Use menu. Click the buttons in the Movie Settings window, you can change any of the settings. A discussion of the various options is in Chapter 12 of iMovie: the Missing Manual, available in Murray 114. (Please do not remove this book from the room.) Click OK when you have finished selecting your settings.

5. Click Save to begin creating your Quicktime movie. The length of time it takes to create your Quicktime movie will depend on the length of your movie, the format you choose, and the speed of the computer.
Part 4. How to Put Quicktime Videos to iMovie?
iMovie needs something like DV. So you need to convert Quicktime videos to DV. It's something of a mystery as to how one manages to import existing QuickTime 'footage' into iMovie for editing 'practice' if one doesn't have immediate access to a DV camera or deck.
1. Create a new iMovie project (UK release probably defaults to PAL).
2. Quit iMovie.
3. Export your QT movie as a DV stream (in the UK, select PAL in the options box). If you do not want to pay for Quicktime Pro which can convert movies to DV, you can get MPEG Streamclip. Here is a tutorial on how to use it to convert Quicktime movies to DV on Mac.
4. Place this file into the 'media' folder of your new iMovie project.
5. Open project and it will ask you if it's OK to put it "on the shelf".
6. Check "OK".
The Project and the exported file must be in the same format, so it is very important to check what your copy of iMovie defaults to when you create the new project.

Brian Fisher
staff Editor