
- Value: Simple Image Resizer offers quick, free solutions for basic image tasks, ideal for casual users and social media.
- Comparison: It's a 'commuter car' for images, fast for everyday needs, but lacks the advanced features of professional tools like UniConverter.
- Decision: Choose based on need: free tools for basic edits, UniConverter for quality, batch processing, and comprehensive features.
- Pitfalls: Be aware of privacy risks, intrusive ads, potential watermarks, and quality degradation with aggressive use of free online tools.
In this article
- Part 1: What is Simple Image Resizer & Image Enhancer?
- Part 2: Simple Image Resizer & Image Enhancer: Core Features, Pros, and Cons
- Part 3: Simple Image Resizer & Image Enhancer: Target Audience and Use Cases
- Part 4: Simple Image Resizer & Image Enhancer vs. Competitors
- Part 5: Risks and Pitfalls to Consider
- Part 6: How to Use UniConverter to Efficiently Enhance Images
- Part 7: Final Verdict and Recommendations
- Part 8: FAQs
Simple Image Resizer & Image Enhancer: A Comprehensive Scenario-Based Review
When I first started dabbling in online content creation, I quickly realized the headache of image optimization. Every platform seemed to have its own quirky requirements for image dimensions and file sizes. That's when I stumbled upon tools like Simple Image Resizer and Image Enhancer. This review dives deep into my experience with these types of tools, comparing their capabilities, highlighting their strengths and weaknesses, and ultimately guiding you to make an informed decision about which solution best fits your needs. We'll explore various scenarios, from quick social media posts to more demanding e-commerce product shots, to see where these tools truly shine and where they fall short.
Part 1: What is Simple Image Resizer & Image Enhancer?
From my perspective, Simple Image Resizer and Image Enhancer tools emerged from a clear and pressing need in the digital landscape: the constant demand for optimized imagery. Whether you're a casual blogger, a social media enthusiast, or running a small online business, you've probably faced the frustration of an image being too large, too small, or just not looking quite right after uploading. These tools aim to simplify that process, offering a quick fix without the steep learning curve of professional software. My goal with this review is to cut through the marketing jargon and tell you what these tools are genuinely good for, and more importantly, when you might need something more robust.
Understanding the Market Need for Image Resizing and Enhancement
* The "Goldilocks" Problem: Images are often either too big, slowing down websites, or too small, appearing pixelated.
* Platform-Specific Demands: Social media, e-commerce, and email marketing all have unique image specifications.
* Ease of Use Over Complexity: Many users just need a quick, straightforward solution, not a full-fledged photo editor.
* Visual Appeal is Key: In a visually driven world, poorly optimized images can significantly detract from your message.
Part 2: Simple Image Resizer & Image Enhancer: Core Features, Pros, and Cons
When I first tried Simple Image Resizer, I was looking for something that could just get the job done without much fuss. Its core strength, I found, lies in its straightforward approach to image manipulation. It’s not trying to be Photoshop, and that’s precisely its appeal for many. I’ve used it for countless quick adjustments, and it rarely disappoints for those basic tasks.
* Intuitive User Interface: The layout is usually clean and self-explanatory, making it easy to jump in and start resizing or enhancing.
* Efficient Batch Processing: This was a lifesaver for me when I had a folder full of images that all needed the same treatment.
* Wide Range of Output Formats Supported: I appreciate being able to choose between JPG, PNG, and sometimes even WebP, depending on where the image is going.
* Basic Enhancement Options: It typically offers sliders for brightness, contrast, and sharpness, which are enough for a quick visual pop.
* Predefined Size Presets: For common platforms like Instagram or Facebook, having these presets saves a lot of time and guesswork.
- Pros:
- Intuitive User Interface for Quick Edits: I found it incredibly easy to navigate, even for someone who isn't tech-savvy.
- Efficient Batch Processing for Multiple Images: This feature alone saved me hours when dealing with bulk uploads.
- Wide Range of Output Formats Supported: It's great to have options like JPG, PNG, and sometimes even WebP.
- Cons:
- Limited Advanced Enhancement Features: Don't expect professional-grade color correction or noise reduction; it's just not built for that.
- Potential for Quality Degradation on Aggressive Resizing: If you push it too hard, especially with upscaling, you'll definitely notice a drop in quality.
Part 3: Simple Image Resizer & Image Enhancer: Target Audience and Use Cases
From my experience, tools like Simple Image Resizer and Image Enhancer are perfect for a specific segment of users who prioritize speed and simplicity over advanced features. If you're not a professional photographer or graphic designer, but you still need your images to look good online, these tools are probably in your sweet spot. I've found them invaluable for certain tasks, but also quickly hit their limits for others.
- Optimal Scenario: Social Media Content Creation
When I'm churning out content for Instagram, Facebook, or a blog, I need images that fit perfectly and load quickly. This is where Simple Image Resizer shines. I can quickly adjust image dimensions and file sizes for various platforms without losing visual appeal. It’s a no-brainer for getting my posts up fast and looking decent. For me, it’s about efficiency and meeting platform requirements without getting bogged down in complex software.
- Limited Scenario: Professional Photography Post-Processing
However, if I'm working on photos from a professional shoot, I wouldn't even consider these tools. They are simply insufficient for intricate color correction, noise reduction, or high-fidelity upscaling required by professional photographers. I've tried to push them for more detailed work, and the results were always disappointing. For serious image manipulation, you really need dedicated, powerful editing software.
Part 4: Simple Image Resizer & Image Enhancer vs. Competitors
When I look at the landscape of image tools, Simple Image Resizer and Image Enhancer occupies a specific niche. It's like a reliable, no-frills commuter car compared to a luxury SUV or a high-performance sports car. Here's how I see it stacked up against some other popular options I've used:
| Feature/Tool | Simple Image Resizer & Image Enhancer | Adobe Express | GIMP | UniConverter |
| Ease of Use | High | Medium | Low | High |
| Enhancement Depth | Basic | Moderate | Advanced | Moderate |
| Batch Processing | Yes | Limited | Manual | Yes |
| Price | Free/Freemium | Freemium/Subscription | Free | Freemium/Subscription |
| Processing Speed | Fast | Moderate | Slow | Fast |
| Output Quality | Good (for basic tasks) | Very Good | Excellent | Excellent |
| Customer Support | Basic (community/FAQ) | Good | Community | Excellent |
| Security | Varies (online tool) | High | High | High |
- Key Differentiators: Simple Image Resizer excels in speed and simplicity for basic tasks, making it my go-to for quick, everyday needs. Adobe Express offers a good balance of features and ease of use, but often comes with a subscription cost. GIMP, while free and powerful, has a steep learning curve that I frankly don't have time for with quick edits. UniConverter, on the other hand, really impressed me with its comprehensive approach, offering both ease of use and high-quality results, especially for batch processing, which is a huge plus for me.
Part 5: Risks and Pitfalls to Consider
While the convenience of online tools like Simple Image Resizer and Image Enhancer is undeniable, I've learned through experience that they come with their own set of risks and potential pitfalls. It's not always as straightforward as just uploading and downloading. Being aware of these issues has saved me from some headaches down the line.
Data Privacy Concerns with Online Tools
When I upload my images to an online resizer, I always pause and think about where that data is going. Many free online tools might not have the most robust privacy policies, and there's a risk that your images, especially if they contain sensitive information or personal content, could be accessed or stored by third parties. For me, this is a major concern, particularly with client work.
Intrusive Advertisements and User Experience
I've encountered numerous free tools that are absolutely riddled with ads. Pop-ups, banner ads, and even video ads can make the user experience incredibly frustrating. It often feels like I'm spending more time closing ads than actually resizing my images. This can significantly slow down my workflow and make a supposedly "simple" task quite annoying.
Potential for Unwanted Watermarks
Some free versions of image resizers or enhancers might subtly add their own watermarks to your processed images. I've had to re-do work because I didn't notice a small, unwanted logo until after I'd already used the image. Always double-check the output, especially if you're using a free tier, as this can undermine the professionalism of your content.
Image Quality Compromises on Aggressive Settings
While these tools are designed to help, pushing them too far can lead to noticeable quality degradation. If I try to drastically upscale a small image or compress a large one too aggressively, I often end up with pixelated, blurry, or artifact-ridden results. It’s a fine line between optimization and destruction, and these tools don't always have the sophisticated algorithms to handle extreme changes gracefully.
Limited Offline Functionality
One major drawback for me is the reliance on an internet connection. If I'm working offline or in an area with poor connectivity, these online tools become completely unusable. This can be a real problem when I'm on the go or dealing with a tight deadline and my internet decides to act up.
Part 6: How to Use UniConverter to Efficiently Enhance Images
I've found that while many online tools offer basic image enhancement, they often fall short when it comes to batch processing, consistent quality, or simply being ad-free. This is where UniConverter truly shines as a robust alternative. If you're looking for a solution that avoids the pitfalls of inconsistent enhancement, intrusive ads, and limited features, UniConverter is definitely worth considering. It provides a comprehensive suite of tools for image resizing, enhancement, conversion, and more, delivering a balanced solution for various user needs without compromising on quality or user experience. For me, it's an all-in-one powerhouse that handles my image needs with ease, offering GPU acceleration for speed and stable, lossless processing.
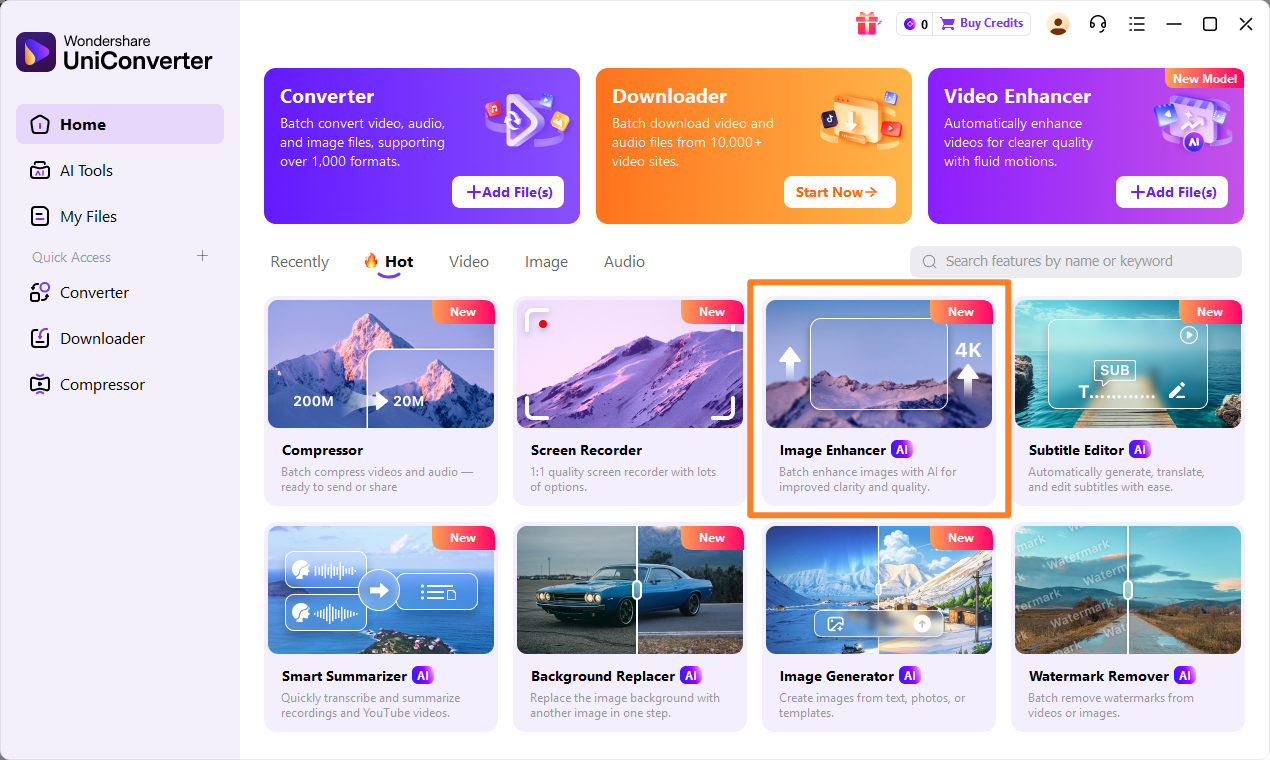
Step 1: Open UniConverter and Choose Image Enhancer
First, launch UniConverter on your computer. On the main interface, navigate to the "Toolbox" section. Here, you'll find various utilities. Select the Image Enhancer option to begin.
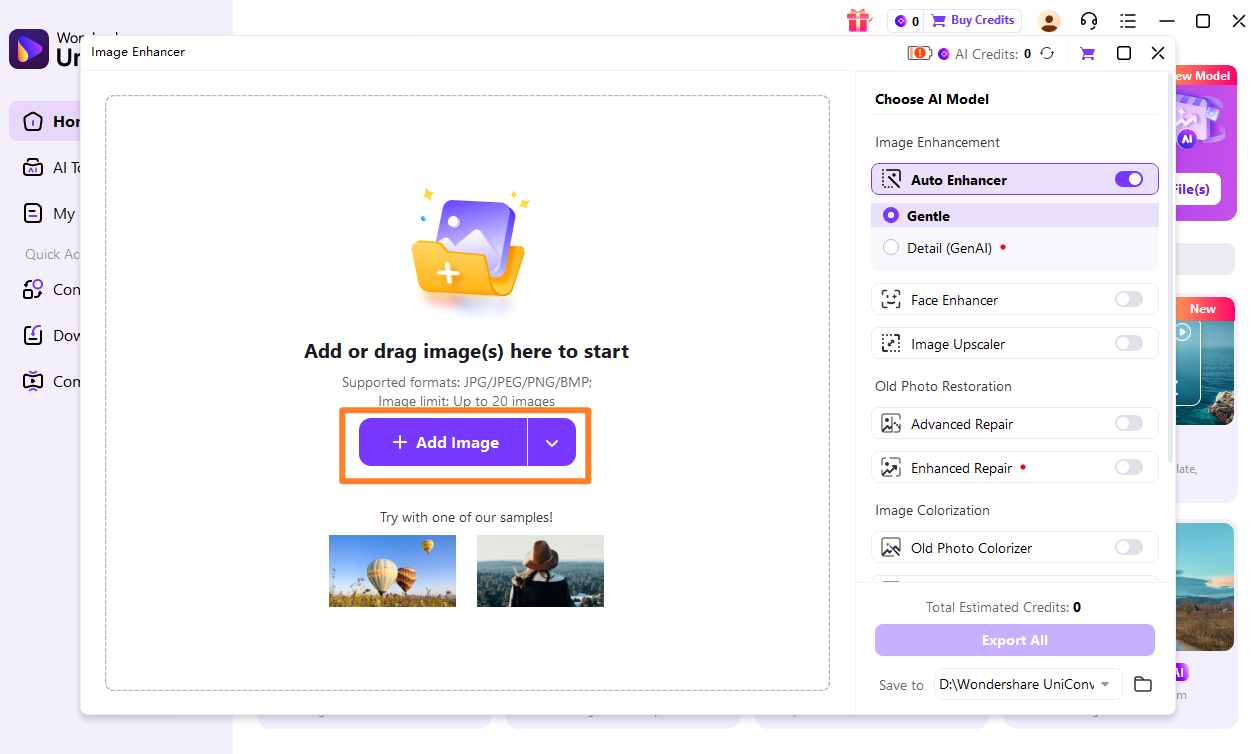
Step 2: Upload the Images
Next, you'll need to add the images you want to enhance. You can either drag and drop your image files directly into the UniConverter window or click the "Add Files" button to browse and select them from your computer. UniConverter supports batch uploading, so you can add multiple images at once. For those looking to enhance image resolution, this feature is particularly useful.
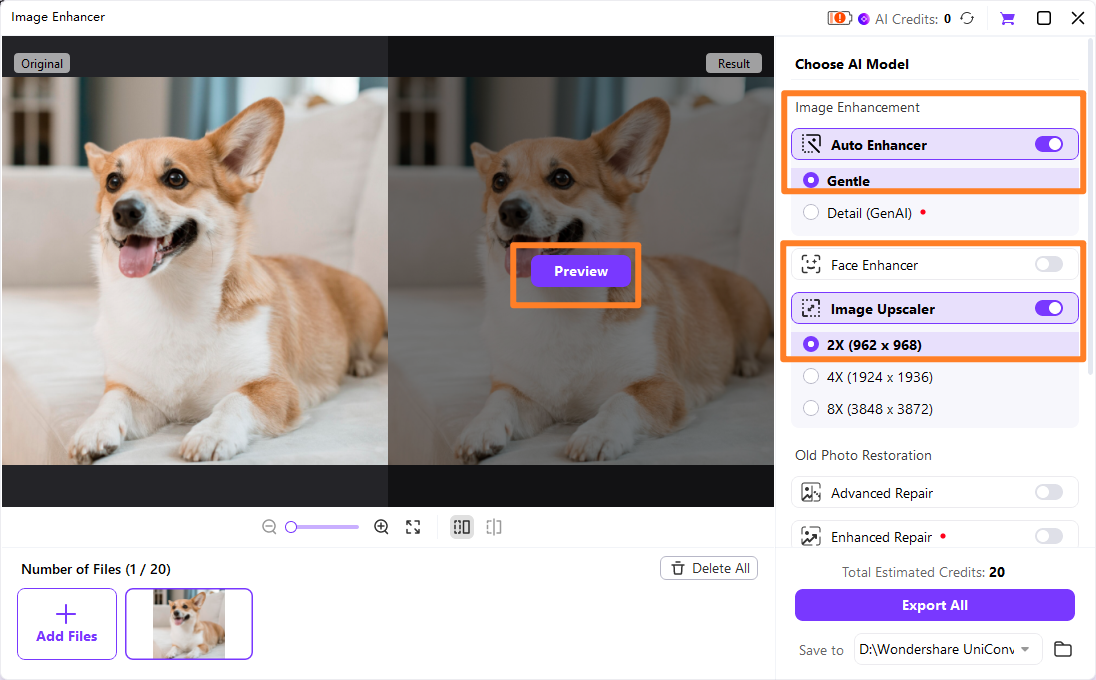
Step 3: Choose Enhancement Model
Once your images are loaded, UniConverter will present you with different enhancement models. These models are designed to improve various aspects of your images, such as clarity, color, and detail. Select the model that best suits your needs. You can also adjust other settings like output format and resolution here. This functionality is similar to an AI image enhancer, providing intelligent improvements.
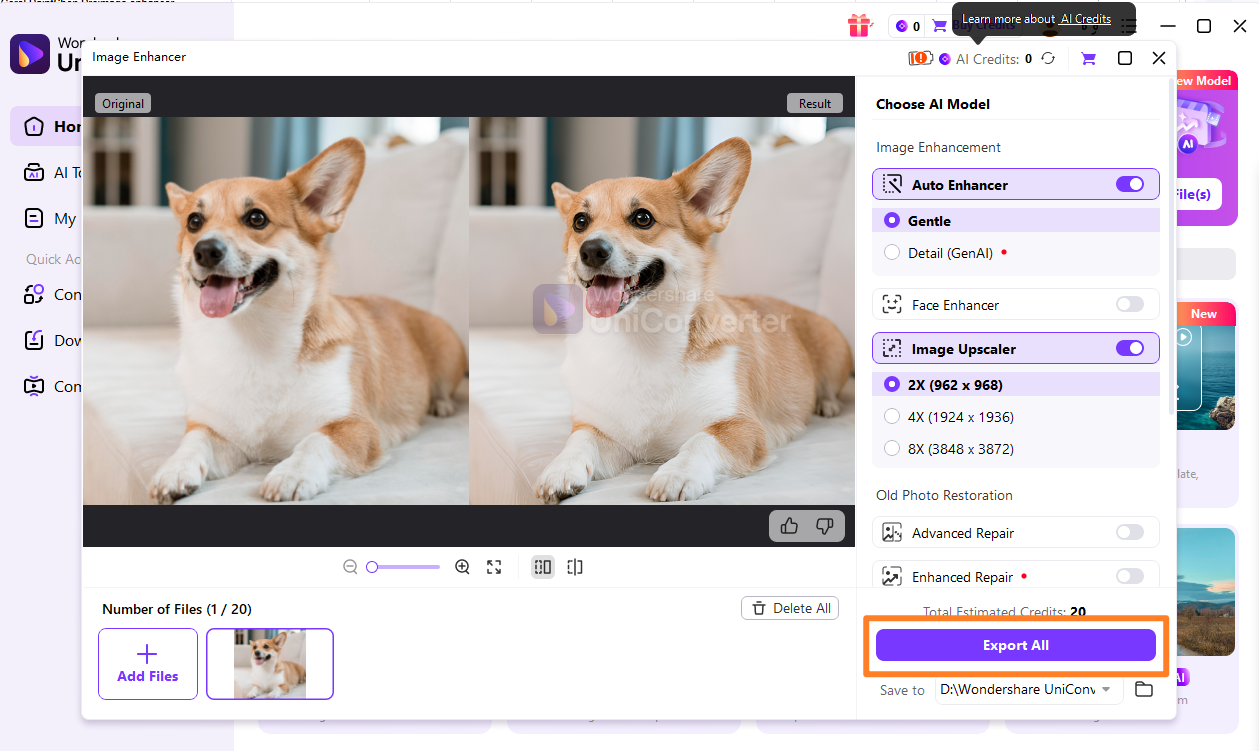
Step 4: Preview and Save the Enhanced Images
After selecting your enhancement model, UniConverter will process your images. You can often preview the enhanced results alongside the original to compare. Once you're satisfied, choose your desired output folder and click the "Export" or "Save" button to save your newly enhanced images. This process ensures your photos are perfectly optimized, much like a dedicated photo enhancer would achieve.

Need a Better Simple Image Resizer Alternative?
Part 7: Final Verdict and Recommendations
After extensively using and comparing various image tools, my take on Simple Image Resizer and Image Enhancer is that it serves a very specific, yet important, purpose. It's a quick, accessible fix for basic image needs, but it's far from a universal solution. For casual users and social media managers who just need to quickly adjust dimensions or file sizes for a post, it’s perfectly adequate and often free, making it a convenient choice. However, for small businesses and e-commerce owners who rely on high-quality product images, while it can handle basic resizing, its limited enhancement capabilities mean you might need to supplement it with other tools for truly impactful visuals. For professional designers and photographers, I'd strongly advise against relying on it for anything beyond the most rudimentary tasks; the lack of advanced features and potential for quality degradation simply won't meet professional standards. When you find yourself needing consistent quality, advanced batch processing, or a broader suite of editing tools without the hassle of ads or privacy concerns, that's when to consider a dedicated image editor or a more comprehensive solution like UniConverter. Ultimately, choose your tool based on your specific needs and the level of quality you require.
Part 8: FAQs
-
1. **Is Simple Image Resizer completely free to use?**
Simple Image Resizer typically offers a free tier with basic functionalities, often with limitations on file size or batch processing. Premium features may require a subscription or a one-time purchase.
-
2. **How does image enhancement work in Simple Image Resizer?**
Image enhancement usually involves basic adjustments like brightness, contrast, and sharpness, aiming for a quick visual improvement rather than detailed artistic manipulation. It uses simple algorithms to make general improvements.
-
3. **Can I resize images without losing quality?**
While Simple Image Resizer attempts to minimize quality loss, significant resizing, especially upscaling, can lead to some degradation. Using advanced algorithms or AI-powered tools can mitigate this, but some loss is almost inevitable with extreme changes.
-
4. **What are the common file formats supported for output?**
Most image resizers support popular formats like JPG, PNG, GIF, and sometimes WebP, catering to web and general use cases. This covers the majority of needs for online content.
-
5. **Is UniConverter suitable for batch processing a large number of images?**
Yes, UniConverter is highly efficient for batch processing, allowing users to apply resizing and enhancement settings to multiple images simultaneously, saving considerable time and ensuring consistent results across your entire image library.
