
- Replicate Overview: Replicate Image Enhancer offers advanced AI via API for superior detail restoration and integration into custom workflows.
- Ideal Users: Best for professional photographers/designers needing high-quality upscaling and custom workflow integration.
- Limited Users: Not ideal for casual users needing quick, simple edits due to its API-first, technical nature.
- Comparison Insight: Replicate excels in customization and advanced AI, while UniConverter offers user-friendly, comprehensive media solutions.
- UniConverter Value: UniConverter provides a reliable, all-in-one solution for stable, lossless, and batch image enhancement.
- Final Decision: Choose Replicate for ultimate control/development, UniConverter for powerful, easy-to-use desktop enhancement.
In this article
- Part 1: What is Replicate Image Enhancer?
- Part 2: Replicate Image Enhancer: Core Features, Pros, and Cons
- Part 3: Who Benefits from Replicate Image Enhancer? Ideal Scenarios and Limitations
- Part 4: Replicate Image Enhancer and Alternatives Comparison
- Part 5: Risks and Pitfalls to Consider When Using Image Enhancers
- Part 6: How to Use UniConverter for Comprehensive Image Enhancement
- Part 7: Final Verdict and Recommendations
- Part 8: FAQs About Image Enhancement Tools
When I first started exploring AI-powered image enhancement, I was overwhelmed by the sheer number of tools available. My journey led me to Replicate Image Enhancer review, a platform that promised cutting-edge AI for superior detail restoration. This review isn't just a feature rundown; it's a deep dive into my personal experience with Replicate and its competitors, aiming to help you navigate the complex world of image enhancement. I'll share what I found most useful, where it fell short, and ultimately, who I think it's best suited for. If you're looking to make an informed decision about your next image enhancement tool, stick around – I've got some insights to share.
Part 1: What is Replicate Image Enhancer?
Replicate Image Enhancer is essentially a powerful API that provides access to a wide array of state-of-the-art AI models specifically designed for image enhancement. Think of it as a developer's playground for integrating advanced image processing capabilities into their own applications or workflows. I initially thought it was a standalone app, but I quickly realized its true power lies in its programmatic access. For me, this meant a steeper learning curve than a simple drag-and-drop tool, but the flexibility it offered was unparalleled. This platform addresses a significant need in the market for high-quality, scalable image enhancement solutions.
The Growing Demand for AI Image Enhancement
The digital age has brought an explosion of visual content, and with it, a constant desire for perfection.
* Restoring Old Photos: Many of us have cherished old photos that are blurry or faded, and AI offers a new lease on life for these memories.
* Upscaling Low-Resolution Images: In a world dominated by high-definition screens, low-res images just don't cut it anymore, especially for professional use.
* Enhancing User-Generated Content: From social media to e-commerce, user-generated content often needs a quality boost to look professional.
* Automating Image Processing Workflows: Businesses and creators are always looking for ways to streamline their image editing processes.
Part 2: Replicate Image Enhancer: Core Features, Pros, and Cons
Replicate Image Enhancer, from my experience, is built around its robust API, offering a suite of AI models that can tackle various enhancement tasks. Its core capability revolves around applying sophisticated algorithms to improve image quality, from upscaling and de-noising to color correction. What impressed me most was the sheer variety of models available; it felt like having a specialized AI for almost every enhancement need.
Pros:
* Advanced AI Algorithms for Superior Detail Restoration: I found that for complex tasks like restoring fine details in old photos or upscaling images significantly, Replicate's models often delivered results that were noticeably better than many other tools I've tried.
* User-Friendly API for Seamless Integration: Once I got past the initial setup, integrating Replicate into my existing scripts and workflows was surprisingly straightforward. This is a huge plus for developers or anyone looking to automate their image processing.
* Diverse Model Selection for Various Enhancement Needs: The ability to choose from different AI models, each optimized for specific tasks (e.g., face enhancement, general upscaling), allowed me to fine-tune the results to my exact requirements.
Cons:
* Potential for Over-Processing and Unnatural Results: While powerful, there were instances where the AI, if not carefully controlled, could make images look a bit too "processed" or artificial, especially with aggressive settings.
* Cost Considerations for High-Volume Usage: For casual users, the usage-based pricing might seem steep. If you're processing thousands of images, the costs can add up quickly, so it's something to budget for.
Part 3: Who Benefits from Replicate Image Enhancer? Ideal Scenarios and Limitations
From my perspective, Replicate Image Enhancer isn't for everyone. It truly shines in specific scenarios where its advanced capabilities can be fully leveraged.
Best Use Case: Professional Photographers and Graphic Designers Seeking High-Quality Upscaling
If you're a professional photographer or graphic designer who frequently needs to upscale images for large prints or high-resolution displays, Replicate is a game-changer. I've used it to breathe new life into older, lower-resolution client photos, and the results have been impressive. The ability to integrate it into a custom workflow means I can automate parts of my post-processing, saving valuable time while maintaining a high standard of quality. For anyone who needs precise control and top-tier enhancement, this is where Replicate truly excels.
Limited Use Case: Casual Users Needing Quick, Simple Edits Without Technical Expertise
On the flip side, if you're just a casual user looking to quickly fix a blurry phone photo for social media, Replicate might be overkill. The API-first approach means there's a learning curve involved, and you'll likely need some technical know-how to get it running. For quick, simple edits, I found myself reaching for more user-friendly, standalone applications. The time and effort required to set up Replicate for a one-off enhancement often isn't worth it for someone without a development background or a recurring need for advanced enhancement.
Part 4: Replicate Image Enhancer and Alternatives Comparison
When I was evaluating image enhancers, I didn't just look at Replicate; I also explored other popular options to see how they stacked up. Here's a comparison of Replicate with some of the alternatives I considered, including UniConverter, Topaz Gigapixel AI, and VanceAI Image Enhancer.
| Feature/Tool | Replicate Image Enhancer | UniConverter | Topaz Gigapixel AI | VanceAI Image Enhancer |
| AI Model Sophistication | High | Medium | High | Medium |
| API Integration | Excellent | Fair | Poor | Good |
| Output Quality | Excellent | Good | Excellent | Good |
| Pricing Model | Usage-based | Subscription/One-time | One-time purchase | Subscription/Credits |
| Ease of Use | Moderate | High | Moderate | High |
Key Differentiators: Replicate's Strengths in Customization and Advanced AI
What I found truly sets Replicate apart is its unparalleled customization and advanced AI models. While UniConverter is fantastic for an all-in-one media solution and Topaz Gigapixel AI offers incredible desktop performance, Replicate's API-driven approach allows for deep integration into custom workflows. If you're a developer or a business looking to build bespoke image enhancement solutions, Replicate's flexibility is a huge advantage. VanceAI is good for quick online enhancements, but it doesn't offer the same level of control or integration as Replicate. For me, if I need to programmatically enhance images with specific AI models, Replicate is the clear winner.
Part 5: Risks and Pitfalls to Consider When Using Image Enhancers
My journey with image enhancers hasn't been without its bumps. There are several risks and pitfalls I've encountered that I think everyone should be aware of, especially when dealing with cloud-based or AI-driven tools.
Data Privacy Concerns with Cloud-Based Processing
When you upload your images to cloud-based enhancers, you're essentially entrusting your data to a third party. I always ask myself: "Where are my photos stored? How long are they kept? Who has access to them?" This is particularly critical if you're dealing with sensitive or personal images. Always read the privacy policy carefully before uploading anything.
Potential for AI Hallucinations and Artifacts
AI, while powerful, isn't perfect. I've seen instances where an AI enhancer "hallucinates" details that weren't there, or introduces strange artifacts into an image, especially when the original quality is very poor. It's like the AI is guessing what should be there, and sometimes it guesses wrong, leading to unnatural or distorted results.
Understanding Licensing and Usage Rights of Enhanced Images
This is a big one for professionals. If you use an AI tool to enhance an image, who owns the copyright of the enhanced image? Does the tool claim any rights? What about the original image? It's a murky area, and I always advise checking the terms of service to avoid any legal headaches down the line, especially if you plan to use the enhanced images commercially.
The Impact of Over-Enhancement on Image Authenticity
There's a fine line between enhancement and alteration. I've noticed that it's easy to get carried away with enhancement settings, leading to images that look artificial or lose their original character. For documentary photography or journalistic purposes, over-enhancement can compromise the authenticity of the image, which is a serious ethical consideration.
Hidden Costs and Subscription Traps
Many tools offer "free" versions or trials, but the real power often lies behind a paywall. I've been caught off guard by unexpected credit usage or automatic subscription renewals. Always be clear about the pricing model, understand what you're getting for free, and be mindful of any recurring charges.
Part 6: How to Use UniConverter for Comprehensive Image Enhancement
Sometimes, when other tools fall short with batch processing, unstable enhancements, or weak results, I turn to UniConverter. It's become my go-to for a reliable, all-in-one media solution that handles image enhancement with surprising efficiency. It’s ad-free, supports a wide range of formats, leverages GPU acceleration for speed, ensures stable and lossless enhancement, and crucially, handles batch processing like a champ. It's a comprehensive solution that avoids many of the pitfalls I've discussed. For those looking to upscale video or enhance video quality, UniConverter offers robust features. You can even fix pixelated videos with its advanced capabilities.
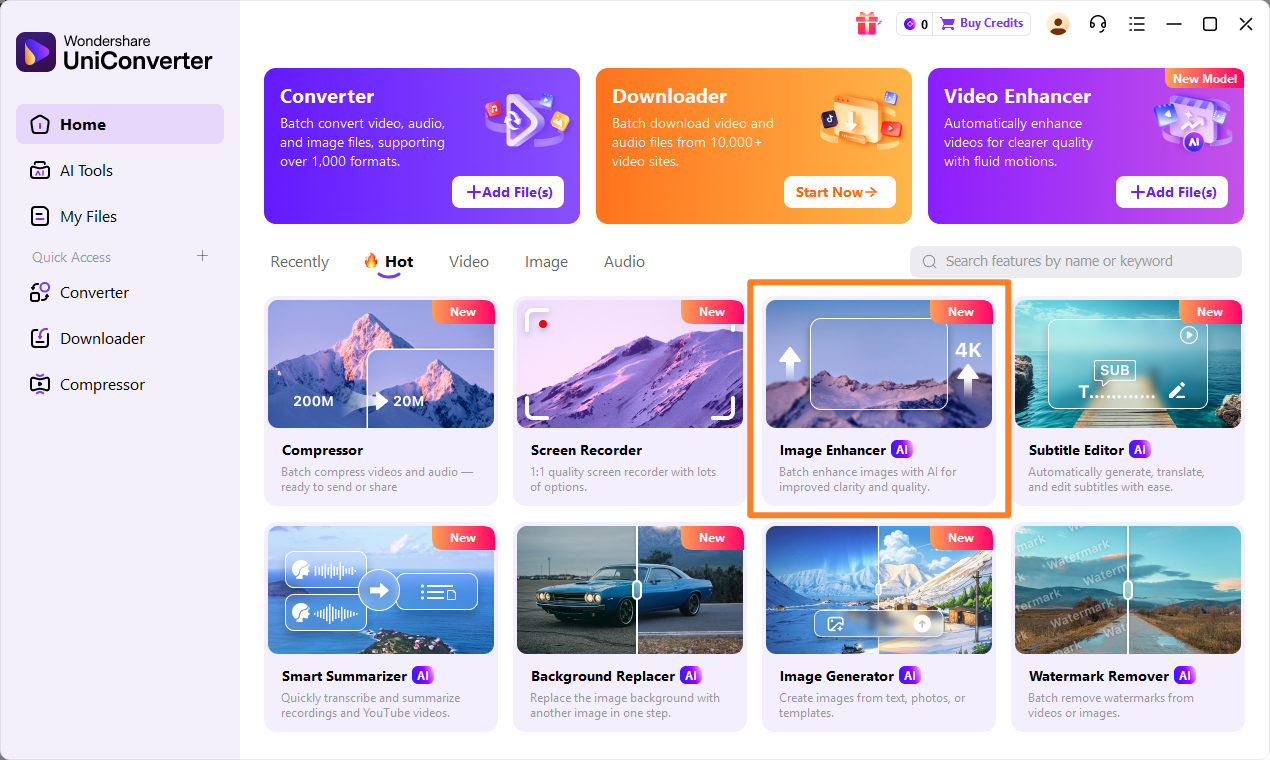
Step 1: Open UniConverter and Choose Image Enhancer
First, launch UniConverter on your computer. On the main interface, navigate to the "Toolbox" section. Within the Toolbox, you'll find the "Image Enhancer" option. Click on it to open the dedicated enhancement module.
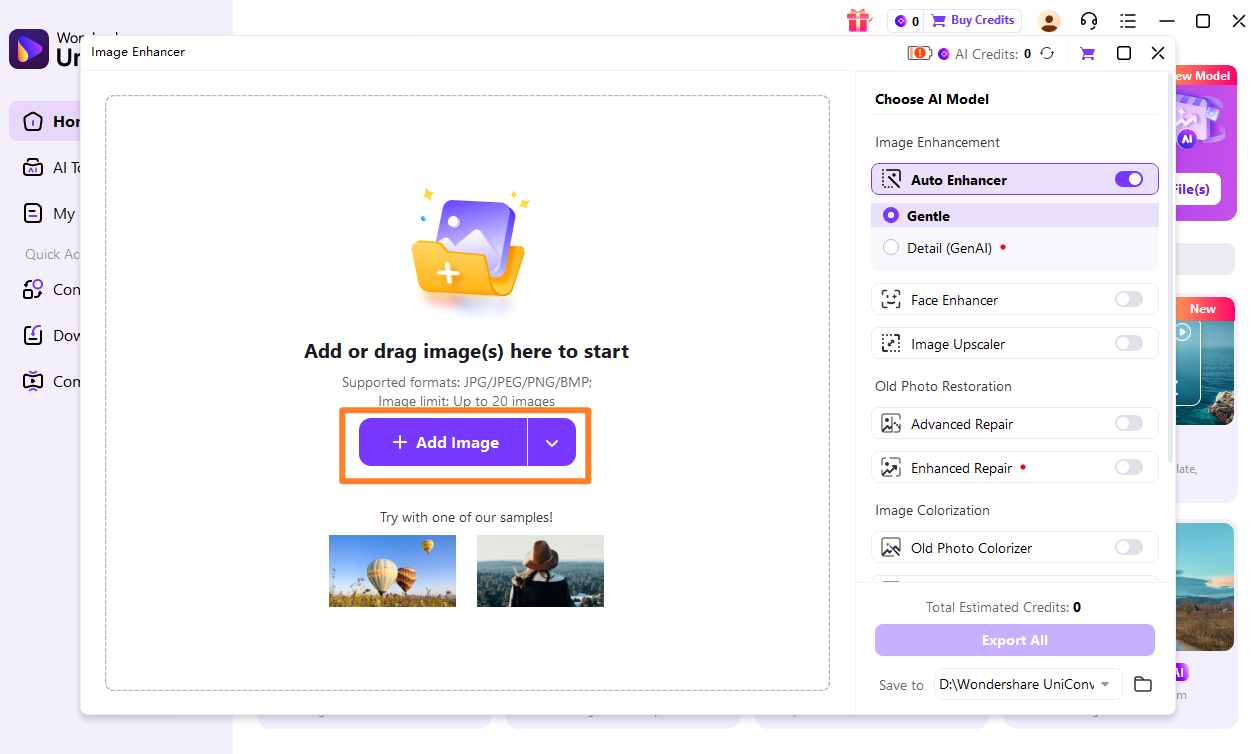
Step 2: Upload the Images
Next, you'll need to import the images you wish to enhance. You can either drag and drop your image files directly into the UniConverter window or click the "Add Files" button to browse and select them from your computer. UniConverter supports various image formats.
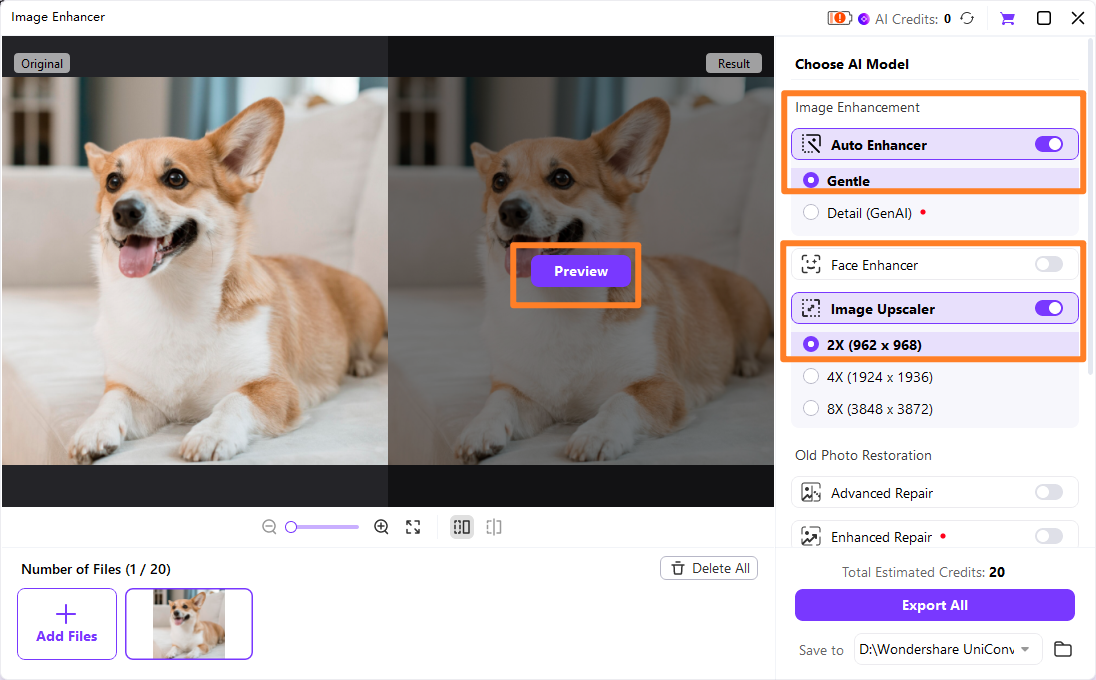
Step 3: Choose Enhancement Model
Once your images are loaded, UniConverter will present you with different enhancement options or AI models. Select the model that best suits your needs, whether it's for general upscaling, de-noising, or specific detail restoration. You can often adjust intensity settings here as well.
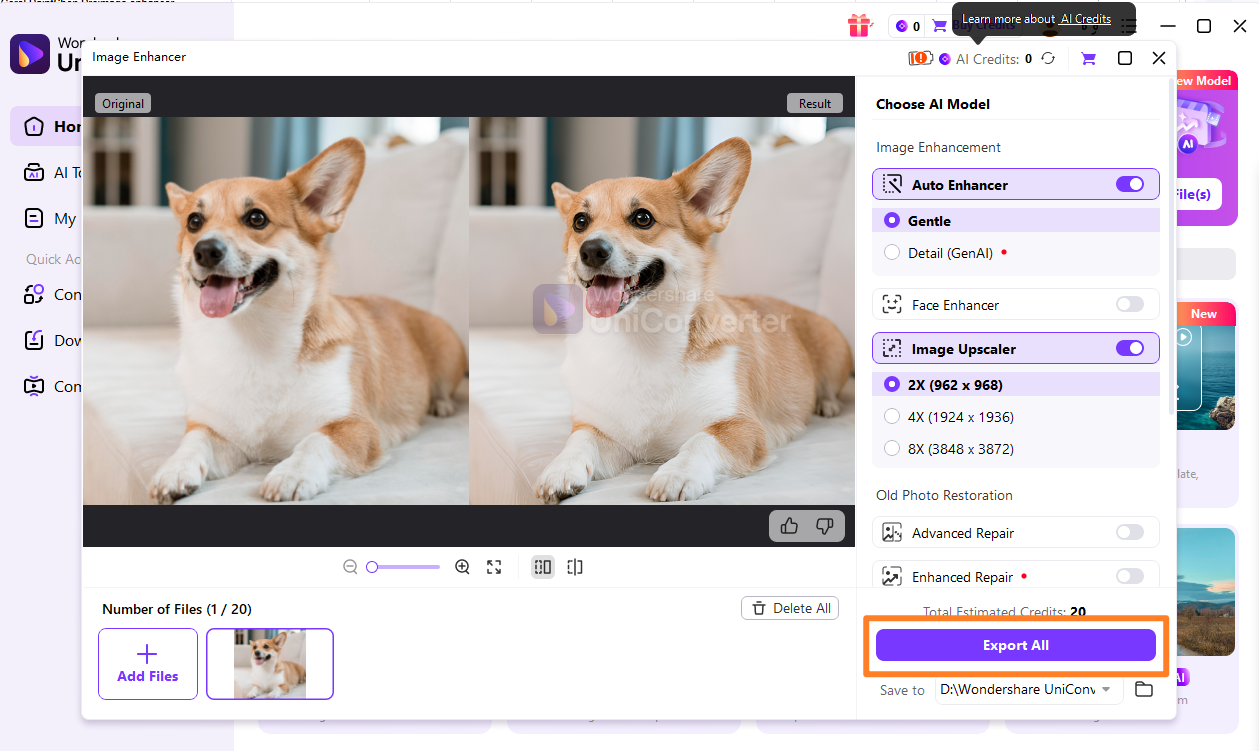
Step 4: Preview and Save the Enhanced Images
After applying the enhancement, UniConverter allows you to preview the results side-by-side with the original image. This is crucial for ensuring you're happy with the outcome. Once satisfied, click the "Export" or "Save" button to save your enhanced images to your desired location.

Seeking a Powerful Image Enhancer Alternative?
Part 7: Final Verdict and Recommendations
After spending considerable time with Replicate Image Enhancer review and its competitors, my conclusion is that there's no single "best" tool; it truly depends on your specific needs and technical comfort level. Replicate stands out for its advanced AI and API-first approach, making it an excellent choice for developers, researchers, and professionals who need to integrate high-quality image enhancement into custom workflows or applications. Its flexibility and the sheer power of its underlying models are undeniable. However, for those who prefer a more user-friendly, all-in-one solution without diving into code, UniConverter offers a fantastic alternative. It provides robust enhancement capabilities, batch processing, and a straightforward interface, making it ideal for content creators, small businesses, or even advanced casual users who want reliable results without the technical overhead. My advice is to consider your primary use case: if you're building something or need ultimate control, Replicate is your friend. If you're looking for a powerful, easy-to-use desktop application for a wide range of media tasks, UniConverter is a solid bet. Always test out the options that align with your budget and workflow before committing.
Part 8: FAQs About Image Enhancement Tools
-
1. What is the best image enhancer for professional use?
For professionals, tools like Replicate Image Enhancer (for API integration and advanced AI) or Topaz Gigapixel AI (for desktop-based, high-quality upscaling) are often considered top-tier due to their superior algorithms and control.
-
2. Can AI image enhancers improve old, blurry photos?
Yes, AI image enhancers are particularly effective at improving old, blurry, or low-resolution photos by intelligently adding detail, sharpening edges, and reducing noise. The results can be quite remarkable, making old memories look new again.
-
3. Are there any free image enhancement tools available?
While many professional-grade enhancers come with a cost, there are free online tools and basic features within photo editing software that offer some level of image enhancement. However, their capabilities are usually limited compared to dedicated AI enhancers.
-
4. How do image enhancers affect image file size?
Enhancing an image, especially through upscaling or adding detail, often results in a larger file size. This is because the process typically adds more pixel data or complexity to the image, requiring more storage space.
-
5. Is it safe to upload personal photos to online image enhancers?
It depends on the service. Always review the privacy policy and terms of service of any online image enhancer before uploading personal photos. Look for services that explicitly state they do not store your images long-term or use them for training their AI models without your consent.
