
- PhotoKit Overview: AI-powered online tool for image upscaling and detail recovery.
- Core Features: AI-driven detail recovery, upscaling, color/contrast adjustments, noise reduction, one-click enhancement.
- Pros: User-friendly, efficient batch processing, good for quick social media enhancements.
- Cons: Limited advanced editing, subscription model for full features, potential for unnatural results.
- Ideal Users: Casual users, social media enthusiasts needing quick, presentable image boosts.
- Limited Use: Not suitable for professional print production or fine art requiring precise control.
- Comparison: Faster than Photoshop, simpler than Topaz, less comprehensive than UniConverter.
- Risks: Data privacy concerns with cloud processing, ads in free version, internet dependency, limited free output resolution.
- UniConverter Alternative: Offers robust, comprehensive image enhancement with offline processing and broader media capabilities.
- Final Verdict: PhotoKit is good for casual use; UniConverter provides a more versatile, professional alternative.
In this article
- Part 1: What is PhotoKit Image Enhancer?
- Part 2: PhotoKit Image Enhancer: Core Features, Pros, and Cons
- Part 3: PhotoKit Image Enhancer: Ideal Users and Use Cases
- Part 4: PhotoKit Image Enhancer and Alternatives Comparison
- Part 5: Risks and Pitfalls of Using PhotoKit Image Enhancer
- Part 6: How to Use UniConverter for Comprehensive Image Enhancement
- Part 7: Final Verdict and Recommendations
- Part 8: Frequently Asked Questions (FAQs)
In this PhotoKit Image Enhancer review, I'm going to share my honest thoughts on a tool that's been making waves in the world of AI photo upscaling. I've spent a good amount of time putting it through its paces, and I'll walk you through its strengths, weaknesses, and how it stacks up against some of its rivals. My goal is to help you figure out if PhotoKit is the right fit for your image enhancement needs, whether you're just looking to spruce up social media snaps or you're aiming for something a bit more professional. We'll cover everything from its core features to potential risks and even explore some solid alternatives.
Part 1: What is PhotoKit Image Enhancer?
PhotoKit Image Enhancer is an AI-powered online tool designed to improve the quality of your digital photos, primarily through upscaling and detail recovery. When I first heard about it, I was intrigued by the promise of effortlessly transforming low-resolution or slightly blurry images into sharper, more vibrant ones. It positions itself as a quick and accessible solution for anyone looking to give their photos a boost without needing complex photo editing software. This review aims to dissect its capabilities, weigh its benefits against its drawbacks, and ultimately help you decide if it deserves a spot in your digital toolkit.
The Rise of AI-Powered Image Enhancement Tools
The digital age has brought with it an explosion of images, and with that, a growing need for tools that can effortlessly enhance them. I've seen firsthand how frustrating it can be to have a great photo marred by poor resolution or blur. This is where AI image enhancers like PhotoKit step in, addressing several common pain points:
* Low-Resolution Headaches: Many of my older photos, or even some taken with less-than-ideal phone cameras, simply don't hold up when I try to zoom in or print them.
* The Blurry Blight: Sometimes, a slight shake or a fast-moving subject can ruin an otherwise perfect shot, leaving it a blurry mess.
* Time-Consuming Manual Edits: I've spent countless hours trying to manually sharpen and enhance images in Photoshop, only to achieve mediocre results.
Part 2: PhotoKit Image Enhancer: Core Features, Pros, and Cons
From my experience, PhotoKit Image Enhancer primarily focuses on delivering a streamlined, AI-driven approach to photo enhancement. Its core ability lies in its AI upscaling, which attempts to intelligently add pixels and recover lost detail. I found it particularly useful for:
* AI-driven detail recovery: This is where PhotoKit truly shines. It does a decent job of intelligently filling in gaps and sharpening edges, especially on faces and textures.
* Upscaling for various image types: Whether it's a landscape, a portrait, or even an old scanned photo, it tries to improve the resolution.
* Color and contrast adjustments: While not as granular as professional tools, it often gives a subtle boost to colors and contrast.
* Noise reduction: I noticed it helps smooth out some of the graininess in lower-light photos.
* One-click enhancement: For quick fixes, it's incredibly straightforward.
Pros:
* AI-driven detail recovery for various image types: I was genuinely impressed with how it handled different subjects, from old family photos to product shots.
* User-friendly interface for quick enhancements: Seriously, it's super intuitive. I didn't need to read a manual to get started.
* Batch processing capability for efficiency: This is a lifesaver when you have a whole folder of photos that need a quick touch-up.
Cons:
* Limited advanced editing options beyond enhancement: If you're looking for color grading or object removal, you'll be disappointed.
* Subscription model for full feature access: I initially thought I could get by with the free version, but the limitations quickly pushed me towards considering a subscription.
Part 3: PhotoKit Image Enhancer: Ideal Users and Use Cases
After spending some time with PhotoKit, I've got a pretty good sense of who this tool is really for and where it shines, as well as where it falls short. It's definitely not a one-size-fits-all solution, and understanding its sweet spot is key to avoiding frustration.
Best Use Case: Quick Enhancement for Social Media and Casual Sharing
If you're anything like me and you just want to quickly spruce up photos for Instagram, Facebook, or sharing with friends and family, PhotoKit is fantastic. I often find myself with screenshots or older phone photos that look a bit pixelated when I try to post them. PhotoKit lets me run them through its enhancer in seconds, giving them a noticeable boost in clarity and sharpness. It's perfect for those "good enough" moments where you don't need professional-grade results but still want your images to look presentable. For quick, casual sharing, it's incredibly convenient and saves me a lot of time.
Limited Use Case: Professional Print Production and Fine Art Photography
However, if your goal is professional print production, large-format art prints, or any scenario where absolute fidelity and artistic control are paramount, I'd honestly look elsewhere. I tried using it for some high-resolution art pieces, and while it did improve them, the AI sometimes introduced artifacts or smoothed out details in ways I didn't want. For fine art photography, where every pixel matters and you need precise control over sharpening and noise reduction, PhotoKit simply doesn't offer the granular control required. It's not designed to replace professional-grade software for those demanding tasks.
Part 4: PhotoKit Image Enhancer and Alternatives Comparison
When I started looking into image enhancers, I quickly realized PhotoKit wasn't the only player in the game. I've tried a few others, and here's how PhotoKit stacks up against some notable alternatives like UniConverter and Topaz Gigapixel AI, and even a more general-purpose tool like Adobe Photoshop's upscaling features.
| Feature/Tool | PhotoKit Image Enhancer | UniConverter Image Enhancer | Topaz Gigapixel AI | Adobe Photoshop (Upscale) |
| AI Upscaling Quality | High | High | Very High | Medium-High |
| Ease of Use | Excellent | Excellent | Good | Moderate |
| Batch Processing | Yes | Yes | Yes | Limited (via actions) |
| Advanced Editing | No | Limited | No | Yes |
| Pricing Model | Subscription | One-time purchase / Subscription | One-time purchase | Subscription |
| Processing Speed | Fast (Cloud) | Fast (Local/GPU) | Moderate (Local/GPU) | Moderate (Local) |
| Output Resolution | Up to 4x | Up to 8x | Up to 6x | Variable |
From my perspective, PhotoKit excels in its sheer simplicity and speed, especially for online use. If you just need a quick, decent upscale without any fuss, it's a strong contender. However, for the absolute best quality and more control, especially with very challenging images, Topaz Gigapixel AI often produces superior results, though it comes at a higher price and requires a more powerful local machine. UniConverter, on the other hand, offers a fantastic balance. It's incredibly easy to use, provides excellent quality, and has the added benefit of being part of a larger suite of tools, making it a more versatile option if you're also dealing with video or other media. Photoshop, while powerful, isn't primarily an upscaler and requires more technical know-how for optimal results. If speed and online accessibility are your top priorities, PhotoKit is great. But if you value higher quality, offline processing, and a broader feature set, UniConverter or Topaz Gigapixel AI are worth considering.
Part 5: Risks and Pitfalls of Using PhotoKit Image Enhancer
While PhotoKit Image Enhancer offers a convenient way to improve your photos, I've encountered a few potential downsides and risks that I think you should be aware of, especially if you're considering it for anything beyond casual use. It's important to go in with open eyes.
Data Privacy Concerns with Cloud Processing
Since PhotoKit is a cloud-based tool, you're uploading your images to their servers for processing. This immediately raises a red flag for me regarding data privacy. While they likely have terms of service addressing this, I always feel a bit uneasy sending personal or sensitive photos to a third-party server. I've learned to be cautious about what I upload, especially if it's something I wouldn't want potentially exposed.
Potential for Over-Processed or Unnatural Results
I've noticed that sometimes, especially with heavily pixelated or blurry images, PhotoKit's AI can go a bit overboard. The results can look overly smooth, plasticky, or even introduce strange artifacts that weren't there before. It's like the AI tries too hard to "guess" what details should be there, and it doesn't always get it right. For me, this means I always have to critically evaluate the enhanced image and sometimes prefer a slightly less "enhanced" but more natural look.
In-App Advertisements in Free Version
If you're trying to use the free version, be prepared for ads. I found them to be quite intrusive, often popping up or being strategically placed to encourage upgrading. It definitely detracts from the user experience and can be quite annoying when you're trying to quickly process an image. It's a common trade-off for free services, but it's something to factor into your decision.
Dependency on Internet Connection for Optimal Performance
Because PhotoKit is entirely online, a stable and fast internet connection is non-negotiable. I've experienced frustrating slowdowns and even failed uploads when my Wi-Fi was spotty. This means if you're working offline, or in an area with poor connectivity, PhotoKit becomes unusable. For me, this is a significant limitation compared to desktop applications that can process images locally.
Limited Output Resolution in Free Tier
Another major limitation I hit with the free tier is the restricted output resolution. While it enhances the image, the maximum resolution you can download is often capped. This means if you're trying to upscale for a larger print or a high-resolution display, the free version simply won't cut it. You'll inevitably hit a paywall if you need anything beyond a modest resolution increase.
Part 6: How to Use UniConverter for Comprehensive Image Enhancement
Sometimes, when I've found other tools lacking in batch processing, struggling with inconsistent enhancement quality, or just not delivering the punch I need, I turn to UniConverter. It's become my go-to for a more robust and reliable image enhancement experience, especially when I want to avoid ads, ensure stable, lossless quality, and leverage GPU acceleration for speed. It's truly an all-in-one solution for my media needs.
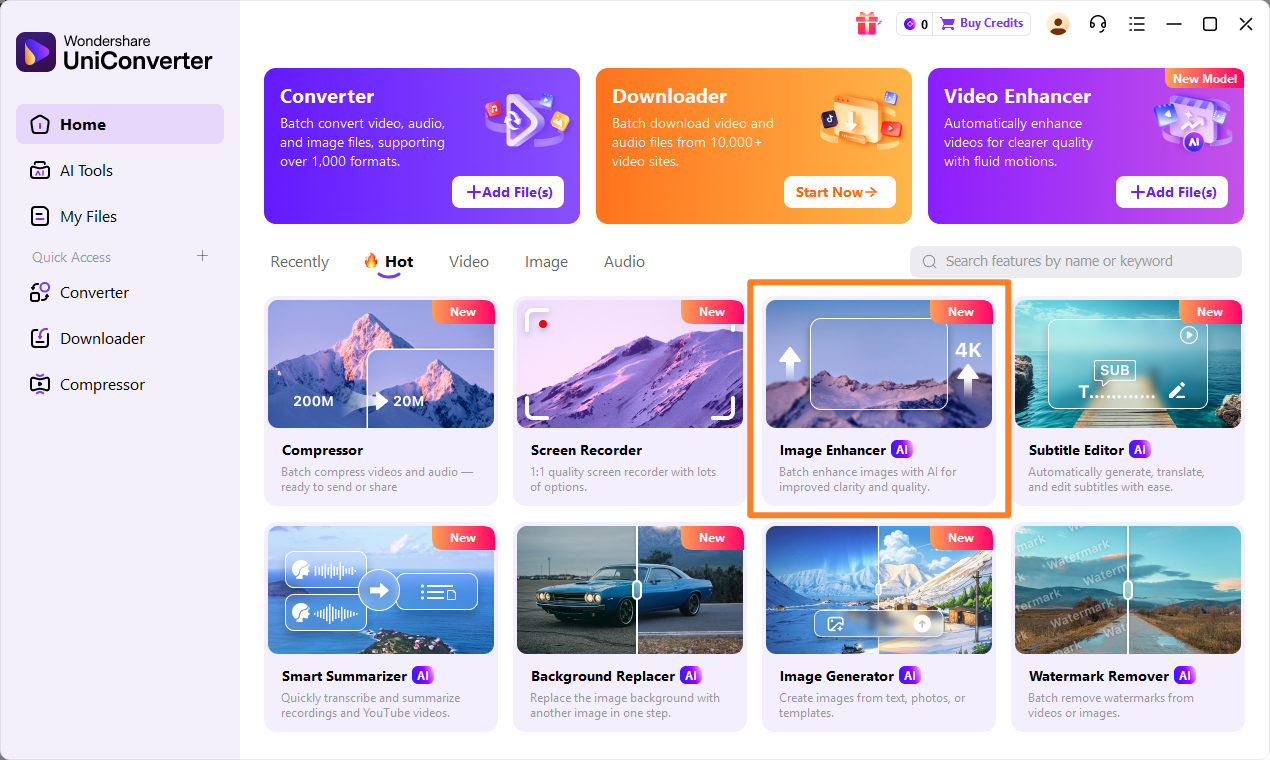
Step 1: Open UniConverter and Choose Image Enhancer
First things first, I launch UniConverter. On the main interface, I navigate to the "Toolbox" section. Within the Toolbox, I easily spot and select the "Image Enhancer" option. It's clearly labeled and straightforward to find.
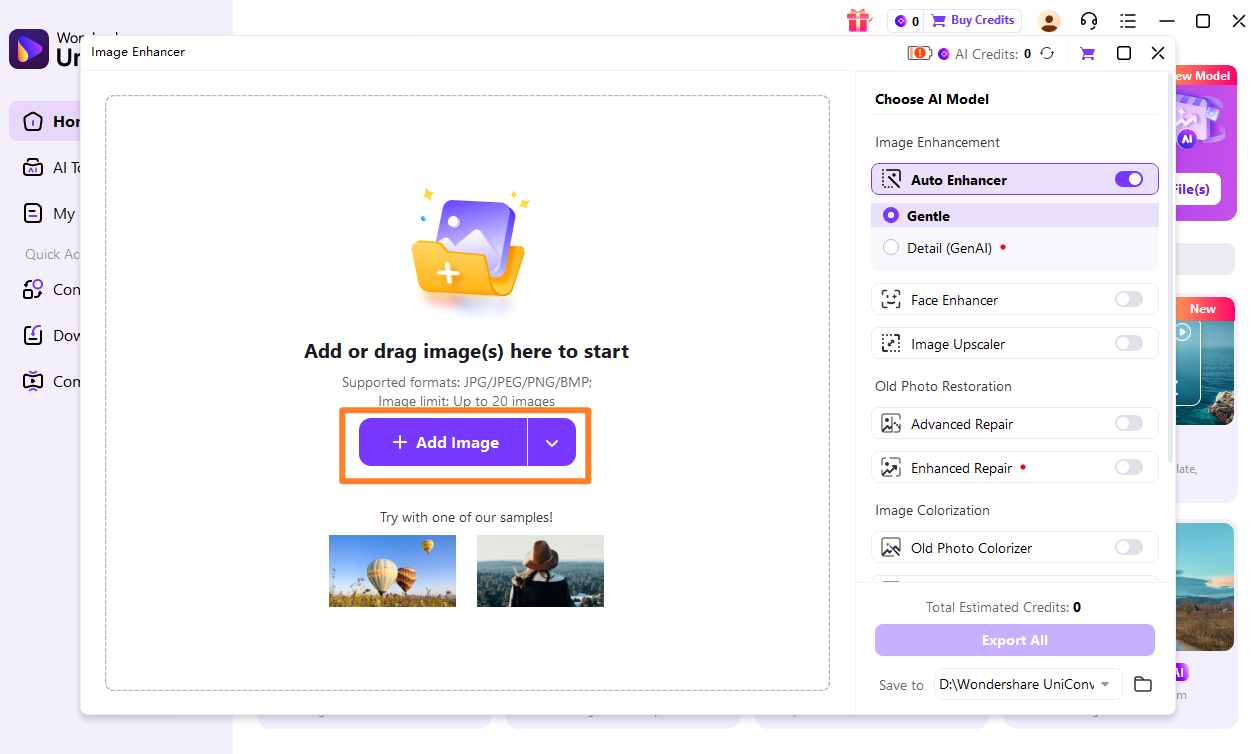
Step 2: Upload the Images
Once the Image Enhancer module is open, I simply drag and drop the images I want to enhance directly into the interface. Alternatively, I can click the "Add Files" button to browse my computer and select multiple images. UniConverter handles various formats, which is super convenient.
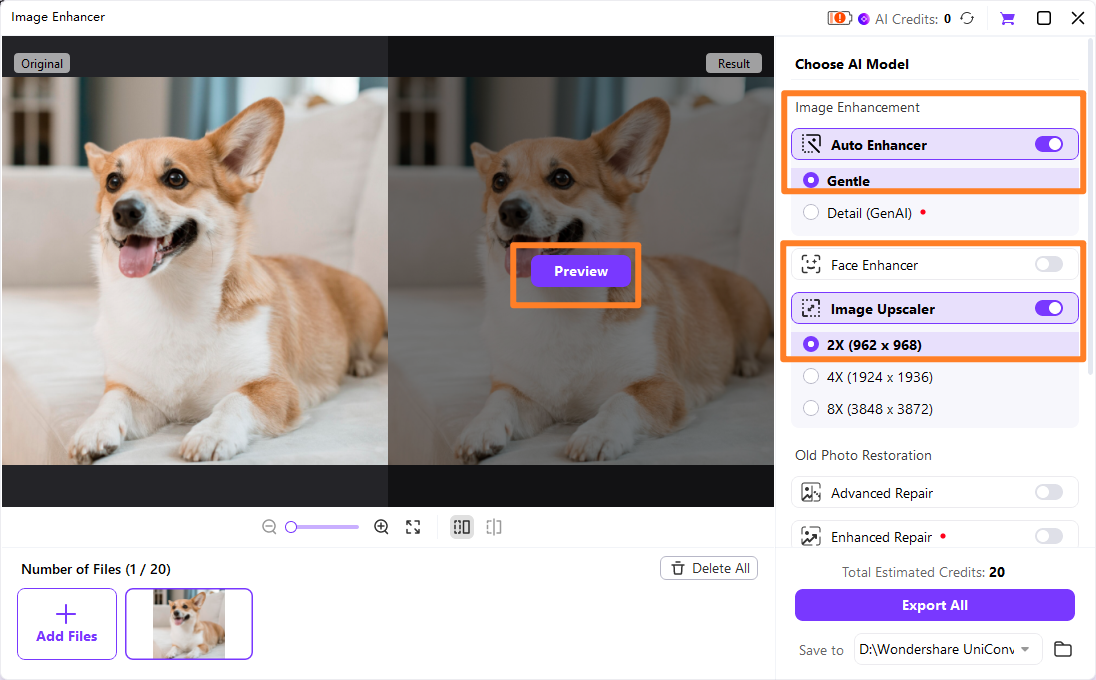
Step 3: Choose Enhancement Model
After uploading, UniConverter presents me with different enhancement models. I usually experiment to see which one works best for my specific image type – whether it's a portrait, a landscape, or an old photo. I select the model that promises the best results for my needs, often opting for the general enhancement or specific AI upscaling options.
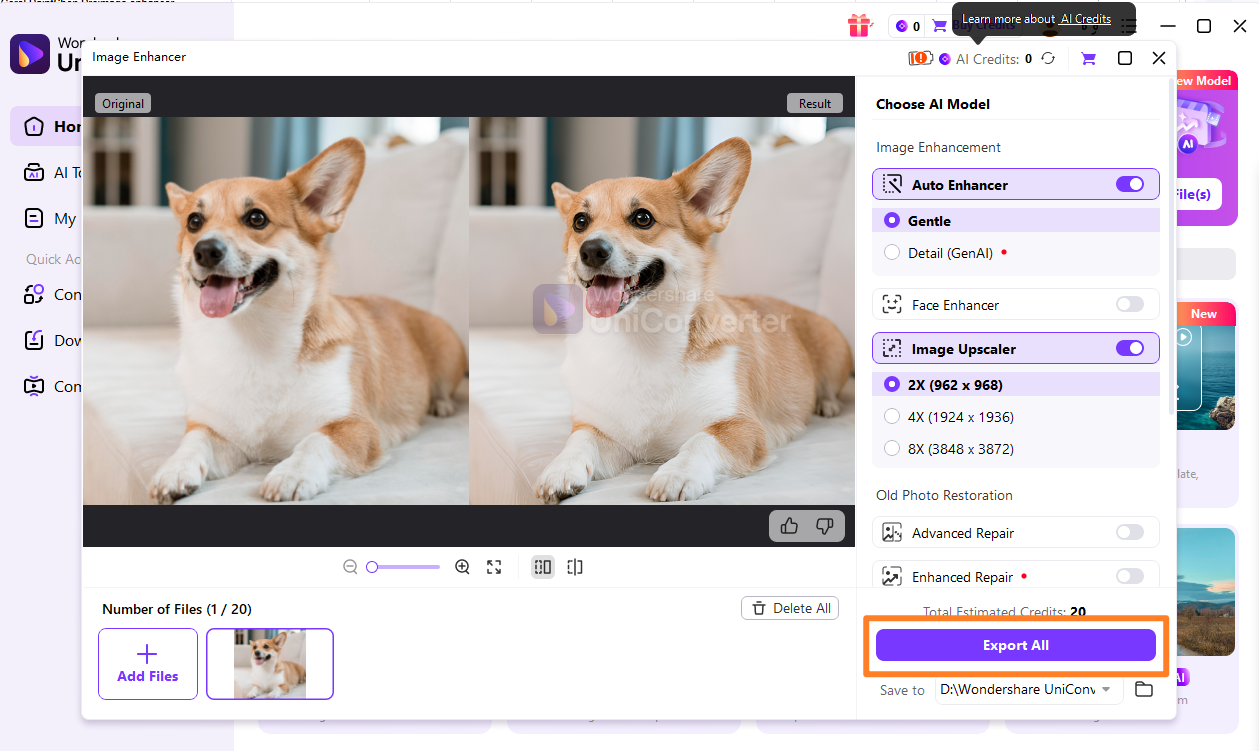
Step 4: Preview and Save the Enhanced Images
Before committing, I always use the preview feature to compare the original and enhanced versions side-by-side. This allows me to make any final adjustments or confirm the quality. Once I'm satisfied, I click the "Start" or "Enhance" button, and UniConverter quickly processes and saves my improved images to my chosen output folder.

Seeking a PhotoKit Image Enhancer Alternative?
Part 7: Final Verdict and Recommendations
After putting PhotoKit Image Enhancer through its paces, I've come to a pretty clear understanding of its place in the crowded market of AI photo tools. My PhotoKit Image Enhancer review concludes that it's a decent tool, but its suitability really depends on your specific needs and expectations. It's not a magic bullet for every image problem, but it certainly has its strengths.
For Casual Users and Social Media Enthusiasts
If you're primarily looking for a quick and easy way to make your social media photos pop, or to give old, blurry phone pictures a noticeable facelift without diving into complex software, PhotoKit is a solid choice. Its user-friendly interface and quick processing make it ideal for those "good enough" moments where convenience trumps absolute perfection. Just be mindful of the free tier's limitations and potential ads.
For Semi-Professionals and Content Creators
For content creators or semi-professionals who need consistent, high-quality results and more control over the enhancement process, I'd suggest looking at alternatives. While PhotoKit can provide a good starting point, its lack of advanced editing features and the potential for over-processed results might leave you wanting more. You might find yourself needing to export PhotoKit's output into another editor for further refinement, which adds an extra step.
For Users Prioritizing Offline Functionality and Advanced Features
If offline capability, robust batch processing without internet dependency, and a broader suite of features (like video editing or format conversion) are important to you, then PhotoKit might not be the best fit. Tools like UniConverter offer a more comprehensive solution that can handle a wider range of media tasks, often with better control over the enhancement process and without the privacy concerns of cloud-based services. Ultimately, PhotoKit is a handy tool for specific, light-duty tasks, but for anything more demanding, consider its limitations carefully.
Part 8: Frequently Asked Questions (FAQs)
-
1. Is PhotoKit Image Enhancer free to use?
Yes, PhotoKit offers a free tier with limited features and output resolution. For full functionality, higher resolutions, and batch processing without ads, you'll need to subscribe to their premium plans.
-
2. Can PhotoKit Image Enhancer improve old, blurry photos?
It can certainly try! PhotoKit's AI is designed to recover detail and sharpen blurry images. For moderately blurry or low-resolution old photos, you'll likely see a noticeable improvement. However, for severely damaged or extremely blurry images, the results might still be limited or appear somewhat artificial.
-
3. What are the main differences between PhotoKit and other AI enhancers?
PhotoKit stands out for its extreme ease of use and online accessibility. Compared to desktop software like Topaz Gigapixel AI, it's less powerful in terms of raw quality for highly challenging images but is much quicker for casual enhancements. Compared to more comprehensive tools like UniConverter, PhotoKit is more specialized in just image enhancement, lacking broader media conversion or editing capabilities.
-
4. Does PhotoKit Image Enhancer support RAW image files?
From my experience, PhotoKit primarily supports common image formats like JPG, PNG, and WebP. I haven't found direct support for RAW files. You'd typically need to convert your RAW files to a compatible format first before uploading them to PhotoKit.
-
5. How secure is my data when using PhotoKit Image Enhancer?
As a cloud-based service, your images are uploaded to PhotoKit's servers for processing. While they likely have privacy policies in place, it's always wise to be cautious with sensitive or personal images. If data privacy is a top concern, a desktop-based enhancer that processes files locally, like UniConverter, might be a more secure option.
