
- Movavi Overview: User-friendly, AI-powered photo editor for quick, efficient enhancements without a steep learning curve.
- Core Strengths: AI-powered enhancements, object removal, background changes, and retouching tools simplify editing.
- Ideal User: Perfect for casual users enhancing vacation photos for social media; less suited for professional-grade retouching.
- Key Comparison: Excels in ease of use and AI, while UniConverter offers similar quality with broader media capabilities.
- Considerations: Watch for potential over-processing, subscription costs, and data privacy with cloud features.
- UniConverter Alternative: Offers stable, high-quality image enhancement, batch processing, and broad media management features.
In this article
- Part 1: What is Movavi Photo Editor?
- Part 2: Movavi Photo Editor: Core Features, Pros, and Cons
- Part 3: Movavi Photo Editor: Ideal Users and Use Cases
- Part 4: Movavi Photo Editor and Alternatives Comparison
- Part 5: Risks and Pitfalls to Consider
- Part 6: How to Use UniConverter for Efficient Image Enhancement
- Part 7: Conclusion
- Part 8: FAQs
Movavi Photo Editor: Your Go-To Image Enhancer?
When I first started dabbling in photo editing, I was overwhelmed by the sheer number of options available. I needed something intuitive yet powerful enough to make my vacation snaps pop. That's when I stumbled upon Movavi Photo Editor. This Movavi Photo Editor review aims to cut through the noise and give you an honest look at whether it lives up to its promise as an easy-to-use image enhancer. We'll explore its features, weigh its pros and cons, and compare it to some popular alternatives, helping you decide if it's the right tool for your photo editing needs.
Part 1: What is Movavi Photo Editor?
Movavi Photo Editor emerged as a user-friendly solution in a market often dominated by complex, professional-grade software. It's designed for individuals who want to enhance their photos quickly and efficiently without a steep learning curve. My initial impression was that it aimed to democratize photo editing, making powerful tools accessible to everyone, not just seasoned graphic designers. This Movavi Photo Editor review will delve into its capabilities, especially its AI-powered features, to see if it truly simplifies the enhancement process.
The Rise of AI-Powered Image Enhancement
The digital age has brought an explosion of photos, and with it, a demand for effortless enhancement.
* The sheer volume of digital photos: We're all snapping pictures constantly, and not every shot is perfect straight out of the camera.
* The desire for instant gratification: We want our photos to look great now, not after hours of fiddling with sliders.
* The accessibility of social media: Everyone wants their images to stand out on platforms like Instagram and Facebook.
* The complexity of traditional photo editors: Tools like Photoshop can be intimidating for casual users.
Part 2: Movavi Photo Editor: Core Features, Pros, and Cons
Movavi Photo Editor, in my experience, really shines with its core capabilities, especially its AI-driven enhancements. I've found it to be surprisingly robust for a tool that prides itself on simplicity.
* AI-Powered Enhancement: This is a game-changer. With a single click, it can automatically adjust brightness, contrast, and color balance, often yielding impressive results.
* Object Removal: I've used this countless times to magically erase unwanted elements from my photos – a stray person in the background or an unsightly power line.
* Background Change: This feature allows you to easily swap out backgrounds, which is fantastic for creative projects or just making a subject stand out.
* Retouching Tools: For portraits, the skin smoothing, teeth whitening, and eye enhancement tools are incredibly useful for quick touch-ups.
* Extensive Filters and Effects: If you're looking to add a specific mood or style, the wide array of filters and effects offers plenty of creative options.
Pros:
* Intuitive Interface for Quick Edits: I was able to navigate and perform basic edits almost immediately, which was a huge relief after struggling with more complex software.
* Powerful AI-Driven Enhancement Tools: The AI truly makes a difference, often achieving results that would take me much longer to accomplish manually.
* Comprehensive Set of Basic and Advanced Editing Features: While it's easy to use, it doesn't skimp on features, offering a good balance for both beginners and those with a bit more experience.
Cons:
* Subscription Model Can Be Costly for Casual Users: For someone who only edits photos occasionally, the subscription can feel a bit steep. I wish there were more flexible payment options.
* Occasional Performance Lags with Large Files: When working with very high-resolution images, I've noticed it can sometimes slow down, which can be a bit frustrating.
Part 3: Movavi Photo Editor: Ideal Users and Use Cases
From my perspective, Movavi Photo Editor is perfectly tailored for a specific type of user, and it excels in particular scenarios. It’s not a one-size-fits-all solution, but for its target audience, it’s a fantastic choice.
Best Use Case: Enhancing Vacation Photos for Social Media
For me, this is where Movavi Photo Editor truly shines. After a trip, I have hundreds of photos, and I want to quickly make them look their best before sharing them with friends and family online. The AI enhancement tools are a godsend here – I can batch process a set of images, and with minimal tweaking, they’re ready for Instagram or Facebook. The object removal feature is also incredibly useful for getting rid of photobombers or distracting elements in tourist spots. If you're like me and primarily want to make your personal photos look great for sharing, this is an excellent tool.
Limited Use Case: Professional-Grade Retouching for High-Resolution Prints
While Movavi Photo Editor offers a good range of tools, I wouldn't recommend it for professional photographers who need pixel-perfect control for high-resolution prints or complex commercial projects. For instance, if I needed to meticulously retouch a portrait for a client's magazine spread, or perform intricate color grading for a fine art print, I'd definitely turn to more specialized software like Adobe Photoshop or Lightroom. Movavi's tools, while powerful for quick enhancements, don't offer the granular control and non-destructive editing workflows that professionals often require for such demanding tasks.
Part 4: Movavi Photo Editor and Alternatives Comparison
When I look at the landscape of image enhancers, Movavi Photo Editor definitely holds its own, but it's crucial to understand where it fits in compared to its competitors.
| Feature/Product | Movavi Photo Editor | Adobe Lightroom | GIMP | UniConverter |
| AI Enhancement | High | Medium | Low | High |
| Ease of Use | High | Medium | Low | High |
| Price Model | Subscription/One-time | Subscription | Free | One-time/Subscription |
| Advanced Tools | Medium | High | High | Medium |
| Learning Curve | Low | Medium | High | Low |
| Processing Speed | Good | Excellent | Fair | Excellent |
| Output Quality | Excellent | Excellent | Good | Excellent |
| Customer Support | Good | Excellent | Community | Excellent |
| Security | Standard | High | Community | High |
Key Differentiators:
Movavi's focus on user-friendliness and AI automation is its biggest draw; it’s designed for quick, impactful edits. Lightroom, on the other hand, is the industry standard for professional photographers, offering unparalleled control and organization for large photo libraries. GIMP, being open-source, is fantastic for budget-conscious editors who don't mind a steeper learning curve to gain powerful, customizable tools. UniConverter, surprisingly, offers a robust image enhancement feature that's incredibly easy to use and delivers high-quality results, especially if you're already using it for other media tasks.
Part 5: Risks and Pitfalls to Consider
While Movavi Photo Editor offers a lot of convenience, I've learned that it's important to be aware of potential downsides, especially when dealing with any software that processes your personal images. It’s not always smooth sailing, and some aspects can be a bit frustrating.
Data Privacy Concerns with Cloud Features
If you're using any cloud-based features or integrations, it's always wise to consider data privacy. While Movavi itself is a desktop application, if you're uploading images to share directly from the app or using any online components, I always ask myself what data is being collected and how it's being used. It's a general concern with many software products today, and something I always keep an eye on.
Potential for Over-Processing and Unnatural Results
The AI enhancement tools, while powerful, can sometimes be a double-edged sword. I've found that if I rely too heavily on the "auto" settings without fine-tuning, my images can look over-processed or unnaturally vibrant. It’s easy to push the sliders too far, resulting in photos that lose their natural feel. My advice is always to use the AI as a starting point and then make subtle manual adjustments to ensure the results look authentic.
In-App Advertisements or Upsells
While not always intrusive, I have encountered occasional prompts or suggestions within the Movavi interface to upgrade to a different plan or try other Movavi products. For me, it's a minor annoyance, but it's something to be aware of if you prefer a completely ad-free experience. It's part of their business model, but it can interrupt the workflow slightly.
Impact on Original Image Quality
When you save an enhanced image, especially if you're not careful with your export settings, there's a risk of compressing the image too much or losing some of the original quality. I always make sure to save my enhanced versions as new files and keep the originals untouched. This way, I have a backup and can always revert if I'm not happy with the edited outcome. It's a good practice with any photo editor, but particularly important when you're making significant changes.
Part 6: How to Use UniConverter for Efficient Image Enhancement
Sometimes, despite the promises of dedicated photo editors, I find myself needing a more comprehensive solution, especially when dealing with batch processing or when other tools fall short on stability or quality. This is where UniConverter has surprisingly stepped in as a reliable alternative. When other tools struggle with batch processing, deliver inconsistent enhancements, or simply don't offer the stability I need, UniConverter becomes my go-to. It’s a fantastic all-in-one media management tool that also excels at image enhancement, offering a stable, ad-free experience with rich format support, GPU acceleration, and lossless quality. It truly acts as a comprehensive solution for various media needs. For instance, it can help you fix pixelated videos or even unblur a video. You can also use its capabilities to upscale images to 4K or enhance video quality online.
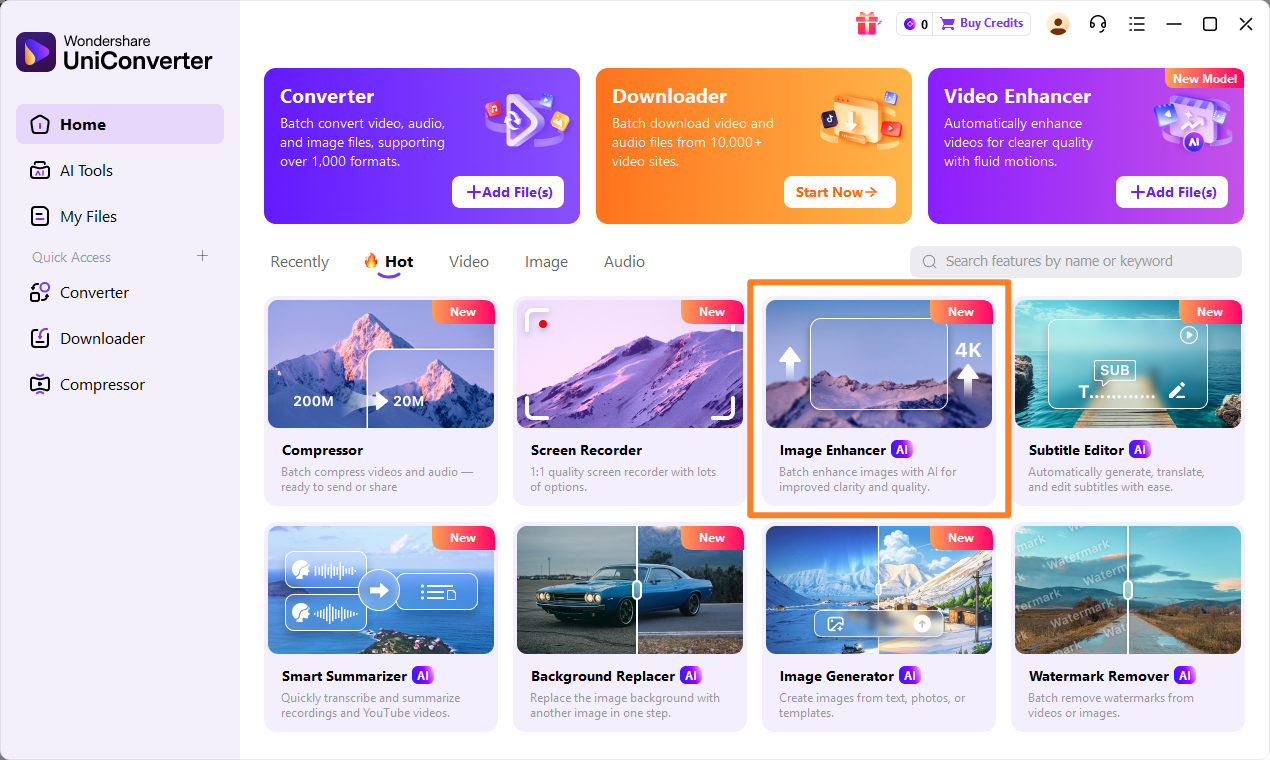
Step 1: Open UniConverter and Choose Image Enhancer
Launch UniConverter on your computer. On the main interface, navigate to the "Toolbox" section and select the "Image Enhancer" feature.
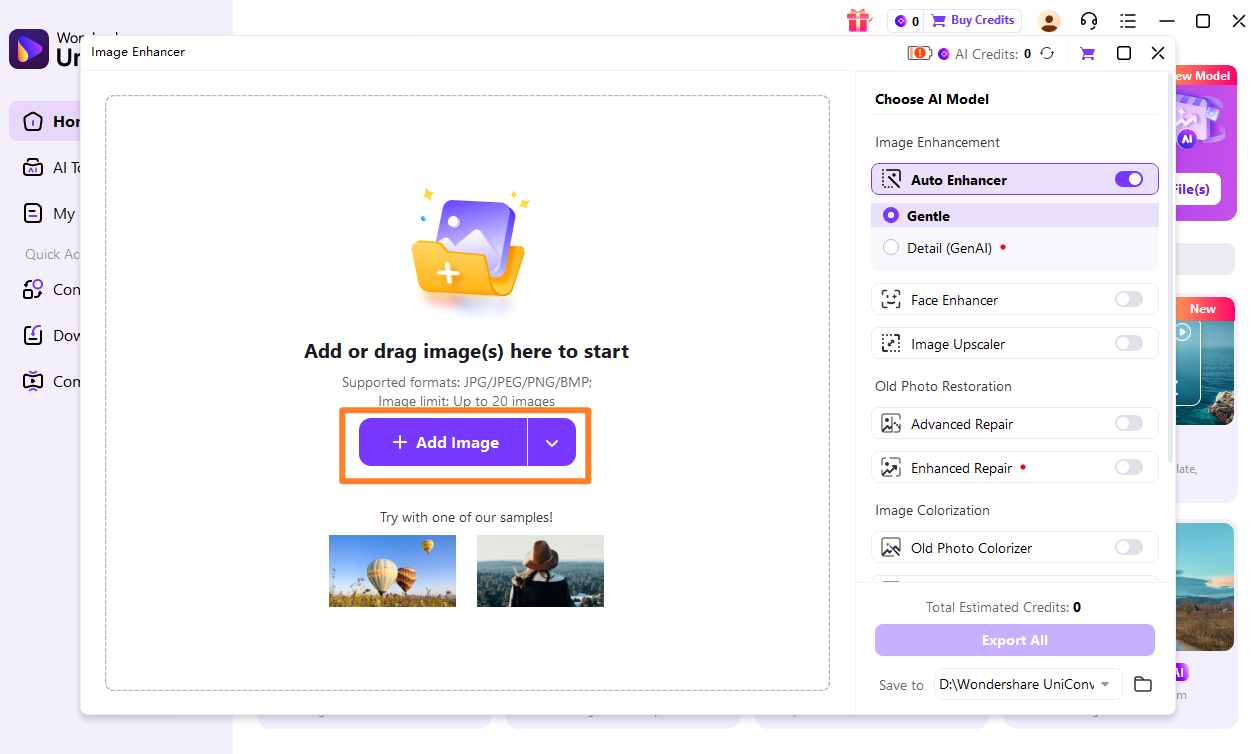
Step 2: Upload the Images
Click the "Add Files" button or simply drag and drop the images you wish to enhance into the UniConverter window. You can add multiple images for batch processing.
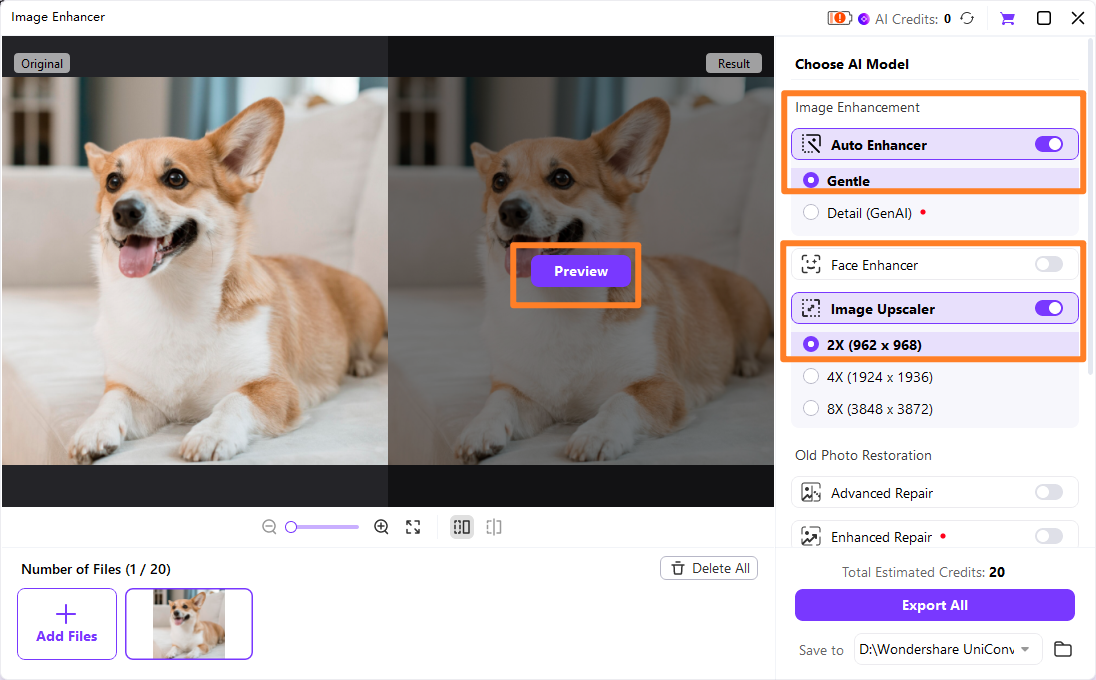
Step 3: Choose Enhancement Model and Adjust Parameters
Once your images are loaded, you'll see options for different AI enhancement models. Select the one that best suits your needs (e.g., general enhancement, portrait, landscape). You can also fine-tune parameters like contrast, brightness, and saturation if desired.
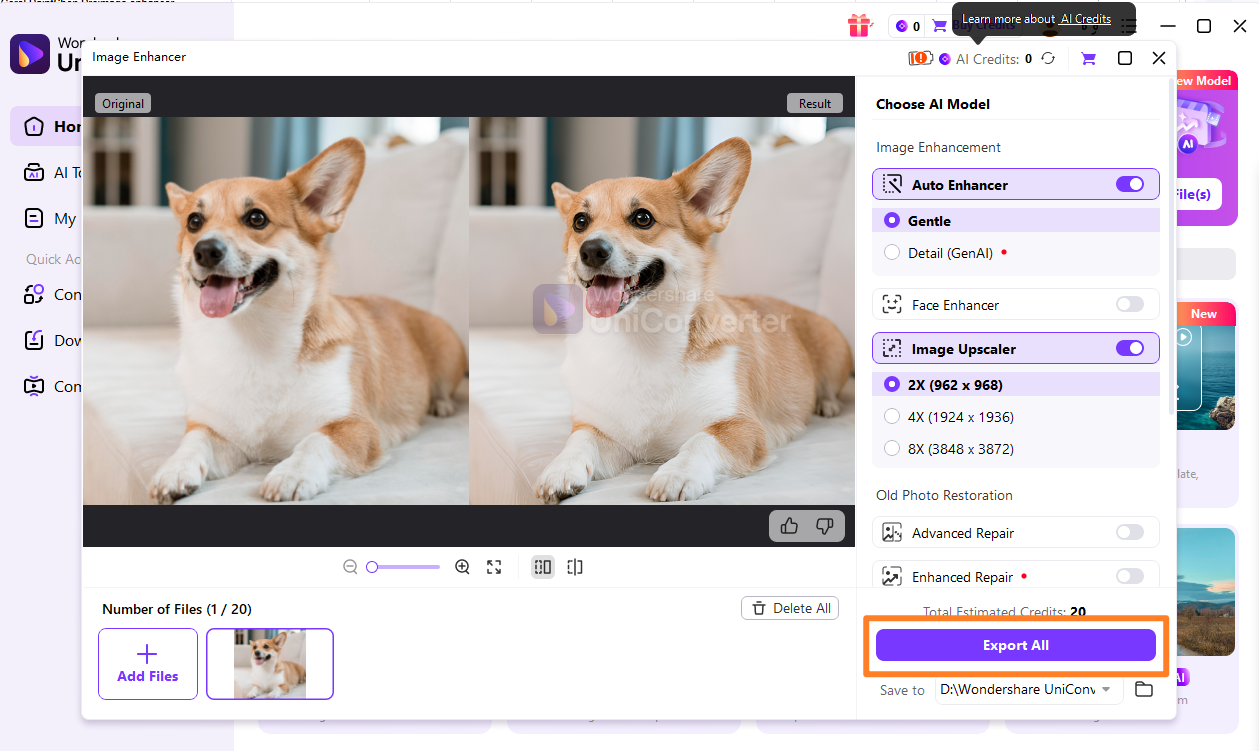
Step 4: Preview and Save the Enhanced Images
After applying the enhancements, you can preview the results to ensure they meet your expectations. Once satisfied, click the "Start" or "Export" button to save your enhanced images to your desired location.

Seeking a Movavi Photo Editor Alternative?
Part 7: Conclusion
After spending considerable time with Movavi Photo Editor, my Movavi Photo Editor review concludes that it’s an excellent tool for specific users. For casual users seeking quick enhancements for social media or personal use, its intuitive interface and powerful AI features make it a standout choice. It simplifies complex editing tasks, allowing you to achieve impressive results without a steep learning curve. However, for budget-conscious editors who might find the subscription model a bit much, or for professionals requiring granular control and advanced non-destructive editing for high-resolution prints, alternatives like GIMP or Adobe Lightroom might be more suitable. Ultimately, if you prioritize ease of use and efficient, AI-driven enhancements for everyday photos, Movavi Photo Editor is definitely worth considering.
Part 8: FAQs
-
1. Is Movavi Photo Editor suitable for beginners?
Absolutely! Its user-friendly interface and AI-powered tools are designed to be accessible even for those with no prior photo editing experience. You can achieve great results with minimal effort.
-
2. Can Movavi Photo Editor remove watermarks?
Yes, it has an object removal tool that can be used to remove watermarks, though the effectiveness can vary depending on the complexity and placement of the watermark. It works best on simple, non-intrusive watermarks.
-
3. What's the difference between Movavi Photo Editor and Photoshop?
Movavi Photo Editor is geared towards quick, easy enhancements and basic manipulations, often leveraging AI. Photoshop is a professional-grade tool offering unparalleled depth, granular control, and complex layer-based editing for graphic design, advanced retouching, and illustration. Photoshop has a much steeper learning curve.
-
4. Does Movavi Photo Editor offer a free trial?
Yes, Movavi typically offers a free trial period, allowing you to test out all the features before committing to a purchase. This is a great way to see if it fits your needs.
-
5. How does AI enhancement work in Movavi Photo Editor?
The AI enhancement in Movavi Photo Editor uses algorithms trained on vast datasets of images to automatically analyze your photo and make intelligent adjustments to elements like exposure, contrast, color balance, and sharpness, aiming to improve overall image quality with a single click.
