
- AI Power: Luminar Neo excels with AI for creative enhancements like sky replacement and portrait retouching.
- Target Users: Ideal for landscape and portrait photographers seeking AI-driven efficiency and creative control.
- Performance: Demanding on hardware; requires a robust system for optimal performance, especially with large files.
- Cost Model: Subscription-based, which offers continuous updates but might be costly for casual users.
- Alternatives: UniConverter provides efficient, user-friendly image enhancement and batch processing for general needs.
- Decision Factor: Choose based on workflow, hardware, and value placed on AI-powered creative assistance versus efficiency.
In this article
- Part 1: What is Luminar Neo Image Enhancer?
- Part 2: Luminar Neo Image Enhancer: Core Features, Pros, and Cons
- Part 3: Luminar Neo Image Enhancer: Ideal Users and Use Cases
- Part 4: Luminar Neo Image Enhancer vs. Competitors
- Part 5: Risks and Pitfalls to Consider
- Part 6: How to Use UniConverter to Efficiently Enhance Images
- Part 7: Conclusion
- Part 8: FAQs
Luminar Neo Image Enhancer: A Comprehensive Scenario-Based Review
When I first heard about Luminar Neo, I was intrigued by the promise of AI-powered image enhancement. As someone who spends a lot of time behind the lens, I'm always looking for tools that can streamline my workflow without sacrificing quality. This Luminar Neo Image Enhancer review aims to cut through the marketing hype and give you a real-world perspective on what this software can do, where it shines, and where it might fall short. I'll be diving into its core features, comparing it to some of its major competitors, and highlighting the scenarios where it truly makes a difference. If you're a photographer looking to elevate your images with intelligent tools, stick around – this might just be the review you've been waiting for.
Part 1: What is Luminar Neo Image Enhancer?
Luminar Neo is an AI-driven photo editor developed by Skylum, designed to simplify complex editing tasks and empower photographers with creative control. It’s positioned as a next-generation image editor that leverages artificial intelligence to offer features that were once time-consuming and difficult to achieve manually. My initial impression was that it aimed to bridge the gap between traditional photo editing software and the growing demand for intelligent, automated solutions.
The Evolving Landscape of AI-Powered Photo Editing
The world of photo editing is constantly changing, and AI is at the forefront of this evolution. For me, this means:
* Faster Workflows: AI can automate repetitive tasks, freeing up more time for creative decisions.
* Accessibility for All: Complex edits become more approachable for photographers of all skill levels.
* Pushing Creative Boundaries: New AI tools open up possibilities that were previously unimaginable.
* Addressing Common Pain Points: AI helps fix common issues like poor lighting or distracting backgrounds with surprising ease.
Part 2: Luminar Neo Image Enhancer: Core Features, Pros, and Cons
Luminar Neo packs a punch with its AI-centric approach to photo editing. From my experience, its core strength lies in its ability to handle intricate adjustments with remarkable speed and accuracy. It’s not just about making photos look good; it’s about making them look great with minimal effort.
* Sky AI: Effortlessly replace or enhance skies with realistic results.
* Relight AI: Adjust the lighting in a scene, even relighting subjects independently.
* Portrait AI: Advanced tools for skin retouching, face reshaping, and eye enhancement.
* Structure AI: Intelligently enhance details and clarity without over-sharpening.
* Layers: Non-destructive layer-based editing for complex compositions.
Pros
* AI-Powered Sky Replacement and Enhancement for Landscape Photography: This feature is a game-changer for landscape photographers like me. I used to spend ages masking skies, but Neo does it almost instantly and with incredible realism.
* Advanced Portrait Retouching with AI for Professional Headshots: For professional headshots, the AI portrait tools are fantastic. They smooth skin, whiten teeth, and brighten eyes without making the subject look artificial – a huge time-saver.
* Intuitive Layer-Based Editing for Creative Compositing: I appreciate the non-destructive layer system. It allows me to experiment with different elements and effects without committing to changes, which is crucial for creative compositing.
Cons
* Resource-Intensive Performance on Older Hardware: I found that on my older laptop, Luminar Neo could be quite demanding. It sometimes lagged, especially when working with large files or multiple layers.
* Subscription Model Can Be Costly for Casual Users: While I value the continuous updates, the subscription model might be a deterrent for someone who only edits photos occasionally. It feels like a bigger commitment than a one-time purchase.
Part 3: Luminar Neo Image Enhancer: Ideal Users and Use Cases
From my time with Luminar Neo, it's clear that this software isn't a one-size-fits-all solution. It excels in specific scenarios and caters to particular types of photographers. Understanding its sweet spot is key to deciding if it's the right tool for your workflow.
Best Use Case: Professional Landscape and Portrait Photographers Seeking AI-Driven Efficiency
For me, as someone who often shoots landscapes and portraits, Luminar Neo is a godsend. The AI Sky Replacement and Relight AI features drastically cut down my editing time for landscapes, allowing me to achieve stunning results quickly. Similarly, the Portrait AI tools are incredibly efficient for professional headshots, providing high-quality retouching that would otherwise take hours of manual work. If you're a pro looking to streamline your post-processing and leverage AI for consistent, high-quality output, this is where Neo truly shines. It's about getting professional results with less effort, which means more time for shooting.
Limited Use Case: Quick, On-the-Go Mobile Editing for Social Media
However, if your primary need is quick, on-the-go editing for social media posts using your phone, Luminar Neo isn't the ideal choice. It's desktop software, and while Skylum offers mobile apps, they don't have the full power and functionality of Neo. For simple adjustments, filters, and quick shares, a dedicated mobile editing app would be far more convenient and efficient. I wouldn't recommend firing up my computer and Luminar Neo just to add a quick filter to a photo for Instagram; it's simply overkill and not designed for that kind of instant gratification.
Part 4: Luminar Neo Image Enhancer vs. Competitors
When I look at Luminar Neo Image Enhancer review in the context of its competitors, it really highlights its unique position. It's not just about features; it's about the approach to editing.
| Feature/Scenario | Luminar Neo Image Enhancer | Adobe Lightroom | Topaz Labs Photo AI | UniConverter |
| AI Sky Replacement | Excellent, highly customizable | Basic, less natural | N/A | Basic, limited customization |
| Portrait Retouching | Advanced, AI-driven | Manual, time-consuming | Good, but less artistic control | Basic, mostly automatic |
| Batch Processing | Good, but can be slow | Excellent, industry standard | Excellent, focused on enhancement | Very good, efficient |
| Ease of Use | Moderate, intuitive AI tools | Moderate, steep learning curve | Very easy, automated | Very easy, user-friendly |
| Subscription Model | Yes | Yes | One-time purchase + updates | One-time purchase |
| Performance | Can be demanding | Generally good | Can be demanding | Fast, GPU accelerated |
| Output Quality | High, creative | High, precise | High, natural enhancement | Good, lossless |
| Customer Support | Responsive, community | Extensive resources | Good, online forums | Excellent, 24/7 |
| Security | Standard, local processing | Standard, cloud options | Standard, local processing | High, offline processing |
Key Differentiators: AI-Powered Creativity vs. Traditional Control
From my perspective, Luminar Neo stands out with its focus on AI-powered creative tools. While Lightroom offers unparalleled organizational features and precise manual control, and Topaz Labs Photo AI excels at automated enhancement, Neo truly empowers me to achieve complex creative effects with surprising ease. If I'm looking to quickly transform a dull sky or relight a portrait, Neo is my go-to. However, for meticulous, pixel-level adjustments or managing a vast photo library, Lightroom still holds an edge. UniConverter, on the other hand, is a fantastic all-rounder for general media tasks, including reliable image enhancement, especially when I need quick, consistent results across multiple files without the creative depth of a dedicated photo editor.
Part 5: Risks and Pitfalls to Consider
While Luminar Neo offers some incredible AI-powered features, it's not without its potential downsides. As someone who's spent a fair amount of time with it, I've identified a few areas where users, myself included, need to be cautious. It's important to go in with open eyes to avoid frustration down the line.
Potential for Over-Processed or Unnatural Results
One of the biggest risks I've encountered is the temptation to over-rely on the AI. While the AI tools are powerful, they can sometimes push an image into an unnatural or "plastic" look if not used judiciously. I've had to learn to dial back the intensity of certain AI sliders to maintain a realistic aesthetic, especially with portrait retouching or sky replacements. It's easy to go from enhanced to artificial very quickly.
Data Privacy Concerns with Cloud-Based AI Features
Although much of Luminar Neo's processing happens locally, some of its AI features might involve cloud components for optimal performance or future updates. This always raises a red flag for me regarding data privacy. While Skylum has stated its commitment to user data security, it's something I remain mindful of, especially when dealing with sensitive images. I always recommend checking their privacy policy if you have concerns.
High System Requirements for Optimal Performance
As I mentioned earlier, Luminar Neo can be quite demanding on hardware. If you're running an older computer or one with limited RAM and a less powerful GPU, you might experience slow performance, crashes, or long processing times. I initially underestimated this, thinking my setup was sufficient, but quickly realized that to get the most out of Neo, a robust system is almost a prerequisite. This can be a hidden cost if you need to upgrade your machine.
Subscription Fatigue and Long-Term Cost
The subscription model is a double-edged sword. While it provides access to continuous updates and new features, it also means a recurring cost. For casual users or those on a tight budget, this can lead to "subscription fatigue" and make the long-term cost higher than a one-time purchase model. I often find myself weighing whether the continuous updates justify the ongoing expense, especially if I'm not using the software daily.
Part 6: How to Use UniConverter to Efficiently Enhance Images
Sometimes, dedicated photo editors can be overkill or simply too complex for what you need. When I'm looking for a straightforward, reliable, and efficient way to enhance a batch of images without the fuss of advanced editing suites, or if I find other tools unstable or producing inconsistent results, I often turn to UniConverter. It's a fantastic alternative for quick, lossless enhancements, especially for those who prioritize ease of use, speed, and batch processing without ads or hidden costs. UniConverter offers a robust and user-friendly solution for various media needs, including image enhancement, leveraging GPU acceleration for fast processing and supporting a wide range of formats. For instance, you can easily upscale images to 4K or enhance image resolution with its powerful features.
Step 1: Open UniConverter and Choose Image Enhancer
Launch UniConverter on your computer. On the main interface, navigate to the "Toolbox" section and select the "Image Enhancer" feature.
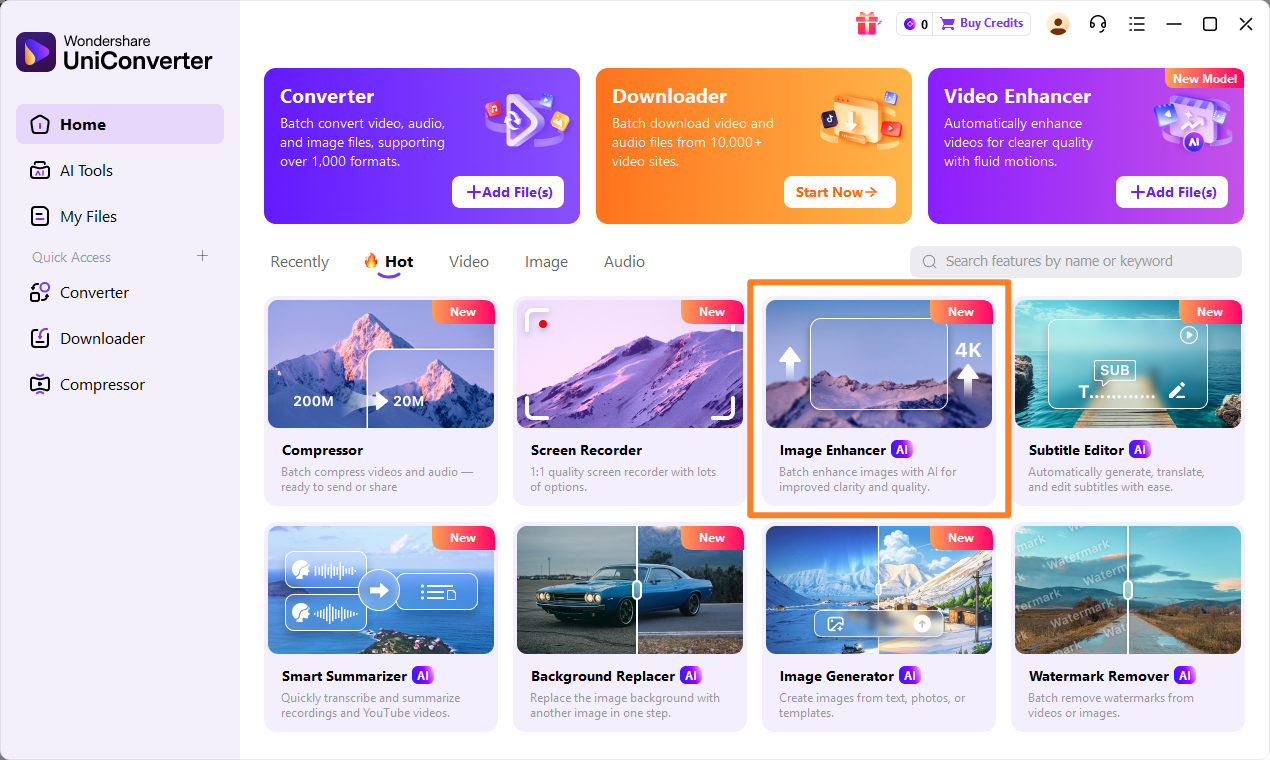
Step 2: Upload the Images
Click on the "Add Files" button or simply drag and drop the images you want to enhance into the UniConverter window. You can add multiple images for batch processing.
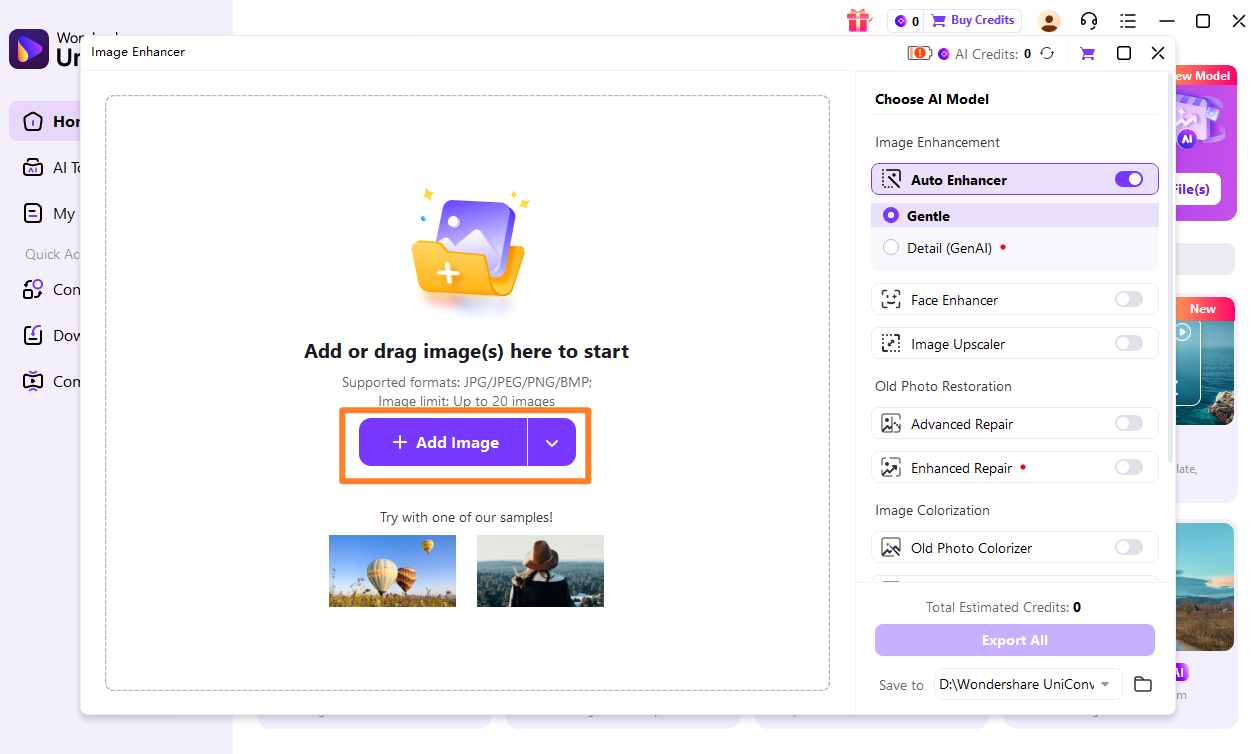
Step 3: Choose Enhancement Model
Once your images are loaded, select the desired enhancement model. UniConverter offers various AI models to improve image quality, reduce noise, and sharpen details. You can preview the changes before applying them.
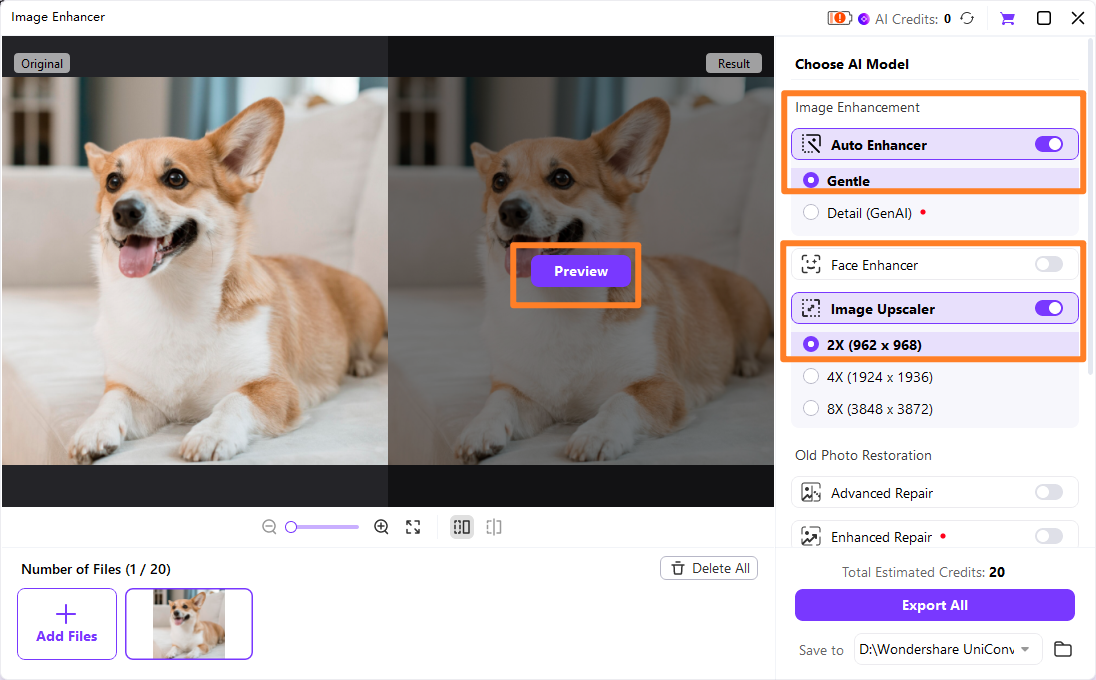
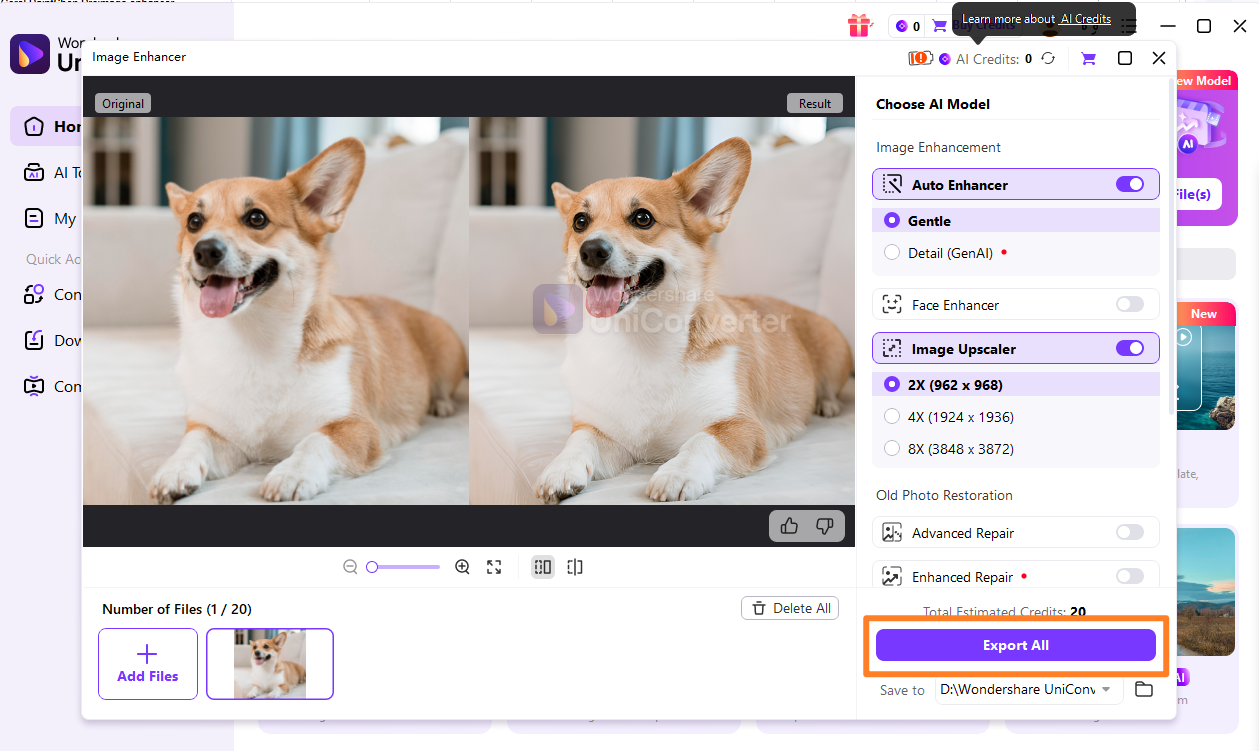
Step 4: Preview and Save the Enhanced Images
After selecting your enhancement settings, UniConverter will process the images. You can preview the enhanced results. Once satisfied, choose your output folder and click "Save" to export your high-quality images.

Luminar Neo Alternative for Enhanced Images?
Part 7: Conclusion
After spending considerable time with Luminar Neo Image Enhancer review, I can confidently say it's a powerful tool that carves out a significant niche in the photo editing landscape. It's a fantastic choice for photographers, particularly those in landscape and portrait genres, who are eager to leverage AI for creative control and workflow efficiency. The AI Sky Replacement, Relight AI, and advanced portrait retouching features are genuinely impressive and can dramatically speed up post-processing. However, it's not without its caveats. The software can be resource-intensive, demanding a capable machine, and its subscription model might not appeal to everyone, especially casual users or those on a tight budget. For those prioritizing AI-driven creative control and willing to invest in the ecosystem, Luminar Neo offers a compelling experience. If your needs are more basic, or you're looking for a one-time purchase solution for general media tasks including reliable image enhancement, alternatives like UniConverter might be a more practical and cost-effective choice. Ultimately, your decision should hinge on your specific workflow, hardware capabilities, and how much you value AI-powered creative assistance versus traditional manual control or straightforward, efficient enhancement.
Part 8: FAQs
-
1. Is Luminar Neo Image Enhancer suitable for beginners?
Yes, Luminar Neo is quite beginner-friendly, especially with its AI tools that simplify complex edits. The intuitive interface and one-click presets make it accessible for those new to photo editing, though mastering all its features will still require some practice.
-
2. How does Luminar Neo's AI compare to other image enhancers?
Luminar Neo's AI is highly focused on creative enhancements like sky replacement, relighting, and portrait retouching, offering more artistic control than many automated enhancers. While other tools like Topaz Labs Photo AI excel at noise reduction and sharpening, Neo's AI is geared towards transformative and stylistic edits.
-
3. Can I use Luminar Neo as a plugin with other photo editors?
Yes, Luminar Neo can be used as a plugin with popular photo editors like Adobe Photoshop and Lightroom, allowing you to integrate its powerful AI tools into your existing workflow seamlessly.
-
4. What are the system requirements for Luminar Neo?
Luminar Neo generally requires a modern processor (Intel Core i5 or AMD Ryzen 5 or better), at least 8GB of RAM (16GB recommended), and a graphics card with 4GB of VRAM (8GB recommended) for optimal performance, especially with larger files and complex edits.
-
5. Is there a one-time purchase option for Luminar Neo?
Historically, Skylum has offered both subscription and one-time purchase options for Luminar Neo. However, their pricing models can change, so it's always best to check their official website for the most current purchasing options and plans.
