
- ImgUpscaler Value: AI-powered upscaling transforms low-res images, ideal for quick enhancements and batch processing.
- ImgUpscaler Limitations: Lacks advanced editing, can over-process, and subscription cost may deter infrequent users.
- Ideal Users: Perfect for content creators, e-commerce, and small businesses needing fast, simple image quality improvements.
- Comparison Insight: ImgUpscaler excels in ease of use; UniConverter offers broader tools and stable, lossless enhancement.
- Decision Factor: Choose ImgUpscaler for convenience; UniConverter for comprehensive features and robust batch processing.
In this article
- Part 1: What is ImgUpscaler?
- Part 2: ImgUpscaler: Core Features, Pros, and Cons
- Part 3: ImgUpscaler: Ideal Users and Use Cases
- Part 4: ImgUpscaler and Alternatives Comparison
- Part 5: Risks and Pitfalls to Consider
- Part 6: How to Use UniConverter for Efficient Image Enhancement
- Part 7: Final Verdict and Recommendations
- Part 8: Frequently Asked Questions (FAQs)
When I first stumbled upon ImgUpscaler review, I was intrigued by its promise to magically transform low-resolution images into stunning, high-quality visuals. As someone constantly dealing with digital content, the idea of effortlessly enhancing photos without complex software was incredibly appealing. This review aims to cut through the marketing hype and provide a practical, hands-on assessment of ImgUpscaler, comparing it with other tools I've used. My goal is to help you understand where ImgUpscaler truly shines and where its limitations might lead you to consider alternatives, ensuring you make an informed decision for your image enhancement needs.
Part 1: What is ImgUpscaler?
ImgUpscaler positions itself as a leading AI-powered image upscaling tool designed to enlarge and enhance images without losing quality. It leverages advanced artificial intelligence algorithms to intelligently fill in missing pixels and refine details, making low-resolution photos suitable for various applications. My initial impression was that it’s a straightforward solution for a common digital problem, and I was keen to see if it lived up to its claims. This review will delve into its capabilities, comparing it against other tools I've personally tried, to help you navigate the often-confusing landscape of image enhancement.
The Growing Demand for High-Quality Visuals
In today's visually-driven world, the demand for high-quality images is insatiable.
* Social Media Dominance: Platforms like Instagram and TikTok thrive on crisp, engaging visuals.
* E-commerce Imperative: Online stores rely heavily on clear product photos to attract and convert customers.
* Professional Presentation: From marketing materials to personal portfolios, sharp images convey professionalism.
* Archival Needs: Preserving old photos in digital format often requires significant enhancement.
Part 2: ImgUpscaler: Core Features, Pros, and Cons
ImgUpscaler's core ability revolves around its AI-driven upscaling technology. I've found it to be surprisingly effective at breathing new life into pixelated or small images. It's not just about making an image bigger; it's about intelligently reconstructing details. The batch processing feature has been a game-changer for me when I have multiple images to enhance, saving a significant amount of time. The interface is remarkably clean and intuitive, making the enhancement process feel less like a chore and more like a quick click-and-go task.
Pros:
* AI-powered upscaling for significant detail recovery: I've seen it recover details I thought were lost forever.
* Batch processing for efficient workflow: This is a huge time-saver for me when dealing with multiple images.
* User-friendly interface for quick enhancements: Even my less tech-savvy friends found it easy to use.
Cons:
* Limited advanced editing features beyond upscaling: If you need more than just upscaling, you'll need another tool.
* Subscription model can be costly for infrequent users: For a quick one-off job, the subscription feels a bit much.
Part 3: ImgUpscaler: Ideal Users and Use Cases
From my experience, ImgUpscaler truly shines for individuals and small businesses that need to quickly improve the quality of their images without diving into complex photo editing software. If you're a content creator, a small e-commerce shop owner, or someone who frequently shares photos online, this tool can be a real asset. It’s designed for efficiency and ease of use, making it perfect for those who prioritize speed and simplicity over granular control.
Best Use Case: E-commerce Product Photography Enhancement
For me, the most impactful use case for ImgUpscaler has been enhancing product photos for online stores. I've used it to upscale small, low-resolution images of products, making them look crisp and professional on e-commerce platforms. It helps products stand out and gives a much better impression to potential buyers.
Limited Use Case: Professional Photo Restoration of Severely Damaged Images
However, I've found its capabilities limited when it comes to professional photo restoration of severely damaged images. While it can improve general quality, it's not a substitute for specialized restoration software that can meticulously repair tears, remove significant blemishes, or colorize old black-and-white photos with precision. For those tasks, I still turn to more advanced tools.
Part 4: ImgUpscaler and Alternatives Comparison
When I look at image enhancement tools, I'm always weighing precision, speed, and cost. ImgUpscaler has carved out a niche for itself with its AI precision and ease of use, but it's not the only player in the game. I've tried several others, and each has its own strengths and weaknesses. For me, the key is finding the right tool for the right job, and sometimes that means looking beyond the most popular option.
Comparison Table: ImgUpscaler & Competitors
| Feature/Tool | ImgUpscaler | Topaz Gigapixel AI | Adobe Photoshop | UniConverter |
| AI Upscaling | Excellent | Excellent | Good | Excellent |
| Batch Processing | Yes | Yes | Yes (via actions) | Yes |
| Price Model | Subscription | One-time purchase | Subscription | One-time purchase/Subscription |
| Output Quality | High | Very High | High | High |
Key Differentiators: ImgUpscaler's Edge in AI Precision and Ease of Use
From my perspective, ImgUpscaler's main advantage lies in its balance of high-quality AI upscaling and an incredibly user-friendly interface. While Topaz Gigapixel AI might offer slightly superior detail recovery in some very specific scenarios, its learning curve is steeper, and the one-time purchase can be a significant upfront investment. Photoshop, while incredibly powerful, requires a deep understanding of its features for effective upscaling. ImgUpscaler, on the other hand, allows me to achieve great results with minimal effort, making it my go-to for quick and efficient enhancements. UniConverter offers a compelling alternative, especially with its broader suite of tools, which I'll discuss later.
Part 5: Risks and Pitfalls to Consider
Using any cloud-based image enhancement tool, including ImgUpscaler, comes with its own set of considerations that I've learned to be wary of. It's not just about the output quality; it's also about how your data is handled and the potential for unexpected results. I always advise people to be aware of these aspects before committing to a service.
Data Privacy Concerns with Cloud-Based Processing
Since ImgUpscaler operates in the cloud, I've always had a slight concern about data privacy. When I upload my images, they are processed on external servers. While most reputable services have strong privacy policies, it's always wise to consider what kind of images you're comfortable uploading, especially if they contain sensitive or proprietary information.
Potential for Over-Processing and Unnatural Results
I've noticed that sometimes, especially with lower-quality source images, ImgUpscaler can over-process, leading to an almost "painted" or artificial look. It's like the AI tries too hard to fill in details that weren't there, resulting in an unnatural smoothness or exaggerated sharpness. I always preview the results carefully to avoid this.
Subscription Fatigue and Hidden Costs
The subscription model, while offering continuous access to updates, can lead to "subscription fatigue." For infrequent users, the monthly or annual cost might feel like a burden, especially if you only need to enhance a few images here and there. I initially thought it would be cost-effective, but for occasional use, it adds up.
Output Quality Variability with Different Image Types
My experience has shown that the output quality can vary significantly depending on the original image type. Line art and graphics tend to upscale beautifully, but complex photographs with intricate textures or subtle gradients sometimes don't fare as well, occasionally introducing artifacts or losing fine details.
Dependence on Internet Connection for Optimal Performance
Since it's a cloud-based tool, a stable and fast internet connection is crucial. I've found that slow internet can make the process frustratingly slow, and sometimes even lead to failed uploads or processing errors. This dependency can be a real bottleneck if I'm working from a location with unreliable connectivity.
Part 6: How to Use UniConverter for Efficient Image Enhancement
Sometimes, when I've found that other tools don't support batch processing, produce unstable enhancements, or the enhancement effect is simply too weak, I turn to UniConverter. It's become my go-to solution for avoiding these common pitfalls. UniConverter offers a robust, ad-free experience with extensive format support, GPU acceleration, stable lossless enhancement, and powerful batch processing capabilities. It truly is an all-in-one ultimate solution for my media needs, including image enhancement.
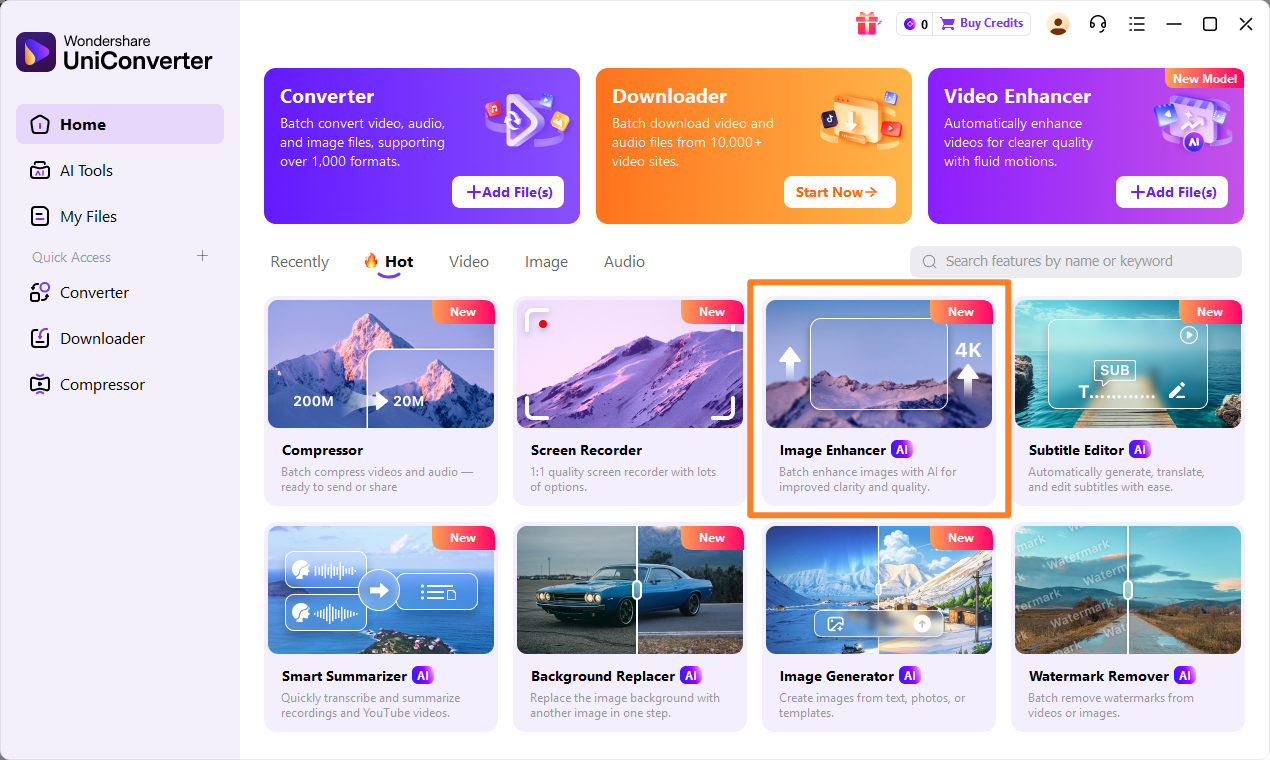
Step 1: Open UniConverter and Choose Image Enhancer
First, I launch UniConverter on my desktop. From the main interface, I navigate to the "Toolbox" section and select the Image Enhancer feature. It's usually prominently displayed and easy to find.
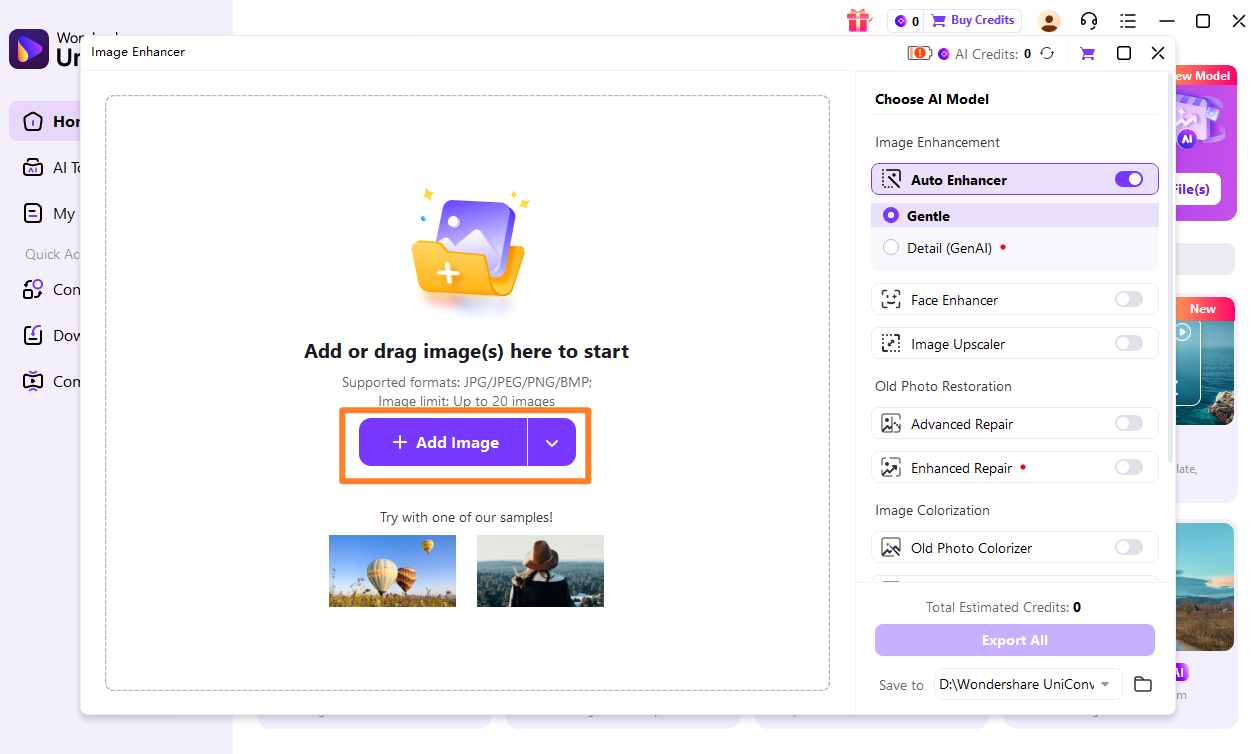
Step 2: Upload the Images
Next, I click on the "Add Files" button or simply drag and drop the images I want to enhance into the UniConverter window. This is where I appreciate its batch processing capability, as I can add multiple images at once.
Step 3: Choose Enhancement Model
After uploading, I select the desired enhancement model. UniConverter often provides different AI models optimized for various image types, allowing me to choose the best fit for my specific needs, whether it's for general photos or portraits.
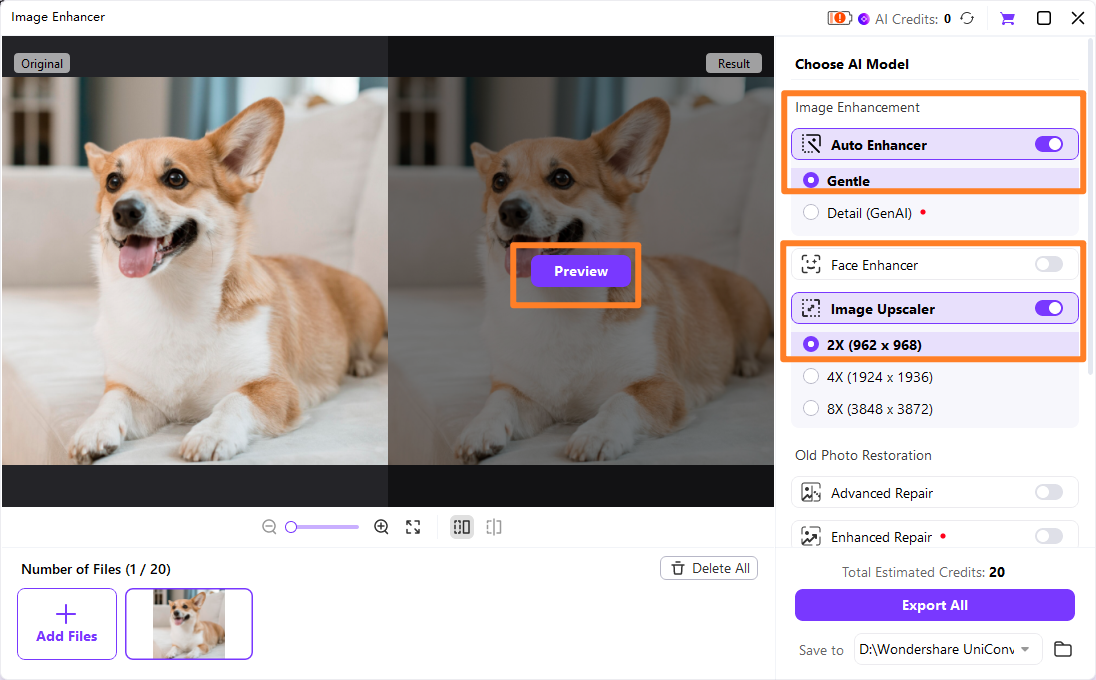
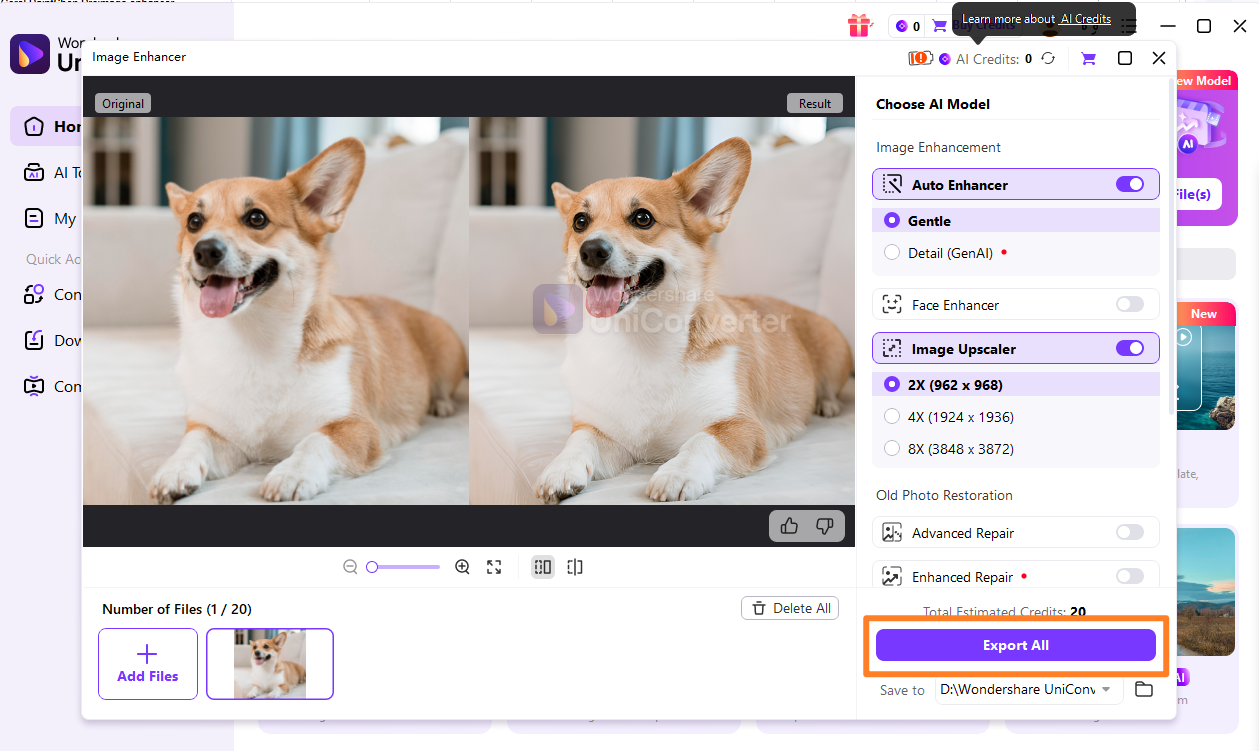
Step 4: Preview and Save the Enhanced Images
Finally, I preview the enhanced images to ensure they meet my expectations. Once satisfied, I click the "Start" or "Export" button, and UniConverter quickly processes and saves the high-quality images to my chosen destination.

Enhance Images Beyond Basic Upscaling
Part 7: Final Verdict and Recommendations
After spending considerable time with ImgUpscaler review and its alternatives, my conclusion is that it's a solid tool, but its suitability largely depends on your specific needs and budget. For casual users and small businesses who need a quick and easy way to upscale images without delving into complex software, ImgUpscaler offers simplicity and speed that is hard to beat. Its AI-powered upscaling is genuinely impressive for general use, making it a convenient option for improving web images or personal photos. However, for professionals who require advanced control over every aspect of image manipulation, or for those dealing with severely damaged images that need meticulous restoration, I would strongly recommend considering alternatives with more comprehensive features. These specialized tools, while often having a steeper learning curve or higher cost, provide the granular control necessary for professional-grade work. For budget-conscious users, exploring free or one-time purchase options might be a more economical choice, especially if image enhancement is an infrequent task. Lastly, for anyone with significant batch processing needs, ImgUpscaler excels in efficiency, making it a strong contender if you frequently have many images to enhance simultaneously. Ultimately, it's about balancing convenience, cost, and the level of control you require.
Part 8: Frequently Asked Questions (FAQs)
-
1. What is the maximum resolution ImgUpscaler can achieve?
ImgUpscaler typically allows upscaling images up to 800% of their original size, which can result in resolutions well into the thousands of pixels, depending on the initial image. However, the practical maximum resolution also depends on the quality of the source image and the subscription plan you have.
-
2. Is ImgUpscaler suitable for printing large-format images?
While ImgUpscaler can significantly improve image resolution, its suitability for large-format printing depends on the original image quality and the desired print size. For very large prints, professional-grade upscaling software like Topaz Gigapixel AI might offer slightly better results in preserving intricate details, but ImgUpscaler can certainly make many images print-ready for moderately large formats.
-
3. How does ImgUpscaler handle different image formats?
ImgUpscaler generally supports common image formats like JPG, PNG, and WebP. It's designed to process these formats efficiently, but it's always a good idea to check their official documentation for the most up-to-date list of supported file types and any limitations.
-
4. Are there any free trials available for ImgUpscaler?
Yes, ImgUpscaler typically offers a free trial or a limited number of free credits, allowing you to test its capabilities before committing to a subscription. This is a great way to see if the tool meets your specific needs and quality expectations.
-
5. What are the main differences between ImgUpscaler and Photoshop's upscaling features?
The main difference lies in their approach and complexity. ImgUpscaler uses AI to automate the upscaling process, making it very user-friendly and quick, especially for batch processing. Photoshop, while also capable of upscaling (using features like "Preserve Details 2.0"), offers a much broader suite of editing tools and requires more manual input and expertise to achieve optimal results. ImgUpscaler is a specialized tool for upscaling, whereas Photoshop is a comprehensive image editor.
