
- GIMP Value: Free, open-source, and powerful for detailed image editing, ideal for budget-conscious users.
- GIMP vs. Paid: Offers extensive manual control, rivaling paid software, but demands significant learning investment.
- AI Comparison: Lacks integrated AI for quick enhancements; manual effort required where AI tools automate.
- Target Audience: Best for hobbyists, graphic designers, and artists willing to master complex tools.
- Workflow Decision: Choose GIMP for artistic control; consider AI tools like UniConverter for speed and batch processing.
In this article
- Part 1: What is GIMP?
- Part 2: GIMP Image Enhancer: Core Features, Pros, and Cons
- Part 3: GIMP Image Enhancer: Target Audience and Use Cases
- Part 4: GIMP Image Enhancer vs. Competitors
- Part 5: Risks and Pitfalls of Using GIMP for Image Enhancement
- Part 6: How to Use UniConverter for AI-Powered Image Enhancement
- Part 7: Final Verdict and Recommendations
- Part 8: FAQs about GIMP and Image Enhancement
When I first delved into image editing, I quickly realized that professional-grade software often came with a hefty price tag. This led me to explore free alternatives, and GIMP, or GNU Image Manipulation Program, consistently popped up. For anyone looking to enhance their photos without breaking the bank, GIMP presents itself as a powerful, open-source solution. This GIMP image enhancer review aims to provide a comprehensive, scenario-based comparison, helping you understand its strengths and weaknesses, especially when pitted against other tools. I'll share my experiences, highlight its best use cases, and even point out potential pitfalls, so you can make an informed decision about whether GIMP is the right fit for your image enhancement needs.
Part 1: What is GIMP?
GIMP, or GNU Image Manipulation Program, is a free and open-source raster graphics editor primarily used for image manipulation and image editing, free-form drawing, transcoding between different image file formats, and more specialized tasks. It's often touted as a free alternative to Adobe Photoshop, offering a robust set of tools for various graphic design tasks. My journey with GIMP started out of necessity – I needed to edit photos for personal projects but couldn't justify the cost of a Photoshop subscription. What I found was a surprisingly capable program, though one that certainly demands a commitment to learn. This review will dive deep into its capabilities as an image enhancer, comparing it to both paid and AI-driven alternatives, to help you understand where it truly shines and where it falls short.
The Landscape of Free Image Editing Tools
* The high cost of professional software: For many, including myself initially, the subscription model of industry-standard tools like Photoshop is a significant barrier.
* The rise of AI-powered solutions: Newer tools are leveraging AI to simplify complex enhancement tasks, promising quick results with minimal effort.
* The need for versatile, accessible options: Users are constantly seeking tools that offer a good balance of features, ease of use, and affordability, especially for everyday photo fixes and creative projects.
Part 2: GIMP Image Enhancer: Core Features, Pros, and Cons
GIMP, as an image enhancer, offers a vast array of features that allow for intricate control over your images. I've personally used it for everything from basic color correction to complex photo manipulations. Its core strength lies in its comprehensive toolset, which includes layers, masks, filters, and a wide range of selection tools. For detailed retouching, like removing blemishes or adjusting specific areas of an image, GIMP provides the granular control I often crave. However, it's not without its quirks, and I've certainly hit some walls during my time with it.
Pros:
* Extensive Toolset for Detailed Editing: GIMP provides a professional-grade suite of tools, including layers, masks, filters, and brushes, allowing for highly detailed and precise image manipulation.
* Open-Source and Highly Customizable: Being open-source means it's free, constantly evolving, and can be customized with numerous plugins and scripts to extend its functionality.
* Strong Community Support and Resources: There's a vast online community, forums, and tutorials available, making it easier to find solutions and learn new techniques.
Cons:
* Steep Learning Curve for Beginners: The interface can be daunting for newcomers, and mastering its extensive features requires significant time and effort.
* Non-Destructive Editing Limitations: While it supports layers, GIMP's non-destructive editing capabilities aren't as robust or intuitive as some paid alternatives, often requiring workarounds.
Part 3: GIMP Image Enhancer: Target Audience and Use Cases
From my experience, GIMP is truly for those who are willing to invest time in learning a powerful tool. It's not a quick-fix solution, but rather a digital darkroom for those who enjoy the process of crafting an image. If you're a hobbyist photographer, a graphic designer on a budget, or someone who enjoys artistic manipulation, GIMP offers incredible value. However, if your goal is simply to quickly brighten a few photos for social media, you might find it overkill.
Best Use Case: Advanced Photo Retouching and Artistic Manipulation
I've found GIMP to be an absolute powerhouse for advanced photo retouching. Whether it's meticulously removing distracting elements, compositing multiple images, or applying complex artistic filters, GIMP gives me the control I need. For instance, I once used it to seamlessly blend several landscape photos into a panoramic shot, adjusting each layer individually to achieve a perfect exposure balance. It's also fantastic for creating digital art from scratch or modifying existing images with a high degree of artistic freedom.
Limited Use Case: Quick Batch Processing for Social Media
Where GIMP falls short for me is in quick, repetitive tasks. If I just need to resize a dozen photos, apply a simple filter, or enhance a batch for social media, GIMP's workflow feels cumbersome. While scripting can automate some tasks, it's not as intuitive or straightforward as dedicated batch processing tools or AI enhancers. I've often found myself wishing for a simpler, more streamlined approach when faced with a large number of images that only need minor adjustments.
Part 4: GIMP Image Enhancer vs. Competitors
When I look at GIMP in the broader market, it really stands out for its cost-effectiveness and deep manual control. But let's be honest, it's not the only player, and depending on what you need, other tools might be a better fit. I've tried them all, and here's my take on how GIMP stacks up against some popular alternatives.
GIMP Image Enhancer & Competitors Comparison Table
| Feature/Scenario | GIMP | Adobe Photoshop | Luminar Neo | Topaz Photo AI |
| Cost | Free | Subscription | One-time/Subscription | One-time |
| AI Enhancement | Manual/Plugins | Advanced | Core Feature | Core Feature |
| Batch Processing | Scripting/Plugins | Advanced | Good | Excellent |
| Learning Curve | High | Moderate | Low | Very Low |
| Platform | Cross-platform | Cross-platform | Cross-platform | Cross-platform |
Key Differentiators: Manual Control vs. AI Automation
From my perspective, the biggest difference here is the philosophical approach. GIMP is all about manual control. You're the artist, and GIMP provides the brushes, but you have to do all the painting. Photoshop offers a blend, with powerful AI features but still extensive manual options. Luminar Neo and Topaz Photo AI, however, are heavily leaning into AI automation. If you're like me and enjoy the meticulous process of editing every detail, GIMP is incredibly rewarding. But if you're short on time and want impressive results with minimal effort, the AI-driven tools are incredibly compelling. For instance, Topaz Photo AI can often fix noise and sharpness in a single click, something that would take me significant time and effort in GIMP.
Part 5: Risks and Pitfalls of Using GIMP for Image Enhancement
While GIMP is a fantastic free tool, I've definitely encountered some frustrations and limitations that anyone considering it for serious image enhancement should be aware of. It's not always a smooth ride, and sometimes, the "free" aspect comes with hidden costs in terms of time and effort.
Plugin Compatibility and Stability Issues
I've spent countless hours trying to get certain plugins to work correctly in GIMP. Because it's open-source and relies heavily on community-developed plugins, compatibility can be a real headache. I've experienced crashes, unexpected behavior, and even complete non-functionality with plugins that promised to enhance my workflow. It's a constant gamble, and sometimes, the time spent troubleshooting outweighs the benefits of the plugin itself.
Time Investment for Learning and Workflow Optimization
Let me tell you, GIMP has a steep learning curve. I initially thought I could just jump in and start editing like I would in a simpler program, but I was quickly overwhelmed. Mastering its interface, understanding its unique terminology, and optimizing my workflow took a significant investment of my personal time. If you're not prepared to dedicate hours to tutorials and practice, you might find yourself frustrated and abandoning it before you unlock its true potential.
Lack of Dedicated AI-Powered Enhancement Features
This is a big one for me, especially as AI tools become more prevalent. GIMP, by itself, lacks the sophisticated, one-click AI enhancement features that I've come to appreciate in tools like Luminar Neo or Topaz Photo AI. While there are some AI-related plugins, they often feel like afterthoughts or are less integrated. If you're looking for automatic noise reduction, intelligent upscaling, or content-aware fills that just work, GIMP will often require a manual, multi-step process that can be time-consuming and less effective.
Potential for Inconsistent Results Without Expertise
Because GIMP relies so heavily on manual input, the quality of your image enhancements is directly tied to your skill level. I've seen my own results vary wildly depending on my focus and understanding of specific tools. Without a deep understanding of color theory, masking techniques, and various filters, it's easy to produce inconsistent or even detrimental results. It's not a tool that will automatically make your photos look professional; it requires your expertise to achieve that.
Limited Integration with Cloud-Based Workflows
In today's interconnected world, I often find myself needing to share and collaborate on images across different devices and platforms. GIMP, being a desktop-centric application, doesn't offer the seamless cloud integration that many modern tools do. There's no built-in cloud storage or easy way to sync projects across multiple computers. This means I'm constantly managing files locally, which can be a hassle if I'm working on the go or collaborating with others who use different software.
Part 6: How to Use UniConverter for AI-Powered Image Enhancement
Sometimes, despite my best efforts with GIMP, I hit a wall, especially when dealing with batch processing or when I need a quick, reliable enhancement without diving deep into manual adjustments. This is where I've found UniConverter to be an incredibly useful alternative. It's not trying to be a full-fledged image editor like GIMP, but it excels at what it does: providing fast, stable, and high-quality AI-powered image enhancements, especially for multiple files. If you're tired of inconsistent results, slow processing, or the sheer learning curve of GIMP for simple enhancements, UniConverter offers a refreshing, streamlined experience. It's an all-in-one solution that avoids the ads, watermarks, and instability often found in other free online tools, and its GPU acceleration means I get my enhanced images back in no time, without any quality loss.
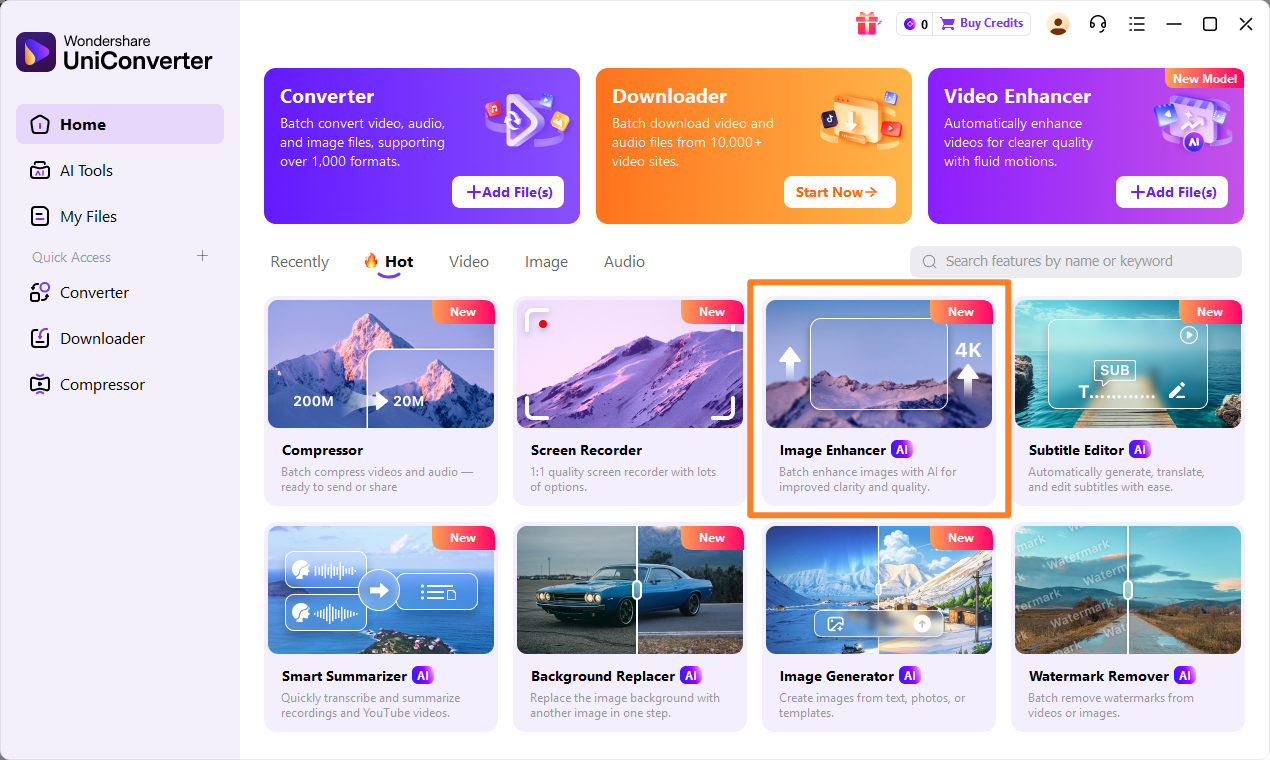
Step 1: Open UniConverter and Choose Image Enhancer
First, I launch UniConverter and navigate to the 'AI Lab' section. There, I find the 'Image Enhancer' tool. It's usually prominently displayed, making it easy to get started.
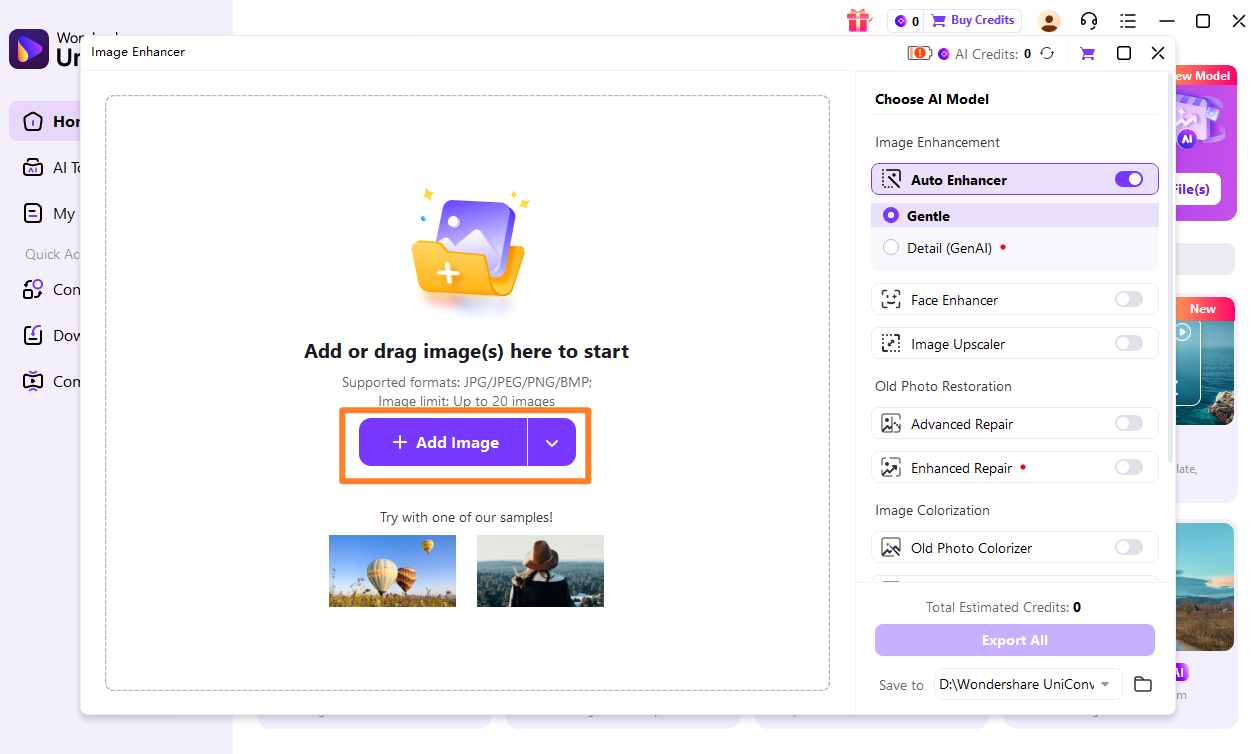
Step 2: Upload the Images
Next, I simply drag and drop the images I want to enhance into the designated area. UniConverter supports various formats, which is a huge plus. I can upload multiple images at once for batch processing, which saves me a ton of time.
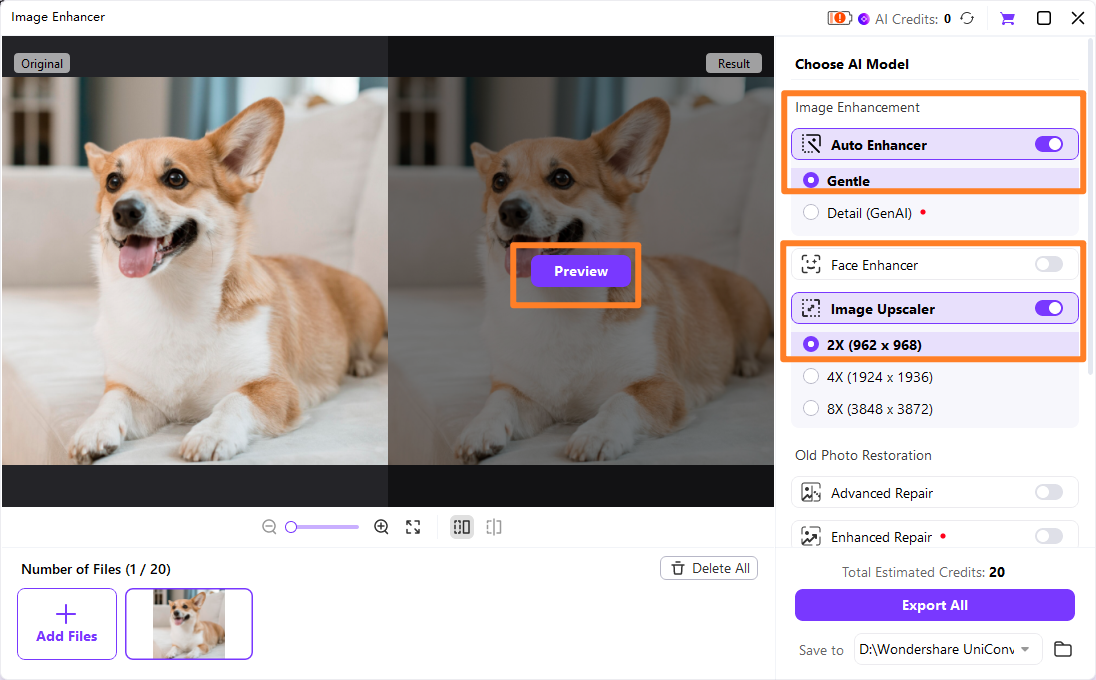
Step 3: Choose Enhancement Model
Once my images are uploaded, I get to choose from different AI enhancement models. UniConverter offers options like 'AI Upscaler' for resolution improvement or 'AI Denoise' for removing grain. I pick the one that best suits my needs for image upscaling.
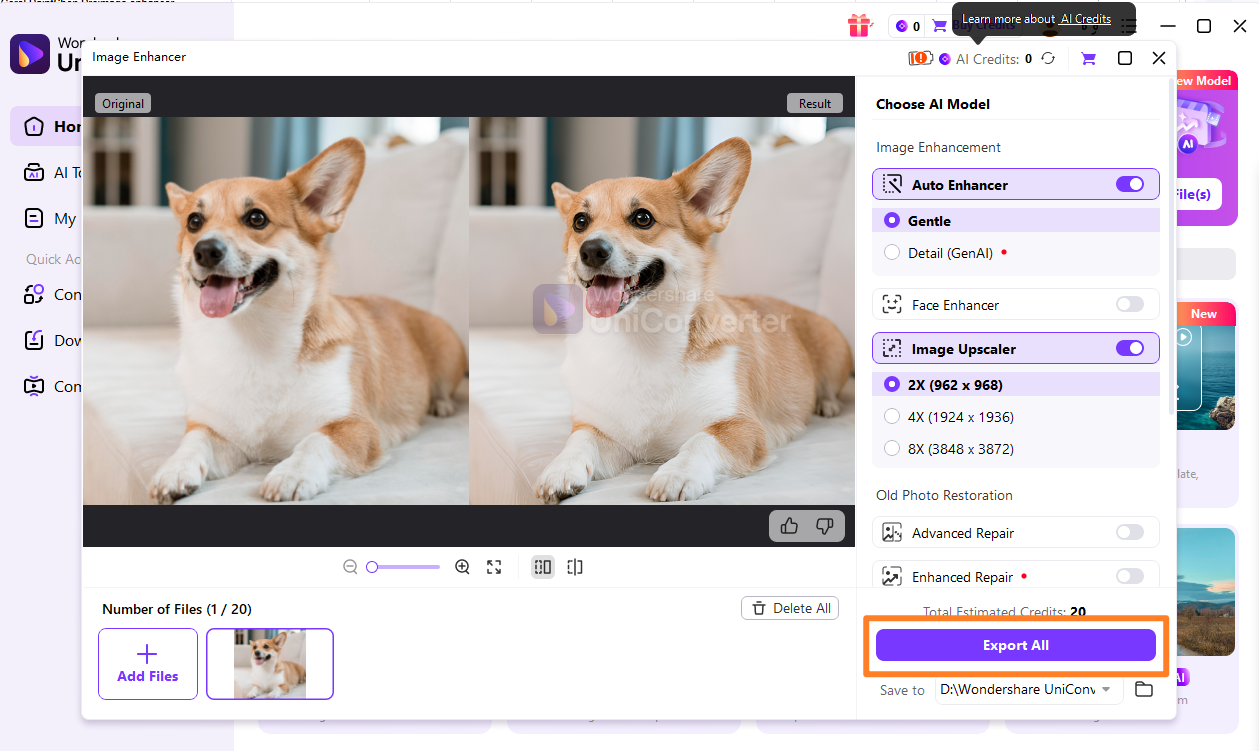
Step 4: Preview and Save the Enhanced Images
After selecting the model, UniConverter processes the images. I can then preview the enhanced versions side-by-side with the originals. If I'm happy with the results, I hit 'Export' and save my high-quality, enhanced images to my desired location.

Enhance Images Beyond GIMP's Limits?
Part 7: Final Verdict and Recommendations
After spending considerable time with GIMP and exploring its capabilities as an GIMP image enhancer review, I've come to a clear understanding of its place in the digital toolkit. For those who are budget-conscious and willing to invest the time, GIMP remains an incredibly powerful and versatile tool. Its extensive feature set allows for detailed, artistic manipulation that rivals paid software. However, for users prioritizing speed, ease of use, or advanced AI-driven enhancements, dedicated tools or even simpler alternatives might be a better fit. Beginners seeking straightforward solutions will likely find GIMP's learning curve daunting, while professionals might need to weigh its lack of seamless cloud integration and dedicated AI features against their workflow requirements. Ultimately, the best choice depends on your specific needs, skill level, and the type of image enhancement you frequently perform.
Part 8: FAQs about GIMP and Image Enhancement
-
1. Can GIMP truly enhance image quality like paid software?
Yes, GIMP can absolutely enhance image quality to a professional degree, but it requires significant manual effort and skill. It offers a comprehensive suite of tools for color correction, retouching, sharpening, and noise reduction, comparable to what you'd find in paid software. However, it lacks the one-click AI automation that some premium tools offer for quick, high-quality results.
-
2. What are the best GIMP plugins for image enhancement?
For image enhancement, some popular GIMP plugins include G'MIC-Qt for a vast array of filters and effects, Resynthesizer for content-aware fill capabilities, and various noise reduction plugins. These can significantly extend GIMP's native capabilities, but be aware that plugin compatibility and stability can sometimes be an issue.
-
3. Is GIMP suitable for professional photographers?
GIMP can be suitable for professional photographers, especially those on a budget or who prefer open-source software. It offers the necessary tools for high-quality retouching and manipulation. However, its non-destructive editing workflow is less intuitive than Photoshop's, and its lack of dedicated AI features or seamless cloud integration might be a drawback for fast-paced professional workflows.
-
4. How does GIMP's image enhancement compare to online AI tools?
GIMP's image enhancement is primarily manual, relying on your expertise to achieve results. Online AI tools, on the other hand, automate many enhancement processes like upscaling, denoising, and color correction with a single click. While AI tools offer speed and convenience, GIMP provides far greater creative control and precision, albeit with a steeper learning curve.
-
5. What are the common challenges when enhancing images in GIMP?
Common challenges include GIMP's steep learning curve, making it difficult for beginners to achieve desired results quickly. Its non-destructive editing capabilities are less robust, often requiring workarounds. Additionally, the lack of integrated AI features means more manual work for tasks like noise reduction or intelligent upscaling, and plugin compatibility issues can sometimes disrupt workflows.
