
- Facetune Overview: Mobile app for portrait/selfie retouching, leveraging AI for effortless enhancements.
- Pros & Cons: Intuitive interface and advanced AI for realistic skin smoothing. Costly subscription, risk of unnatural over-editing.
- Target Audience: Ideal for social media influencers and content creators; limited for professional photographers.
- Competitor Analysis: Excels in user-friendly facial enhancements; Lightroom for pros, PicsArt for creativity, Snapseed for free versatility.
- Risks to Avoid: Privacy concerns, aggressive ads, over-editing, quality degradation, and subscription fatigue.
- UniConverter Alternative: Offers stable, lossless, ad-free image enhancement with GPU acceleration for batch processing and upscaling.
- Final Verdict: Facetune is great for casual selfie editing. Professionals need more robust tools like UniConverter or Lightroom.
In this article
- Part 1: What is Facetune image enhancer?
- Part 2: Facetune Image Enhancer: Core Features, Pros & Cons
- Part 3: Target Audience & Use Cases for Facetune Image Enhancer
- Part 4: Facetune Image Enhancer & Competitors: A Comparative Analysis
- Part 5: Risks and Pitfalls to Avoid
- Part 6: How to use UniConverter to efficiently enhance images
- Part 7: Final Verdict and Recommendations
- Part 8: FAQs
When I first started dabbling in photo editing for my social media, I quickly realized that getting that "perfect" look wasn't as simple as just snapping a picture. That's when I stumbled upon Facetune image enhancer review, a tool that promised to magically transform my selfies. In this comprehensive Facetune image enhancer review, I'll share my honest experience, comparing it with other popular apps, and help you decide if it's the right fit for your editing needs. We'll dive into its features, ideal use cases, and even some potential pitfalls to watch out for.
Part 1: What is Facetune image enhancer?
Facetune image enhancer is essentially a mobile photo editing application primarily designed for retouching portraits and selfies. It's built around the idea of making professional-grade photo enhancements accessible to everyone, right from their smartphone. I remember when it first gained traction, it felt like a secret weapon for influencers, allowing them to achieve flawless skin and perfect features with just a few taps.
The Rise of AI-Powered Photo Editing Apps
The landscape of photo editing has dramatically shifted with the advent of AI. For me, this meant:
* Effortless Enhancements: No more struggling with complex sliders; AI handles the heavy lifting.
* Time-Saving Solutions: Quick edits mean more time creating content, less time tweaking.
* Democratization of "Perfect" Photos: Anyone can achieve magazine-quality looks, regardless of their editing skill.
Part 2: Facetune Image Enhancer: Core Features, Pros & Cons
From my personal experience, Facetune's core strength lies in its ability to make quick, impactful changes to portraits. It's like having a digital makeup artist in your pocket.
Pros:
* Intuitive interface for quick touch-ups and enhancements: I found it incredibly easy to navigate, even for someone who isn't a pro editor.
* Advanced AI for realistic skin smoothing and blemish removal: This was a game-changer for my selfies; it made my skin look naturally smooth without appearing fake.
* Wide range of creative tools for artistic photo manipulation: Beyond just retouching, I enjoyed playing with the artistic filters and effects to give my photos a unique flair.
Cons:
* Subscription-based model can be costly for casual users: I initially found the subscription a bit steep if I wasn't using it daily.
* Over-editing can lead to an unnatural or "plastic" look: This is a trap I fell into early on. It's easy to go overboard and end up with an unrealistic image.
Part 3: Target Audience & Use Cases for Facetune Image Enhancer
Based on my usage, Facetune really shines for a specific demographic, but it definitely has its limitations.
Best Use Case: Social Media Influencers & Content Creators
For me, as someone who posts regularly, Facetune was invaluable.
* Quickly perfecting selfies and portraits for Instagram, TikTok, and other platforms: It's perfect for those last-minute tweaks before hitting "post."
* Enhancing product photos for e-commerce or brand promotion: I've seen many small businesses use it to make their products pop.
Limited Use Case: Professional Photographers & High-Resolution Print
However, I quickly learned it's not a tool for everything.
* Not suitable for detailed, high-resolution image restoration or complex photo manipulation required for print media: When I tried to use it for more serious projects, it just didn't have the depth I needed.
* Lacks advanced color grading and RAW file support: For professional work, I need more control over color and the ability to work with RAW files, which Facetune doesn't offer.
Part 4: Facetune Image Enhancer & Competitors: A Comparative Analysis
When I compare Facetune to other apps I've used, its strengths and weaknesses become clearer.
| Feature/Scenario | Facetune Image Enhancer | Adobe Lightroom Mobile | PicsArt | Snapseed |
| Quick Selfie Enhancement | Excellent | Good | Very Good | Good |
| Advanced Retouching | Excellent | Good | Good | Fair |
| Creative Filters & Effects | Very Good | Good | Excellent | Good |
| Professional Color Grading | Fair | Excellent | Good | Very Good |
| Subscription Model | Yes | Yes | Yes | No |
| Ease of Use | High | Medium | High | Medium |
Key Differentiators:
From my perspective, Facetune really excels in user-friendly, AI-driven facial and portrait enhancements. If you're primarily focused on making your face look good, it's hard to beat. Adobe Lightroom Mobile, on the other hand, is what I turn to for professional-grade editing and when I need to sync across devices. PicsArt is fantastic if you want a vast array of creative tools and enjoy community features, almost like a social network for editors. And Snapseed? It's my go-to for a powerful, free option for general photo editing when I don't want to commit to a subscription.
Part 5: Risks and Pitfalls to Avoid
Using apps like Facetune, especially the free versions or those with aggressive marketing, comes with its own set of considerations that I've learned to be wary of.
Privacy Concerns with User Data
I've always been a bit cautious about what data these apps collect. When you upload your photos, especially highly personal ones like selfies, you're essentially trusting the company with your image data. It's worth digging into their privacy policy to understand how they use and store your information. For me, this is a significant concern, as I don't want my personal photos used for anything I haven't explicitly agreed to.
Aggressive In-App Advertisements (for free versions)
If you're trying to use a free version of a similar app, be prepared for an onslaught of ads. I've found that these can be incredibly disruptive, popping up right when I'm in the middle of a delicate edit. It not only breaks my concentration but also makes the whole experience frustrating and less enjoyable. Sometimes, the ads are so frequent that they make the app almost unusable, pushing you towards a paid subscription.
Potential for Over-Editing and Unrealistic Results
This is a pitfall I personally experienced with Facetune. It's so easy to get carried away with the smoothing and reshaping tools that you end up with an image that looks nothing like you. I've seen many people, including myself, create photos that look "plastic" or unnaturally perfect. It's a fine line between enhancement and creating an unrealistic representation, and it's something I constantly remind myself to be mindful of.
Quality Degradation on Export for Certain Features
I've noticed that sometimes, after applying certain advanced features or filters, the exported image quality isn't as crisp as the original. This can be particularly frustrating if you've spent a lot of time perfecting an image, only to find it loses some of its sharpness or detail upon saving. It's not always consistent, but it's something I've definitely encountered and it makes me question the app's processing capabilities for high-quality output.
Subscription Fatigue and Hidden Costs
The world of app subscriptions can be overwhelming. I've found myself signing up for trials, forgetting to cancel, and then getting charged. Facetune, like many others, operates on a subscription model, and while it offers great features, it's another recurring cost to consider. It's easy to accumulate several such subscriptions, leading to "subscription fatigue" and hidden costs that add up over time. Always check the terms and conditions before committing.
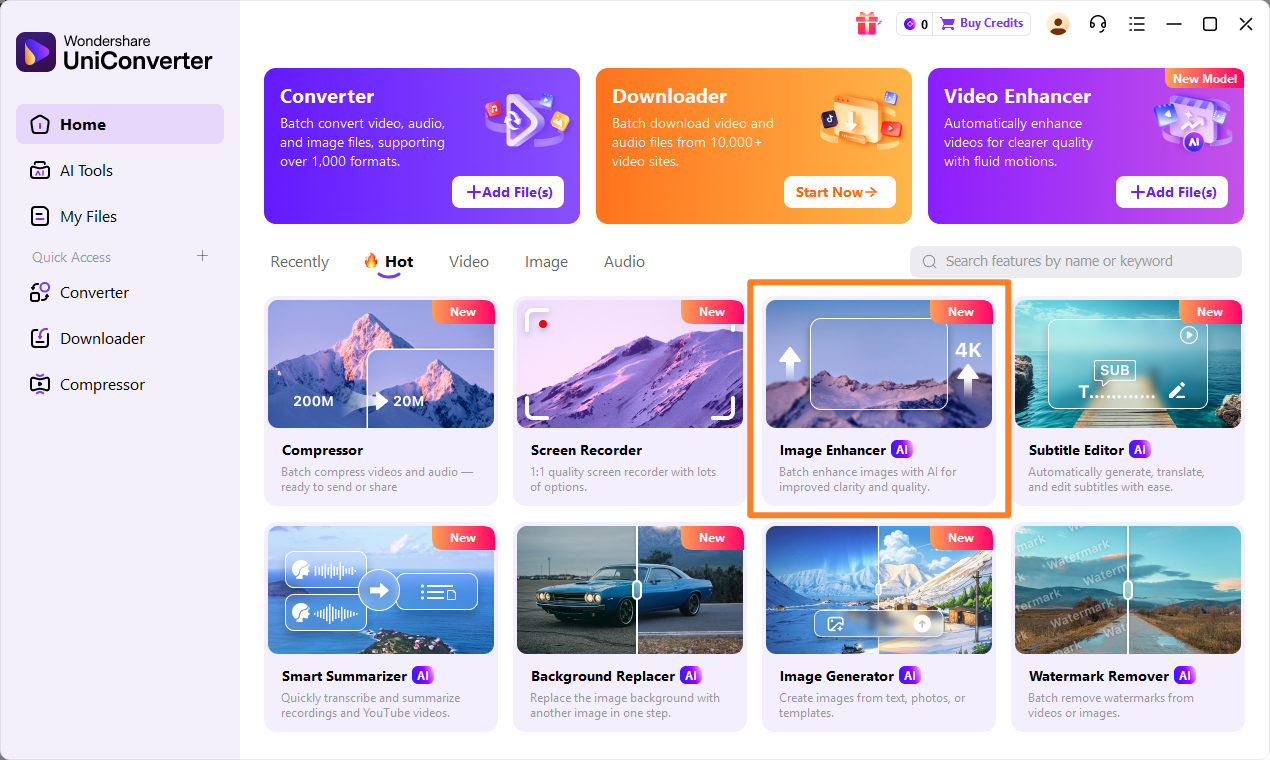
Part 6: How to use UniConverter to efficiently enhance images
Sometimes, when I've found other tools lacking in batch processing, struggling with unstable enhancements, or simply not delivering the quality I expect, I turn to UniConverter. It's a robust solution that avoids many of the issues I've faced with other image enhancers, offering a stable, lossless, and ad-free experience with GPU acceleration for speed and support for a wide range of formats. It truly feels like an all-in-one ultimate solution for my multimedia needs, especially when I need to enhance image resolution.
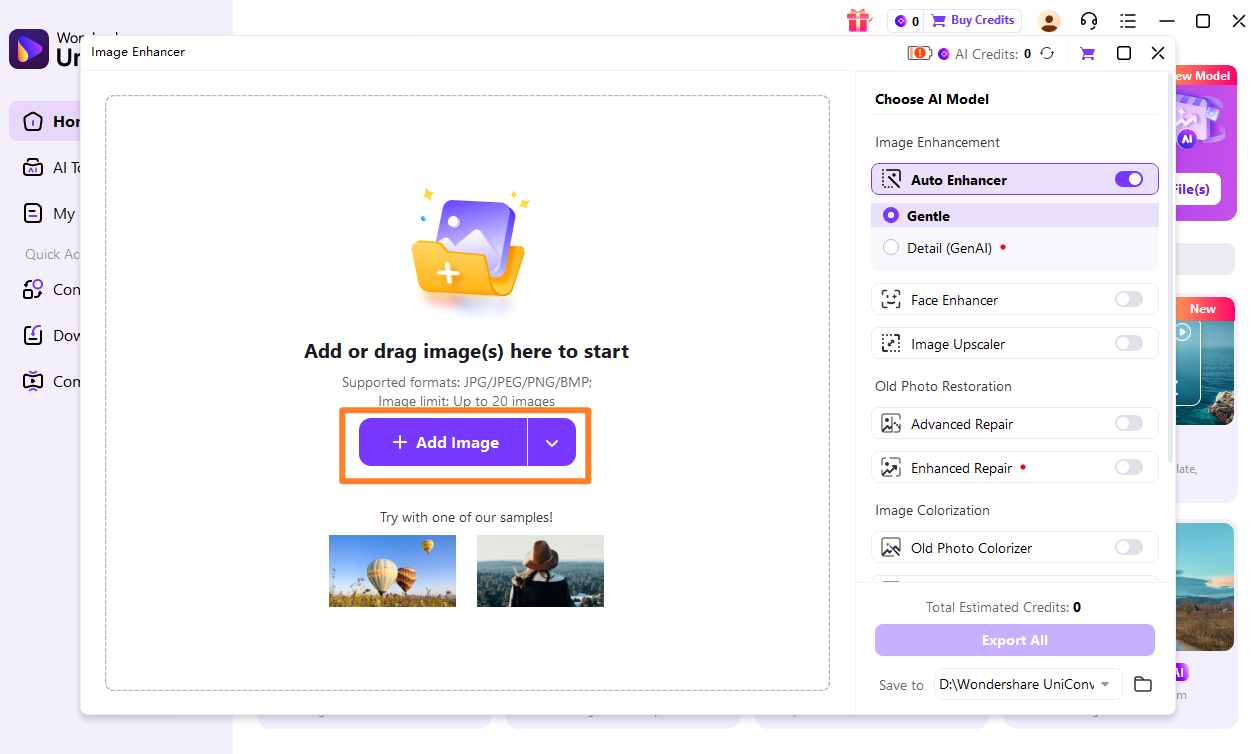
Step 1: Open UniConverter and Choose Image Enhancer
First, I launch UniConverter on my desktop. On the main interface, I navigate to the "AI Lab" section and select the "Image Enhancer" tool. It’s usually quite prominent and easy to find, making it simple to enhance images quickly.
Step 2: Upload the Images
Next, I simply drag and drop the images I want to enhance into the designated area. UniConverter also allows me to click the "Add Files" button to browse and select multiple images from my computer, which is incredibly handy for batch processing. This feature is also useful for those looking to upscale videos.
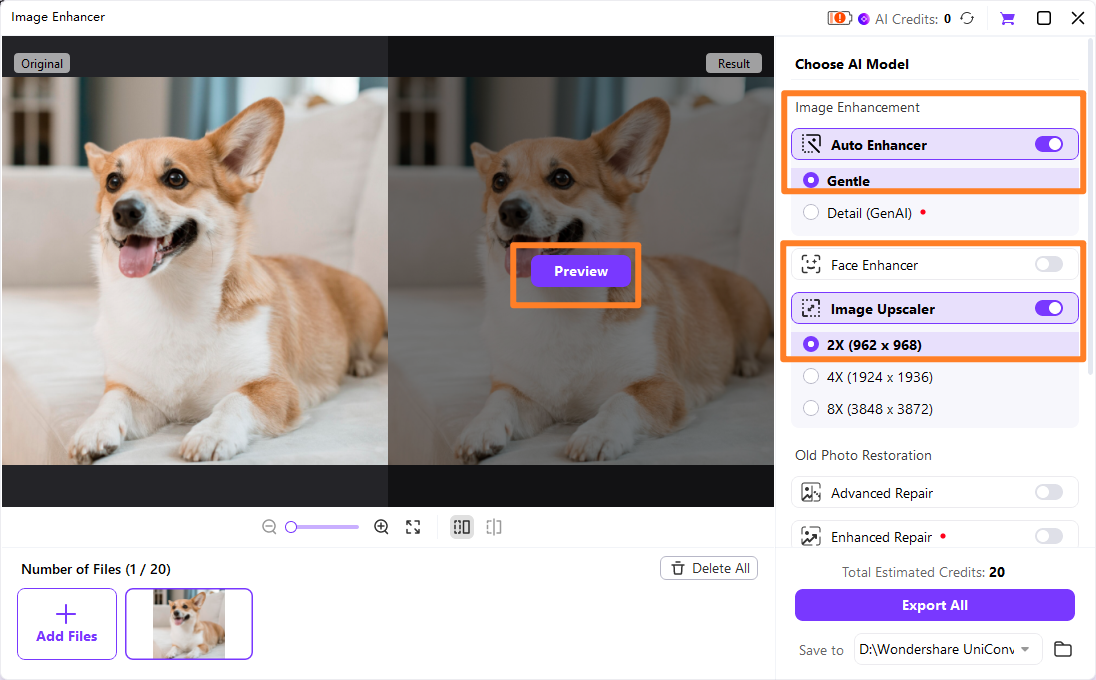
Step 3: Choose Enhancement Model
Once my images are loaded, I can choose from different AI enhancement models. I usually experiment with these to see which one best suits the image type – whether it's for general improvement, portrait enhancement, or even cartoon upscaling. This is similar to how one might choose models for a video enhancer.
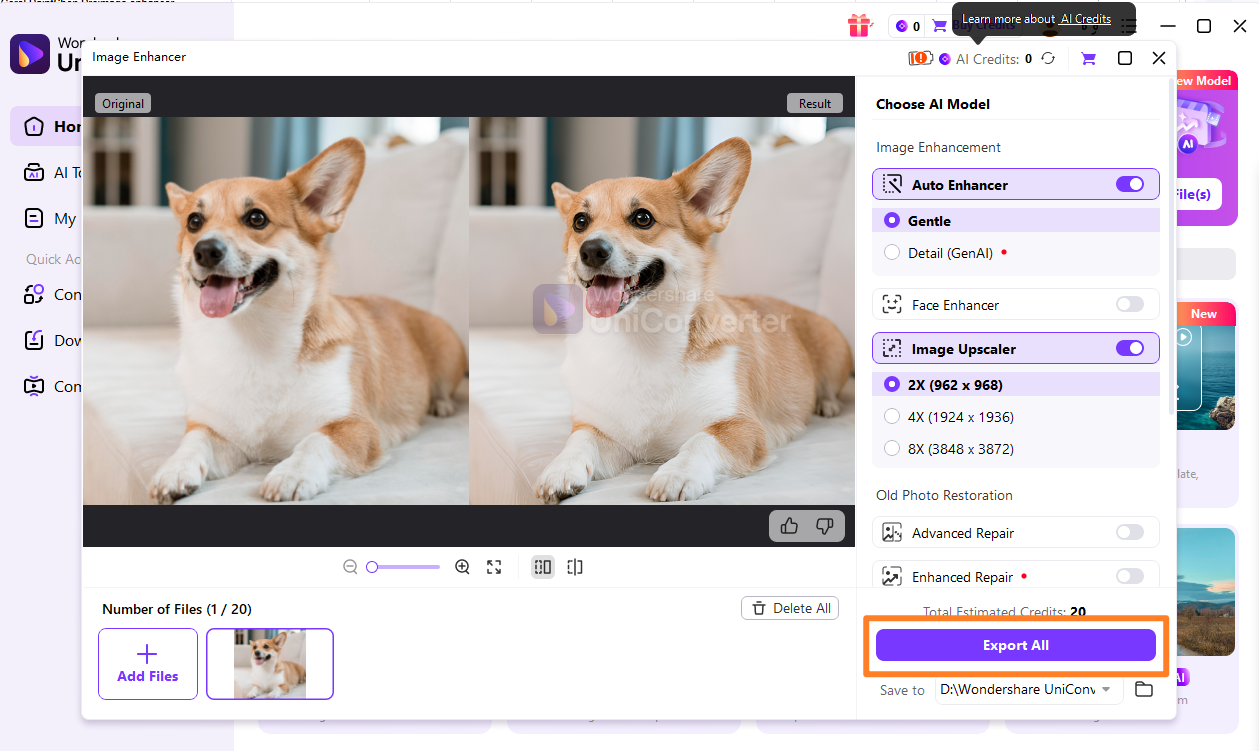
Step 4: Preview and Save the Enhanced Images
After applying the enhancement, UniConverter provides a side-by-side preview, so I can clearly see the improvements. If I'm happy with the result, I click "Start" to process and save the enhanced images to my desired output folder.

Seeking a Powerful Facetune Image Enhancer Alternative?
Part 7: Final Verdict and Recommendations
After spending considerable time with Facetune image enhancer review and its competitors, I've come to a clear understanding of its place in the editing world. For casual users and social media enthusiasts who primarily focus on perfecting selfies and portraits for quick online sharing, Facetune is an excellent choice. Its intuitive interface and powerful AI-driven retouching tools make it incredibly easy to achieve polished results without needing extensive editing knowledge. However, if you're a professional photographer or someone who requires high-resolution output, advanced color grading, RAW file support, or complex photo manipulation for print media, Facetune will likely fall short of your expectations. In such cases, I would strongly recommend considering alternatives like Adobe Lightroom Mobile or even desktop software for more comprehensive control. Evaluating the subscription value against your actual usage frequency is crucial; if you only use it occasionally, the cost might not be justified. Lastly, always prioritize privacy and data security when choosing any photo editing app, as your personal images are valuable.
Part 8: FAQs
-
1. Is Facetune Image Enhancer free to use?
Facetune offers a free trial, but most advanced features require a subscription. I found that to really unlock its potential, you'll need to pay.
-
2. Can Facetune enhance image resolution?
While Facetune can improve image quality by enhancing details and colors, it's not primarily designed for upscaling resolution. For that, I'd recommend dedicated tools like UniConverter, which are much better at increasing image size without losing quality.
-
3. Is Facetune suitable for editing landscapes or architectural photos?
From my experience, Facetune is heavily optimized for portraits and selfies. For landscapes or architectural photos, you'll find other apps with broader editing capabilities, like Snapseed or Lightroom, to be much more effective.
-
4. How does Facetune compare to Photoshop Express?
Facetune focuses more on facial and body retouching, making it ideal for selfies. Photoshop Express, on the other hand, offers a wider range of general photo editing tools, including filters, adjustments, and basic corrections, making it more versatile for various photo types.
-
5. Are there any offline image enhancers similar to Facetune?
Most advanced AI image enhancers, including Facetune, require an internet connection for their cloud-based processing. While some desktop software offers offline capabilities, their feature sets for AI-driven facial retouching might differ significantly from what Facetune provides.
