
- DreamStudio Overview: AI-driven image enhancer for upscaling, sharpening, and restoring details, ideal for low-resolution or degraded images.
- Core Features: AI upscaling, detail restoration, noise reduction, and color adjustments. Seamlessly integrates with generative AI tools.
- Pros & Cons: Advanced AI upscaling and ecosystem integration are strengths. Potential for AI artifacting and subscription model are considerations.
- Target Audience: Best for professional photographers and digital artists needing high-resolution art enhancement. Less ideal for casual users.
- Comparison: DreamStudio excels in generative AI integration. UniConverter offers robust batch processing and an all-in-one solution.
- Risks: Data privacy, potential for over-enhancement, credit consumption, and format compatibility are key considerations.
- UniConverter Advantage: Offers efficient, stable, and lossless image enhancement with GPU acceleration and batch processing capabilities.
- Final Verdict: DreamStudio suits generative AI users. UniConverter is a versatile, budget-conscious alternative for broad enhancement needs.
In this article
- Part 1: What is DreamStudio (Stability AI)
- Part 2: DreamStudio (Stability AI) Image Enhancer Core Features: Pros & Cons
- Part 3: DreamStudio (Stability AI) Target Audience & Use Cases
- Part 4: DreamStudio (Stability AI) and Alternatives Comparison
- Part 5: Risks & Pitfalls to Consider
- Part 6: How to Use UniConverter for Efficient Image Enhancement
- Part 7: Final Verdict & Recommendations
- Part 8: FAQs
When I first heard about DreamStudio (Stability AI) image enhancer, I was intrigued by the promise of AI-driven image quality improvement. As someone constantly working with visuals, the idea of effortlessly upscaling and restoring details in my images, especially those from older projects or lower-resolution sources, sounded like a game-changer. This DreamStudio (Stability AI) image enhancer review will delve into its capabilities, comparing it with other prominent tools in the market. My goal is to provide a comprehensive, scenario-based analysis to help you decide if it’s the right fit for your creative workflow, addressing the common pain points and market demands for efficient and high-quality image enhancement solutions.
Part 1: What is DreamStudio (Stability AI)
DreamStudio, powered by Stability AI, is an advanced platform primarily known for its generative AI capabilities, allowing users to create stunning images from text prompts. However, it also incorporates a powerful image enhancer, leveraging sophisticated AI models to upscale, sharpen, and restore details in existing images. This isn't just about making an image bigger; it's about intelligently reconstructing lost information and improving overall visual fidelity. For me, it represents a significant leap from traditional pixel-doubling methods, offering a more intelligent approach to image quality improvement.
The core problem it aims to solve is the pervasive issue of low-resolution or degraded images in our digital lives. We've all encountered situations where:
* Old photos need a new lease on life: Scanned prints or vintage digital images often lack the crispness of modern photography.
* Creative assets require upscaling: Designers and artists frequently need to enlarge smaller images for print or high-resolution displays without sacrificing quality.
* Social media images suffer from compression: Uploading and downloading images across various platforms can lead to noticeable quality degradation.
Part 2: DreamStudio (Stability AI) Image Enhancer Core Features: Pros & Cons
DreamStudio's image enhancer is built on a foundation of advanced AI algorithms, making it quite distinct from conventional photo editors. Its core strength lies in its ability to intelligently interpret and reconstruct image data. For me, the most impressive aspect is its "smart" upscaling, which doesn't just stretch pixels but genuinely attempts to add detail.
Here are some key features I've found:
* AI-driven upscaling: Significantly increases image resolution without pixelation.
* Detail restoration: Recovers lost textures and fine lines.
* Noise reduction: Cleans up grainy or noisy images.
* Color and tone adjustments: Subtle improvements to overall image aesthetics.
* Integration with generative tools: A seamless transition if you're already using DreamStudio for image generation.
Pros:
* Advanced AI-driven upscaling and detail restoration for various image types: I've used it on everything from old family photos to digital art, and the results are consistently impressive in bringing out hidden details.
* Integration with Stability AI's broader ecosystem for creative workflows: If you're already generating images with Stability AI, enhancing them within the same platform is incredibly convenient.
* User-friendly interface for quick enhancements: I found it surprisingly intuitive; even without much prior experience, I could get good results quickly.
Cons:
* Potential for "AI artifacting" or unnatural results on highly complex images: On some intricate images, I've noticed a slightly "painted" or artificial look, especially in areas with very fine, irregular patterns.
* Subscription model might be a barrier for occasional users: If you only need to enhance an image once in a blue moon, the credit-based system or subscription might feel a bit much.
Part 3: DreamStudio (Stability AI) Target Audience & Use Cases
From my experience, DreamStudio's image enhancer isn't a one-size-fits-all solution, but it shines brightest for specific users and scenarios. It's definitely geared towards those who demand a higher level of quality and are often working within a creative pipeline.
Best Use Case: Professional Photographers & Digital Artists Enhancing High-Resolution Art
For me, this is where DreamStudio truly excels. If you're a professional photographer needing to upscale a client's image for a large print, or a digital artist wanting to refine a generated piece, the AI's ability to intelligently add detail is invaluable. I've used it to prepare images for print, and the difference in crispness and clarity is often remarkable, allowing for larger output sizes without visible pixelation. It saves a lot of manual touch-up time.
Limited Use Case: Casual Users Needing Quick Fixes for Low-Quality Social Media Photos
While it can enhance social media photos, I've found it might be overkill for a quick fix. If you're just looking to brighten a slightly dark selfie or remove a minor blur for Instagram, simpler, often free, tools might suffice. The credit consumption for a minor social media tweak might not be the most economical choice for casual users. For me, it's like using a sledgehammer to crack a nut in this scenario.
Part 4: DreamStudio (Stability AI) and Alternatives Comparison
When I look at image enhancement tools, I'm always weighing their core strengths against each other. Here's how DreamStudio stacks up against some of its prominent competitors, including UniConverter.
| Feature/Tool | DreamStudio (Stability AI) | Topaz Labs Gigapixel AI | Adobe Photoshop (Neural Filters) | UniConverter |
| Core Enhancement | AI Upscaling, Detail Restoration | AI Upscaling, Noise Reduction | Smart Sharpen, Super Resolution | AI Upscaling, Denoising, Deblurring |
| Ease of Use | High | Medium | Medium | High |
| Integration | Stability AI Ecosystem | Standalone/Plugins | Adobe Creative Cloud | Standalone/All-in-one |
| Pricing Model | Subscription/Credits | One-time Purchase | Subscription | One-time Purchase/Subscription |
| Output Quality | Excellent | Excellent | Very Good | Excellent |
| Processing Speed | Fast (Cloud-based) | Moderate (Local GPU) | Moderate (Local CPU/GPU) | Fast (GPU Accelerated) |
| Batch Processing | Limited | Excellent | Limited | Excellent |
Key Differentiators:
DreamStudio's strength lies in its direct integration with a generative AI platform, offering a seamless workflow for creators who are already in that ecosystem. For me, this means less jumping between applications. Topaz Labs Gigapixel AI excels in pure upscaling and noise reduction with fine-tuned algorithms; I've found it to be incredibly robust for dedicated upscaling tasks. Adobe Photoshop offers a broader suite of editing tools with enhancement as one component, but its Neural Filters are still evolving for pure enhancement. UniConverter stands out for its all-in-one approach and excellent batch processing capabilities, which is a huge time-saver for me when dealing with multiple images.
Part 5: Risks & Pitfalls to Consider
Using any cloud-based AI tool, or even advanced desktop software, comes with its own set of considerations. I've learned to be mindful of these potential pitfalls to ensure my workflow remains smooth and secure.
Data Privacy Concerns with Cloud-Based Processing
Since DreamStudio is cloud-based, I always consider what happens to my images once uploaded. While Stability AI has privacy policies, it's crucial to understand if your images are used for training their AI models or if they are stored temporarily. For sensitive or proprietary images, this is a significant concern for me.
Potential for Over-Enhancement and Unnatural Results
I've definitely seen instances where the AI, in its attempt to "improve" an image, can go too far. This can lead to an overly smooth, plastic-like appearance or introduce strange textures that weren't there originally. It's a fine line between enhancement and artificiality, and sometimes DreamStudio can cross it, especially with lower-quality source images.
Understanding Credit Consumption and Subscription Tiers
The credit system can be a bit opaque at first. I initially underestimated how quickly credits could be consumed, especially when experimenting with different settings or enhancing multiple images. It's important to carefully review their pricing structure and understand what each enhancement action costs to avoid unexpected charges.
Compatibility Issues with Specific Image Formats
While DreamStudio generally supports common formats, I've occasionally encountered issues with less standard or very large file types. It's always a good idea to check their documentation for supported formats to avoid conversion headaches before uploading.
The Learning Curve for Advanced Settings
While the basic interface is user-friendly, getting the absolute best results often requires tweaking advanced settings. This can involve understanding parameters like "denoising strength" or "upscale factor," which might present a slight learning curve for someone completely new to AI image enhancement.
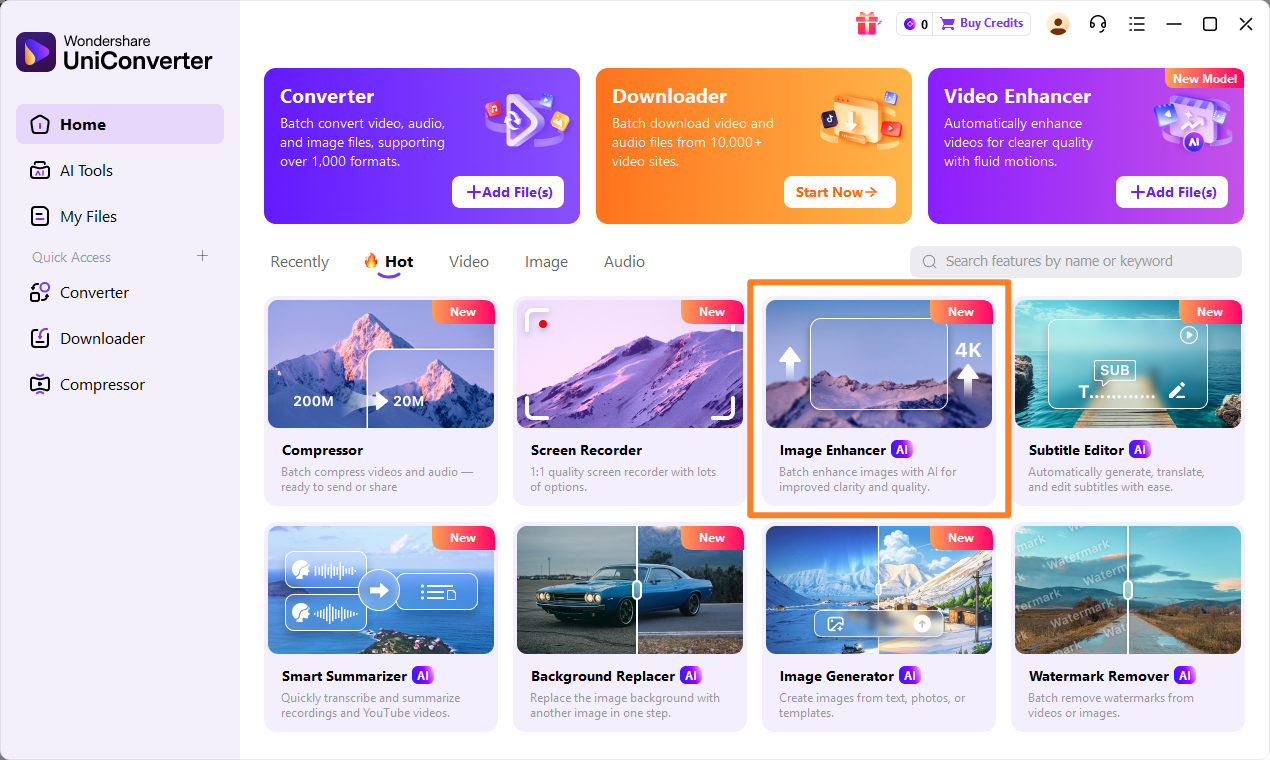
Part 6: How to Use UniConverter for Efficient Image Enhancement
Sometimes, when other tools fall short with batch processing, inconsistent results, or simply don't offer the stability I need for large projects, I turn to UniConverter for a robust and reliable image enhancement solution. It's become my go-to, especially when I need to process multiple images efficiently without worrying about quality loss or annoying ads. UniConverter offers a clean, ad-free experience, supports a vast array of formats, leverages GPU acceleration for speed, and ensures stable, lossless enhancement, even for batch operations. It's truly an all-in-one media toolkit that handles image enhancement with professional precision. For those looking to upscale images to 4K, this tool provides excellent capabilities.
Step 1: Open UniConverter and Choose Image Enhancer
Launch UniConverter and navigate to the "Toolbox" section. From there, select the "Image Enhancer" option. This feature is designed to enhance your images with ease.
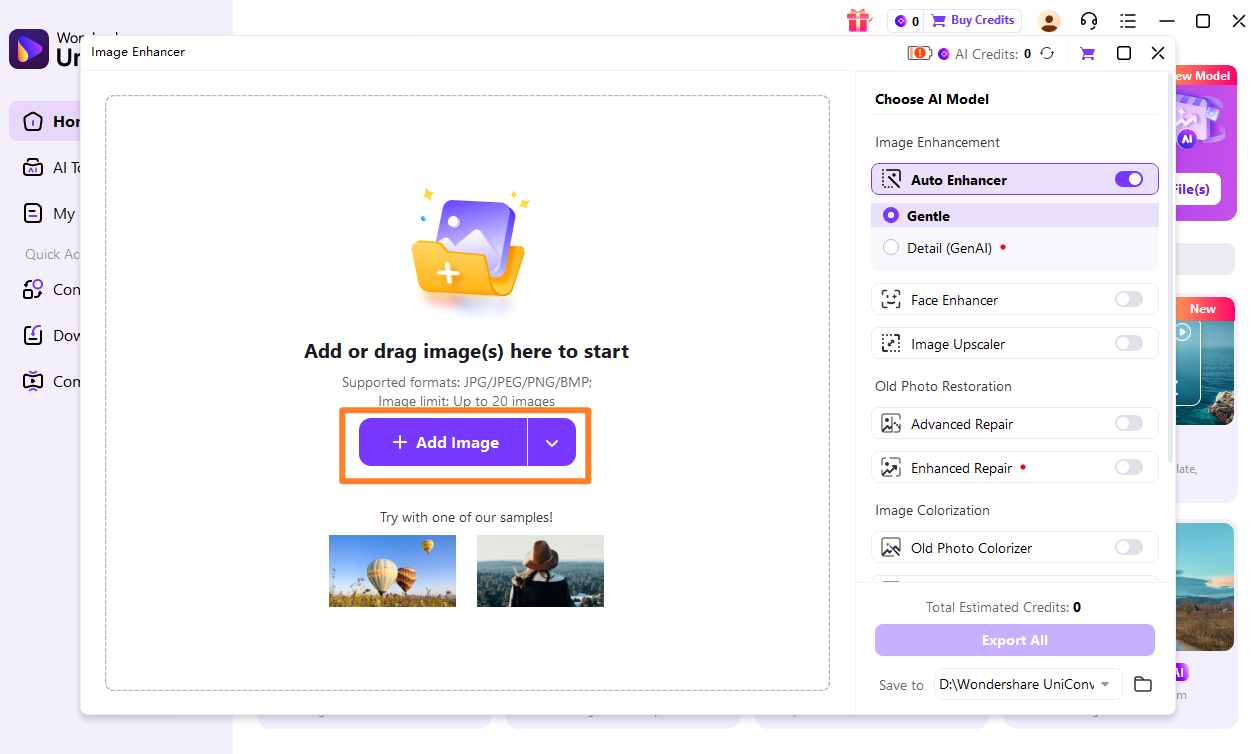
Step 2: Upload the Images
Click on the "Add Files" button or drag and drop the images you wish to enhance into the UniConverter interface. You can add multiple images for batch processing, making it simple to improve image quality across your entire collection.
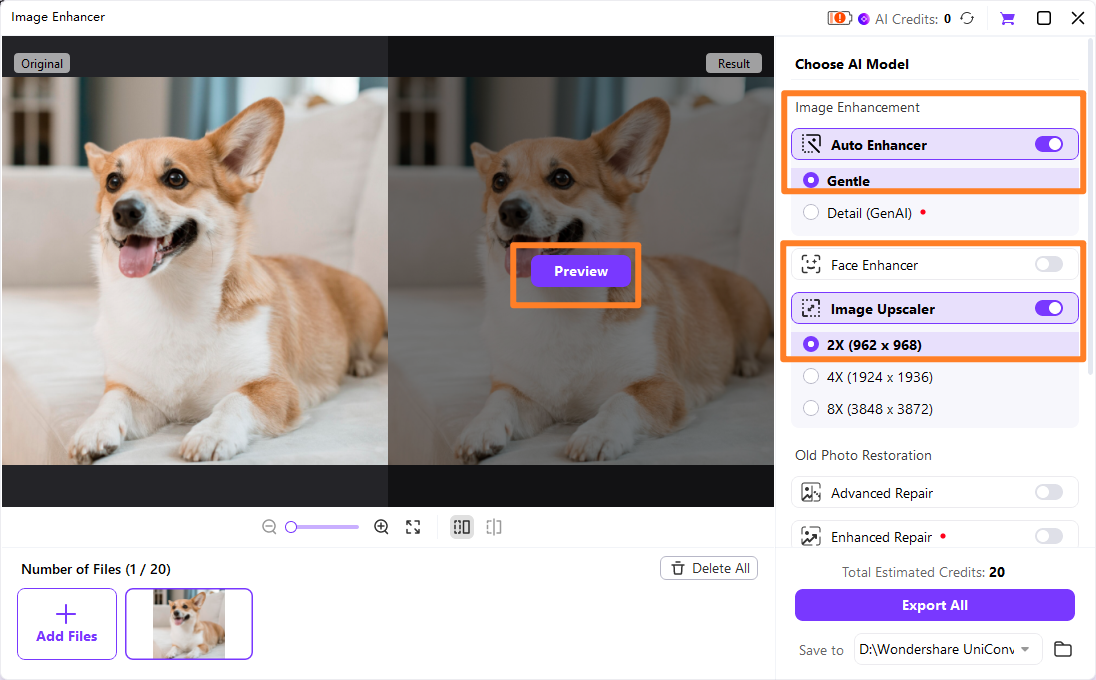
Step 3: Choose Enhancement Model
UniConverter offers various AI enhancement models. Select the one that best suits your image type and desired outcome (e.g., general enhancement, denoise, deblur). You can preview the effect before applying. This allows you to effectively enhance photos to your specific needs.
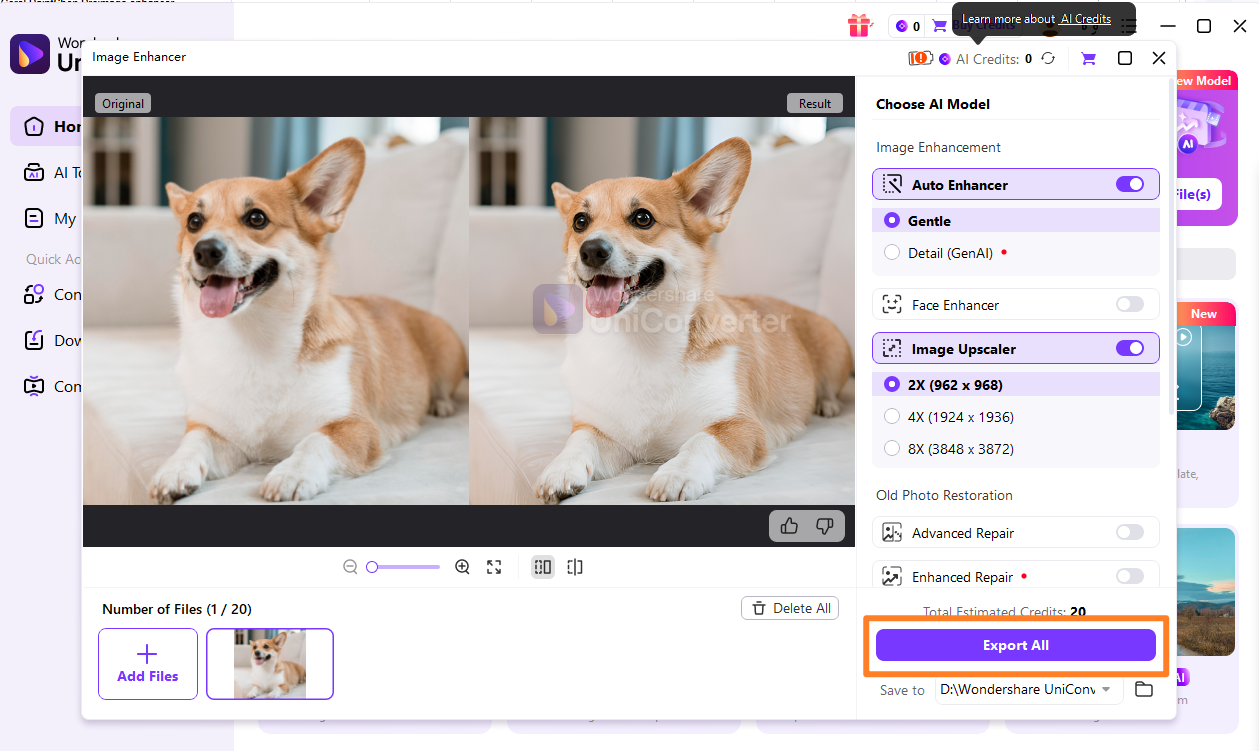
Step 4: Preview and Save the Enhanced Images
After selecting your enhancement settings, click "Enhance" and then preview the results. Once satisfied, choose your output folder and click "Export" to save your enhanced images.

Enhance DreamStudio Images with Ease
Part 7: Final Verdict & Recommendations
After spending considerable time with DreamStudio (Stability AI) image enhancer review and its competitors, my conclusion is that its value largely depends on your specific needs and existing workflow. For professional creators who are already deeply embedded in generative AI platforms, DreamStudio offers a compelling, integrated solution for enhancing their visual assets, providing excellent output quality and a streamlined experience. However, for users whose primary need is pure, unadulterated upscaling and noise reduction without the generative AI component, dedicated tools like Topaz Labs Gigapixel AI might offer more specialized algorithms. Casual users looking for quick fixes for social media photos might find DreamStudio's credit system a bit much, and simpler, often free, online tools or even basic photo editors could suffice. Lastly, for those who prioritize a versatile, all-in-one tool that handles not just image enhancement but also a wide range of media conversions with stability, batch processing, and GPU acceleration, UniConverter presents itself as a robust and budget-conscious alternative, especially if you're exploring free or one-time purchase options. Ultimately, each tool has its niche, and understanding your own priorities is key to making the best choice.
Part 8: FAQs
-
1. What is DreamStudio (Stability AI) image enhancer?
DreamStudio (Stability AI) image enhancer is an AI-powered tool designed to upscale and improve the quality of digital images, often by adding detail and reducing noise, leveraging advanced machine learning models.
-
2. How does DreamStudio compare to traditional image editing software?
DreamStudio leverages advanced AI models for enhancement, often achieving results that are difficult or time-consuming to replicate with traditional manual editing techniques, especially for intelligent upscaling and detail reconstruction, which goes beyond simple sharpening or resizing.
-
3. Is DreamStudio suitable for enhancing old, low-resolution photos?
Yes, DreamStudio can be very effective at enhancing old, low-resolution photos by intelligently adding detail and reducing artifacts. However, the extent of improvement can vary significantly depending on the original image quality and the severity of degradation.
-
4. What file formats does DreamStudio support for image enhancement?
DreamStudio typically supports common image formats like JPG, PNG, and WebP for enhancement. For specific and up-to-date information on supported formats and file size limits, it's always best to consult their official documentation.
-
5. Are there any free alternatives to DreamStudio for image enhancement?
While DreamStudio operates on a credit or subscription model, there are some free online tools and open-source software that offer basic image enhancement capabilities. However, these often come with limitations in terms of advanced AI features, output quality, or may include watermarks and ads.
