
- Darktable Value: Offers professional-grade, non-destructive, open-source image editing for meticulous control.
- Darktable Comparison: Excels in deep control and flexibility, but has a steep learning curve and can be resource-intensive.
- Darktable Decision: Ideal for professionals and enthusiasts seeking granular control over RAW files, willing to invest time.
- UniConverter Value: Provides quick, simple, and high-quality automated image enhancements, especially for upscaling and batch processing.
- UniConverter Comparison: Simpler and faster than Darktable for quick fixes, with a low learning curve and efficient performance.
- UniConverter Decision: Best for users needing rapid, reliable enhancements without complex workflows or extensive editing features.
In this article
- Part 1: What is Darktable
- Part 2: Darktable: Core Features, Pros, and Cons
- Part 3: Darktable: Ideal Users and Use Cases
- Part 4: Darktable and Alternatives Comparison
- Part 5: Risks and Pitfalls to Consider
- Part 6: How to Use UniConverter for Effortless Image Enhancement
- Part 7: Final Verdict and Recommendations
- Part 8: FAQs
When I first delved into the world of digital photography, I quickly realized that a good camera is only half the battle. Post-processing is where the magic truly happens, transforming a raw capture into a visual masterpiece. This is especially true for Darktable image enhancer capabilities, which can significantly elevate the quality of your photos. In this comprehensive Darktable image enhancer review, I'll share my personal journey and insights, comparing Darktable's enhancement features against its competitors, offering a scenario-based analysis to help you make an informed decision about which tool best fits your workflow.
Part 1: What is Darktable
When I first heard about Darktable, I was intrigued by its promise of professional-grade, open-source image editing. It's essentially a virtual lighttable and darkroom for photographers, designed to manage your digital negatives in a database and allow you to view them through a zoomable lighttable. What truly sets it apart for me is its non-destructive editing approach, meaning your original image files are never altered. Every adjustment you make is recorded as a set of instructions, which can be modified or reverted at any time. This flexibility is a game-changer, especially when you're experimenting with different looks for an image.
The Evolving Landscape of Image Enhancement
The world of image enhancement is constantly changing, and staying on top of the latest tools and techniques can be a challenge.
* The Demand for Quality: As camera technology advances, so do our expectations for image quality. We're constantly seeking ways to extract the most detail and vibrancy from our shots.
* The Rise of AI: Artificial intelligence is rapidly transforming how we enhance images, offering automated solutions for tasks that once required significant manual effort.
* The Need for Efficiency: Photographers, whether professional or amateur, are always looking for tools that can streamline their workflow without compromising on results.
Part 2: Darktable: Core Features, Pros, and Cons
Darktable, in my experience, is a powerhouse for image manipulation, especially when it comes to fine-tuning details. Its core strength lies in its modular architecture, offering a vast array of tools for color correction, exposure adjustments, noise reduction, sharpening, and much more. I've found its "Filmic RGB" module particularly effective for managing dynamic range, and the "Equalizer" module offers incredible control over local contrast and sharpness. The ability to stack multiple instances of modules and blend them using masks provides an unparalleled level of control over the enhancement process.
Pros:
* Advanced Non-Destructive Editing Workflow: This is a huge one for me. I can experiment endlessly without fear of ruining my original files.
* Extensive Module-Based Functionality: The sheer number of modules means there's almost always a tool for exactly what I need.
* Strong Community Support and Customization: The active community means I can find tutorials, presets, and even contribute to its development.
Cons:
* Steep Learning Curve for Beginners: I won't lie, it took me a while to get comfortable with Darktable's interface and workflow. It's not as intuitive as some other programs.
* Resource-Intensive Performance on Older Hardware: On my older laptop, Darktable can be a bit sluggish, especially when dealing with large RAW files and complex module stacks.
Part 3: Darktable: Ideal Users and Use Cases
From my perspective, Darktable truly shines for a specific type of user. If you're someone who loves to get under the hood and meticulously craft every aspect of your image, then Darktable is probably for you. I've found it indispensable for my landscape and portrait photography, where precise control over color grading, local adjustments, and noise reduction is paramount. It allows me to achieve a very specific artistic vision that more automated tools often can't replicate.
Best Use Case: Professional Photographers Requiring Fine-Grained Control
For me, as someone who often works with challenging lighting conditions and needs to extract every bit of detail from my RAW files, Darktable is a dream. I can fine-tune exposure, color balance, and sharpness with an accuracy that's hard to match. If you're a professional who needs to deliver consistent, high-quality results and has the time to invest in learning a powerful tool, this is it.
Limited Use Case: Casual Users Needing Quick, Automated Enhancements
However, if you're just looking to quickly brighten a few vacation photos or apply a trendy filter with minimal effort, Darktable might be overkill. I've tried to recommend it to friends who just want quick fixes, and they often get overwhelmed by the interface. For them, a more automated, "one-click" solution is usually a better fit.
Part 4: Darktable and Alternatives Comparison
When I look at the landscape of image enhancement tools, Darktable stands out for its open-source nature and deep control. But it's not the only player, and depending on what you need, other tools might be a better fit. Here's how I see it stacking up against some popular alternatives:
| Feature/Scenario | Darktable | Adobe Lightroom | GIMP | Topaz Photo AI |
| Non-Destructive Editing | Excellent | Excellent | Limited | N/A (Enhancement Focus) |
| AI-Powered Enhancement | Limited | Moderate | Limited | Excellent |
| Batch Processing | Good | Excellent | Moderate | Excellent |
| Learning Curve | High | Moderate | High | Low |
| Cost | Free | Subscription | Free | One-time purchase |
Key Differentiators: Open-Source Flexibility vs. AI Automation
From my experience, Darktable offers incredible flexibility because it's open-source. I can customize it, and there's a community constantly improving it. However, when it comes to AI-powered enhancements, tools like Topaz Photo AI are in a different league. If you're looking for automated noise reduction, sharpening, or upscaling with minimal effort, Topaz is incredibly powerful. Lightroom strikes a good balance, offering robust non-destructive editing with some AI features, but it comes with a subscription cost. GIMP is free like Darktable but focuses more on pixel manipulation rather than RAW development.
Part 5: Risks and Pitfalls to Consider
While I genuinely appreciate Darktable's capabilities, it's important to be aware of some potential downsides, especially if you're considering it as your primary image enhancer. I've definitely run into a few of these myself, and it's good to set expectations.
Performance Bottlenecks on Low-End Systems
This is a big one for me. When I tried running Darktable on my older machine, especially with large RAW files and multiple complex modules, it could become quite sluggish. The preview generation would be slow, and applying adjustments would often lag. If you don't have a relatively powerful CPU and a decent amount of RAM, your experience might be frustratingly slow.
Lack of Dedicated Customer Support
Being an open-source project, Darktable doesn't have a dedicated customer support team you can call or email. While the community forums are incredibly helpful, and I've found answers to most of my questions there, it's not the same as having direct, personalized support. If you hit a really obscure bug or need urgent help, you're relying on the community's goodwill and expertise.
Potential for Inconsistent Results with Default Settings
I've noticed that Darktable's default settings, especially for modules like noise reduction or sharpening, might not always give you the best results right out of the box. You often need to tweak them significantly to get the look you want. This goes back to the learning curve; you need to understand what each slider does to achieve consistent, high-quality enhancements.
Compatibility Issues with Certain Proprietary File Formats
While Darktable supports a vast array of RAW formats, I've occasionally run into issues with very new camera models or obscure proprietary formats. Sometimes, it takes a while for the community to add support, or you might need to convert your files first. This can be a minor annoyance if you're working with cutting-edge camera tech.
Part 6: How to Use UniConverter for Effortless Image Enhancement
Sometimes, when I'm dealing with a large batch of images that need a quick, reliable enhancement, or if Darktable's complex workflow feels like overkill, I turn to UniConverter. It's a fantastic alternative when I need to upscale images without losing quality, or simply enhance them with minimal fuss. It avoids the steep learning curve and performance issues I sometimes face with more complex software.
UniConverter: Your Go-To for Quick and Quality Image Upscaling
UniConverter has become my go-to for situations where I need speed and simplicity without sacrificing quality. It's great for upscaling, denoising, and generally improving image clarity, especially for web use or when I need to print at a larger size. It's ad-free, supports a wide range of formats, leverages GPU acceleration for speed, and consistently delivers stable, lossless enhancements, even in batches. It truly feels like an all-in-one solution for quick image fixes.
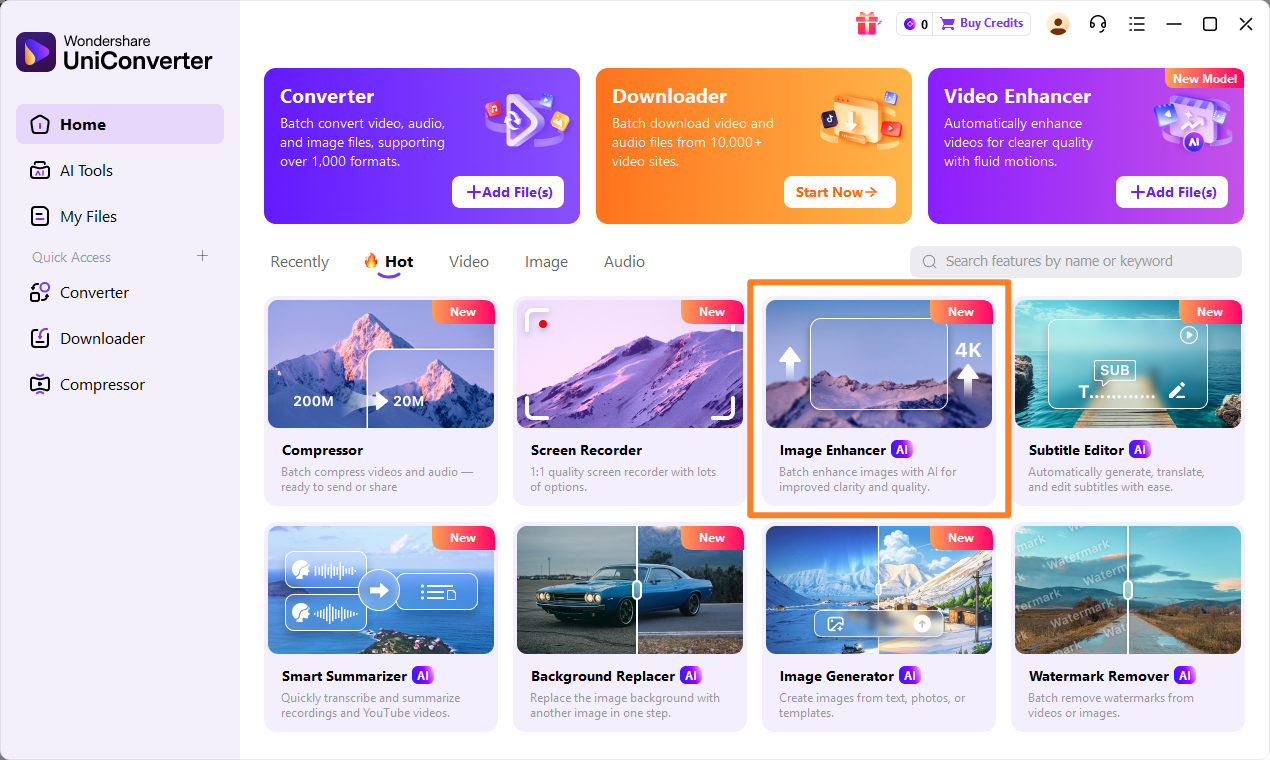
Step 1: Open UniConverter and Choose Image Enhancer
Launch UniConverter and navigate to the "Image Enhancer" tool from the main interface.
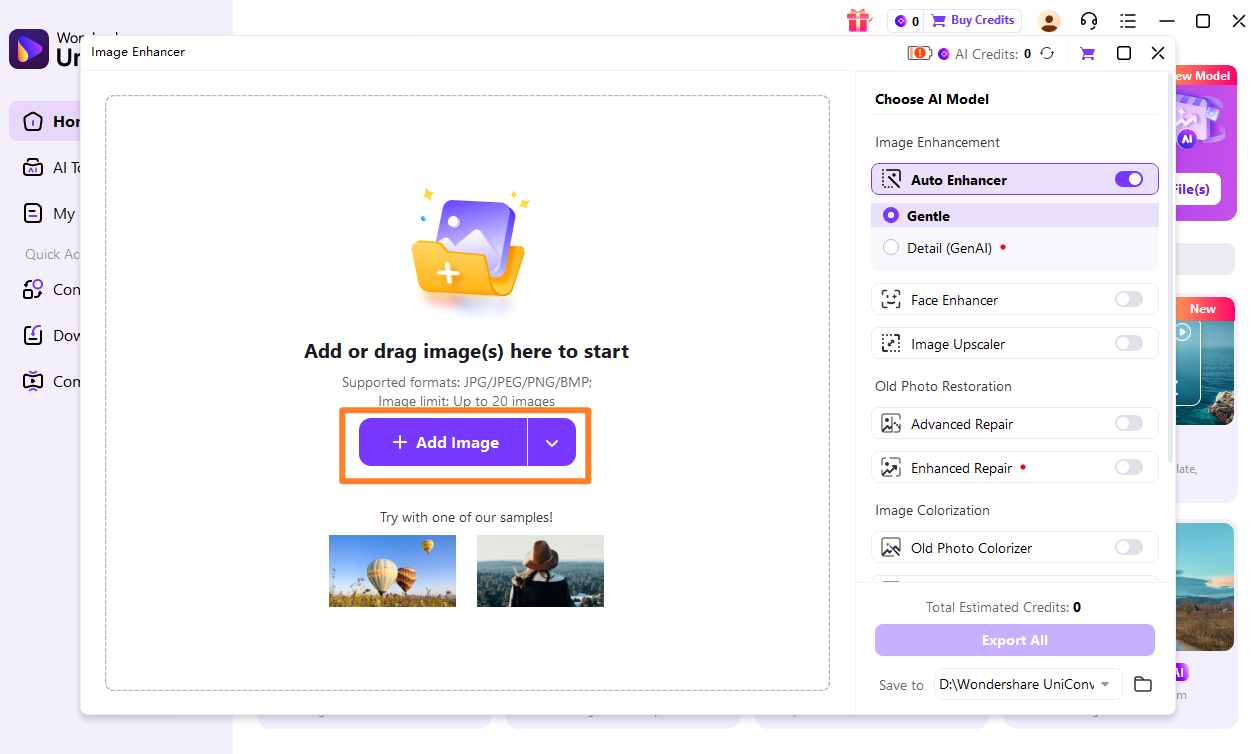
Step 2: Upload the Images
Click the "Add Files" button or drag and drop your images into the designated area.
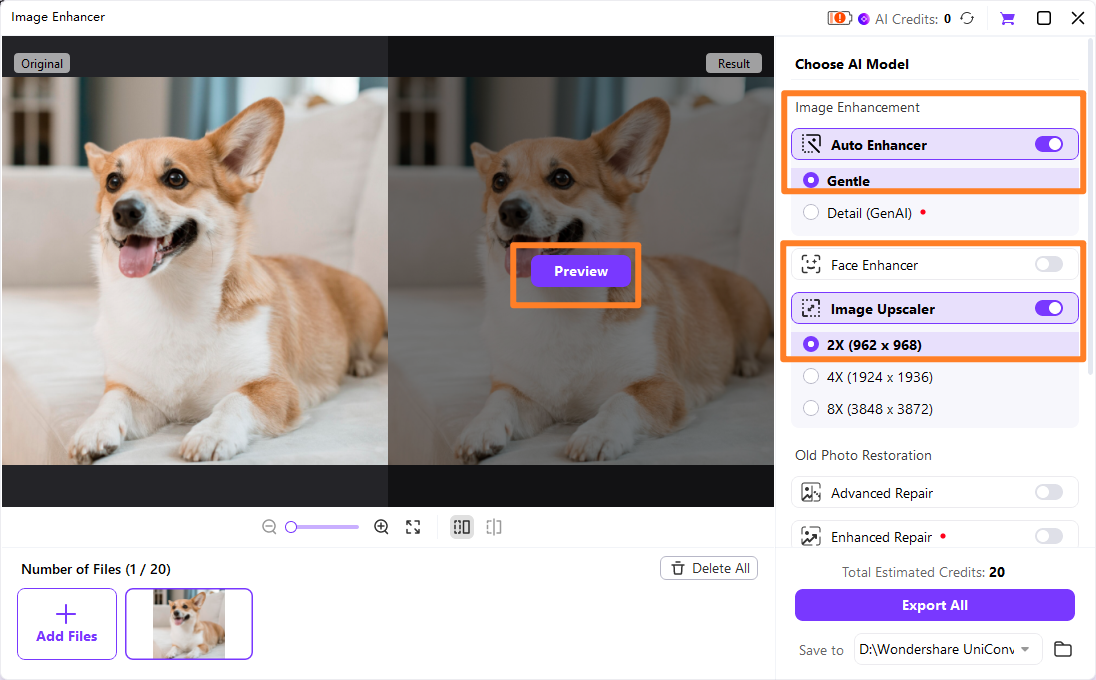
Step 3: Choose Enhancement Model
Select the desired enhancement model (e.g., AI Upscale, Denoise, Sharpen) and adjust parameters as needed.
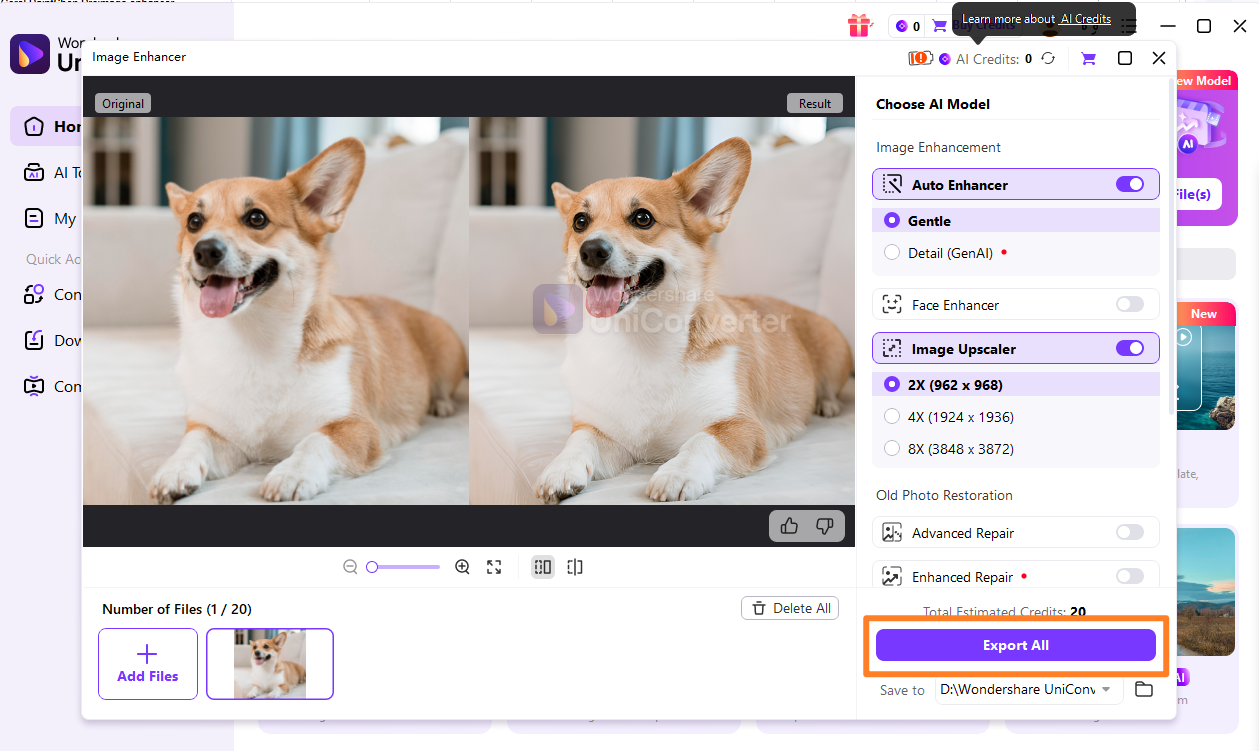
Step 4: Preview and Save the Enhanced Images
Preview the enhanced image and click "Save" or "Export All" to save your improved photos.

Darktable Alternative for Image Enhancement
Part 7: Final Verdict and Recommendations
After spending considerable time with Darktable image enhancer capabilities and exploring its alternatives, my conclusion is clear: the best tool truly depends on your specific needs and workflow. Darktable is an incredibly powerful, free, and open-source solution that offers unparalleled control over your images. It's a fantastic choice for experienced photographers, hobbyists who love to tinker, and anyone who wants to delve deep into the nuances of image processing without a subscription fee. However, its steep learning curve and potential performance demands mean it's not for everyone. If you're a professional who needs to squeeze every last bit of quality from your RAW files and you're willing to invest the time to learn, Darktable will reward you immensely.
UniConverter, on the other hand, fills a different but equally important niche. It's ideal for users who prioritize speed, simplicity, and reliable, automated enhancements, especially for tasks like upscaling or quick batch processing. If you find Darktable too complex or resource-intensive, or if you simply need a quick fix without diving into a full editing suite, UniConverter is an excellent, user-friendly alternative. Ultimately, consider your workflow: are you seeking deep, manual control or efficient, automated results? Balance the learning curve with your desired output quality, and you'll find the right tool for your image enhancement journey.
Part 8: FAQs
-
1. Is Darktable a good alternative to Adobe Lightroom?
Yes, Darktable is an excellent free and open-source alternative to Adobe Lightroom, especially for photographers who prefer a non-destructive workflow and extensive control over their RAW images. While it has a steeper learning curve, it offers many similar features without a subscription cost.
-
2. Can Darktable enhance image resolution?
Darktable primarily focuses on enhancing image quality through adjustments like sharpening, noise reduction, and color correction. While it can improve the perceived sharpness and detail, it does not inherently "upscale" or increase the pixel resolution of an image in the way dedicated AI upscaling tools do.
-
3. What are the best image formats to use with Darktable?
Darktable is designed to work best with RAW image formats (e.g., .CR2, .NEF, .ARW) from various camera manufacturers. It also supports common formats like JPEG, PNG, and TIFF, but its full non-destructive editing power is best utilized with RAW files.
-
4. How does Darktable handle noise reduction?
Darktable offers several powerful modules for noise reduction, including "denoise (profiled)" which uses camera-specific profiles for effective luminance and chrominance noise reduction, and "denoise (bilateral filter)" for more general noise removal. These modules provide fine-grained control to balance noise reduction with detail preservation.
-
5. Is UniConverter suitable for professional photo editing?
UniConverter is primarily designed for quick and efficient image enhancement tasks like upscaling, denoising, and basic quality improvements. While it delivers excellent results for these specific functions, it is not a full-fledged professional photo editor like Darktable or Lightroom, which offer a much broader range of creative and corrective tools.
