
- Canva Enhancer: Simple, integrated, and ideal for quick social media video fixes.
- Limitations: Lacks advanced controls, can over-process, unsuitable for professional-grade video.
- Best for: Social media creators and small businesses needing fast, easy visual improvements.
- Alternatives: UniConverter offers balanced ease-of-use with powerful, high-quality enhancements.
- Decision: Choose Canva for speed; UniConverter for superior control and professional results.
In this article
- Part 1: What is Canva Video Enhancer?
- Part 2: Canva Video Enhancer: Core Features, Pros & Cons
- Part 3: Who Benefits Most from Canva Video Enhancer? (Use Cases)
- Part 4: Canva Video Enhancer and Alternatives: A Comparative Analysis
- Part 5: Risks and Pitfalls to Avoid
- Part 6: How to Use UniConverter to Efficiently Enhance Videos
- Part 7: Conclusion
- Part 8: FAQs
The digital landscape is saturated with tools promising to elevate your visual content, and video enhancement is no exception. With the explosion of short-form video and the increasing demand for high-quality visuals, users are constantly seeking solutions that are both powerful and user-friendly. This Canva Video Enhancer review delves into one such prominent tool, evaluating its capabilities against a backdrop of established and emerging competitors. This comprehensive analysis aims to provide a clear understanding of where Canva's offering stands, helping content creators, small businesses, and even professional videographers make informed decisions about their video enhancement toolkit. We will explore its core features, identify its ideal use cases, and highlight potential pitfalls, ultimately guiding you toward the best solution for your specific needs.
Part 1: What is Canva Video Enhancer?
Canva Video Enhancer is an integrated feature within the popular graphic design platform, Canva, designed to improve the visual quality of video clips directly within its ecosystem. Leveraging AI-powered algorithms, it aims to simplify complex video adjustments, making professional-looking enhancements accessible to users without extensive video editing experience. This tool emerged as a natural extension of Canva's mission to democratize design, allowing its vast user base to not only create stunning static visuals but also to refine their video content with ease. Our review will critically assess whether this convenience comes at the cost of advanced functionality and output quality, especially when compared to dedicated video enhancement software.
The Rise of AI-Powered Video Editing
The demand for accessible video enhancement tools is driven by several key factors:
* Social Media Dominance: The prevalence of platforms like TikTok, Instagram Reels, and YouTube Shorts necessitates quick, high-quality video production.
* Content Creator Economy: A growing number of individuals and small businesses rely on compelling video content to engage their audiences and build their brands.
* Technological Advancements: AI and machine learning have made sophisticated video processing more automated and user-friendly, lowering the barrier to entry.
Part 2: Canva Video Enhancer: Core Features, Pros & Cons
Canva Video Enhancer offers a streamlined approach to improving video aesthetics, focusing on simplicity and integration. Its core capabilities revolve around automated adjustments to brightness, contrast, saturation, and color balance, often with one-click solutions. It also includes basic stabilization and upscaling features, making it a convenient option for quick fixes. The tool is primarily designed for enhancing short video clips intended for digital platforms, where speed and ease of use are paramount.
Pros:
* Intuitive Interface for Beginners: The drag-and-drop functionality and clear visual cues make it incredibly easy for novices to navigate and apply enhancements.
* Seamless Integration with Canva Ecosystem: Users can enhance videos directly within their existing Canva projects, eliminating the need to switch between multiple applications.
* Quick and Easy Enhancements for Social Media: Ideal for rapid adjustments to short-form content, allowing creators to maintain a consistent posting schedule.
Cons:
* Limited Advanced Enhancement Options: Lacks granular control over specific parameters, color grading, or complex noise reduction found in professional tools.
* Potential for Over-Processed Results: Automated enhancements can sometimes lead to an artificial or overly saturated look, especially on already decent footage.
Part 3: Who Benefits Most from Canva Video Enhancer? (Use Cases)
Canva Video Enhancer is tailored for a specific segment of users who prioritize speed and simplicity over intricate control and professional-grade output. Its design philosophy caters to those who need quick visual improvements without a steep learning curve or significant investment in specialized software.
Best Use Case: Social Media Content Creators & Small Businesses
This tool is a perfect fit for individuals and small businesses who regularly produce video content for platforms like Instagram, Facebook, TikTok, and YouTube. They often need to quickly polish raw footage from smartphones or basic cameras to make it more appealing. Canva Video Enhancer allows them to brighten dark clips, add vibrancy to dull colors, and stabilize shaky footage with minimal effort, ensuring their content looks presentable and engaging without diverting significant time or resources. Its integration with Canva's broader design suite further streamlines their content creation workflow.
Limited Use Case: Professional Videographers & High-End Productions
For professional videographers, filmmakers, and those working on high-end productions, Canva Video Enhancer falls short. These users require precise control over every aspect of their footage, including advanced color grading, sophisticated noise reduction, detailed sharpening, and the ability to work with high-resolution, uncompressed video formats. The automated and somewhat simplistic nature of Canva's enhancements would not meet the rigorous quality standards or creative demands of professional projects, which often involve complex post-production pipelines and specialized software.
Part 4: Canva Video Enhancer and Alternatives: A Comparative Analysis
When evaluating video enhancement tools, it's crucial to consider a range of factors beyond just basic functionality. Here's a comparison of Canva Video Enhancer with some prominent alternatives: UniConverter, Adobe Premiere Pro, and DaVinci Resolve.
| Feature/Scenario | Canva Video Enhancer | UniConverter | Adobe Premiere Pro | DaVinci Resolve |
| Ease of Use (Beginner) | High | High | Medium | Low |
| Advanced Enhancement | Low | High | Very High | Very High |
| Integration | High (Canva) | Medium (Standalone) | High (Adobe Ecosystem) | Medium (Standalone) |
| Price | Freemium | One-time purchase/Subscription | Subscription | Freemium/Studio License |
| Output Quality | Good | Excellent | Excellent | Excellent |
| Processing Speed | Medium | Fast (GPU Accelerated) | Fast (GPU Accelerated) | Fast (GPU Accelerated) |
| Customer Support | Good (Community/Help Center) | Excellent (Dedicated Support) | Excellent (Extensive Resources) | Good (Community/Forum) |
| Security | Cloud-based (Standard) | Local (High) | Cloud/Local (High) | Local (High) |
Key Differentiators:
User-Friendliness vs. Professional Control: Canva excels in user-friendliness for basic tasks, while UniConverter offers a balance of ease and powerful features. Premiere Pro and DaVinci Resolve provide unparalleled professional control but have steeper learning curves. Ecosystem Integration vs. Standalone Power: Canva's strength lies in its integration within its design ecosystem. UniConverter is a powerful standalone tool. Premiere Pro is part of a vast creative suite, and DaVinci Resolve is a comprehensive post-production platform. * AI-Driven Automation vs. Manual Fine-Tuning: Canva heavily relies on AI for automated enhancements. UniConverter also leverages AI but offers more manual control. Premiere Pro and DaVinci Resolve prioritize manual, precise fine-tuning.
Part 5: Risks and Pitfalls to Avoid
While convenient, relying solely on cloud-based or overly automated video enhancement tools like Canva Video Enhancer can present several risks and pitfalls that users should be aware of. Understanding these potential drawbacks is crucial for making informed decisions and protecting your content and workflow.
Privacy Concerns with Cloud-Based Processing
When uploading videos to cloud-based platforms, there's always an inherent risk regarding data privacy and security. Your footage, which might contain sensitive or proprietary information, is stored and processed on third-party servers. While reputable companies like Canva have robust security measures, the possibility of data breaches or unauthorized access, however remote, cannot be entirely discounted. Users should always review the platform's privacy policy and terms of service carefully.
Over-Reliance on AI for Critical Enhancements
AI-powered enhancements, while convenient, are not always perfect. Over-reliance on automated features for critical visual improvements can lead to unintended consequences. AI might misinterpret certain elements, resulting in unnatural colors, excessive sharpening, or a "plastic" look on faces. For crucial projects, manual adjustments and human oversight are indispensable to ensure the final output meets specific creative visions and quality standards.
Potential for Watermarks or Subscription Walls
Many freemium video enhancement tools, including aspects of Canva, often impose limitations on their free versions. This can include watermarks on exported videos, restricted access to advanced features, or lower export resolutions. To unlock the full potential and remove these limitations, users are typically required to subscribe to a paid plan. This "hidden cost" can be a pitfall for budget-conscious users who initially opt for a free solution.
Output Quality Limitations for Specific Formats
While Canva Video Enhancer is suitable for social media, it may have limitations when it comes to outputting videos in specific high-quality or professional formats. It might not support advanced codecs, higher bitrates, or specific color spaces required for broadcast, cinema, or archival purposes. This can lead to a compromise in overall video quality or compatibility issues with professional editing workflows.
Understanding the True Cost of "Free" Features
The allure of "free" features can be strong, but it's important to understand the true cost. Beyond potential subscription walls, "free" tools might come with compromises in processing speed, customer support, or the quality of the enhancements themselves. Users might spend more time trying to achieve a desired effect or dealing with suboptimal results, ultimately costing them more in terms of time and effort than investing in a more capable, paid solution.
Part 6: How to Use UniConverter to Efficiently Enhance Videos
When other tools fall short with batch processing, unstable enhancements, or weak results, UniConverter emerges as a robust solution. It bypasses common issues like ads, limited formats, and quality degradation, offering a comprehensive, stable, and high-quality video enhancement experience. UniConverter leverages GPU acceleration for fast processing, supports a vast array of formats, and ensures lossless quality, making it an all-in-one ultimate solution for all your video enhancement needs. For instance, you can easily fix pixelated videos or even upscale anime with its advanced features.
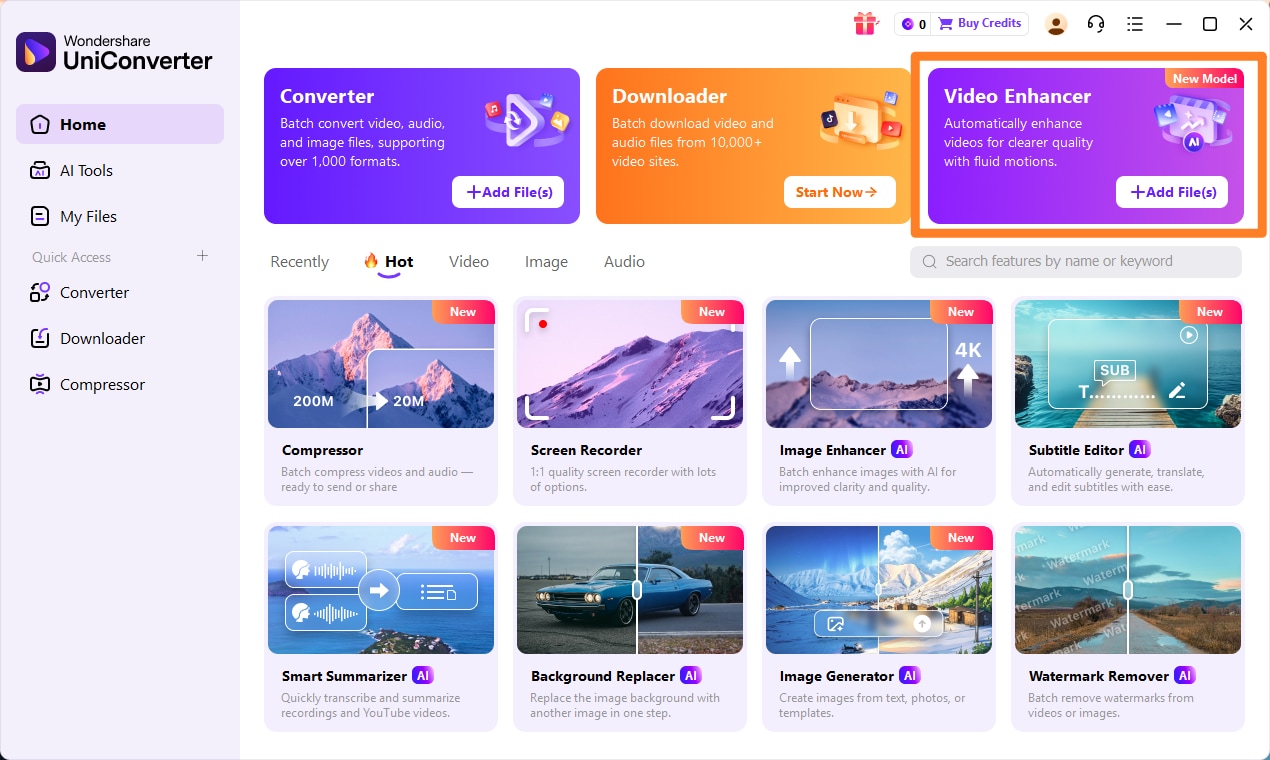
Step 1: Open UniConverter and Choose Video Enhancer
Launch UniConverter on your computer. From the main interface, navigate to the "Toolbox" section and select the "Video Enhancer" feature.
Step 2: Upload the Videos
Click on the "Add Files" button or drag and drop your video files directly into the UniConverter window. You can add multiple videos for batch processing.
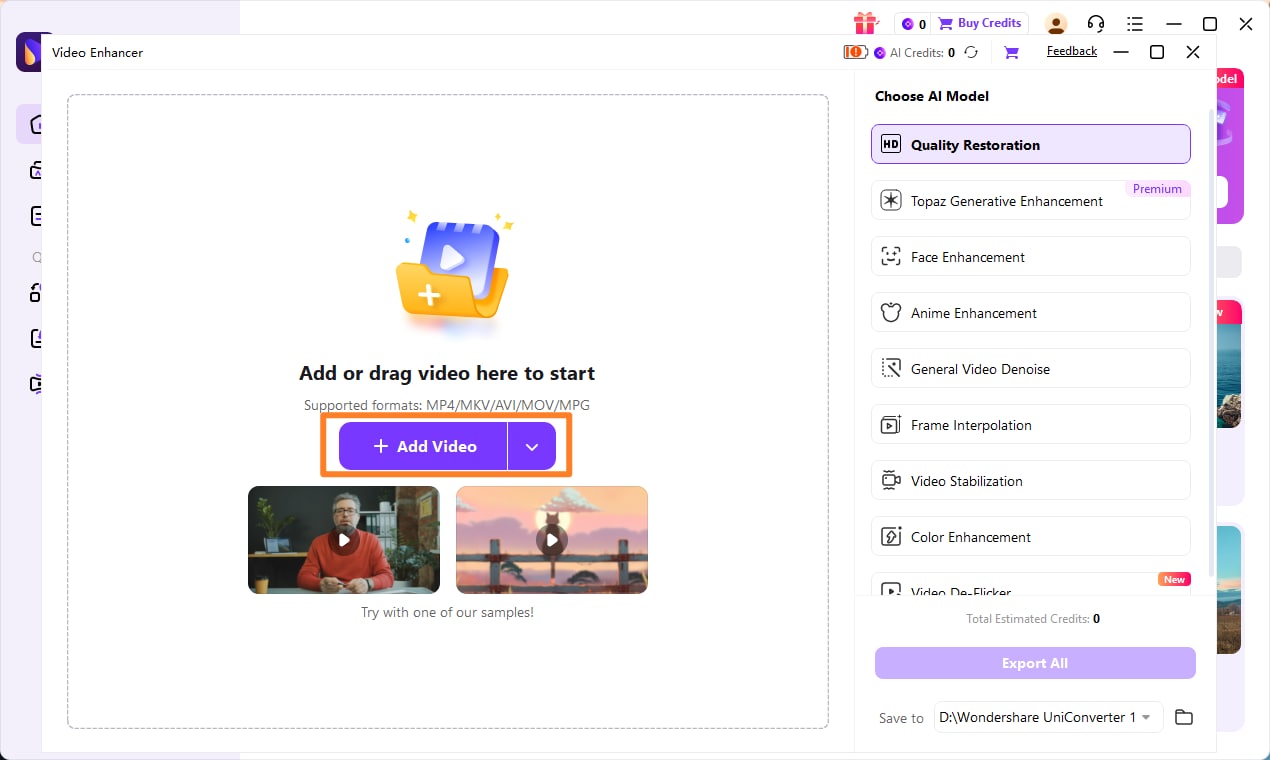
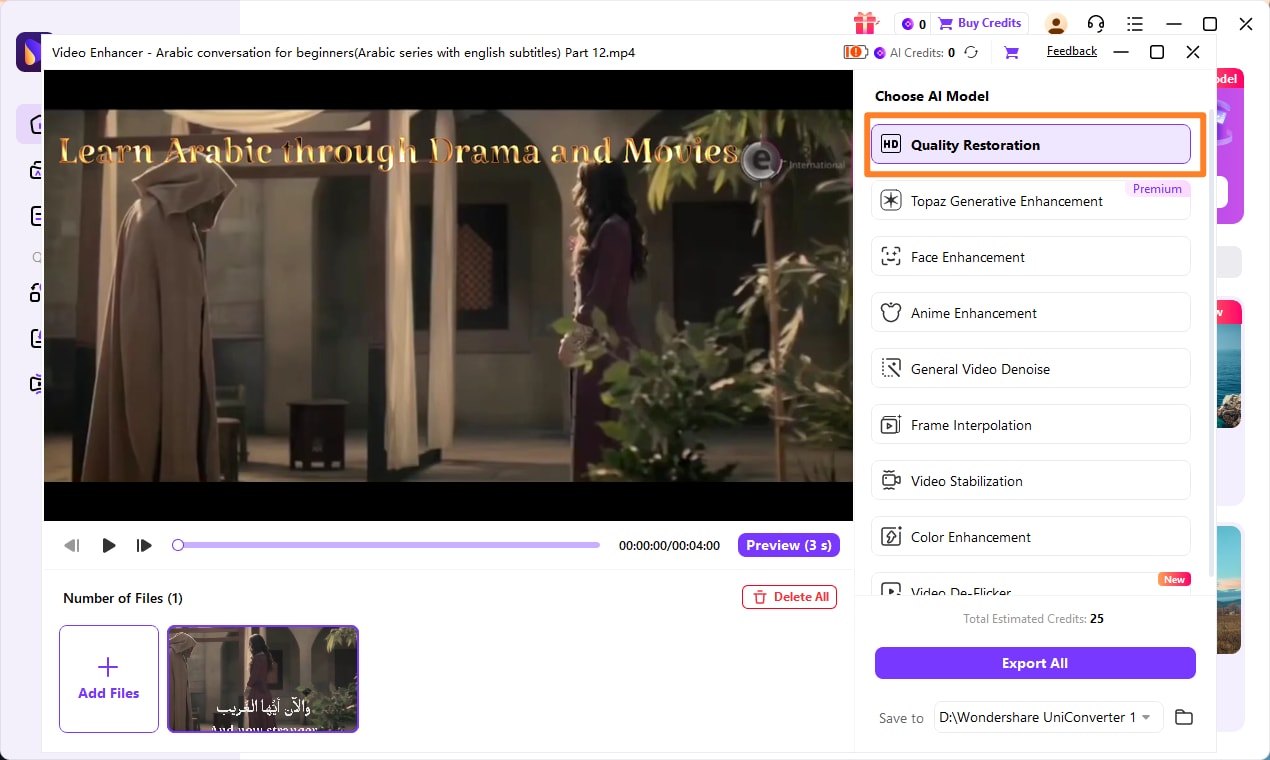
Step 3: Choose Enhancement Model
Once your video is loaded, UniConverter will present various enhancement options. Select the desired enhancement model, such as "AI Upscale," "Brightness/Contrast," or "Denoise," and adjust parameters as needed.
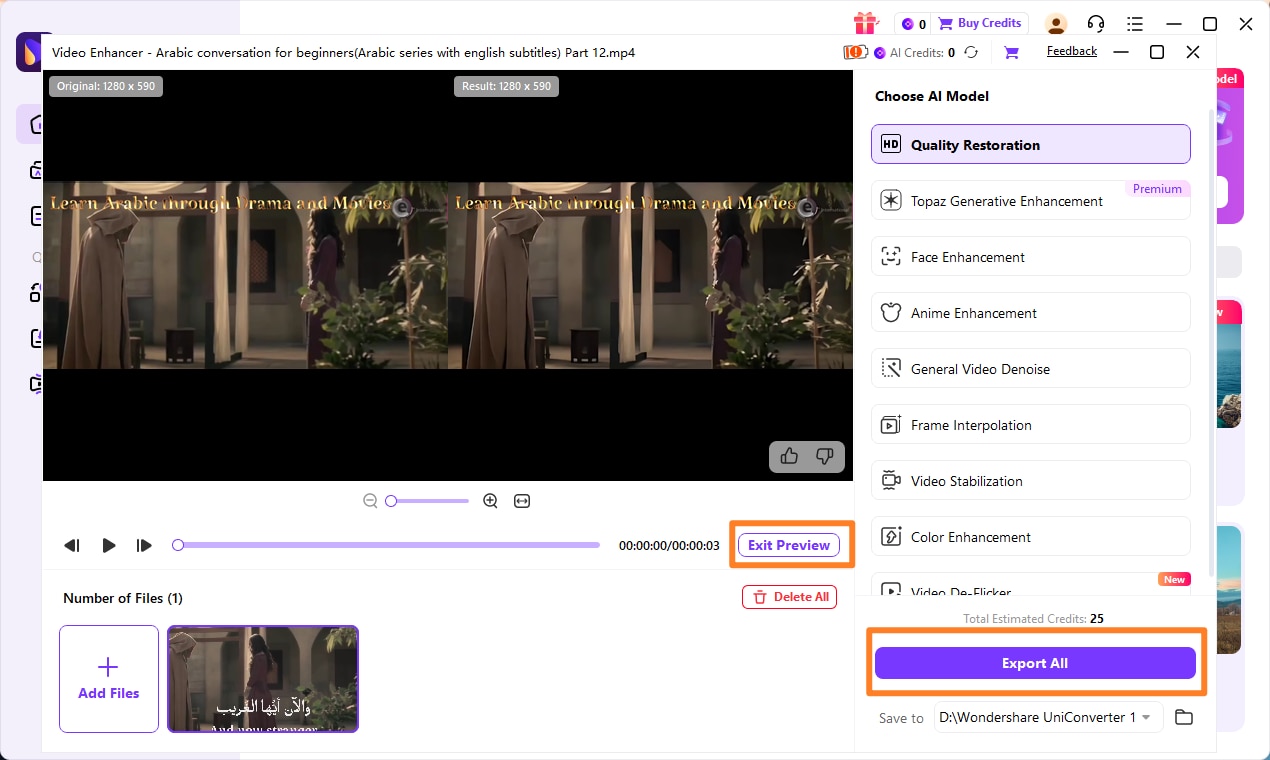
Step 4: Preview and Save the Enhanced Video
Before exporting, use the "Preview" function to see the enhanced result. If satisfied, choose your desired output format and destination folder, then click "Export" to save your high-quality enhanced video.

Seeking a Powerful Canva Video Enhancer Alternative?
Part 7: Conclusion
This Canva Video Enhancer review has explored its capabilities, ideal use cases, and limitations in the context of a rapidly evolving digital content landscape. Canva Video Enhancer stands out for its exceptional ease of use and seamless integration within the broader Canva ecosystem, making it an excellent choice for social media content creators and small businesses who need quick, intuitive video enhancements without a steep learning curve. However, its automated nature and limited advanced controls mean it falls short for professional videographers or high-end productions requiring precise, granular adjustments and uncompromised output quality. For those seeking more robust features, greater control, and superior output, dedicated software like UniConverter offers a compelling alternative, providing advanced enhancement options, faster processing, and comprehensive format support. Ultimately, the best tool depends on your specific needs: prioritize Canva for speed and simplicity in social media content, and opt for UniConverter when professional-grade enhancements and comprehensive control are paramount.
Part 8: FAQs
-
1. Is Canva Video Enhancer truly free?
Canva offers a freemium model. While basic video enhancement features are available for free, more advanced options, higher resolution exports, and removal of potential watermarks often require a Canva Pro subscription.
-
2. Can Canva Video Enhancer improve low-light footage significantly?
Canva Video Enhancer can apply basic brightness and contrast adjustments to low-light footage. However, it has limitations in advanced noise reduction and detail recovery compared to specialized software, so significant improvements in very dark or noisy footage may not be achievable.
-
3. What are the main differences between Canva Video Enhancer and dedicated video editing software?
Canva Video Enhancer focuses on quick, automated visual improvements within a design platform. Dedicated video editing software (like Adobe Premiere Pro or DaVinci Resolve) offers comprehensive editing timelines, advanced color grading, complex effects, multi-track audio, and precise control over every aspect of video production.
-
4. Does Canva Video Enhancer compress video quality?
Like many online tools, Canva may apply some compression during the enhancement and export process, especially for free users or larger files, to optimize for web delivery. This can result in a slight reduction in overall video quality compared to the original source.
-
5. Is UniConverter difficult to learn for beginners?
UniConverter is designed with a user-friendly interface, making it relatively easy for beginners to learn and use. While it offers advanced features, its intuitive layout and clear navigation allow users to quickly access and apply video enhancement tools without extensive prior experience.
