
- OBS Studio Compressor: Essential for live streaming, ensuring consistent audio levels and preventing clipping.
- Real-time vs. Post-production: OBS excels in live audio processing; UniConverter and DAWs are better for post-production.
- Learning Curve: OBS compressor requires audio engineering knowledge; UniConverter offers a simpler approach.
- Common Pitfalls: Over-compression creates unnatural sound; incorrect settings cause artifacts.
- UniConverter's Value: Offers user-friendly batch compression for various media, ideal for post-OBS refinement.
- Decision Factor: Choose OBS for live, UniConverter for easy post-processing, or DAWs for professional control.
In this article
- Part 1: What is OBS Studio?
- Part 2: OBS Studio Audio Compressor: Core Features, Pros, and Cons
- Part 3: OBS Studio Audio Compressor: Target Audience and Use Cases
- Part 4: OBS Studio Audio Compressor vs. Competitors
- Part 5: Risks and Pitfalls of Using OBS Studio Audio Compressor
- Part 6: How to Use UniConverter for Efficient Audio and Video Compression
- Part 7: Conclusion
- Part 8: FAQs
OBS Studio Audio Compressor: A Comprehensive Scenario-Based Review
When diving into the world of live streaming or content creation, pristine audio is paramount. I've spent countless hours tweaking settings, battling inconsistent sound levels, and trying to achieve that professional polish. This OBS Studio Audio Compressor review stems from my personal journey through the often-frustrating landscape of audio dynamics. Many content creators, myself included, start with OBS Studio for its robust streaming capabilities, only to quickly realize that raw microphone audio simply doesn't cut it. This review aims to demystify the OBS Studio Audio Compressor, comparing it against other popular tools, highlighting its strengths and weaknesses in real-world scenarios, and ultimately guiding you toward making informed decisions for your audio setup. My goal is to provide a practical, user-centric perspective on how this built-in tool performs and where it fits into a broader audio workflow.
Part 1: What is OBS Studio?
OBS Studio, or Open Broadcaster Software Studio, is a free and open-source software suite for video recording and live streaming. It's become the go-to solution for millions of content creators, gamers, educators, and professionals due to its powerful features and accessibility. From capturing screen activity to mixing multiple audio and video sources, OBS Studio provides a comprehensive platform for producing high-quality live and recorded content. Its modular design allows users to add various filters and plugins, including essential audio processing tools like the compressor, to enhance their broadcasts.
The core challenge that OBS Studio, and specifically its audio compressor, seeks to address is the dynamic nature of live audio. Without proper management, sudden loud noises can clip and distort, while quiet whispers can become inaudible. This inconsistency can severely detract from the viewer's experience, making it difficult to follow content and potentially leading to audience drop-off.
The Role of Audio Compression in Live Streaming and Recording
* Ensuring Consistent Volume Levels: Compression helps to normalize audio, making loud parts quieter and quiet parts louder, resulting in a more even listening experience.
* Preventing Audio Clipping and Distortion: By reducing peaks, a compressor prevents audio signals from exceeding the maximum level, thus avoiding harsh, distorted sounds.
* Improving Speech Intelligibility: A well-applied compressor can bring out quieter vocal nuances, making speech clearer and easier to understand, especially in environments with background noise.
* Enhancing Perceived Loudness: By reducing the dynamic range, the overall perceived loudness of the audio can be increased without actually boosting the peak levels, making your stream sound more impactful.
Part 2: OBS Studio Audio Compressor: Core Features, Pros, and Cons
The OBS Studio Audio Compressor is a built-in filter designed to manage the dynamic range of your audio sources. It allows you to control how loud and soft your audio signals are, ensuring a more consistent and professional sound for your streams and recordings. Its core capabilities revolve around real-time audio processing, which is crucial for live content.
Here are some of its core features:
* Threshold: Sets the level at which compression begins.
* Ratio: Determines how much the audio signal is reduced once it crosses the threshold.
* Attack: Controls how quickly the compressor reacts to signals exceeding the threshold.
* Release: Dictates how quickly the compressor stops compressing once the signal falls below the threshold.
* Output Gain: Allows you to boost the overall volume after compression to compensate for any perceived loudness reduction.
Pros:
* Real-time audio processing for live broadcasts, meaning you hear the compressed audio as you stream.
* Highly customizable parameters for fine-tuning audio dynamics to suit your specific needs.
* Seamless integration within the OBS Studio ecosystem, accessible directly from your audio source filters.
Cons:
* Steep learning curve for beginners unfamiliar with audio engineering concepts like attack, release, threshold, and ratio.
* Can introduce unwanted artifacts like "pumping" or "breathing" if not configured correctly, making your audio sound unnatural.
Part 3: OBS Studio Audio Compressor: Target Audience and Use Cases
The OBS Studio Audio Compressor is primarily aimed at content creators who need to manage their audio dynamics in real-time for live broadcasts or recordings. It's a powerful tool for anyone looking to improve the consistency and clarity of their spoken word or mixed audio.
Best Use Case: Live Streaming with Dynamic Audio Sources
Imagine you're a gamer streaming live gameplay. You have in-game audio, your microphone commentary, and occasional sound effects from alerts or hotkeys. Without a compressor, your excited shouts might clip and distort, while your quieter strategic whispers get lost in the game's explosions. The OBS Studio Audio Compressor shines here. By applying it to your microphone, it ensures consistent vocal levels despite varying game volume and sudden shouts, preventing audio clipping and improving the listener experience. Your audience won't have to constantly adjust their volume, making for a much more enjoyable stream.
Limited Use Case: Professional Audio Post-Production
Now, consider a podcaster editing a pre-recorded interview for a high-fidelity podcast. While OBS can record, its compressor is primarily for real-time processing. For nuanced post-production, where you need precise control, visual feedback on gain reduction, multi-band compression, and advanced noise reduction, dedicated audio editing software with more sophisticated compression algorithms is preferred. The OBS compressor, while functional, lacks the granular control and visual analysis tools that a professional audio engineer would demand for a polished, studio-quality podcast. It's a real-time workhorse, not a post-production scalpel.
Part 4: OBS Studio Audio Compressor vs. Competitors
When it comes to audio compression, OBS Studio isn't the only player in the game. Let's see how it stacks up against some popular alternatives.
| Feature/Competitor | OBS Studio Audio Compressor | Audacity Compressor | Adobe Audition Dynamics Processing | UniConverter |
| Real-time Processing | Yes | No (post-processing) | Yes | No (post-processing) |
| Customization Depth | High | Medium | Very High | Medium |
| Ease of Use | Medium | High | Low | High |
| Integration | OBS Studio | Standalone | Adobe Creative Cloud | Standalone (all-in-one) |
| Cost | Free | Free | Subscription | One-time purchase/Subscription |
| Output Quality | Good | Good | Excellent | Very Good |
| Batch Processing | No | No | Yes | Yes |
| Customer Support | Community | Community | Adobe | Wondershare |
| Security | Open Source | Open Source | Proprietary | Proprietary |
Key Differentiators:
OBS excels in real-time, integrated compression for live content, making it a go-to for streamers. Audacity offers a simpler, free post-processing solution, perfect for quick edits on recorded audio. Adobe Audition provides professional-grade, highly granular control for both real-time and post-production, but comes with a subscription cost and a steeper learning curve. UniConverter, while not a real-time compressor, offers a user-friendly post-processing option with good output quality and batch processing capabilities, making it a versatile tool for various audio and video tasks.
Part 5: Risks and Pitfalls of Using OBS Studio Audio Compressor
While the OBS Studio Audio Compressor is a powerful tool, it's not without its challenges and potential pitfalls, especially for those new to audio engineering. Understanding these risks can help you avoid common mistakes and achieve better audio quality.
Over-compression leading to a "pumped" or unnatural sound.
One of the most common mistakes I've made is pushing the compressor too hard. When the ratio is too high or the threshold is too low, the compressor works excessively, causing the audio to sound "pumped" or "breathing." This means the background noise or room tone gets noticeably louder when you stop speaking, and then suddenly ducks down when you start again. It's incredibly distracting and makes your audio sound unnatural and fatiguing to listen to.
Incorrect threshold and ratio settings causing audio artifacts.
Setting the threshold too high means the compressor isn't engaging enough, and your audio dynamics remain largely uncontrolled. Conversely, setting it too low with a high ratio can lead to the over-compression issue mentioned above. Incorrect attack and release times can also introduce artifacts. A too-fast attack can sound harsh, while a too-slow release can make your audio sound squashed and lifeless, failing to recover its natural dynamics quickly enough.
Lack of visual feedback for real-time gain reduction.
Unlike dedicated audio software, OBS Studio's compressor filter doesn't provide a visual meter for gain reduction in real-time. This makes it challenging to "see" how much the compressor is working. You're relying solely on your ears, which can be difficult, especially in a live streaming environment where you're focused on multiple things. This lack of visual feedback can make troubleshooting and fine-tuning a more trial-and-error process.
Potential for increased CPU usage on lower-end systems.
While audio filters in OBS are generally optimized, adding multiple filters, including a compressor, can cumulatively increase CPU usage. On lower-end systems, this might lead to performance issues, such as dropped frames in your stream or recording, or even audio crackling if the CPU is struggling to process everything in real-time. It's crucial to monitor your system's performance when adding filters.
Difficulty in troubleshooting complex audio issues without prior knowledge.
If you encounter issues like distortion, inconsistent volume, or strange artifacts after applying the compressor, diagnosing the problem can be tough without a basic understanding of audio engineering principles. The OBS community forums are helpful, but ultimately, you'll need to learn about how each parameter affects the sound to effectively troubleshoot and achieve your desired audio quality.
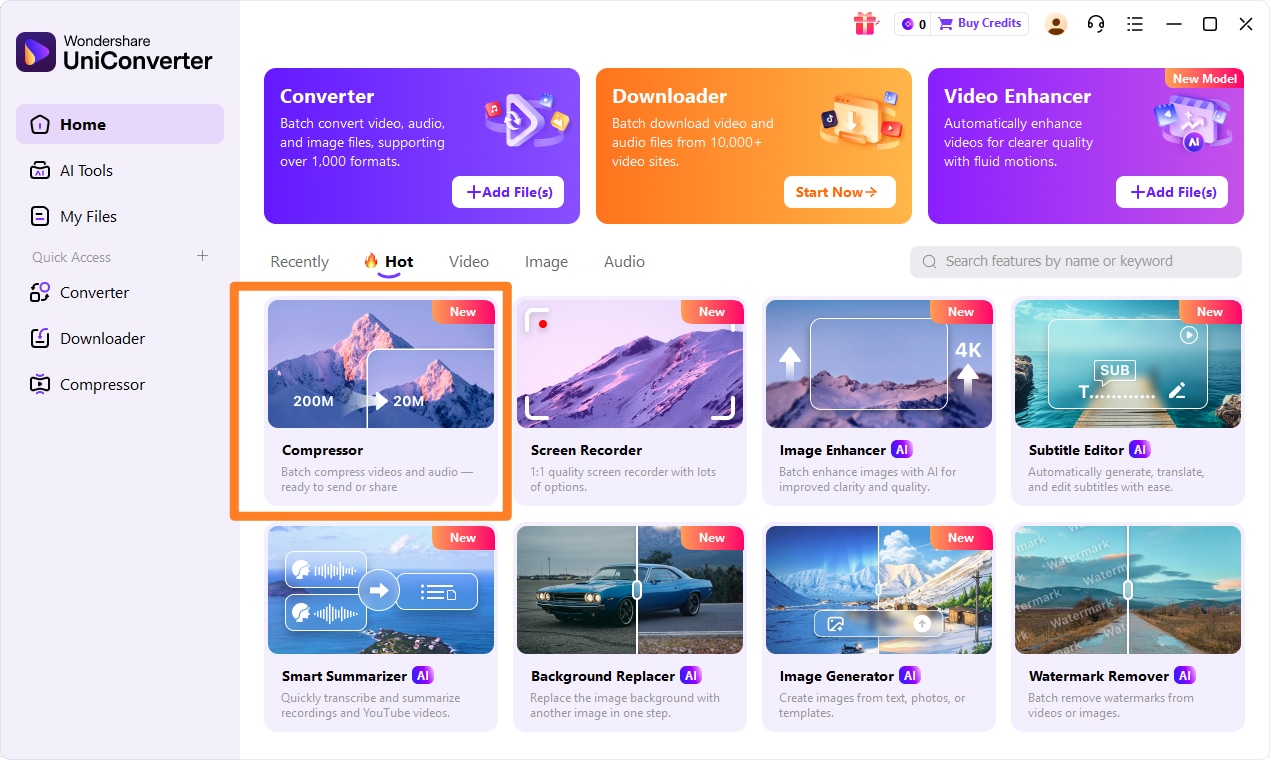
Part 6: How to Use UniConverter for Efficient Audio and Video Compression
Sometimes, other tools may fall short, lacking support for batch compression, yielding inconsistent results, or causing significant quality degradation. In such scenarios, UniConverter proves to be a dependable alternative. It provides a straightforward approach to audio compression and broader video compression tasks, while also supporting image compression when needed. With broad format compatibility, stable output quality, and efficient performance for repeated tasks, it stands out as a practical all-in-one media solution for everyday compression needs.
Step 1: Open UniConverter and Choose Compressor
Launch UniConverter on your computer. From the main interface, navigate to the "Toolbox" section and select the "Video Compressor" or "Audio Compressor" option, depending on your file type.
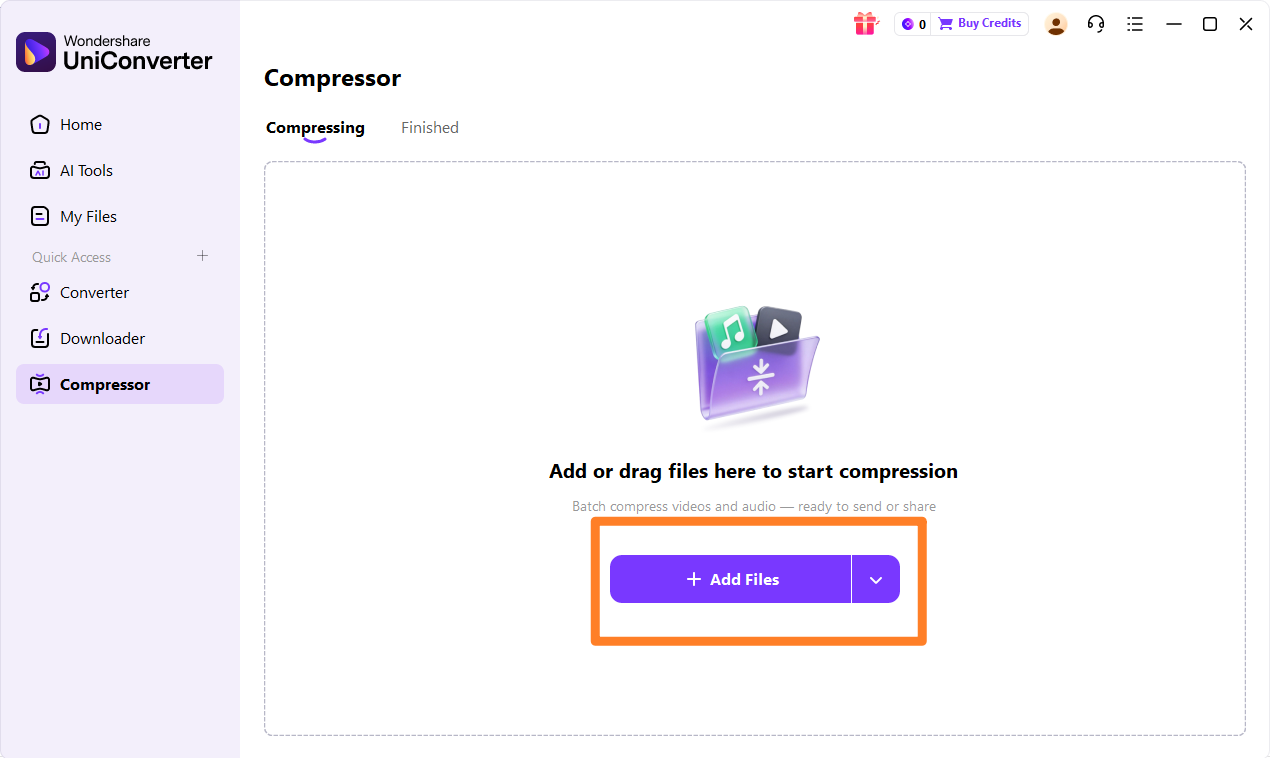
Step 2: Upload the Video, Audios or Images
Click the "Add Files" button or simply drag and drop your video, audio, or image files into the UniConverter window. You can add multiple files for batch compression.
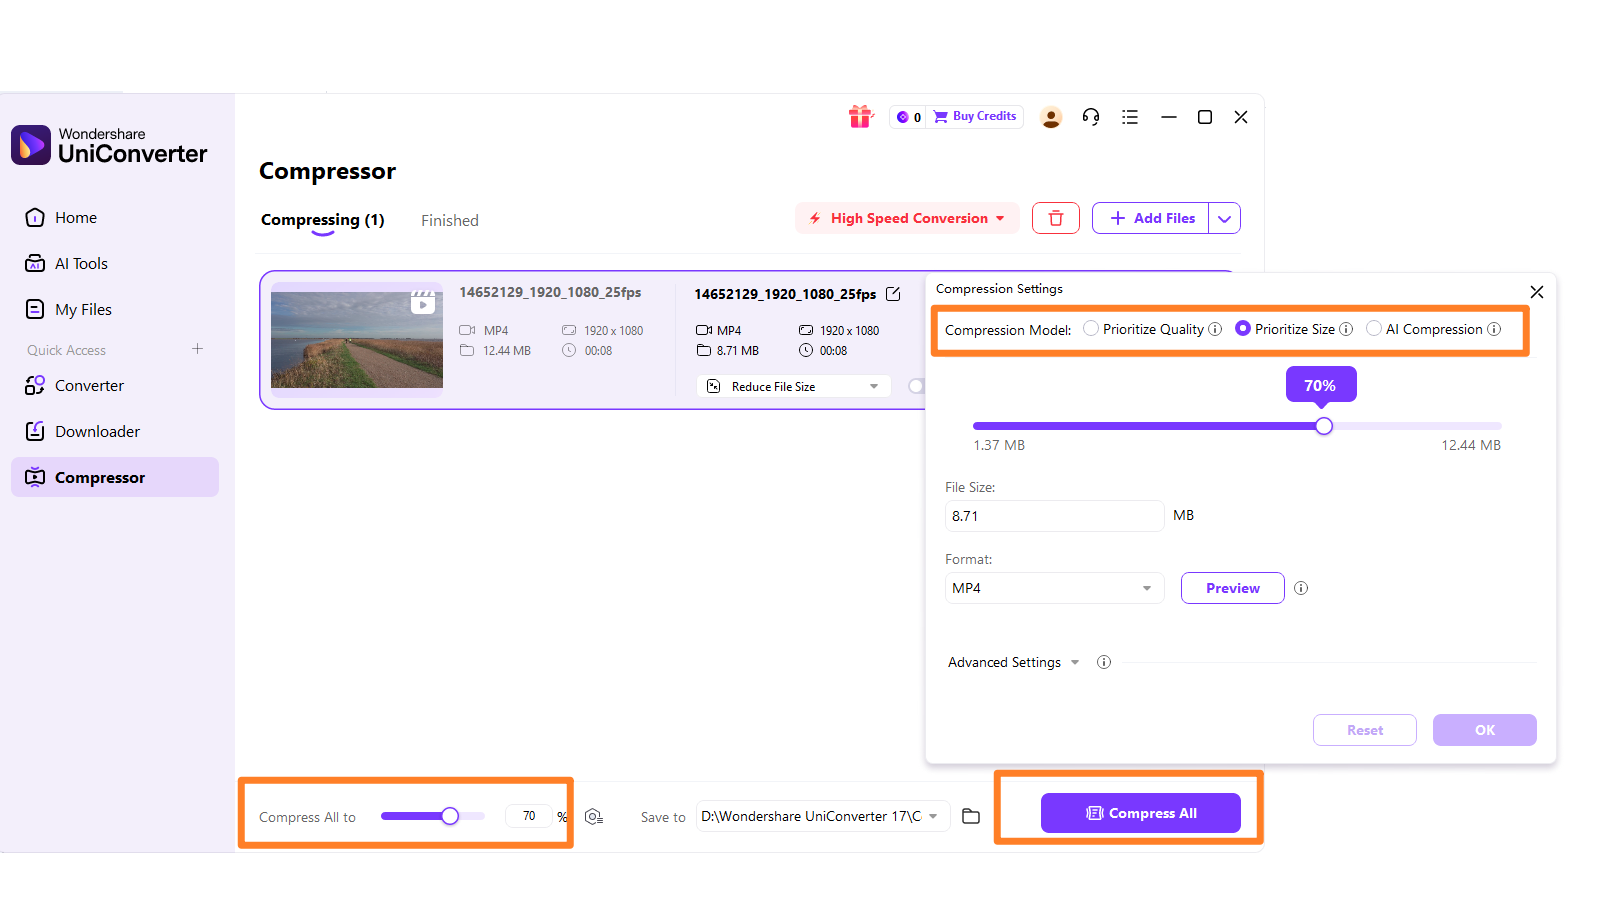
Step 3: Choose Required Parameters
Once your file is loaded, you'll find options to adjust compression parameters. For videos, you can modify resolution, bitrate, and quality. For audio, you can adjust bitrate, sample rate, and channel. UniConverter often provides visual feedback to help you understand the impact of your changes.
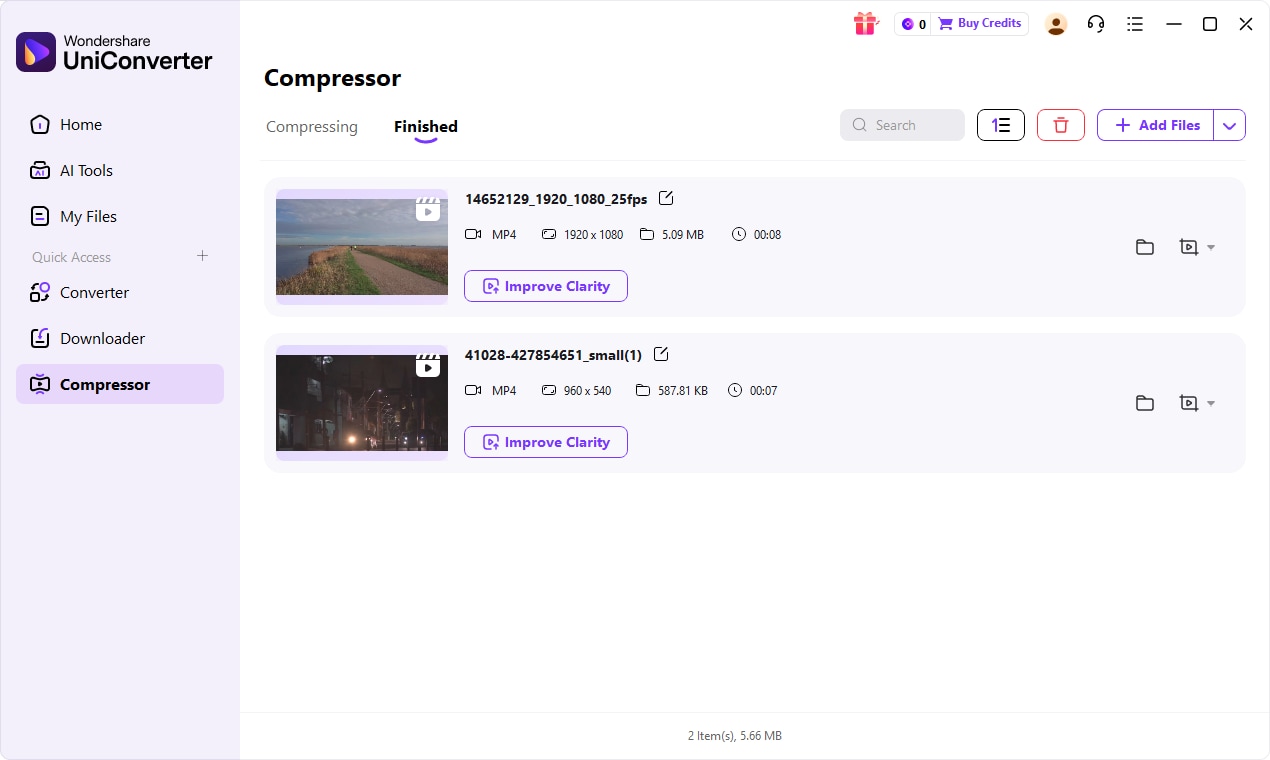
Step 4: Save the Compressed File
After setting your desired parameters, choose an output folder for your compressed files. Then, click the "Compress" or "Start All" button to begin the compression process. UniConverter will quickly process your files, providing you with optimized versions.

Enhance OBS Audio Beyond Basic Compression
Part 7: Conclusion
In conclusion, the OBS Studio Audio Compressor review highlights its indispensable role for live streamers and content creators seeking real-time audio leveling. Its seamless integration and customizable parameters make it a powerful tool for ensuring consistent and clear audio during broadcasts. However, its steep learning curve and potential for artifacts if misconfigured mean it's not a set-it-and-forget-it solution. For beginners and casual users who find the OBS compressor too complex or need post-processing capabilities, UniConverter offers a simpler, more intuitive approach to audio adjustments, providing a user-friendly interface and reliable compression without the need for deep audio engineering knowledge. For professional audio engineers demanding the highest level of control and advanced features, dedicated Digital Audio Workstations (DAWs) like Adobe Audition remain the superior choice. Regardless of your chosen tool, the most crucial recommendation is always to thoroughly test your audio settings before going live or finalizing recordings to ensure the best possible listening experience for your audience.
Part 8: FAQs
-
1. What is audio compression and why is it important for streaming?
Audio compression reduces the dynamic range of an audio signal, making loud parts quieter and quiet parts louder. This is crucial for streaming to ensure consistent volume levels, prevent clipping, and improve overall listener experience by making your audio easier to listen to without constant volume adjustments.
-
2. Can OBS Studio Audio Compressor remove background noise?
While compression can help manage overall volume, it's not designed for noise reduction. OBS Studio offers other filters like "Noise Suppression" or "Noise Gate" for that purpose. For more advanced noise reduction in post-production, tools like UniConverter or dedicated audio editors are more effective.
-
3. How do I know if I'm over-compressing my audio in OBS?
Listen for a "pumping" or "breathing" sound, where the audio volume noticeably fluctuates with the compressor's action, especially when you stop and start speaking. Also, monitor your audio levels to ensure they aren't constantly hitting the maximum, which can indicate excessive compression.
-
4. Is there a preset for OBS Studio Audio Compressor?
OBS Studio doesn't offer built-in presets for its compressor. Users typically need to adjust the threshold, ratio, attack, and release settings manually based on their specific audio source and desired outcome. This allows for maximum flexibility but requires some understanding of audio dynamics.
-
5. What's the difference between a compressor and a limiter in OBS?
A compressor reduces the dynamic range by a set ratio once the audio exceeds a threshold, making loud parts quieter proportionally. A limiter is a type of compressor with a very high ratio (often infinity:1), effectively preventing the audio from exceeding a specific maximum level, acting as a "brick wall" to protect against clipping.
