
- Kdenlive Compressor: Integrated, free, open-source video compression within Kdenlive for convenience.
- Core Features: Offers custom bitrate, resolution, and codec control; good for individual projects.
- Target Audience: Ideal for budget-conscious independent creators comfortable with a learning curve.
- Comparative Analysis: Kdenlive is good, but dedicated tools like HandBrake, FFmpeg, and UniConverter offer superior quality or features.
- Risks & Pitfalls: Potential quality loss, performance issues on older hardware, limited codec support, and no dedicated support.
- UniConverter Advantage: Offers intuitive interface, GPU acceleration, and robust batch processing for efficient, high-quality compression.
- Final Verdict: Kdenlive suits basic needs; UniConverter excels for ease, quality; FFmpeg for advanced control.
In this article
- Part 1: What is Kdenlive Video Compressor?
- Part 2: Kdenlive Video Compressor: Core Features, Pros, and Cons
- Part 3: Kdenlive Video Compressor: Target Audience and Use Cases
- Part 4: Kdenlive Video Compressor & Competitors: A Comparative Analysis
- Part 5: Risks and Pitfalls of Using Kdenlive for Video Compression
- Part 6: How to Use UniConverter for Efficient Video Compression
- Part 7: Final Verdict and Recommendations
- Part 8: FAQs
Kdenlive, a powerful open-source video editor, has long been a go-to for many content creators. But when it comes to video compression, its integrated tools often spark questions about efficiency and quality. This review will delve into the Kdenlive Video Compressor's capabilities, comparing it with dedicated compression software to help you understand its strengths and weaknesses. We'll explore its features, ideal use cases, potential pitfalls, and provide a comprehensive comparison with popular alternatives like HandBrake, FFmpeg, and UniConverter, ensuring you make an informed decision for your video compression needs.
Part 1: What is Kdenlive Video Compressor?
Kdenlive is a free and open-source non-linear video editing software, widely recognized for its robust set of editing tools. Within this comprehensive suite, it offers integrated video compression functionalities, allowing users to reduce file sizes of their video projects directly after editing. This built-in compressor leverages various codecs and settings to optimize videos for different platforms and purposes, from web uploads to archival. My experience with it has shown that it aims to provide a convenient, all-in-one solution for video production, eliminating the need to export and then compress using a separate application. This integrated approach is particularly appealing for those who prefer to keep their workflow within a single environment.
Understanding the Need for Efficient Video Compression
* Faster Uploads and Downloads: Large video files can significantly slow down internet transfers, impacting content delivery and consumption.
* Reduced Storage Requirements: High-resolution videos consume vast amounts of storage space, which can be costly and inconvenient.
* Improved Playback Performance: Smaller file sizes often translate to smoother playback, especially on devices with limited processing power or bandwidth.
* Enhanced Compatibility: Compressed videos are generally more compatible across various devices and platforms.
Part 2: Kdenlive Video Compressor: Core Features, Pros, and Cons
The Kdenlive Video Compressor is an integral part of the Kdenlive video editing suite, offering users the ability to reduce video file sizes directly within their editing workflow. Its core capabilities revolve around leveraging various encoding presets and custom settings to achieve desired compression levels. I've found that it provides options for adjusting resolution, bitrate, and codec, giving me a degree of control over the output. While it's not a standalone compression tool, its integration is its defining feature, streamlining the post-production process for many.
Core Features
* Integrated Encoding Profiles: Offers a range of presets for common platforms and devices.
* Custom Bitrate Control: Allows manual adjustment of video and audio bitrates for specific quality/size targets.
* Resolution Scaling: Enables changing video dimensions to reduce file size.
* Codec Selection: Supports various codecs like H.264, H.265, and VP9 for different compression efficiencies.
* Two-Pass Encoding: Provides an option for better quality at a given bitrate.
Pros
* Open-source and Free: Accessible to everyone without any cost.
* Advanced Compression Settings: Offers fine-grained control over output parameters.
* Integrated Workflow: Allows for seamless compression within the editing suite, saving time.
Cons
* Steep Learning Curve: Can be challenging for beginners to master optimal settings.
* Performance Variability: Dependent on system resources and codec choice, leading to inconsistent speeds.
Part 3: Kdenlive Video Compressor: Target Audience and Use Cases
The Kdenlive Video Compressor primarily targets independent filmmakers, content creators, and hobbyists who are already using Kdenlive for their video editing needs. Its appeal lies in its open-source nature and the convenience of having compression tools built directly into the editor. If you're someone who values a unified workflow and is comfortable with a bit of a learning curve, Kdenlive's compressor can be a valuable asset.
Best Use Case: Independent Filmmakers and Content Creators on a Budget
* Scenario: As a YouTube creator, I often shoot 4K videos that are massive in file size. Uploading them directly can take hours, and storage quickly becomes an issue. Using Kdenlive's integrated compressor, I can reduce the file size significantly after editing, making uploads much faster and saving precious cloud storage, all without having to switch to another application. I can tweak the settings to find a good balance between file size and visual quality, ensuring my audience still gets a great viewing experience.
Limited Use Case: Professionals Requiring Batch Processing and Advanced Codec Support
* Scenario: Imagine a production studio that needs to compress hundreds of video files daily for various broadcast standards and archival purposes. They require specific professional codecs, robust batch processing capabilities, and automated workflows. In this scenario, Kdenlive's compressor, while functional for single files, often falls short. Its batch processing is less intuitive and comprehensive, and its codec support, while good for general use, might not cover all the specialized professional formats required by a large studio. They would likely find dedicated compression tools far more efficient and reliable for their high-volume, high-standard needs.
Part 4: Kdenlive Video Compressor & Competitors: A Comparative Analysis
When evaluating the Kdenlive Video Compressor, it's crucial to compare it against other popular tools in the market. My experience shows that while Kdenlive offers convenience, specialized tools often excel in specific areas. For instance, HandBrake is renowned for its excellent compression quality and wide preset library, making it a favorite for many. FFmpeg, though command-line based, offers unparalleled control and is a powerhouse for advanced users and developers. UniConverter, on the other hand, provides a user-friendly interface with a strong emphasis on ease of use and comprehensive features, appealing to a broader audience.
| Feature/Product | Kdenlive Video Compressor | HandBrake | FFmpeg | UniConverter |
| Ease of Use | Moderate | Moderate | High (CLI) | Easy |
| Compression Quality | Good | Excellent | Excellent | Excellent |
| Batch Processing | Limited | Good | Excellent | Excellent |
| Advanced Settings | Good | Excellent | Excellent | Good |
| Cost | Free | Free | Free | Paid |
| Processing Speed | Varies | Fast | Very Fast | Very Fast (GPU accelerated) |
| Customer Support | Community | Community | Community | Dedicated |
| Security | Open-source (community vetted) | Open-source (community vetted) | Open-source (community vetted) | Proprietary (company vetted) |
Key Differentiators
Kdenlive's strength lies in its integration within a full non-linear editor (NLE), allowing me to compress videos without leaving my editing environment. This is a significant time-saver for individual projects. However, competitors like HandBrake and FFmpeg offer more specialized compression features, often achieving better quality-to-size ratios or faster processing for dedicated tasks. The open-source nature of Kdenlive, HandBrake, and FFmpeg contrasts with UniConverter's commercial offering, which often translates to a more polished user experience and dedicated customer support.
Part 5: Risks and Pitfalls of Using Kdenlive for Video Compression
While Kdenlive offers a convenient integrated video compressor, my experience has highlighted several risks and pitfalls that you should be aware of, especially if you're relying on it for critical projects. These issues can impact the final quality of your video, the efficiency of your workflow, and even the stability of your system.
Potential Quality Degradation
One of the biggest concerns I've encountered is the potential for quality degradation. While Kdenlive provides various settings, achieving the optimal balance between file size and visual fidelity can be tricky. Without a deep understanding of codecs, bitrates, and resolution, you might inadvertently compress your video too much, resulting in noticeable artifacts, pixelation, or a general loss of detail. This is particularly true if you're aiming for very small file sizes.
Performance Bottlenecks on Older Hardware
Video compression is a resource-intensive task. If you're running Kdenlive on older or underpowered hardware, you'll likely experience significant performance bottlenecks. Compression times can become excessively long, making your workflow inefficient. I've found that without a powerful CPU and sufficient RAM, even moderate compression tasks can bring the system to a crawl, impacting productivity.
Limited Codec Support Compared to Dedicated Tools
While Kdenlive supports common codecs like H.264 and H.265, its range might be limited compared to dedicated compression software. If your project requires very specific or less common professional codecs, you might find Kdenlive lacking. This can force you to export an uncompressed file and then use another tool, defeating the purpose of an integrated compressor.
Lack of Dedicated Customer Support
As an open-source project, Kdenlive relies on community support. While the community is generally helpful, there's no dedicated customer support line or official troubleshooting team. If you encounter a complex compression issue or a bug, you might have to spend considerable time searching forums or waiting for community responses, which can be frustrating in a professional setting.
Steep Learning Curve for Optimal Settings
To truly leverage Kdenlive's compressor for high-quality, efficient results, you need to understand a lot about video encoding. The interface, while functional, isn't always intuitive for beginners when it comes to advanced settings. I've spent a fair amount of time experimenting with different parameters to achieve the desired output, which can be a significant hurdle if you're new to video compression.
Part 6: How to Use UniConverter for Efficient Video Compression
When Kdenlive’s built-in compressor falls short—whether in batch processing, output consistency, or preserving visual quality—I usually switch to UniConverter for a more dependable workflow. It provides a smoother and more stable experience, especially when I need a dedicated video compressor that delivers efficient results without the usual hassles. What I like most is its beginner-friendly interface, broad format compatibility, and GPU acceleration, which help speed up processing while still aiming to compress videos without quality loss. Since it also supports image compression and other media tools, UniConverter has become my preferred all-in-one option for simple and reliable media management.
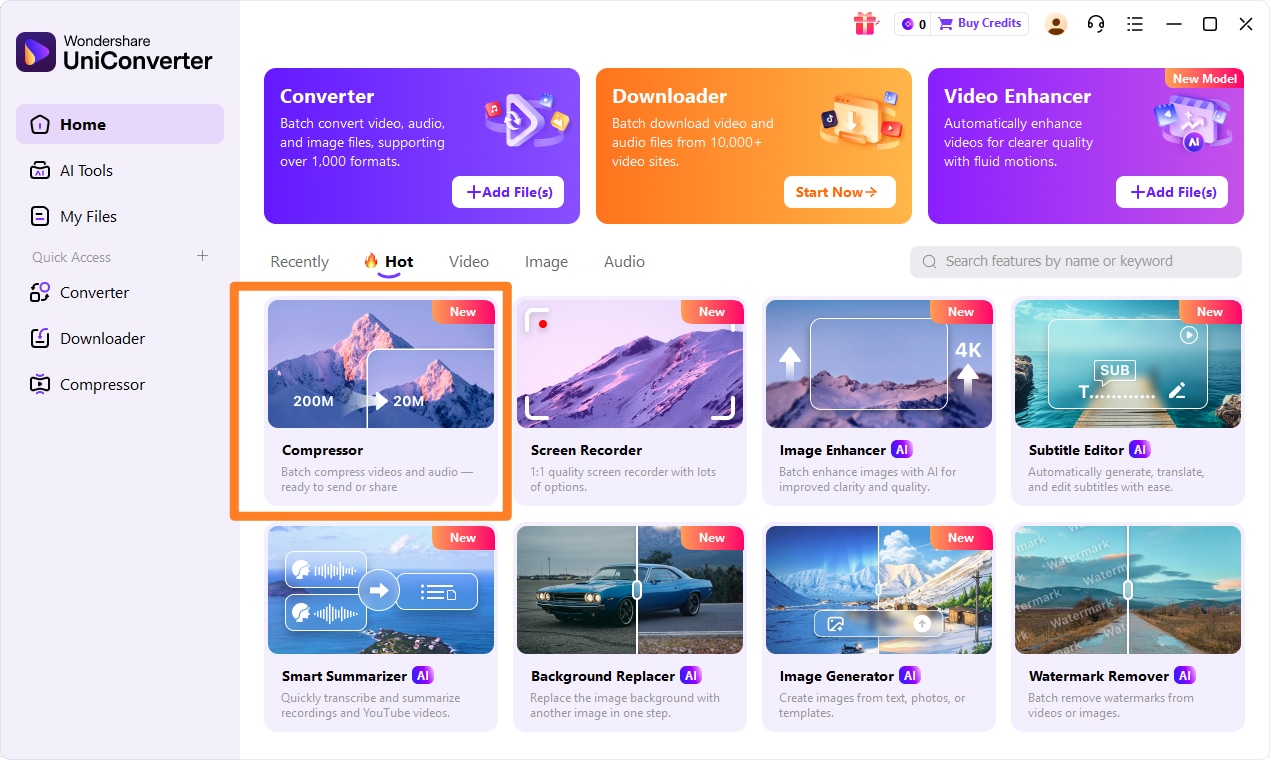
Step 1: Open UniConverter and Choose Compressor
Launch UniConverter on your computer. On the main interface, navigate to the "Video Compressor" tool. This is your starting point for reducing file sizes.
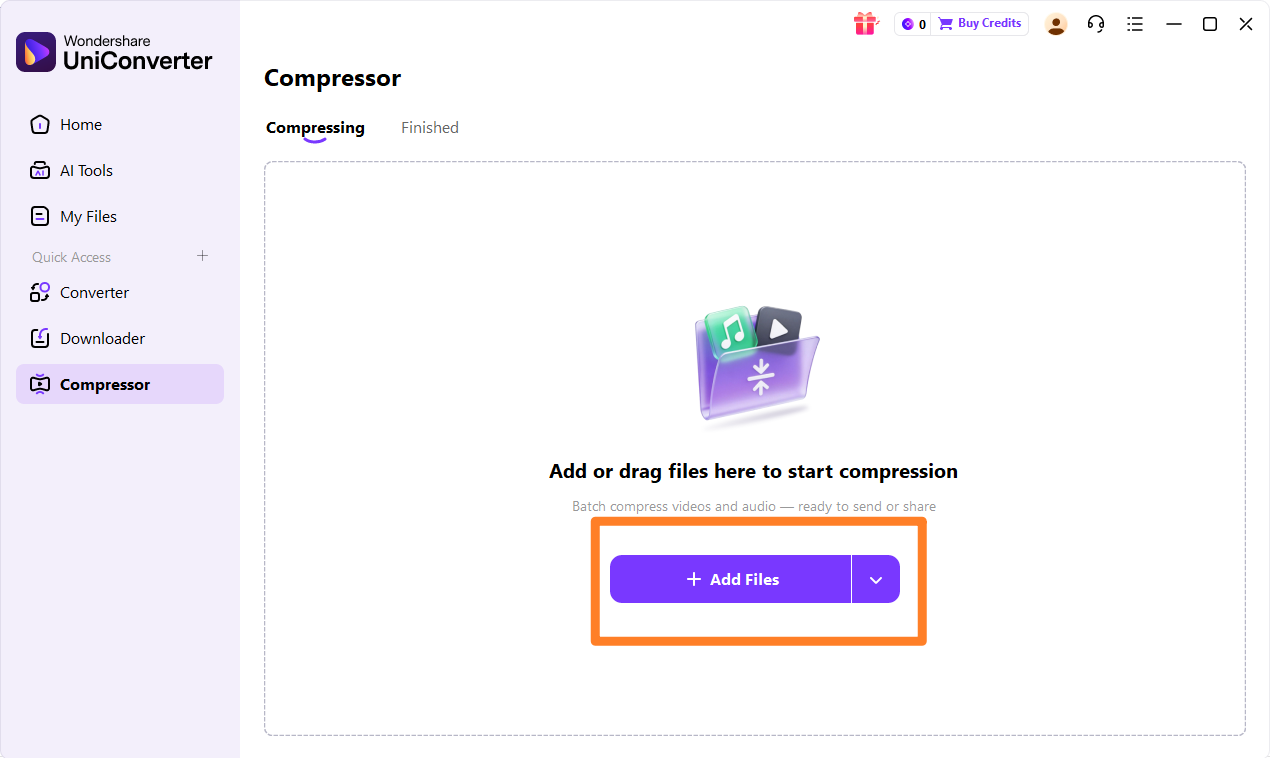
Step 2: Upload the Video, Audios or Images
Drag and drop your video files directly into the UniConverter window, or click "Add Files" to browse and select them. You can upload multiple files for batch processing.
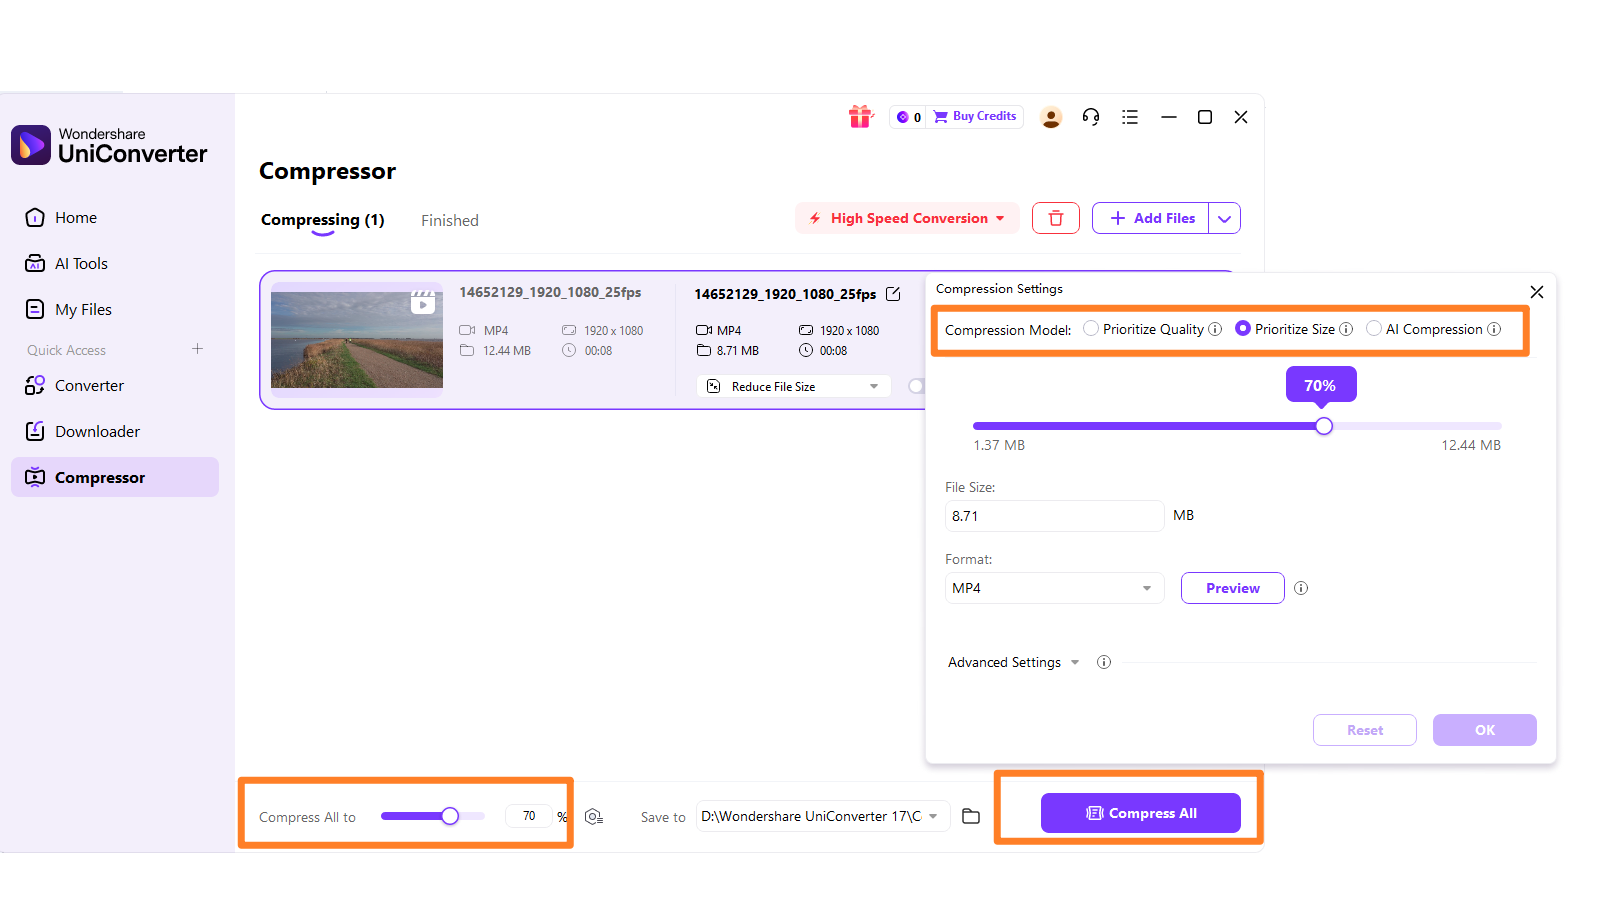
Step 3: Choose Required Parameters
After uploading, you can adjust various compression parameters such as file size, format, resolution, and bitrate. UniConverter provides presets or allows custom settings for optimal balance between quality and size.
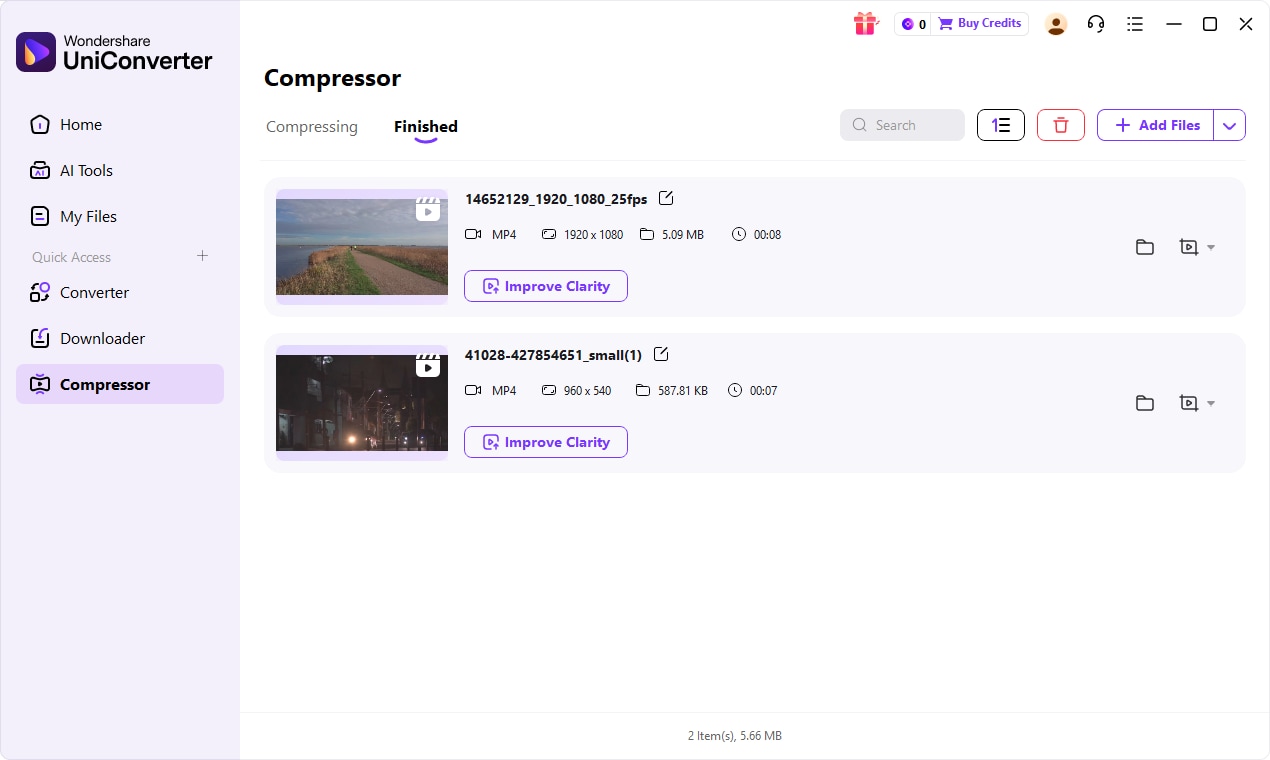
Step 4: Save the Compressed File
Once you've configured your settings, click the "Compress" button. UniConverter will process your files quickly. After compression, you can choose the output folder to save your newly optimized videos.

Kdenlive Compressor Alternatives for Better Video Quality?
Part 7: Final Verdict and Recommendations
After thoroughly reviewing the Kdenlive Video Compressor and comparing it with its alternatives, my conclusion is that its suitability largely depends on your specific needs and technical expertise. For budget-conscious creators, Kdenlive is a viable option, offering the convenience of integrated compression within a free, open-source video editor. If you're already using Kdenlive for editing and your compression needs are occasional and not overly complex, it can certainly get the job done. However, be prepared for a learning curve to master its settings and potential performance variations.
For professionals who require advanced features such as robust batch processing, support for specialized codecs, and consistent high-speed performance, I strongly recommend considering dedicated tools. Kdenlive, while capable, simply doesn't offer the same level of efficiency and specialized functionality that professional workflows demand.
For those prioritizing ease of use, superior quality, and faster processing, UniConverter is highly recommended. Its intuitive interface, powerful compression algorithms, and comprehensive format support make it an excellent choice for both beginners and experienced users looking for a reliable, all-in-one solution.
Lastly, for command-line enthusiasts and developers who need ultimate control and scripting capabilities, FFmpeg remains unrivaled. Its flexibility and power are unmatched, though it comes with a steep learning curve that isn't for everyone. Ultimately, choose the tool that best aligns with your workflow, technical comfort, and project requirements.
Part 8: FAQs
-
1. Is Kdenlive Video Compressor completely free to use?
Yes, Kdenlive is open-source and completely free to download and use.
-
2. Can Kdenlive compress videos without losing quality?
While some quality loss is inherent in compression, Kdenlive allows for settings adjustments (like higher bitrates or two-pass encoding) to minimize it significantly. Achieving truly "lossless" compression is generally not possible with typical video compression.
-
3. What are the main advantages of using UniConverter over Kdenlive for compression?
UniConverter offers a more intuitive user interface, faster processing speeds (often with GPU acceleration), broader format support, and more robust batch processing capabilities, making it more efficient for high-volume or demanding tasks.
-
4. Does Kdenlive support batch video compression?
Kdenlive's batch processing capabilities are limited compared to dedicated compression software. While you can queue multiple renders, it's not as streamlined or feature-rich as dedicated batch compressors.
-
5. What kind of system requirements does Kdenlive have for efficient video compression?
Efficient video compression in Kdenlive benefits greatly from a powerful multi-core CPU, ample RAM (16GB or more is recommended), and a fast SSD for project files. A dedicated GPU can also accelerate certain encoding tasks, though it's not strictly required for basic compression.
