
- Value: Imagify optimizes website speed with advanced compression and seamless WordPress integration.
- Comparison: Imagify excels in WordPress integration; UniConverter offers superior offline speed and control.
- Decision: Choose Imagify for automated WordPress optimization, UniConverter for high-volume, precise offline compression.
- Consideration: Be aware of potential quality loss at high compression and Imagify's subscription-based pricing.
- Alternative: UniConverter provides a powerful, GPU-accelerated desktop solution for diverse image and video compression needs.
In this article
- Part 1: What is Imagify Image Compressor?
- Part 2: Imagify Image Compressor: Core Features, Pros, and Cons
- Part 3: Imagify Image Compressor: Ideal Users and Use Cases
- Part 4: Imagify Image Compressor vs. Competitors
- Part 5: Risks and Pitfalls to Consider
- Part 6: How to Use UniConverter for Efficient Image Compression
- Part 7: Conclusion
- Part 8: FAQs
When I first started my blog, I quickly realized that slow-loading images were a major bottleneck for my website's performance and user experience. That's when I began my deep dive into image compression tools, and Imagify Image Compressor review was high on my list. In this comprehensive review, I'll share my firsthand experience with Imagify, comparing it against its competitors and highlighting its strengths and weaknesses. My goal is to help you navigate the often-complex world of image optimization, ensuring your digital content loads quickly and looks great, without sacrificing too much quality.
Part 1: What is Imagify Image Compressor?
Imagify Image Compressor is a popular online tool and WordPress plugin designed to reduce the file size of images without significantly compromising their visual quality. It's developed by WP Media, the same team behind WP Rocket, a well-known caching plugin. My initial interest in Imagify stemmed from its promise of seamless integration with WordPress, a platform I rely heavily on for my content creation. The core idea behind Imagify is to make websites faster by optimizing images, which often constitute the largest portion of a page's total size.
This review aims to address several key questions:
* How effective is Imagify at reducing image file sizes? I want to know if it truly delivers on its promise of significant compression.
* What are the trade-offs between compression levels and image quality? Finding the right balance is crucial for my visual content.
* How does Imagify stack up against other leading image compressors in the market? I'm looking for the best tool for my specific needs.
* Are there any hidden pitfalls or considerations I should be aware of before committing to Imagify? Understanding potential risks is just as important as knowing the benefits.
Part 2: Imagify Image Compressor: Core Features, Pros, and Cons
Imagify offers a robust set of features aimed at simplifying image optimization. Its core capability lies in its advanced compression algorithms, which intelligently analyze and reduce image file sizes. I found its seamless integration with popular CMS platforms, especially WordPress, to be a significant time-saver. Once installed, it can automatically optimize new uploads and even bulk-optimize existing images. The tool also provides multiple compression levels—Normal, Aggressive, and Ultra—allowing me to choose the balance between file size reduction and image quality. Additionally, it supports WebP conversion, a next-generation image format that offers superior compression.
Pros
* Advanced Compression Algorithms for Optimal File Size Reduction: I've seen impressive file size reductions, often by 50% or more, without a drastic drop in visual quality at the "Aggressive" setting.
* Seamless Integration with Popular CMS Platforms (e.g., WordPress): The WordPress plugin is incredibly user-friendly, automating much of the optimization process.
* Multiple Compression Levels (Normal, Aggressive, Ultra) for Flexibility: This flexibility allows me to tailor compression based on the image's importance and visibility.
Cons
* Potential for Noticeable Quality Loss at Highest Compression Settings: While "Ultra" offers the most significant compression, I've found it can sometimes lead to visible artifacts, especially on images with fine details or gradients.
* Pricing Structure Can Be Restrictive for High-Volume Users: The free tier is quite limited, and the paid plans can become costly if you're optimizing thousands of images monthly.
Part 3: Imagify Image Compressor: Ideal Users and Use Cases
Imagify is particularly well-suited for individuals and businesses who prioritize website speed and efficiency, especially those running content-heavy platforms. If you're a blogger, an e-commerce store owner, or a small to medium-sized business relying on a fast-loading website to attract and retain visitors, Imagify can be a game-changer. Its ease of use and WordPress integration make it an attractive option for those who aren't necessarily tech-savvy but understand the importance of image optimization.
Best Use Case: Optimizing Website Performance for Small to Medium Businesses
For my small online shop, Imagify has been invaluable. It automatically compresses product images, ensuring my pages load quickly, which directly impacts my conversion rates and SEO rankings. I can set it and forget it, knowing my images are being optimized in the background.
Limited Use Case: High-Resolution Photography Portfolios Requiring Absolute Fidelity
However, if you're a professional photographer showcasing a portfolio where every pixel matters, Imagify's "Ultra" compression might be too aggressive. While "Normal" or "Aggressive" might be acceptable, I wouldn't recommend it for images where even the slightest quality degradation is unacceptable, as the primary goal is often to preserve absolute fidelity. In such cases, a more manual, fine-tuned approach might be preferred.
Part 4: Imagify Image Compressor vs. Competitors
When I compare Imagify to its rivals, I look at several key aspects that impact my workflow and the final output. Here's a quick comparison:
| Feature/Scenario | Imagify | ShortPixel | TinyPNG | UniConverter |
| WordPress Integration | Excellent | Very Good | Good (via plugins) | N/A (Desktop Software) |
| Compression Quality (Aggressive) | Good | Very Good | Excellent | Very Good |
| Pricing (Monthly 5000 images) | Moderate | Lower | Free Tier Available | One-time purchase |
| Batch Processing | Yes | Yes | Limited | Yes |
| Image Resizing | Yes | Yes | No | Yes |
| Processing Speed | Fast | Fast | Moderate | Very Fast (GPU Accelerated) |
| Offline Processing | No | No | No | Yes |
Key Differentiators: Imagify's Strengths and Weaknesses Against Rivals
Imagify's strength lies in its excellent WordPress integration and its ability to handle various image formats, including WebP conversion. However, when it comes to raw compression quality at aggressive settings, I've found TinyPNG often edges it out, producing slightly smaller files with less perceptible quality loss. ShortPixel is a strong contender, offering competitive pricing and good quality. UniConverter, while primarily a video tool, offers robust offline image compression with GPU acceleration, making it incredibly fast for large batches, a significant advantage if you prefer desktop software and don't want to rely on cloud services. For me, the choice often comes down to whether I prioritize cloud-based automation (Imagify) or maximum control and speed for local files (UniConverter).
Part 5: Risks and Pitfalls to Consider
While Imagify offers significant benefits, it's crucial to be aware of potential risks and pitfalls before fully committing to it. My experience has shown me that even the best tools have their downsides.
Potential for Image Quality Degradation
This is perhaps the most significant concern. While Imagify strives for minimal quality loss, especially at "Normal" and "Aggressive" settings, the "Ultra" setting can sometimes lead to noticeable artifacts, banding, or a general "softening" of the image. For highly detailed graphics or professional photography, this can be a deal-breaker. Always preview your images after compression, especially if you're using the highest settings. I've learned the hard way that blindly trusting automated compression can sometimes backfire.
Data Privacy Concerns with Cloud Processing
Imagify is a cloud-based service, meaning your images are uploaded to their servers for processing. While they have privacy policies in place, for businesses dealing with sensitive or proprietary images, this might raise data privacy concerns. You're essentially entrusting your visual assets to a third party. It's always wise to review their data handling policies and consider if it aligns with your company's security requirements.
Unexpected Costs with High Usage
The free tier is great for testing, but if your website grows or you have a large backlog of images, you'll quickly hit the limits. The paid plans are subscription-based, and if you have sudden spikes in image uploads, you might incur unexpected overage charges or need to upgrade your plan, which can add up over time. It's essential to accurately estimate your monthly image usage to avoid budget surprises.
Vendor Lock-in and Migration Challenges
Once you've optimized thousands of images with Imagify, especially if you've opted for WebP conversion and replaced original files, migrating away from the service can be a hassle. You might lose the optimized versions or have to re-optimize everything with a new tool. This "vendor lock-in" can make switching providers a time-consuming and potentially costly endeavor. Always consider the long-term implications of relying heavily on a single cloud-based optimization service.
Part 6: How to Use UniConverter for Efficient Image Compression
Sometimes, cloud-based tools like Imagify aren’t always the best fit—especially when I’m working with large batches of files, need more privacy, or want more consistent results. In those situations, I usually turn to UniConverter as a more dependable desktop alternative. It works especially well for image compression, giving me more control over file size and output quality without relying on an online service. I also like that GPU acceleration helps speed up processing, and since it also supports video compression and audio compression, it works well as a practical all-in-one solution for managing different types of media files offline.
Step 1: Open UniConverter and Choose Compressor
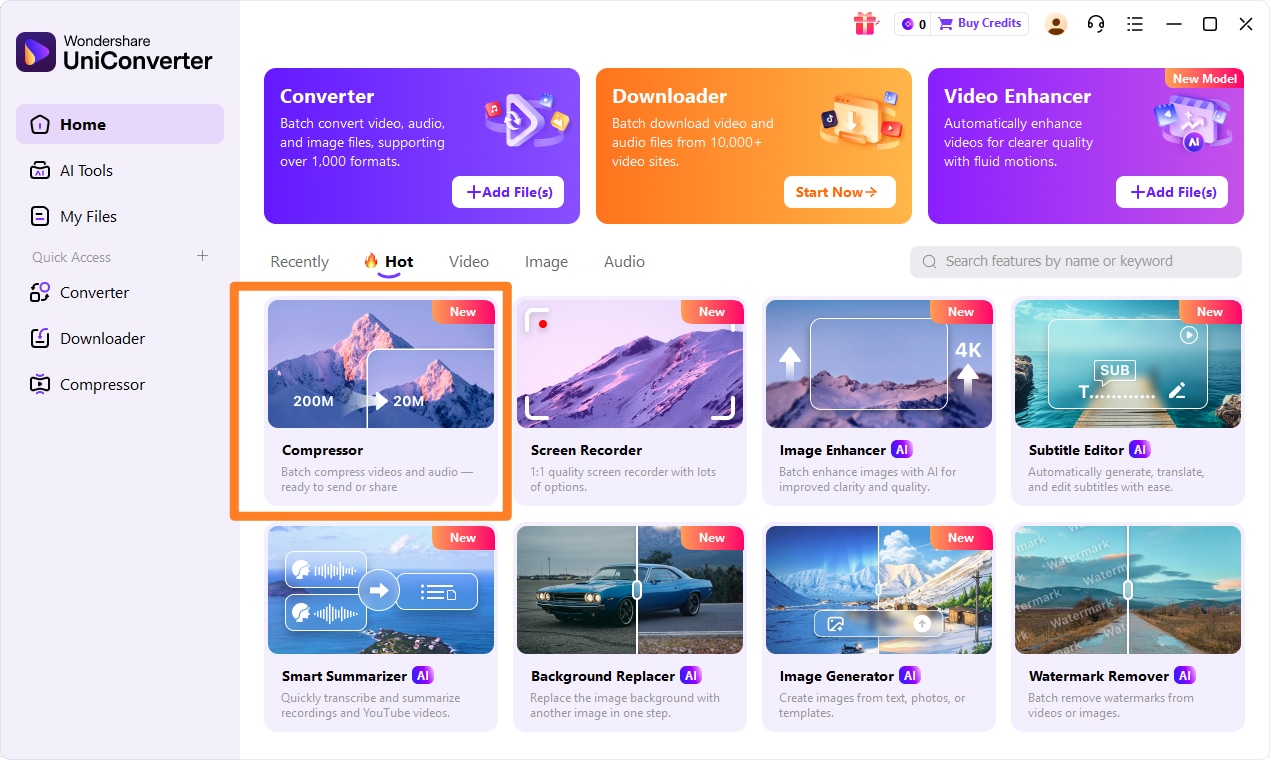
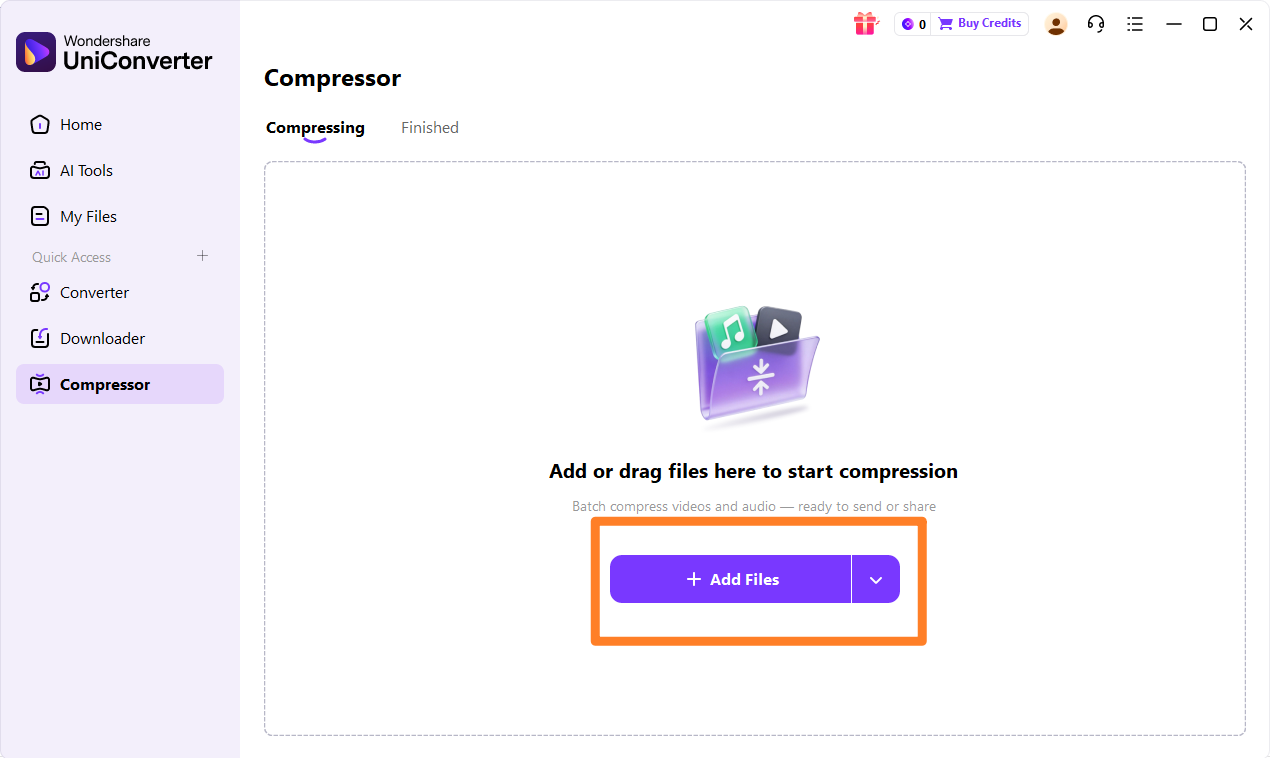
Launch UniConverter on your desktop. On the left sidebar, you'll find various tools. Click on the "Compressor" option.
Step 2: Upload the Video, Audios or Images
Drag and drop your images directly into the UniConverter interface, or click the "Add Files" button to browse and select them from your computer.
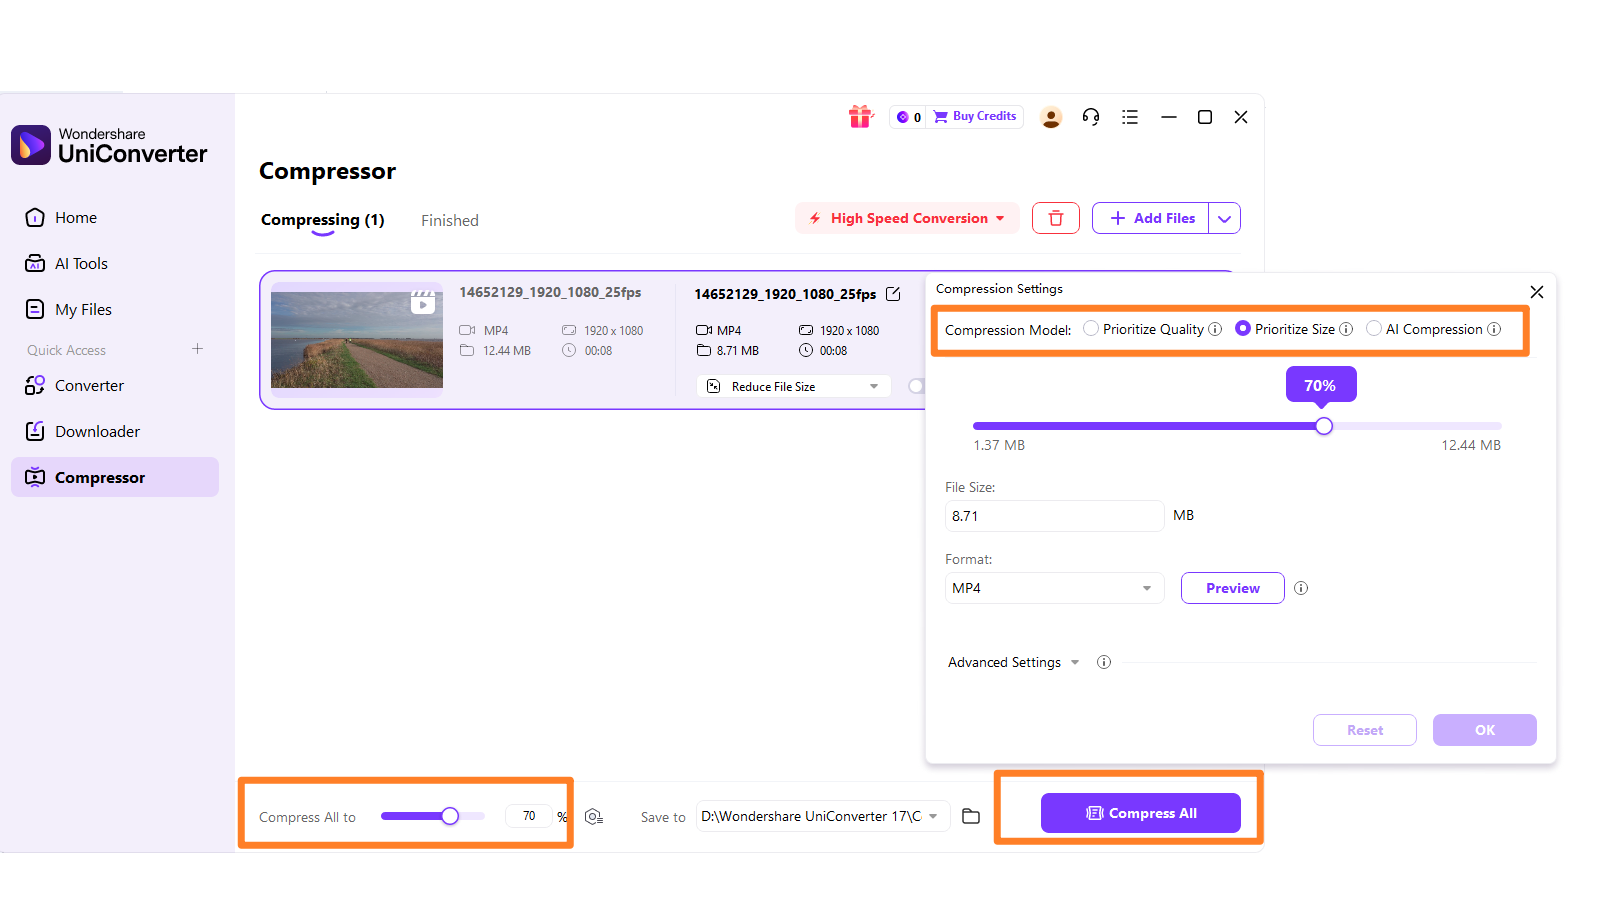
Step 3: Choose Required Parameters
After uploading, you can select your desired compression settings. UniConverter allows you to adjust the quality, resolution, and format for each image or apply settings in bulk.
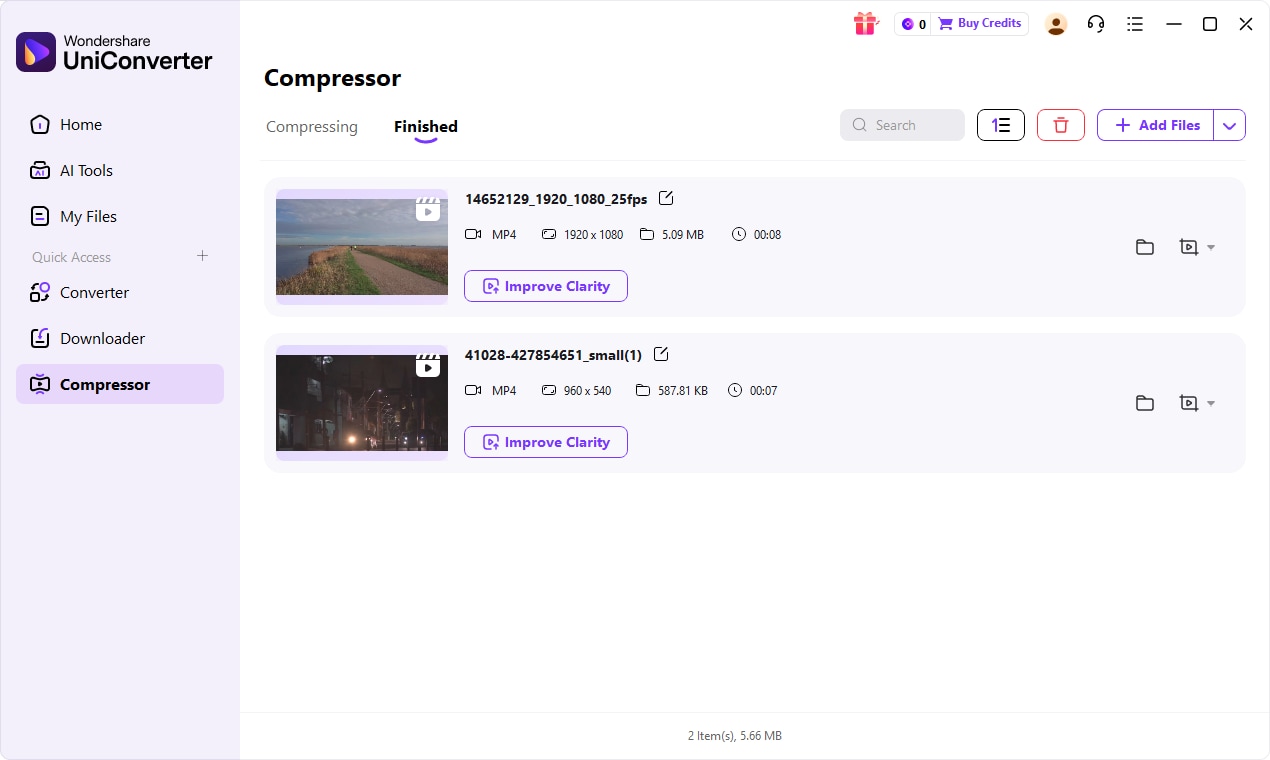
Step 4: Save the Compressed File
Once you're satisfied with the settings, click the "Compress" button. UniConverter will process your images, and you can then choose the output folder to save your optimized files.

Need a Better Imagify Alternative?
Part 7: Conclusion
After extensively using and comparing Imagify Image Compressor, I can confidently say it's a powerful tool, particularly for WordPress users. Its seamless integration, multiple compression levels, and WebP conversion capabilities make it an excellent choice for bloggers, small businesses, and e-commerce sites looking to improve their website's loading speed. If you prioritize ease of use and automated optimization within your WordPress environment, Imagify is definitely worth considering. However, if you're a professional photographer requiring absolute image fidelity, or a user with extremely high volumes of images where pricing becomes a major factor, you might find its "Ultra" compression too aggressive and its pricing structure a bit restrictive. For those who prefer offline processing, maximum control over compression parameters, and GPU-accelerated speed, especially for large batches, alternatives like UniConverter offer a compelling solution. Ultimately, the best tool depends on your specific needs, technical comfort, and budget.
Part 8: FAQs
-
1. Does Imagify Image Compressor reduce image quality significantly?
Imagify offers different compression levels. "Normal" typically has minimal quality loss, while "Ultra" can show noticeable degradation, especially on detailed images. For critical images, I often stick to "Aggressive" or use an offline tool like UniConverter for more precise control.
-
2. Is Imagify Image Compressor free to use?
Imagify offers a free tier with a limited number of image compressions per month. For higher volumes, paid plans are required. If you need to compress a lot of images regularly without subscription fees, UniConverter is a good one-time purchase alternative.
-
3. How does Imagify Image Compressor integrate with WordPress?
Imagify has a dedicated WordPress plugin that allows for automatic image optimization upon upload and bulk optimization of existing images. It's incredibly user-friendly and integrates directly into your media library.
-
4. Can Imagify Image Compressor optimize images already on my website?
Yes, the Imagify WordPress plugin includes a bulk optimization feature to compress all existing images on your site, which is a huge time-saver for older websites.
-
5. What types of image formats does Imagify Image Compressor support?
Imagify supports common image formats such as JPEG, PNG, and GIF. It also converts images to WebP for further optimization, which is a great feature for modern web performance.
