
- GarageBand Compressor: Ideal for beginners and budget-conscious creators, offering basic dynamic control for demos and podcasts.
- Core Features: Understand Threshold, Ratio, Attack, Release, and Gain for fundamental audio shaping in GarageBand.
- Limitations: GarageBand lacks advanced controls, visual feedback, and sidechaining, making it unsuitable for professional mastering.
- Competitor Comparison: GarageBand is free and easy; Logic Pro X offers an upgrade; FabFilter Pro-C 2 is for pros; UniConverter excels in efficient multimedia compression.
- Avoid Pitfalls: Beware of over-compression, pumping effects, and the lack of precise visual feedback in GarageBand.
- UniConverter Advantage: For stable, high-quality, and batch audio/video compression, UniConverter provides a robust, user-friendly alternative.
In this article
- Part 1: What is GarageBand Audio Compressor?
- Part 2: GarageBand Audio Compressor: Core Features, Pros, and Cons
- Part 3: GarageBand Audio Compressor: Users and Use Cases
- Part 4: GarageBand Audio Compressor vs. Competitors
- Part 5: Risks and Pitfalls to Avoid
- Part 6: How to Use UniConverter to Efficiently Compress Audio and Video
- Part 7: Conclusion
- Part 8: FAQs
GarageBand Audio Compressor: A Comprehensive Review and Comparison
For many aspiring musicians and podcasters, GarageBand is the first step into the world of audio production. It's an accessible, free DAW that comes pre-installed on Apple devices, offering a surprisingly robust set of tools for its price point. Among these tools is its built-in audio compressor, a crucial component for shaping the dynamics of your tracks. This GarageBand Audio Compressor review will delve into its core features, compare it with more advanced alternatives, and help you understand when it's the right tool for your needs, and when you might need to look elsewhere. We'll explore its strengths and weaknesses, provide practical use cases, and highlight potential pitfalls to avoid, ensuring you make informed decisions about your audio production workflow.
Part 1: What is GarageBand Audio Compressor?
GarageBand's Audio Compressor is an integrated effect designed to reduce the dynamic range of an audio signal. In simpler terms, it makes the loud parts quieter and the quiet parts louder, resulting in a more consistent and "glued together" sound. This is essential for vocals to sit well in a mix, for instruments to have more punch, and for overall track consistency. Its primary appeal lies in its seamless integration within the GarageBand environment, making it incredibly easy for beginners to access and apply. This review aims to clarify its capabilities and limitations, guiding you through its effective use.
The Role of Audio Compressors in Music Production
* Achieving Consistent Volume: Compressors help to smooth out volume fluctuations, making tracks sound more even and professional.
* Adding Punch and Impact: By reducing dynamic range, compressors can make drums hit harder and vocals cut through a mix more effectively.
* Creating a "Glued" Sound: When applied to a bus or master track, compression can make individual elements feel more cohesive and unified.
* Controlling Transients: Compressors can tame sudden peaks in audio, preventing clipping and harshness.
Part 2: GarageBand Audio Compressor: Core Features, Pros, and Cons
GarageBand's built-in compressor offers a straightforward approach to dynamic control, making it an excellent starting point for those new to audio production. Its core functionality revolves around a few key parameters that allow you to shape your sound without overwhelming complexity. You can adjust the threshold, ratio, attack, and release, which are the fundamental controls for any compressor. It also includes a gain knob to compensate for any volume reduction caused by the compression.
* Threshold: Determines the level at which the compressor starts to work.
* Ratio: Controls how much the signal is compressed once it crosses the threshold.
* Attack: Sets how quickly the compressor reacts to signals above the threshold.
* Release: Dictates how long it takes for the compressor to stop acting on the signal after it falls below the threshold.
* Gain: Allows you to boost the overall output volume after compression.
- Pros:
- Integrated and user-friendly within the GarageBand ecosystem.
- Offers essential compression parameters for basic audio shaping.
- Free with Apple devices, making it highly accessible.
- Cons:
- Limited advanced controls compared to dedicated compressor plugins.
- Can be less precise for professional-grade mastering.
Part 3: GarageBand Audio Compressor: Users and Use Cases
The GarageBand Audio Compressor is designed with accessibility in mind, making it a perfect tool for specific user groups and scenarios. Its simplicity is its greatest strength, allowing users to achieve noticeable improvements in their audio without a steep learning curve.
- Best Use Case: Aspiring Musicians and Podcasters on a Budget
- If you're just starting out with music production or podcasting and don't want to invest in expensive plugins, GarageBand's compressor is an invaluable tool. It's ideal for adding punch and consistency to vocals, acoustic guitars, or even drum tracks in your demos or podcast episodes. I've personally used it to level out my podcast voiceovers, making them sound much more professional and consistent without spending a dime. It's about getting your ideas out there with decent quality, not about achieving a perfectly polished, radio-ready sound.
- Limited Use Case: Professional Audio Engineers and Mastering Studios
- For intricate dynamic control, surgical precision, or high-fidelity mastering, GarageBand's compressor simply doesn't cut it. Its limited visual feedback and lack of advanced features like sidechaining, multiple compression curves, or detailed metering mean it's not suitable for professional audio engineers or mastering studios. When I'm working on client projects that demand a pristine, nuanced sound, I always turn to dedicated, high-end compressor plugins that offer the granular control needed for such tasks. It's a tool for foundational work, not for the final, critical polish.
Part 4: GarageBand Audio Compressor vs. Competitors
When comparing the GarageBand Audio Compressor to other options, it's crucial to understand the trade-offs between simplicity, control, and cost. While GarageBand offers an excellent entry point, more specialized tools provide greater depth.
| Feature/Competitor | GarageBand Audio Compressor | Logic Pro X Compressor | FabFilter Pro-C 2 | UniConverter |
| Processing Speed | Real-time | Real-time | Real-time | Fast (GPU accelerated) |
| Output Quality | Good for basic tasks | Excellent | Pristine | High (lossless options) |
| Ease of Use | Very High | High | Moderate | Very High |
| Customer Support | Apple Support Forums | Apple Support | FabFilter Support | Dedicated Support |
| Security | Apple ecosystem | Apple ecosystem | Plugin security | High (offline processing) |
GarageBand's compressor excels in ease of use and cost, being free and integrated. Logic Pro X's compressor offers a significant step up in control and quality within the Apple ecosystem, making it a natural upgrade for GarageBand users. FabFilter Pro-C 2 is a professional-grade plugin, providing unparalleled visual feedback and expert-level control for those who demand the absolute best. UniConverter, while not a DAW compressor, offers robust audio compression capabilities as part of its multimedia toolkit, focusing on efficient file size reduction with high-quality output, making it a versatile choice for general audio file management.
Part 5: Risks and Pitfalls to Avoid
While GarageBand's compressor is user-friendly, there are several risks and pitfalls you should be aware of, especially if you're aiming for a polished sound. Misusing it can lead to undesirable audio artifacts and a less professional final product.
Over-compression: The "Pumping" Effect
One of the most common mistakes I see beginners make is over-compressing their audio. This often results in a noticeable "pumping" or "breathing" sound, where the volume of the track seems to fluctuate unnaturally in response to the compressor. It's particularly evident on tracks with strong transients, like drums or vocals with sharp consonants. This happens when the ratio is too high and the attack/release times aren't set correctly, causing the compressor to clamp down too hard and then release too quickly, making the background noise rise and fall.
Lack of Visual Feedback for Precise Adjustments
Unlike more advanced compressors that offer detailed gain reduction meters, waveform displays, and knee controls, GarageBand's compressor provides very basic visual feedback. This makes it challenging to understand exactly how the compressor is affecting your audio in real-time. Without clear visual cues, it's harder to make precise adjustments and can lead to guesswork, often resulting in suboptimal settings. I've found myself relying heavily on my ears, which is good practice, but sometimes a visual aid can speed up the process and confirm what I'm hearing.
Limited Sidechaining Options
Sidechain compression is a powerful technique where the volume of one track is controlled by the signal of another (e.g., ducking music under a vocal). GarageBand's compressor has very limited, if any, true sidechaining capabilities. This restricts creative mixing techniques and can make it harder to achieve a clean, professional mix, especially in genres like electronic music or podcasts where vocals need to cut through a busy soundscape.
Incompatibility with Non-Apple DAWs
Since GarageBand is an Apple-exclusive product, its built-in compressor and any settings you apply within it are tied to the GarageBand environment. If you decide to move your project to a different Digital Audio Workstation (DAW) on a Windows machine or a more professional DAW like Pro Tools, you won't be able to directly transfer those compressor settings. You'll have to re-apply compression using different plugins, which can be a time-consuming and frustrating process.
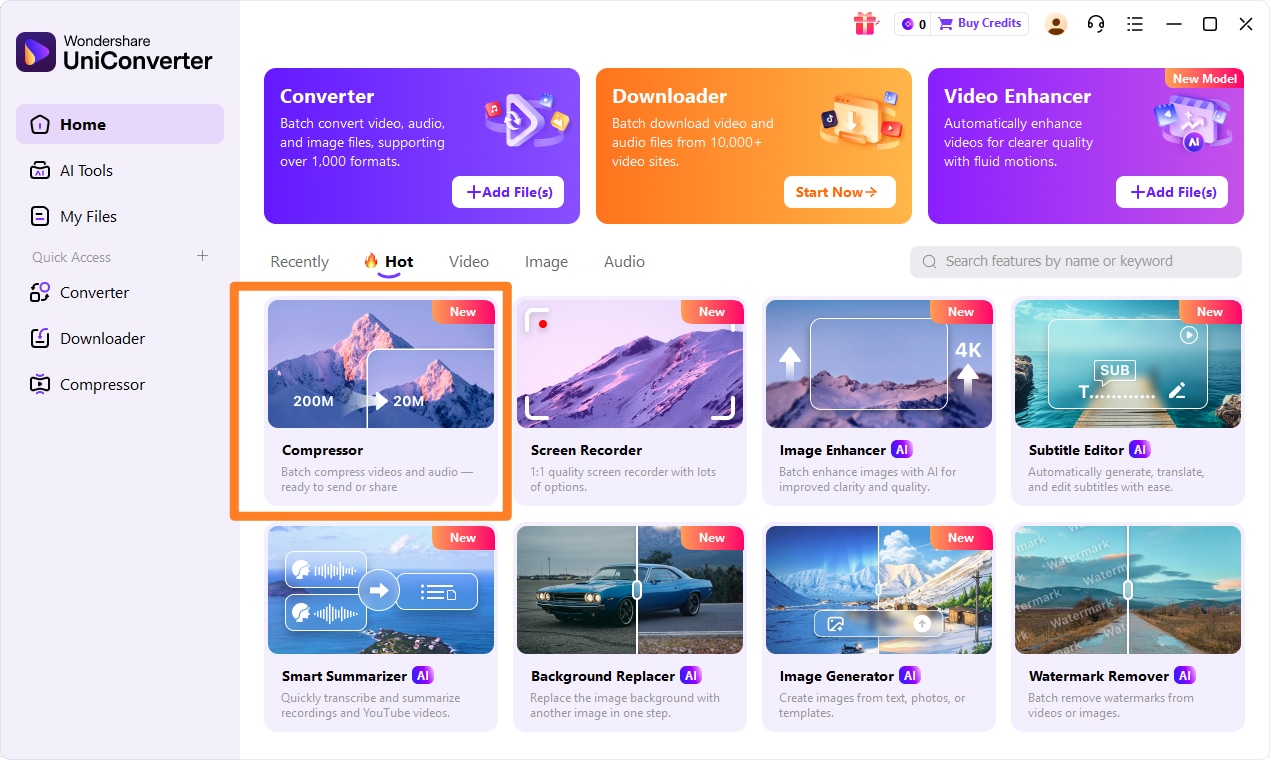
Part 6: How to Use UniConverter to Efficiently Compress Audio and Video
A more reliable multimedia workflow becomes important once compression tools start producing unstable results, dropping file quality, or failing to support proper batch processing. That’s why I often use UniConverter as an all-in-one option for both audio compression and video compression. It offers broad format support, GPU acceleration for faster processing, and a much cleaner experience without the ads or interruptions found in many lighter tools. For video files, it can also help compress videos without quality loss as much as possible, making it a practical choice for everyday audio and video management.
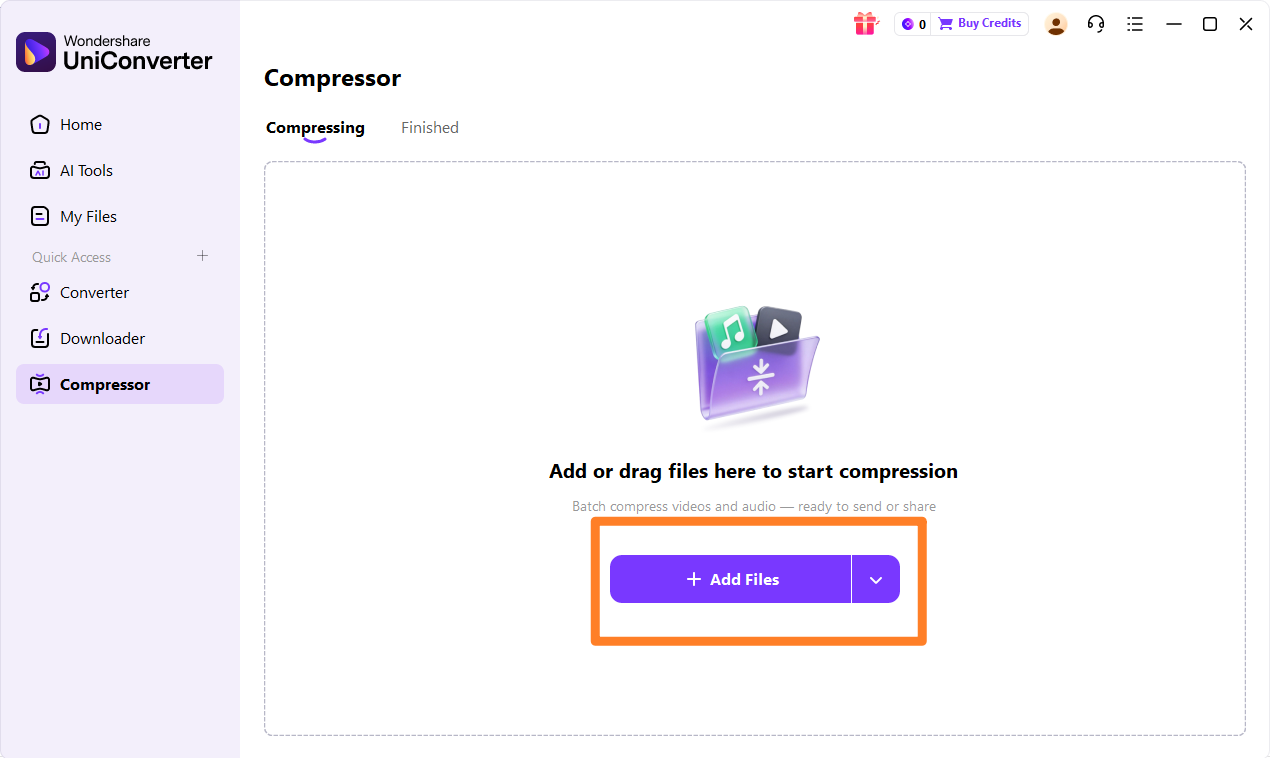
Step 1: Open UniConverter and Choose Compressor
Launch UniConverter on your computer. From the main interface, navigate to the "Toolbox" section and select the "Video Compressor" or "Audio Compressor" tool, depending on your file type.
Step 2: Upload the Video, Audios or Images
Click the "Add Files" button or simply drag and drop your audio or video files into the UniConverter window. You can add multiple files for batch compression.
Step 3: Choose Required Parameters
Once your files are loaded, you can adjust various compression parameters. For video, you can change resolution, bitrate, and format. For audio, you can modify the bitrate, sample rate, and format. UniConverter also offers a percentage-based compression option for quick adjustments.
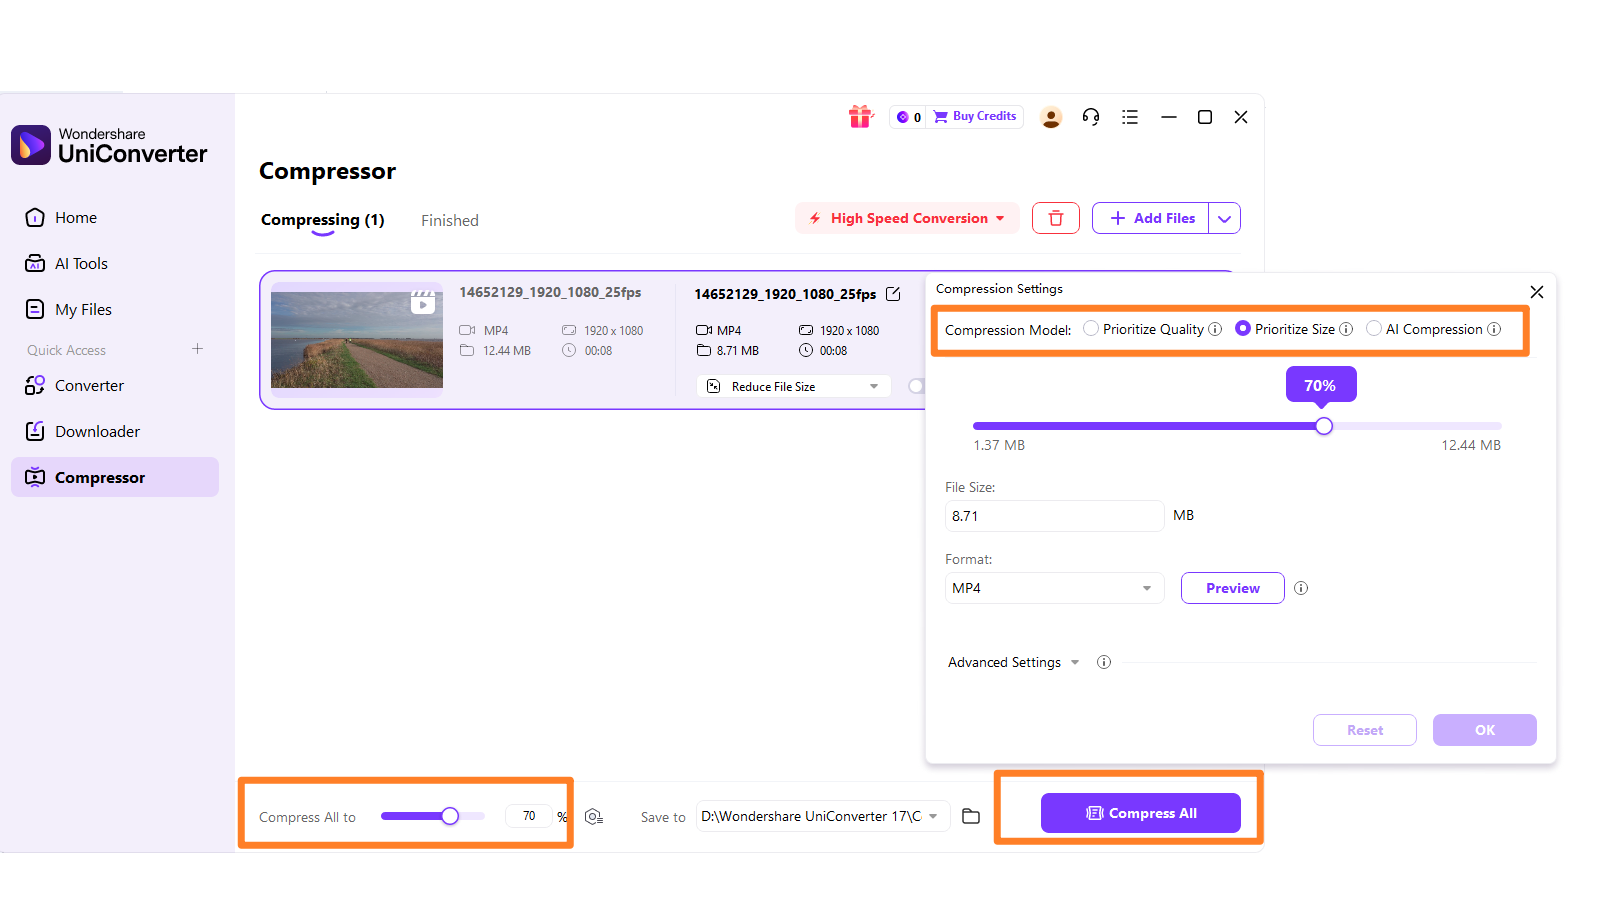
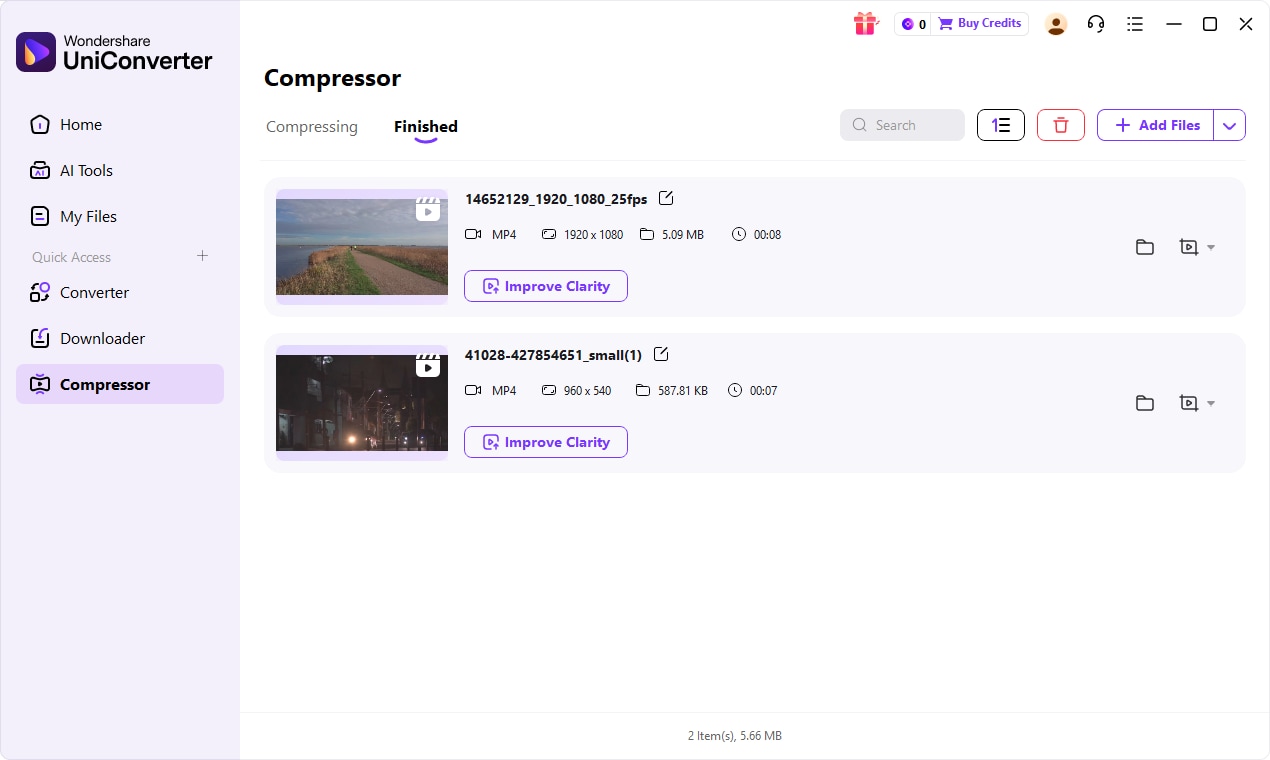
Step 4: Save the Compressed File
After setting your desired parameters, preview the compressed file to ensure quality. Then, choose your output folder and click the "Compress" button to start the process. Your optimized files will be ready in moments.

Enhance Audio Quality Beyond GarageBand Compressor
Part 7: Conclusion
The GarageBand Audio Compressor review reveals it as an excellent starting point for anyone venturing into audio production. Its integration, ease of use, and zero cost make it ideal for beginners, aspiring musicians, and podcasters on a budget who need basic dynamic control for demos or casual projects. However, its limitations in advanced controls, visual feedback, and sidechaining mean it's not suitable for professional audio engineers or intricate mastering tasks. For those seeking more precision and power, upgrading to a dedicated compressor plugin or a more advanced DAW is a necessary step. Learning the fundamentals of compression with GarageBand is invaluable, but understanding its boundaries is key to knowing when to seek more sophisticated tools. For general multimedia compression, especially when dealing with various file types and needing stable, high-quality results, UniConverter offers a versatile and efficient mid-tier solution that bridges the gap between basic and professional tools.
Part 8: FAQs
-
1. Can GarageBand's compressor be used for mastering?
While it can add some polish, it's generally not recommended for professional mastering due to its limited controls and lack of precision. For mastering, you typically need more advanced tools with detailed metering and specialized algorithms.
-
2. Is the GarageBand compressor good for vocals?
Yes, it's quite effective for basic vocal leveling and adding presence, especially for demos, podcasts, or simple song mixes. It can help your vocals sit better in the mix and sound more consistent.
-
3. How does GarageBand's compressor compare to free VST plugins?
Many free VST compressor plugins often offer more advanced features, better visual feedback, and sometimes even sidechaining capabilities compared to GarageBand's built-in compressor. If you're looking for more control without spending money, exploring free VSTs is a good next step.
-
4. Can I use GarageBand's compressor on individual tracks?
Yes, you can apply the compressor to individual instrument or vocal tracks within GarageBand. This allows you to shape the dynamics of each element of your mix independently.
-
5. What are the key parameters to understand when using a compressor?
The fundamental parameters are Threshold (when compression starts), Ratio (how much compression occurs), Attack (how fast it reacts), Release (how fast it stops), and Gain (to compensate for volume loss). Mastering these will significantly improve your compression skills. If you find yourself struggling with these concepts across different audio types, UniConverter offers a more simplified approach to audio compression, focusing on overall file size reduction while maintaining quality, which can be a good starting point for general use.
