
- FL Studio Compressor: Excellent for integrated production, especially EDM. Seamless workflow, but can be overwhelming for beginners.
- Alternatives Comparison: FL Studio excels in integration and low CPU. FabFilter Pro-C 2 offers deep features; Waves C1 is versatile.
- UniConverter Value: Not for music production, but ideal for quick, efficient general audio/video file size reduction and sharing.
- Decision Making: Choose FL Studio for in-DAW production. Opt for third-party plugins for advanced control. Use UniConverter for simple file compression.
In this article
- Part 1: What is FL Studio Audio Compressor?
- Part 2: FL Studio Audio Compressor: Core Features, Pros, and Cons
- Part 3: FL Studio Audio Compressor: Ideal Users and Scenarios
- Part 4: FL Studio Audio Compressor and Alternatives Comparison
- Part 5: Risks and Pitfalls to Avoid
- Part 6: How to Use UniConverter for Efficient Audio Compression
- Part 7: Conclusion
- Part 8: FAQs
FL Studio Audio Compressor: A Comprehensive Review and Comparison
When I first started diving into music production, the sheer volume of tools and plugins available felt overwhelming. Among them, the audio compressor quickly emerged as a fundamental yet often misunderstood component. It's the secret sauce that makes tracks sound polished, punchy, and professional. As an FL Studio user, I naturally gravitated towards its built-in options. This FL Studio Audio Compressor review aims to demystify this essential tool, comparing it against some industry heavyweights and helping you understand where it shines and where you might need to look elsewhere. My goal is to provide a clear, scenario-based analysis so you can make informed decisions for your own productions.
Part 1: What is FL Studio Audio Compressor?
The FL Studio Audio Compressor refers to the suite of dynamic range processors integrated directly into the FL Studio Digital Audio Workstation (DAW). These tools are designed to control the dynamic range of audio signals, making loud parts quieter and quiet parts louder, resulting in a more consistent and controlled sound. For me, it's about making my tracks sit better in the mix and achieve that professional sheen. This review will explore how well FL Studio's native compressors stand up against dedicated third-party plugins in various production scenarios.
The Crucial Role of Dynamic Control in Modern Music Production
* Achieving Mix Cohesion: Compressors help individual tracks blend seamlessly, preventing certain elements from jumping out or getting lost.
* Enhancing Punch and Impact: Strategic compression can make drums hit harder and basslines feel more solid.
* Controlling Unwanted Peaks: It's essential for taming transient peaks that can cause clipping and distortion.
* Shaping Tonal Characteristics: Beyond just dynamics, compressors can subtly alter the perceived tone and sustain of instruments.
Part 2: FL Studio Audio Compressor: Core Features, Pros, and Cons
FL Studio's native compressors, primarily the Fruity Limiter (which includes a compressor module) and the Fruity Compressor, offer a robust set of features for dynamic processing. I've found them to be incredibly versatile for a wide range of tasks. They handle everything from subtle vocal smoothing to aggressive drum shaping with relative ease. The visual feedback, especially in the Fruity Limiter, is a huge plus for understanding what's happening to your audio in real-time.
Core Features
* Threshold Control: Sets the level at which compression begins.
* Ratio Adjustment: Determines how much the signal is compressed once it crosses the threshold.
* Attack and Release Times: Controls how quickly the compressor reacts to and disengages from the signal.
* Gain Make-up: Compensates for the volume reduction caused by compression.
* Knee Control: Shapes the transition from uncompressed to compressed signal (hard or soft knee).
Pros
* Seamless Integration within the FL Studio Ecosystem: No compatibility issues, just drag and drop.
* Versatile Compression Algorithms for Various Genres: Works well for EDM, hip-hop, and even rock.
* Intuitive User Interface for Quick Adjustments: I can dial in settings fast, especially with the visualizers.
Cons
* Can Be Overwhelming for Beginners Without Prior Compression Knowledge: The sheer number of parameters can be daunting.
* Lacks Some Advanced Features Found in Dedicated Third-Party Plugins: Things like multi-band compression or specific vintage emulations are missing.
Part 3: FL Studio Audio Compressor: Ideal Users and Scenarios
From my experience, the FL Studio Audio Compressor is a fantastic tool for producers who are already comfortable within the FL Studio environment and need reliable, integrated compression without the hassle of managing third-party plugins. It's particularly well-suited for electronic music producers, but its versatility extends beyond that.
Best Use Case: Electronic Dance Music (EDM) Production
If you're making EDM, hip-hop, or any genre where punchy drums and sustained synths are key, FL Studio's compressors are right at home. I regularly use the Fruity Limiter to glue my drum bus together, giving it that cohesive, driving feel. For individual synth lines, I'll often use the Fruity Compressor to smooth out dynamics and help them sit consistently in the mix, achieving that powerful, sustained sound without peaks. The quick workflow allows me to experiment and get the sound I want efficiently.
Limited Use Case: Mastering Complex Orchestral Scores
While capable, I've found that for mastering complex orchestral scores or highly dynamic acoustic recordings, FL Studio's native compressors might not offer the nuanced control I sometimes need. These scenarios often demand very transparent, subtle compression with extremely precise attack and release times, or even multi-band processing to handle different frequency ranges independently. For these intricate tasks, I often find myself reaching for more specialized, dedicated mastering compressors that offer a wider range of controls and a more transparent sound.
Part 4: FL Studio Audio Compressor and Alternatives Comparison
When I'm working on a project, I often consider what tools will give me the best results for a specific task. While FL Studio's native compressors are great, sometimes I need something different. Here's how they stack up against some popular alternatives.
| Feature/Scenario | FL Studio Fruity Limiter | FabFilter Pro-C 2 | Waves C1 Compressor | UniConverter |
| Ease of Use for Beginners | Good | Moderate | Moderate | Excellent |
| Advanced Control Options | Moderate | Excellent | Good | Basic |
| CPU Usage | Low | Moderate | Low | Very Low |
| Price Point | Included with FL Studio | ~$179 | ~$29 (on sale) | ~$50/year |
| Specific Genre Suitability | EDM, Hip-Hop, Pop | All Genres, Mastering | Pop, Rock, Vocals | General Audio/Video Compression |
Key Differentiators
FL Studio's native tools shine with their native integration, meaning zero setup and immediate access within your workflow. For quick, in-the-box solutions, they're hard to beat. FabFilter Pro-C 2, on the other hand, offers an incredibly deep feature set with unparalleled visual feedback and advanced sidechain options, making it a go-to for surgical compression and mastering. Waves C1 is a workhorse, known for its versatility and efficiency, often used for individual track processing due to its low CPU footprint and classic sound. UniConverter, while not a music production compressor, excels at quick and easy compression for general audio and video files, focusing on file size reduction rather than dynamic shaping.
Part 5: Risks and Pitfalls to Avoid
Using compressors, especially when you're still learning, can lead to some common mistakes that can degrade your sound rather than improve it. I've definitely fallen into some of these traps myself.
Over-Compression Leading to Loss of Dynamics
One of the biggest risks is squashing your audio too much. This happens when the threshold is set too low and the ratio too high, resulting in a flat, lifeless sound. Your music loses its "bounce" and emotional impact.
Misunderstanding Threshold and Ratio Settings
These two parameters are the heart of compression. If you don't grasp how they interact, you'll struggle to get the desired effect. A low threshold means more of the signal is compressed, and a high ratio means it's compressed more aggressively. Getting this balance wrong can lead to either no noticeable effect or extreme over-compression.
Relying Solely on Presets Without Understanding Their Impact
While presets can be a good starting point, blindly applying them without understanding what they do is a recipe for disaster. A "vocal compressor" preset might work for one vocal, but completely ruin another. Always tweak and listen critically.
Compatibility Issues with Older FL Studio Versions
Sometimes, new features or plugin updates in FL Studio can cause slight inconsistencies or even crashes with older project files or FL Studio versions. Always ensure your projects are backed up and consider rendering tracks if you're moving between different FL Studio environments.
Part 6: How to Use UniConverter for Efficient Audio Compression
For quick file-size reduction outside a DAW workflow, UniConverter is usually the tool I reach for. It’s especially useful when I need straightforward audio compression or fast video compression for sharing, storage, or everyday uploads without dealing with production-level settings. I also like that it works well when preparing files to compress videos for email, since it keeps the process simple while still delivering stable results. With its ad-free interface, broad format support, and GPU acceleration, it’s a practical all-in-one option for reducing media file sizes quickly and efficiently.
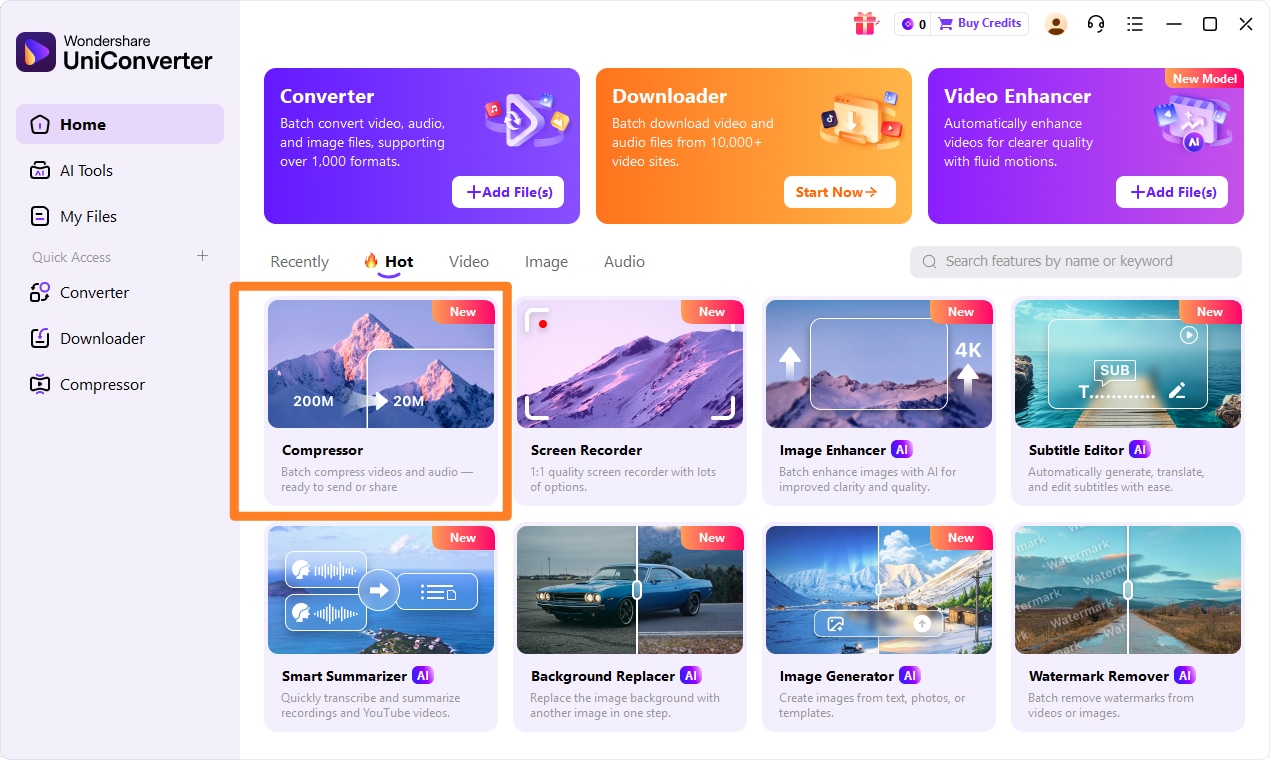
Step 1: Open UniConverter and Choose Compressor
Launch UniConverter on your computer. On the main interface, navigate to the "Compressor" tool.
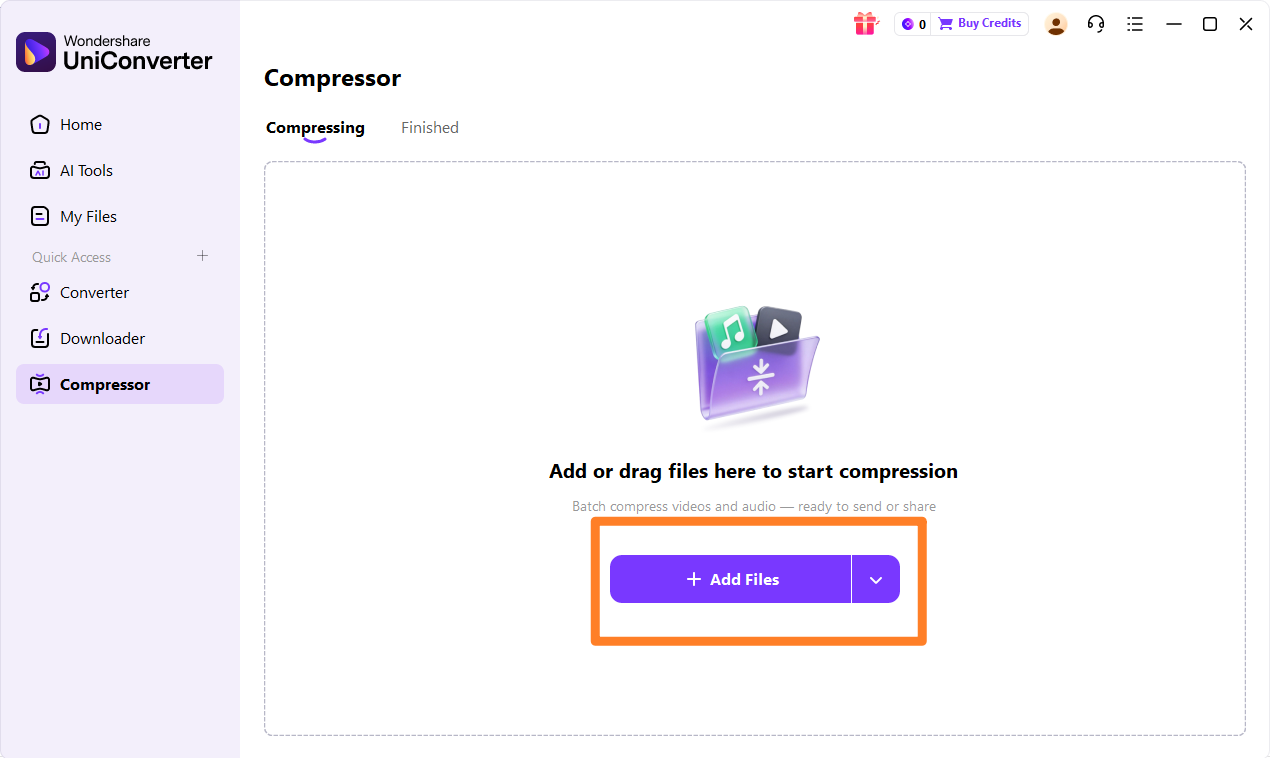
Step 2: Upload the Video, Audios or Images
Drag and drop your audio file (or video/image) directly into the UniConverter window, or click "Add Files" to browse and select it.
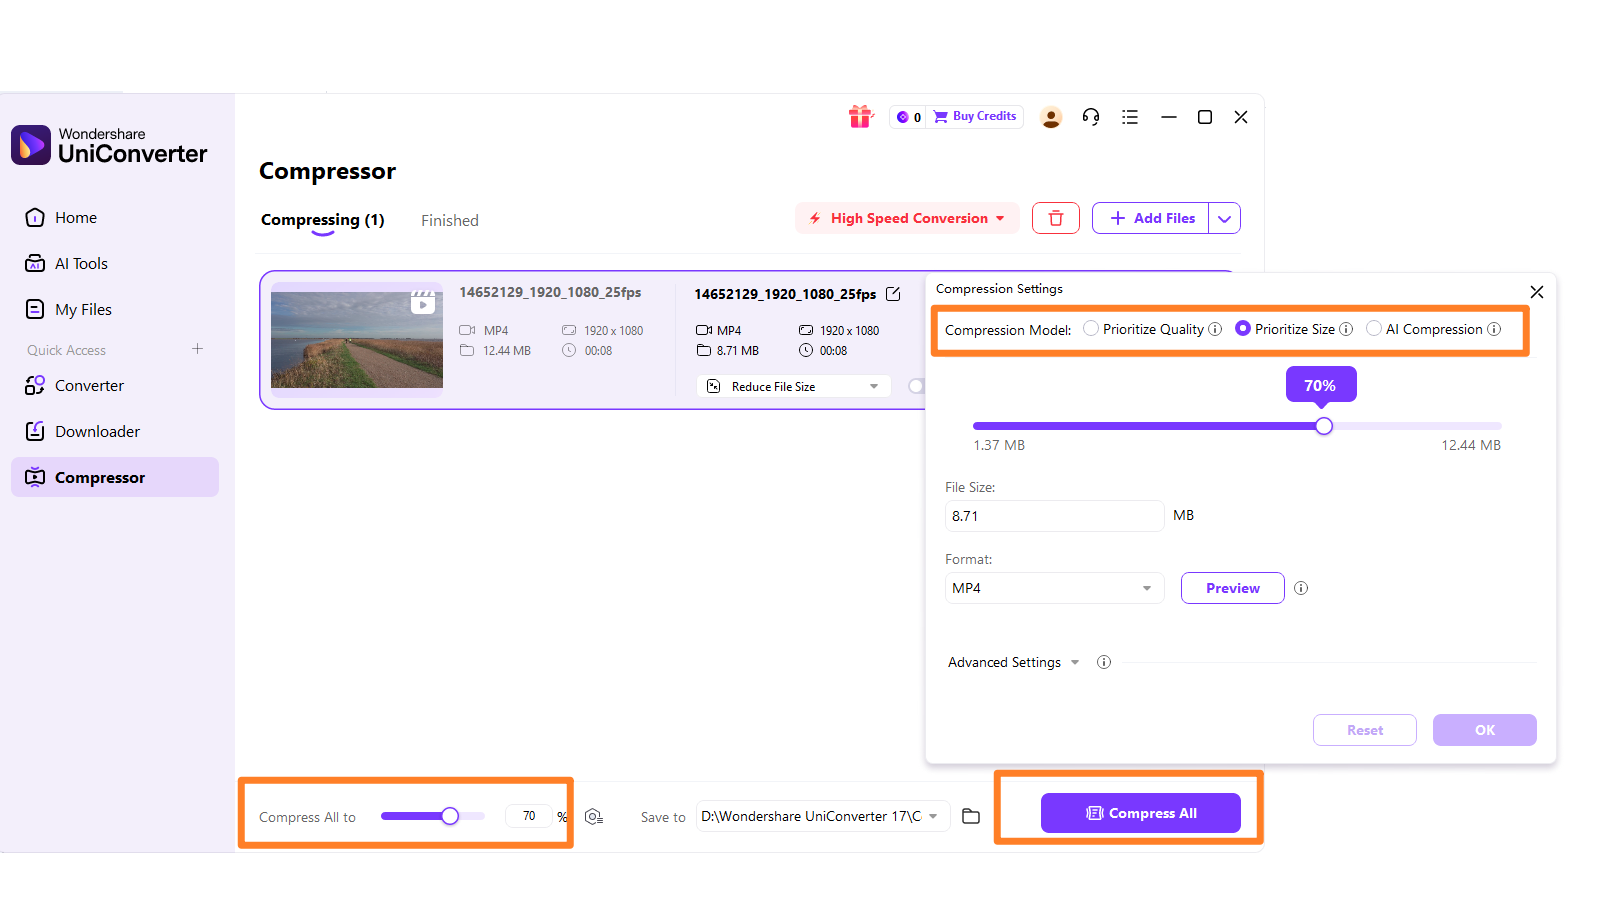
Step 3: Choose Required Parameters
Once your file is loaded, you'll see options to adjust the compression settings. You can typically choose a target file size or adjust quality parameters.
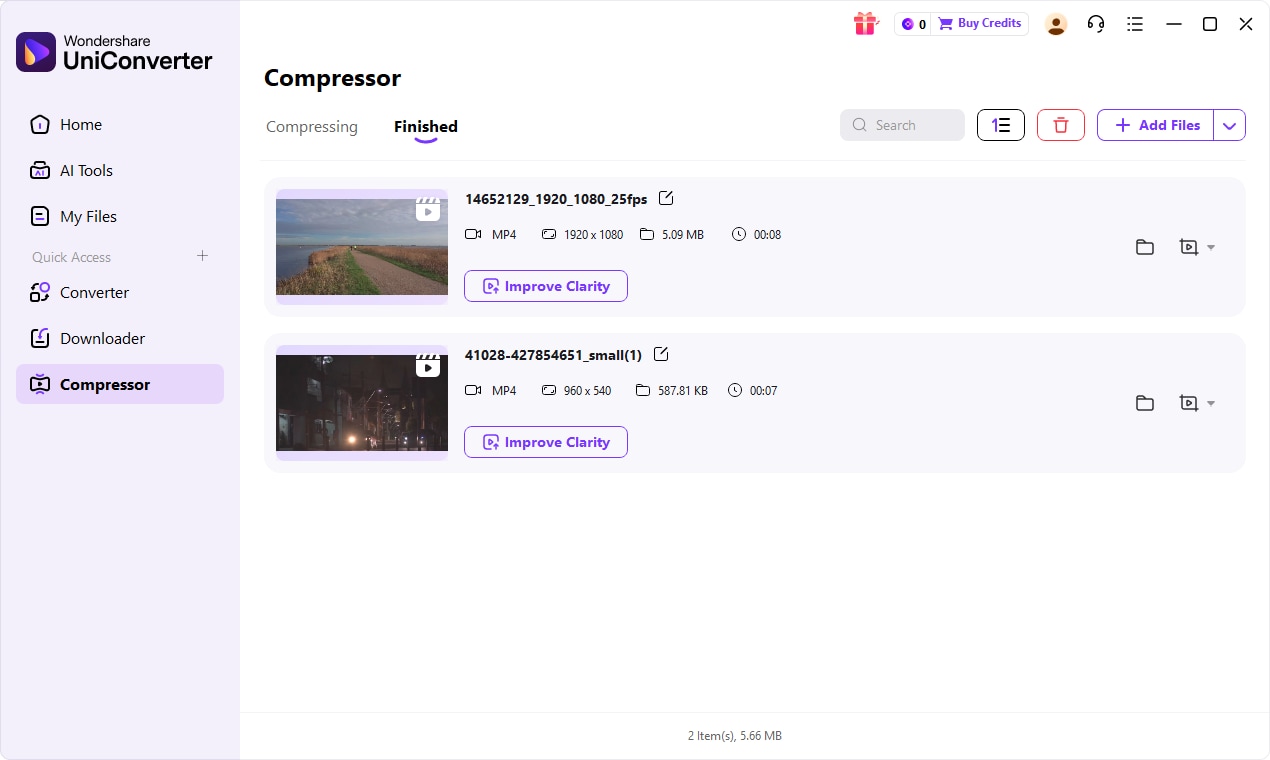
Step 4: Save the Compressed File
After setting your desired compression level, click the "Compress" button. UniConverter will process your file, and you can then save the smaller version to your chosen destination.

Enhance Your FL Studio Audio Compression
Part 7: Conclusion
After spending countless hours with FL Studio's native compressors and comparing them to various alternatives, my FL Studio Audio Compressor review concludes that they are incredibly powerful and versatile tools, especially for producers working within the FL Studio ecosystem. For most electronic music production, they offer more than enough control to achieve professional-sounding results. However, for advanced users seeking highly specialized features like multi-band compression, vintage emulations, or ultra-transparent mastering, investing in dedicated third-party plugins like FabFilter Pro-C 2 might be a worthwhile upgrade. Beginners should focus on understanding the fundamentals of compression with FL Studio's tools before diving into more complex options. And for those moments when you simply need to reduce the file size of an audio or video file quickly and efficiently, UniConverter stands out as an excellent, user-friendly standalone solution. Ultimately, the best compressor is the one you understand and can use effectively to achieve your desired sound.
Part 8: FAQs
-
1. What is the primary function of an audio compressor in FL Studio?
An audio compressor in FL Studio primarily reduces the dynamic range of an audio signal, making loud parts quieter and quiet parts louder, resulting in a more consistent and controlled sound.
-
2. Can FL Studio's built-in compressor achieve professional-grade results?
Yes, with proper understanding and application, FL Studio's built-in compressors can achieve professional-grade results, especially for many genres of music production.
-
3. Are there any free alternatives to FL Studio's compressor?
Yes, there are several free VST compressor plugins available that can be used within FL Studio, offering various features and sonic characteristics. For general audio file size reduction, UniConverter offers a free trial that can compress audio efficiently.
-
4. How does compression affect the overall loudness of a track?
While compression itself doesn't directly increase loudness, by reducing dynamic range, it allows you to raise the overall gain of a track without hitting peak limits, making it sound louder.
-
5. When should I use a compressor on individual tracks versus the master bus?
Compressors are typically used on individual tracks to shape their dynamics and blend them into the mix. On the master bus, a compressor (often a mastering compressor) is used for subtle glue and overall dynamic control of the entire mix. If you need to compress an entire mixed track for sharing, UniConverter can quickly reduce the file size without affecting the mix's dynamic balance.
