
- FCPX Integration: Final Cut Pro's compressor is built-in, not standalone, ideal for FCPX users.
- Core Features: Offers presets, custom settings, batch export, and hardware acceleration for efficient compression.
- Pros & Cons: Seamless FCPX workflow and high-quality output vs. limited standalone use and learning curve.
- Ideal Users: Best for professional FCPX editors needing integrated compression within their workflow.
- Competitor Comparison: FCPX excels in integration; HandBrake for standalone, UniConverter for versatility.
- Risks: Aggressive settings can cause quality loss; compatibility issues on non-Apple devices.
- UniConverter Solution: Use UniConverter for efficient, versatile compression of various media types outside FCPX.
- Decision Factor: Choose based on your primary editing software, workflow needs, and budget.
In this article
- Part 1: What is Final Cut Pro Video Compressor?
- Part 2: Final Cut Pro Video Compressor: Core Features & Pros/Cons
- Part 3: Final Cut Pro Video Compressor: Ideal Users & Scenarios
- Part 4: Final Cut Pro Video Compressor vs. Competitors
- Part 5: Risks & Pitfalls to Consider
- Part 6: How to Use UniConverter to Efficiently Compress Audio and Video
- Part 7: Conclusion
- Part 8: FAQs
Video compression is an essential, yet often overlooked, aspect of modern video production. As resolutions climb and file sizes balloon, efficient compression becomes critical for storage, sharing, and streaming. For Final Cut Pro users, the integrated video compressor is a powerful tool, but how does it stack up against dedicated alternatives? This Final Cut Pro Video Compressor review will dive deep into its capabilities, compare it with leading competitors, and help you determine if it's the right solution for your workflow. We'll explore its strengths, weaknesses, and ideal use cases, ensuring you make an informed decision about your video compression needs.
Part 1: What is Final Cut Pro Video Compressor?
Final Cut Pro (FCPX) is Apple's professional non-linear video editing software, renowned for its intuitive interface and powerful features. Integral to its post-production workflow is its built-in video compressor, which isn't a standalone application but rather a robust set of export options and settings within FCPX itself. When you finish editing a project and choose to export, you're engaging FCPX's video compression engine. This engine leverages Apple's optimized codecs and hardware acceleration to efficiently reduce file sizes while aiming to preserve visual quality. My goal in this review is to dissect this integrated tool, examining its performance, user experience, and how it measures up against other dedicated compression software.
The Evolving Landscape of Video Editing Software
The world of video editing is constantly changing, driven by:
* Higher Resolutions: The shift to 4K, 8K, and beyond demands more efficient compression.
* Faster Delivery: Content creators need quick turnaround times for platforms like YouTube and social media.
* Diverse Platforms: Videos need to be optimized for everything from mobile phones to large cinema screens.
* Cloud Integration: Collaborative workflows and cloud storage necessitate smaller, more manageable file sizes.
Part 2: Final Cut Pro Video Compressor: Core Features & Pros/Cons
When I use Final Cut Pro, its video compressor is an integral part of my export process, not a separate app. It offers a comprehensive suite of tools for optimizing my video files. I find its core capabilities revolve around its deep integration with the FCPX ecosystem, allowing for a smooth transition from editing to delivery.
Here are its core features:
* Integrated Export Presets: A wide range of built-in presets for various platforms (YouTube, Vimeo, Apple Devices) and codecs.
* Custom Export Settings: Granular control over resolution, frame rate, bitrate, and codec selection (H.264, HEVC, ProRes).
* Batch Export: Ability to queue multiple projects or clips for export and compression simultaneously.
* Hardware Acceleration: Utilizes Apple's Metal engine and dedicated hardware for faster encoding on compatible Macs.
* Metadata Embedding: Automatically includes project metadata in the exported file.
Pros:
* Seamless Integration with FCPX Workflow: As an FCPX user, I love that I don't have to leave the application to compress my videos. It's all right there.
* High-Quality Output with Advanced Codec Options: I've consistently achieved excellent visual quality, especially when using ProRes or HEVC.
* Efficient Batch Processing for Multiple Clips: When I have several short clips or versions to export, the batch processing saves me a lot of time.
Cons:
* Limited Standalone Functionality Outside FCPX: If I need to compress a video that wasn't edited in FCPX, this tool is useless to me.
* Steep Learning Curve for Optimal Settings: While powerful, understanding all the codec, bitrate, and resolution settings can be daunting for new users.
Part 3: Final Cut Pro Video Compressor: Ideal Users & Scenarios
From my experience, the Final Cut Pro video compressor is best suited for a specific type of user and workflow. It's not a one-size-fits-all solution, and understanding its strengths and limitations helps me decide when to use it.
Best Use Case: Professional FCPX Editors Needing Integrated Compression
If you're a professional video editor who primarily works within Final Cut Pro, this built-in compressor is your best friend. I find it incredibly efficient because it's part of my existing workflow. I can edit, color grade, and then export with compression all within the same application, without needing to import files into a separate program. This saves me valuable time and reduces the chances of errors. For instance, when I'm finishing a client project and need to deliver multiple versions (e.g., a high-res master, a web-optimized version, and a social media cut), I can set up all my export presets and batch process them directly from FCPX. The quality control is also excellent, as it leverages Apple's optimized codecs.
Limited Scenario: Quick, Standalone Compression for Non-FCPX Users
However, if I just need to quickly compress a video file that wasn't edited in Final Cut Pro – perhaps a screen recording, a video from my phone, or a file sent by a colleague – FCPX's compressor is not an option. It's not a standalone application. In these cases, I'd have to import the video into a new FCPX project, which is an unnecessary and time-consuming step just for compression. It's also not ideal for someone who doesn't own FCPX or primarily uses other editing software like Adobe Premiere Pro or DaVinci Resolve. For these users, a dedicated, standalone video compressor is a much more practical choice.
Part 4: Final Cut Pro Video Compressor vs. Competitors
When I look at video compression tools, I consider integration, output quality, and cost. Here's how Final Cut Pro's built-in compressor stacks up against some popular alternatives.
| Feature/Criteria | Final Cut Pro Video Compressor | HandBrake | Adobe Media Encoder | DaVinci Resolve |
| Integration | Native FCPX | Standalone | Adobe Ecosystem | Native DaVinci |
| Ease of Use | Moderate | Moderate | Moderate | Moderate |
| Output Quality | Excellent | Very Good | Excellent | Excellent |
| Batch Processing | Yes | Yes | Yes | Yes |
| Price | Included with FCPX | Free | Subscription | Free/Paid |
| Processing Speed | Fast (Apple Silicon optimized) | Moderate | Fast (GPU acceleration) | Fast (GPU acceleration) |
| Format Support | Broad (Apple-centric) | Very Broad | Very Broad | Broad |
| Customer Support | Apple Support | Community Forums | Adobe Support | Blackmagic Design Support |
| Security | High (within FCPX) | Good (open-source) | High (Adobe ecosystem) | High (Blackmagic Design) |
Key Differentiators: Integration, Ecosystem, and Cost
For me, the biggest differentiator for the Final Cut Pro Video Compressor is its seamless, native integration within FCPX. If I'm already in FCPX, it's the most efficient choice. Adobe Media Encoder shines for those deep in the Adobe ecosystem, offering similar integration with Premiere Pro and After Effects. HandBrake stands out as a free, open-source powerhouse with incredible format support, making it my go-to for standalone, cross-platform compression. DaVinci Resolve's compressor is excellent for Resolve users, offering high quality within its own ecosystem. Ultimately, my choice depends on my primary editing software and whether I need a standalone solution or one integrated into my NLE.
Part 5: Risks & Pitfalls to Consider
While the Final Cut Pro video compressor is a powerful tool, I've learned that there are several risks and pitfalls to be aware of, especially when I'm pushing the limits of compression or dealing with specific workflows. Understanding these helps me avoid common mistakes and ensure my final output meets my expectations.
Potential Quality Loss with Aggressive Settings
One of the biggest risks I face is inadvertently sacrificing too much quality by using overly aggressive compression settings. While the goal is to reduce file size, if I set the bitrate too low or choose a highly lossy codec without understanding its implications, my video can end up looking pixelated, blocky, or washed out. This is particularly true for videos with a lot of motion or fine detail. I always recommend doing a small test export first to check the quality before committing to a full, lengthy export.
Compatibility Issues with Non-Apple Devices
Final Cut Pro's compressor, being an Apple product, sometimes leans towards Apple-centric codecs and containers. While H.264 and HEVC are widely supported, I've occasionally encountered minor playback issues on older Windows machines or specific Android devices if I've used less common settings or very specific ProRes flavors. It's crucial to know your target audience's devices and test playback on a variety of platforms if compatibility is a concern.
Time Consumption for Large Projects
Compressing large 4K or 8K projects, especially with complex effects or long durations, can be incredibly time-consuming. Even with hardware acceleration, I've seen exports take hours, tying up my machine. This can be a significant pitfall if I'm on a tight deadline and haven't factored in sufficient export time. It's not a "set it and forget it" process if I have other tasks that require my computer's full power.
Over-reliance on Default Presets
While FCPX offers convenient default presets for platforms like YouTube or Vimeo, I've found that over-reliance on them without understanding the underlying settings can be a pitfall. These presets are general and might not always be optimized for my specific video content or my desired balance between file size and quality. For example, a default YouTube preset might be fine for a talking head video, but it might not be optimal for a fast-paced action sequence where higher bitrates are needed to preserve detail. Customizing settings often yields better results.
Part 6: How to Use UniConverter to Efficiently Compress Audio and Video
Sometimes, I need to compress video or audio files outside of my FCPX projects, or I simply want a more flexible tool with broader format support and an easier workflow. In those cases, I usually turn to UniConverter as a more practical all-around solution. It works especially well as a reliable video compressor, with wide compatibility across different file types and devices. I also like that it can help compress videos without quality loss as much as possible, while keeping the process smooth and efficient with GPU acceleration. Beyond video, it also supports audio compression, making it a convenient all-in-one option for media conversion and compression without ads or unnecessary complexity.
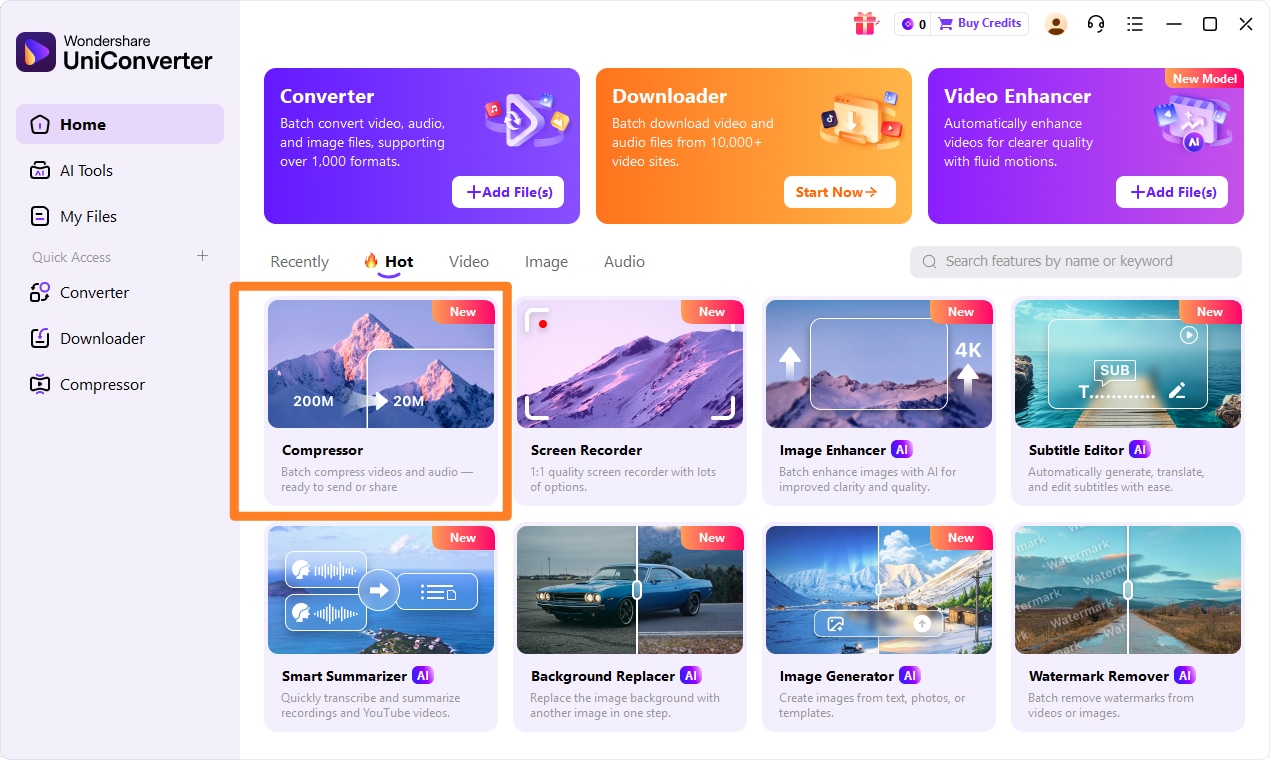
Step 1: Open UniConverter and Choose Compressor
First, I launch UniConverter on my computer. On the left sidebar, I navigate to the "Toolbox" section and then select the "Video Compressor" option. This brings up the dedicated compression interface.
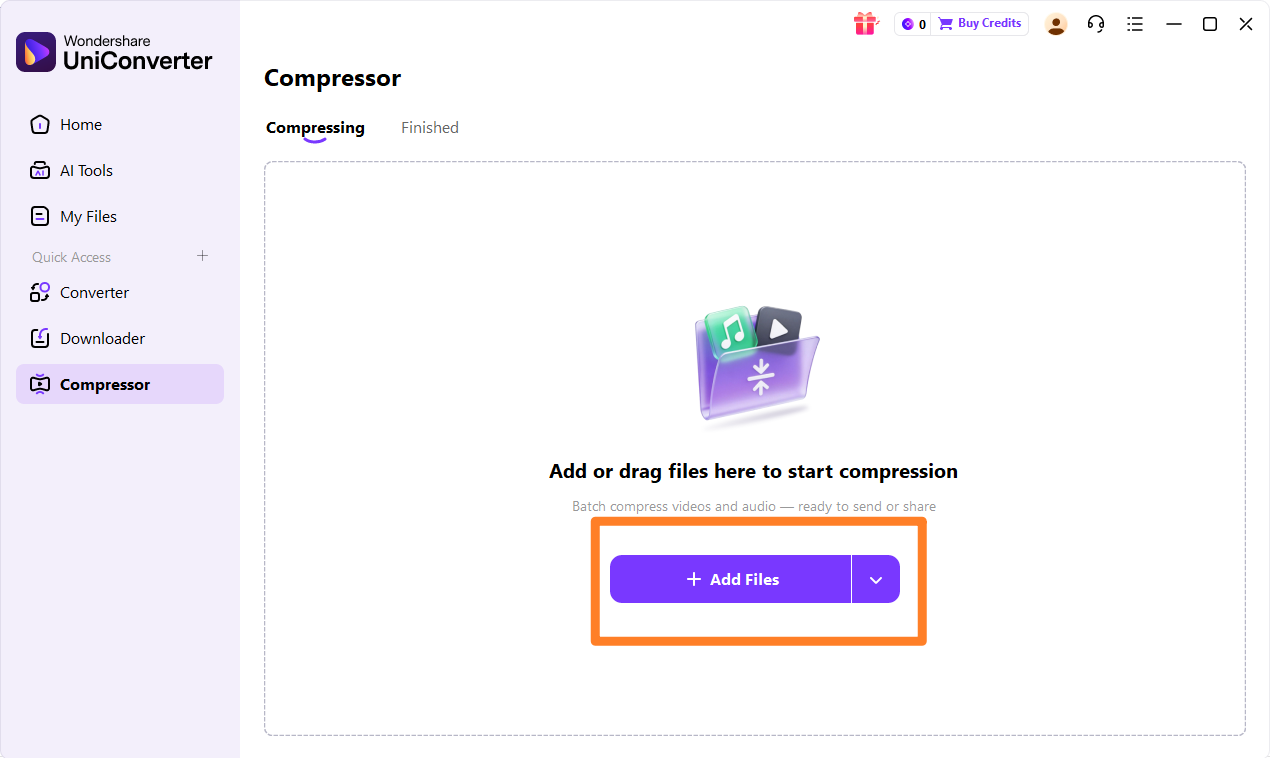
Step 2: Upload the Video, Audios or Images
Next, I click the "Add Files" button in the center of the window or simply drag and drop the video, audio, or image files I want to compress into the designated area. I can add multiple files for batch processing.
Step 3: Choose Required Parameters
Once my files are loaded, I can adjust the compression settings. For each file, I can click the "Settings" icon to customize parameters like file size, format, resolution, and bitrate. UniConverter provides a real-time preview of the estimated compressed file size.
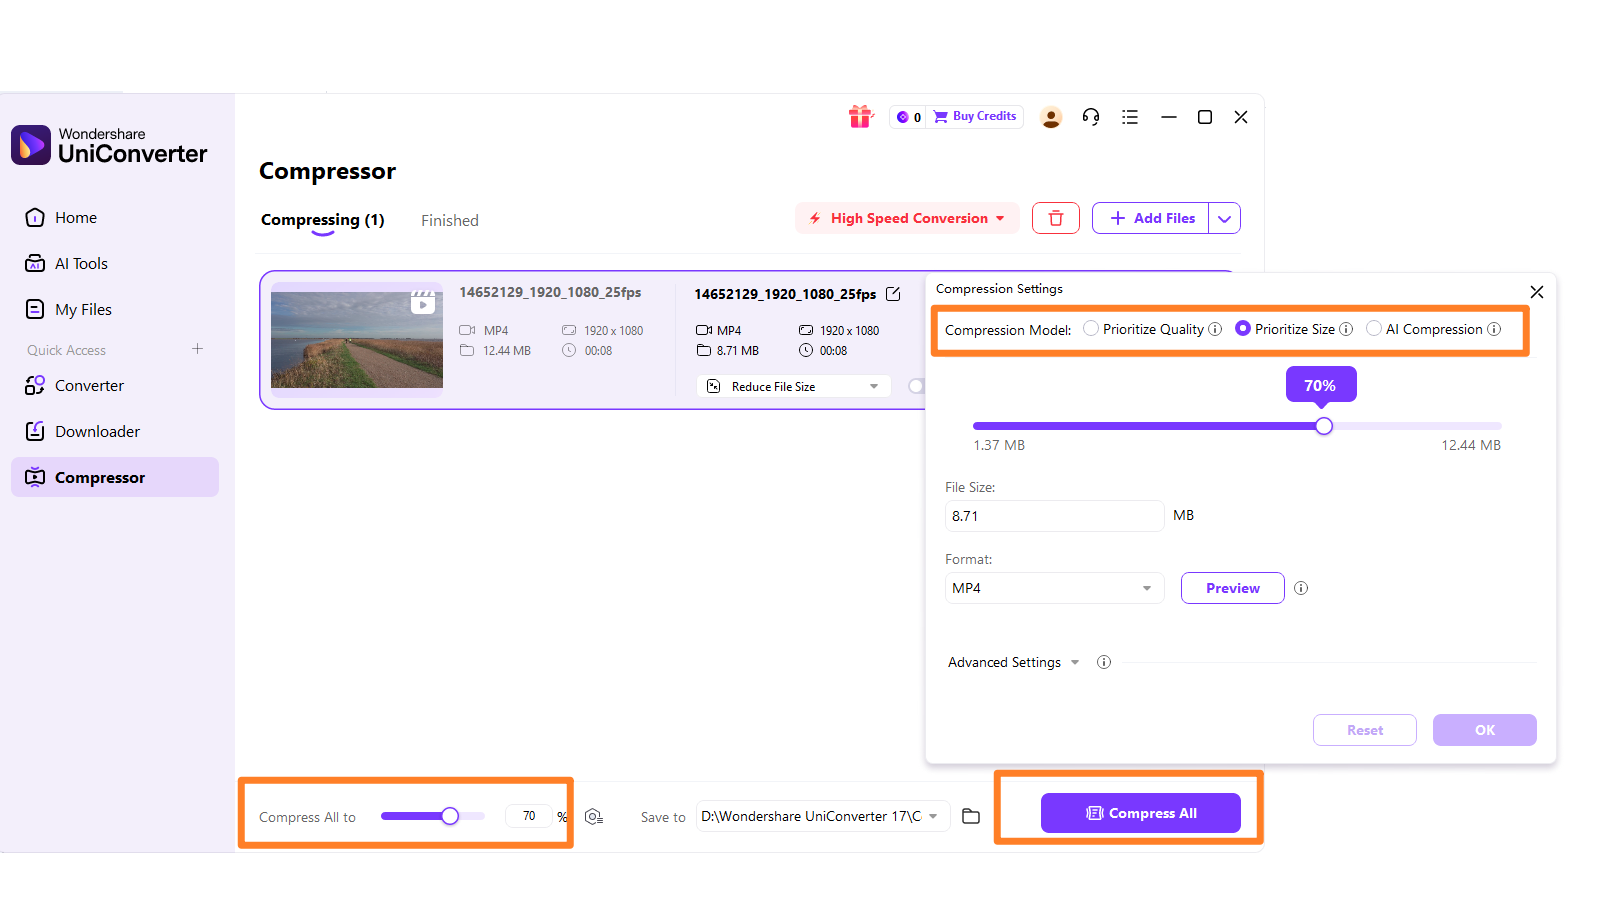
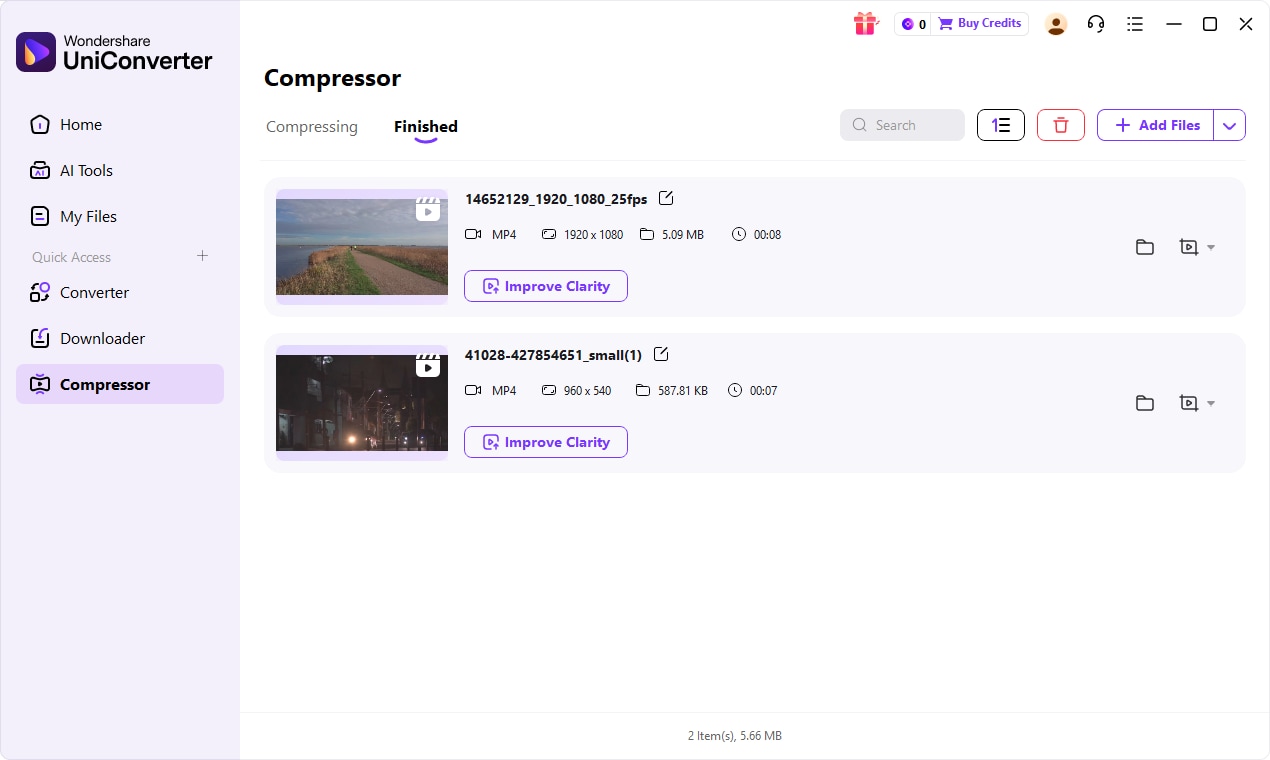
Step 4: Save the Compressed File
After I've set all my desired compression parameters, I choose an output folder at the bottom of the window. Finally, I click the "Compress" button to start the process. UniConverter will then efficiently compress my files to the specified settings.

Struggling with Final Cut Pro Video Compression?
Part 7: Conclusion
In conclusion, my Final Cut Pro Video Compressor review reveals that it is an incredibly powerful and efficient tool for anyone deeply embedded in the Final Cut Pro ecosystem. Its seamless integration, high-quality output, and batch processing capabilities make it ideal for professional FCPX editors who prioritize workflow efficiency and consistent results within their primary editing environment. However, its lack of standalone functionality means it's not the right choice for quick, ad-hoc compression tasks outside of FCPX or for users of other editing software. For those needing a versatile, cross-platform solution that handles various file types with ease and offers a more straightforward user experience, dedicated tools like HandBrake or UniConverter present compelling alternatives. Ultimately, the best video compressor depends on your specific workflow, the software you primarily use, and your budget. FCPX users should leverage their native tools, while others might benefit more from a specialized, all-in-one solution.
Part 8: FAQs
-
1. Does Final Cut Pro have a built-in compressor?
Yes, Final Cut Pro includes robust video compression capabilities as part of its export functions, allowing you to optimize file size and quality directly within the application.
-
2. Can I compress 4K video in Final Cut Pro without losing quality?
While some quality loss is inherent in compression, FCPX allows for high-quality compression of 4K video using advanced codecs like HEVC (H.265) and ProRes, which minimize degradation significantly. For truly lossless compression, file sizes will remain very large.
-
3. What is the best export setting for Final Cut Pro for YouTube?
For YouTube, I generally recommend using the H.264 or HEVC codec, with a resolution matching your project (e.g., 1080p or 4K), a frame rate of 24, 25, 30, 50, or 60 fps, and a data rate that balances quality and file size (e.g., 20-50 Mbps for 4K, 8-15 Mbps for 1080p). FCPX also has specific YouTube presets you can start with.
-
4. Is Final Cut Pro's compressor better than HandBrake?
It depends on your workflow. FCPX offers seamless integration for projects edited within it, providing a streamlined experience. HandBrake, on the other hand, is a free, standalone tool with broader format support and more granular control over compression settings, making it excellent for compressing videos from various sources outside of FCPX. If you need a versatile, all-in-one solution for various media types, UniConverter is also a great option.
-
5. How do I reduce file size in Final Cut Pro?
You can reduce file size in Final Cut Pro by adjusting several parameters during the export process: lower the resolution, reduce the frame rate (if appropriate), decrease the bitrate, and select more efficient codecs like HEVC (H.265) over H.264. Be mindful that aggressive settings can impact visual quality.
